TL;DR
- Quartz countertops mount with 100% neutral-cure silicone applied to cabinet tops, and slab joints get filled with color-matched two-part epoxy seam adhesive.
- A 3cm slab weighs 18-20 lbs per square foot, so pro installation is standard.
- The steps: level cabinets, dry-fit, apply silicone, align seams, then wait 24 hours before use.
What does mounting a quartz countertop actually involve?
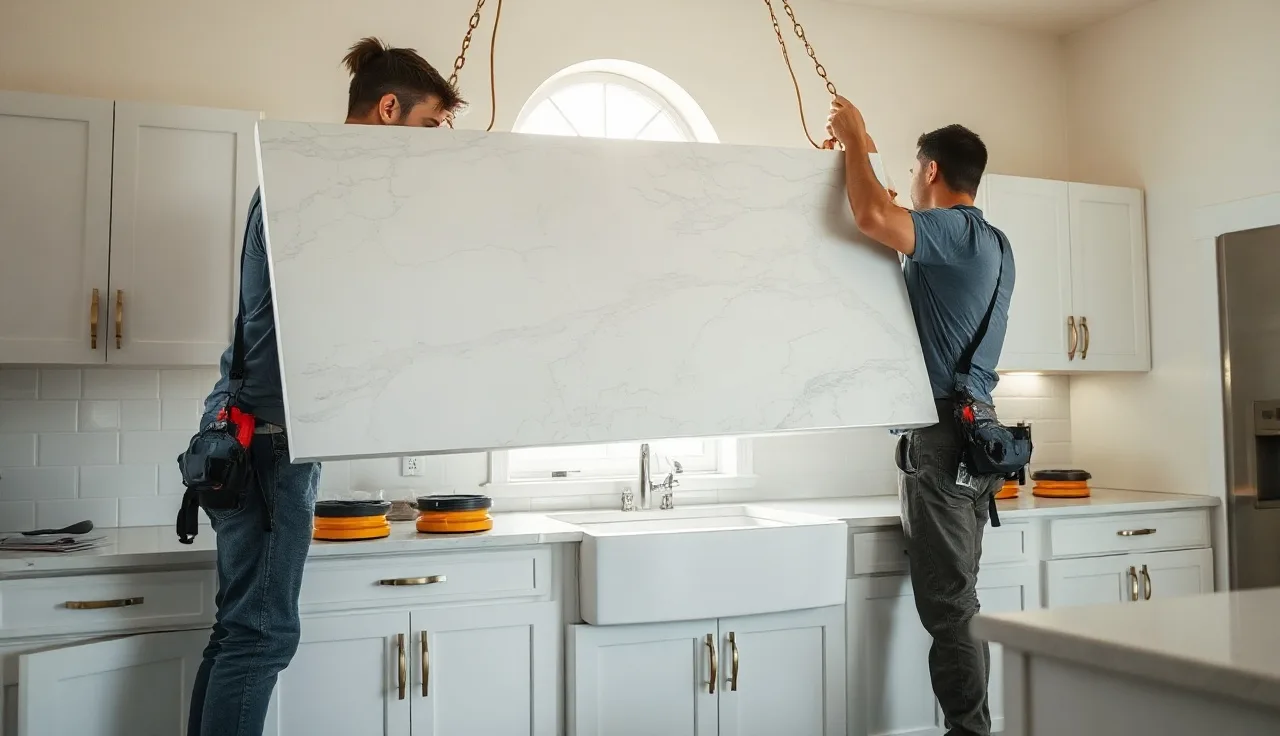
Mounting quartz is less like gluing a shelf and more like setting a 300-pound puzzle piece you get one shot at. The slab goes down onto finished cabinets, bonds with silicone, and the joints between pieces get filled with a two-part epoxy adhesive color-matched to the stone. Once it cures, the countertop is a structural part of your kitchen.
The work breaks into four phases: site prep and cabinet leveling, templating and slab fabrication (which happens offsite at the shop), delivery and dry-fit, then adhesive application and seam work. The fabrication shop cuts and polishes. The installer handles everything that happens in your kitchen.
For a typical 40-50 square foot kitchen, professional installation takes 2-4 hours of hands-on time, not counting the 24-hour adhesive cure. Larger kitchens, complex cutouts, or tight access can stretch that to a full day.
Homeowners ask whether quartz is a DIY job. Honest answer: the adhesive and silicone work is manageable for a careful person. Weight kills the DIY attempts. A standard 3cm quartz slab (the industry default thickness) weighs roughly 18-20 lbs per square foot [1]. A single 8-foot section of kitchen counter can top 150 lbs. You need at least two strong people, ideally three, plus lifting suction cups. Without them, you drop a slab or crack it mid-install.
What tools and materials do you need before starting?
Get everything staged before the slab arrives. Running to a hardware store with a 200-lb slab sitting on your cabinets is not a good afternoon.
Tools you need:
- Lifting suction cups (two minimum, four preferred) rated for stone
- 4-foot level and a short torpedo level
- Oscillating multi-tool or jigsaw for last-minute trim on cabinet shims
- Drill with mixing paddle attachment for two-part epoxy
- Caulk gun (heavy-duty, not the $6 version)
- Plastic wedges or shims
- Rubber mallet
- Clean rags and denatured alcohol or acetone for surface prep
- Painter's tape to protect cabinet faces during seam work
Materials you need:
- Silicone adhesive: 100% silicone, neutral-cure, color-matched to your slab or clear. Skip acetoxy-cure silicone (the kind that smells like vinegar) near stone. The acetic acid can etch some surfaces over time [2].
- Two-part epoxy seam adhesive: your fabricator should supply this already color-matched to your specific slab. Do not buy a generic color and hope it matches.
- Backer rod or seam setter clamps for holding seam pressure during cure
- Plywood or MDF sub-top strips if your cabinets have wide unsupported spans (more on that below)
One thing fabricators watch homeowners skip constantly: the denatured alcohol wipe-down on the cabinet top before applying silicone. Silicone adhesion fails on dusty or oily surfaces. Take five minutes and do it.
How do you prepare cabinets for quartz installation?
Cabinet prep is where most installation problems start and where almost nobody spends enough time. Get it right here and the rest goes smoothly.
First, check that all cabinets are level to each other. Quartz does not flex. If one cabinet runs 1/4 inch higher than the next, the slab either cracks under point load or sits visibly tilted. Use a 4-foot level across the entire run. Shim low spots from the cabinet bottom. Never shim the countertop itself after the slab is on. Most fabricators refuse to install over cabinets more than 1/8 inch out of level across a 4-foot span.
Second, check the cabinet top frames for support. Quartz makers generally want support every 24 inches along unsupported spans [1]. If your frameless cabinets have a large center opening (common with base cabinets that hold pull-out drawers), you may need a plywood sub-top. A 3/4-inch plywood strip across the front and back of the run gives the silicone something to bond to and spreads out stress.
Third, strip the old countertop and check for remnants of old adhesive, caulk, or silicone. Grind or scrape them off. High spots make the quartz rock, and a rocking slab is a cracking slab.
Finally, confirm your wall is plumb where the countertop meets it. Quartz gets scribed to fit tight against walls, but if the wall bows badly, the fabricator needs to know before the final template cut, not after.
This prep is also the moment to think about the full scope of your countertop installation. Backsplash tile, outlet locations, and appliance clearances all interact with countertop height and overhang.
What adhesive is used to mount quartz to cabinets?
Silicone. That is the standard answer across every major quartz maker's installation guide, and for good reason.
Silicone stays flexible after curing. Quartz and wood cabinets expand and contract at different rates as temperature and humidity change. A rigid adhesive like construction adhesive or thin-set mortar would transmit that stress straight into the slab. Silicone absorbs it. Cambria, Silestone, Caesarstone, and MSI all specify silicone adhesive in their installation requirements [1][3].
The application pattern matters. Run silicone in a continuous bead around the perimeter of each cabinet top (roughly 1 inch from the outer edge) and add S-curves or dot patterns across the interior framing members. Do not cover the whole surface. You want enough contact for a strong bond and enough gaps for the adhesive to compress evenly when the slab lands. Full coverage can make the slab sit unevenly.
Seams between slabs use a different adhesive: a two-part polyester or epoxy seam compound. The fabricator mixes a colorant into the resin to match the slab's background. They apply it to both mating edges, clamp the pieces together with seam setter clamps, and let it cure. Done right, seams on quartz are nearly invisible from standing height. Done wrong (wrong color, gaps, overfill), they're the first thing anyone looks at.
Neutral-cure silicone products common in the trade include the GE SCS1000 series and Dow 995, though fabricators develop strong preferences based on regional supply and habit. The specific product matters less than using a 100% silicone, neutral-cure formula rated for non-porous surfaces.
How much does quartz countertop installation cost?
Installation cost almost always folds into the total countertop quote instead of showing as a separate line, which makes comparison shopping tricky. Here is roughly what the numbers look like when you pull them apart.
Labor for installation alone typically runs $150-$450 for a standard kitchen. Complex jobs, island installations, or high labor-cost markets push that higher.
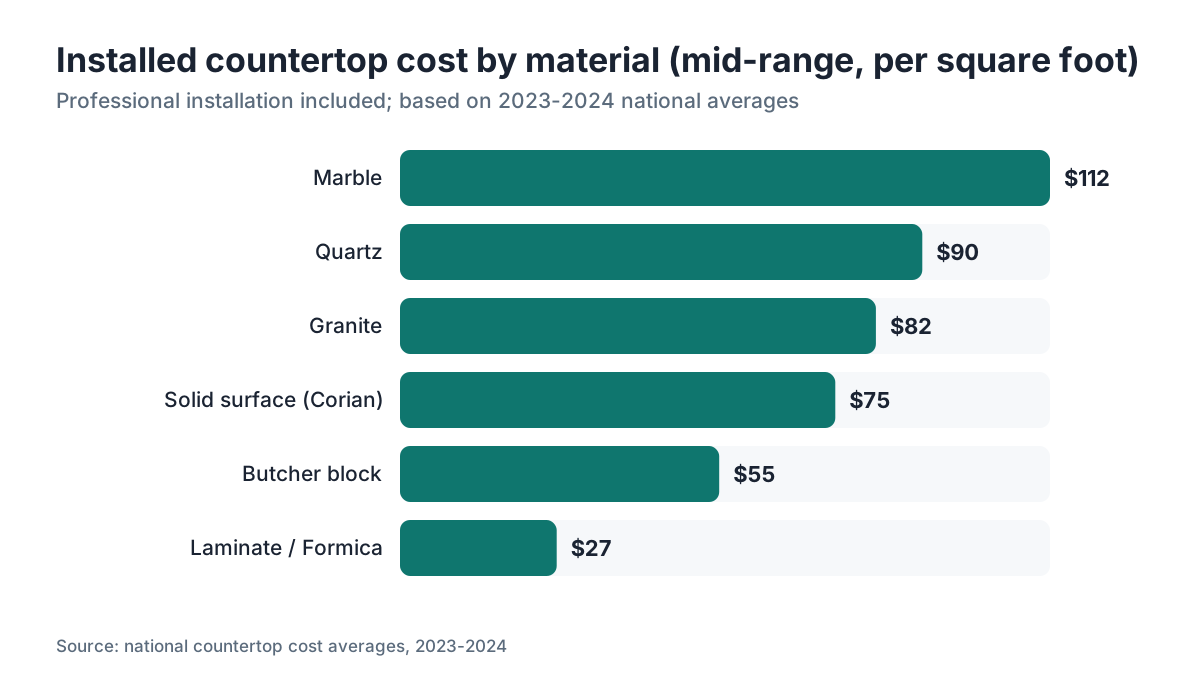
The full installed price of quartz (material plus fabrication plus installation) runs from roughly $50 to $150 per square foot for mid-range slabs, with designer brands like Cambria reaching $100-$200 per square foot installed. A 50-square-foot kitchen at the mid-range ($80/sq ft) comes out around $4,000 total.
Separate charges you might see on your quote:
- Sink cutout: $100-$200 per cutout
- Cooktop cutout: $100-$200
- Edge profile (anything beyond a standard eased edge): $10-$30 per linear foot
- Seam location: sometimes charged if extra layout work is needed
- Haul-away of old countertop: $50-$150
The table below gives a realistic picture of installed quartz versus other common materials at mid-range quality.
| Material | Installed cost per sq ft (mid-range) | DIY feasibility |
|---|---|---|
| Quartz | $60-$120 | Low (weight, precision) |
| Granite | $55-$110 | Low (weight, sealing) |
| Laminate | $15-$40 | High |
| Butcher block | $35-$75 | Medium |
| Marble | $75-$150 | Low |
| Solid surface (Corian) | $50-$100 | Medium |
For granite countertops, installation runs a similar process, sometimes faster because granite fabricators cut seams differently. For laminate countertops or Formica countertops, the DIY window is much wider because sheets weigh far less and cut with standard woodworking tools.
How do you actually set the slab in place?
Dry-fit first. Always.
Before any adhesive touches anything, bring the slab in and set it on the cabinets dry. Check that it seats flat, that the front overhang stays consistent (standard is 1-1.5 inches), and that it fits tight to the wall. Check the sink cutout over your sink opening. Check that seams align. If something is off, this is your only chance to fix it without fighting fresh silicone.
Once dry-fit checks out, lift the slab back off (this is where the suction cups earn their rental fee), apply silicone to the cabinet tops using the bead pattern above, and set the slab back down. Move deliberately. Quartz does not slide easily once silicone touches it, so position matters on the way down.
Press down along the entire slab. You should see a little silicone squeeze out at the cabinet edges, which tells you contact is good. Wipe the squeeze-out right away with a damp rag before it skins over.
For seam work, both mating pieces go down with silicone, then the seam compound gets mixed and applied to the seam gap. Clamps go on, the seam gets scraped flush, and the assembly sits undisturbed for the cure. Silicone runs 24-48 hours, epoxy seam compound 30-60 minutes to handling strength [1][2].
Do not put anything on the countertop during cure. No leaning, no appliances, no testing with a full pot of water. The silicone is strong when fully cured. It is not strong at 2 hours.
How do you handle an undermount sink with a quartz countertop?
Undermount sinks are the single most common source of callbacks in countertop installation. Get this part right.
The sink cutout is made at the fabrication shop, not on site. The fabricator uses a CNC router to cut the opening, then polishes the underside edge that shows below the sink rim. If that edge is chipped or rough, you see it every time you look at the sink.
At installation, the sink mounts one of two ways. In the traditional method, the installer runs silicone around the sink rim, then uses sink clips or brackets that thread into holes drilled in the underside of the quartz to clamp the sink up against the stone. The clips screw up into the stone from below. Quartz is hard but brittle, and over-torquing a clip can crack the stone around the hole. Tighten firmly, not aggressively.
Some installers prefer a full silicone-bed method: apply a thick bead to the sink rim, press it up into the cutout, and let the silicone do all the work without clips. This works fine for lighter sinks but is not the move for heavy cast iron sinks without extra support.
After installation, caulk the seam between countertop and sink rim with matching silicone. This joint sees daily water and needs to stay airtight. Plan to re-caulk it every 2-5 years as normal maintenance. The caulk fails before the stone does.
For post-installation care, cleaning quartz at the sink is the same as everywhere else on the surface. See how to clean stone countertops for the full rundown.
Can you mount quartz countertops yourself, or do you need a pro?
This question deserves an honest answer instead of a liability-driven "always hire a pro."
The adhesive and seam work sit within reach for a mechanically competent homeowner who has done tile or woodworking. The seam compound is available at stone supply distributors. Neutral-cure silicone is at any hardware store. The techniques are not exotic.
The real barriers are weight and fabrication. You cannot buy a slab, cut it with a circular saw in your garage, and expect a professional result. Engineered quartz is roughly 90-93% ground quartz bound in resin, and cutting it cleanly takes diamond wet saws and water-cooled CNC routers [4]. The edge polish needs specialized equipment. This is shop work, period. Dry-cutting it also throws off respirable crystalline silica, which OSHA regulates hard [5].
The realistic DIY scenario: you hire a fabricator to template, cut, and deliver the slab, then you handle the installation. Some fabricators will do this. Many won't, because if you crack the slab during install they don't want a dispute about whose fault it was.
If you go that route, the non-negotiables are proper suction cups, a helper (minimum one other strong adult), and patience on the leveling step. Rushing the cabinet level check is how DIY installs crack slabs.
For context, marble countertops and Cambria countertops share the same weight challenge, so the DIY math is identical. Butcher block countertops and Corian countertops are genuinely more DIY-friendly because they're lighter and cut with woodworking tools.
Fabricators running their own shops who want tighter quote accuracy and less material waste before installation day might look at SlabWise, which runs quartz and stone nesting calculations to reduce remnant waste. That's a back-office conversation, not an installation one, but shop profit starts at the quote stage.
What support does quartz need at overhangs and islands?
Quartz has real tensile limits. It's strong in compression, brittle in tension. Unsupported overhangs put the underside of the slab in tension, and past a certain length, the slab cracks.
The industry rule of thumb, consistent across Silestone, Caesarstone, and MSI installation guidelines, is that 3cm quartz can cantilever up to 12 inches without extra support [1][3]. Beyond 12 inches, you need corbels, brackets, or knee wall support. This matters most for kitchen islands with seating overhangs: a 15-inch eating overhang for counter-height seating needs support.
Support options for overhangs:
- Steel corbels: the common choice, available in many profiles. Mount them to the cabinet or wall framing, not the cabinet face. The fasteners need to hit wood or metal framing.
- Steel L-brackets: less decorative than corbels but structurally equal. Often hidden under the overhang where nobody sees them from the seating side.
- Knee wall: a short stub wall at the outer edge of the island that the countertop rests on. It cuts into seating room but is bombproof.
- Cantilevered steel supports: for very long overhangs (18+ inches), a welded steel frame that bolts to the cabinet structure and extends under the slab. Custom fabrication territory.
For a waterfall edge island (where the quartz wraps down the side), the vertical piece is a separate slab section. The miter joint at the top has to be perfectly square and usually gets reinforced with a steel rod or biscuit set into the stone during fabrication, plus seam adhesive. The vertical panel is heavy, so it needs secure fastening at the bottom too.
Plan support placement before fabrication, not after. Adding a corbel once the countertop is installed means cutting silicone, lifting the slab, and drilling into framing. Nobody wants that call.
How long does the adhesive take to cure and when can you use the countertop?
Silicone used for mounting quartz reaches handling strength in about 1 hour and full cure in 24-48 hours, depending on temperature and humidity [2]. Two-part epoxy seam adhesive cures much faster, typically 30-60 minutes to handling strength.
Practically: the countertop is in place and looks done after installation. But the bond between quartz and cabinet is not fully developed for a day. Setting a 50-pound stand mixer on the slab 2 hours after install is pushing it. Light tasks (a glass, a coffee cup) at 4-6 hours are generally fine. Moving heavy appliances back into position should wait 24 hours.
Temperature swings cure time hard. Silicone cures by reacting with atmospheric moisture. Cold, dry conditions slow it down. In a heated kitchen at 65-75 F with normal indoor humidity, 24 hours is a reliable full-cure benchmark. In a cold garage or a winter renovation with no heat, give it 48 hours.
For the seam, wait the full cure before subjecting it to any flexing or stress. The seam is where cracks start when the stone gets stressed before the adhesive is solid.
Caulk at the wall and at the sink (same silicone) follows the same 24-48 hour cure before it should get wet. Caulking the morning of install, then running the sink that afternoon, is a very common mistake.
What are the most common mounting mistakes and how do you avoid them?
Fabricators see the same failures over and over. Here are the ones that cost real money.
Cabinets not level. This is number one. A slab bridging a low cabinet and a high cabinet lives in constant stress. It may not crack immediately, but it will crack. Check level before ordering the countertop, then check again before installation.
Wrong adhesive. Using acetoxy-cure silicone (the hardware store default) near porous stone or in enclosed spaces where the vinegar smell lingers. Use neutral-cure, 100% silicone [2].
Seam placed wrong. Seams should dodge high-stress areas: directly over a sink cutout edge, at a 90-degree inside corner, or in the middle of a cooking zone that sees fast temperature swings. Seam placement gets decided at templating. If the proposed seam location bothers you, say so then.
Over-tightening sink clips. The clips need to be snug, not torqued down. The stone cracks radially from an overtightened clip hole. Finger-tight plus a quarter turn is often enough.
Skipping the dry-fit. People get excited and jump straight to adhesive. Then the slab doesn't seat right and they're trying to adjust a 200-lb piece of stone with fresh silicone under it.
Not supporting long spans in cabinet runs. A frameless cabinet with a center drawer bank can leave a 30-inch unsupported span. Add a plywood stretcher across the top before the countertop goes on.
Rushing the cure. The countertop is not ready for heavy use the day it's installed. Wait 24 hours.
For reference, kitchen countertops as a category share these failure modes across materials. Quartz is less forgiving than wood or laminate because it doesn't flex and won't give you a warning creak before it cracks.
How does mounting quartz compare to other countertop materials?
Quartz installation sits in the middle of the difficulty range: harder than laminate, roughly equal to granite, easier than some custom thin-stone installs.
Granite: nearly the same process, same silicone adhesive, same seam epoxy, same weight class. The main difference is granite needs sealing after installation (an impregnating sealer applied and wiped off) while quartz does not. Granite's natural variation makes seams harder to hide. See granite countertops for that material's specifics.
Marble: same weight, same install method, much more demanding on seam precision because marble's veining makes color-matched seam compound nearly impossible. Seams on white marble show more than seams on quartz.
Laminate / Formica: dramatically lighter, goes down with contact cement, DIY-able with basic tools. The tradeoff is durability. Laminate chips and scorches. Quartz does not.
Butcher block: light enough for one strong person to handle, mounts with silicone or construction adhesive, needs annual oiling. The DIY choice for people who want a natural feel.
Solid surface (Corian, etc.): similar weight to quartz but cuts and shapes with woodworking tools on site, and seams sand nearly invisible. Friendlier to DIY than quartz.
Between quartz and quartzite (a natural stone often confused with quartz): quartzite is metamorphic rock, not engineered, and needs sealing like granite. The installation process matches, but the care differs. See how to clean quartzite countertops for the maintenance side.
For fabricators pricing and comparing jobs across materials, accurate per-job cost tracking starts at the quote stage. That's where tools like SlabWise's fabrication quoting software come in, handling slab yield and material costs so estimators aren't guessing.
Frequently asked questions
Do quartz countertops need to be glued down?
Yes. Quartz countertops get secured with silicone adhesive applied to the cabinet tops. The slab's weight alone (18-20 lbs per square foot for 3cm quartz) keeps it stable in normal use, but silicone prevents shifting, vibration movement, and gaps that could let moisture under the stone. All major manufacturers require silicone adhesive as part of their installation specifications.
How long after quartz is installed can you use it?
For light use (setting items down, making coffee), 4-6 hours after installation is generally safe. For normal heavy use, including moving appliances back and using the sink, wait a full 24 hours. The silicone adhesive reaches full cure in 24-48 hours depending on temperature and humidity. Rushing this window risks disturbing the bond before it's solid.
Can quartz countertops be installed over existing countertops?
Sometimes, but most fabricators recommend against it. Installing over an existing surface adds height (which may conflict with appliances), and the old surface may not be flat or stable enough for quartz. If the existing countertop is laminate on a solid substrate with no delamination, some shops will install over it. Tile is never acceptable as a base for quartz. The grout lines create uneven support that can crack the slab.
What holds a quartz countertop to the wall?
Nothing, structurally. Quartz countertops sit on and bond to the cabinet tops, not the wall. The backsplash side may get caulked to the wall with silicone to block water intrusion, but that wall caulk is a seal, not a structural connection. The slab's weight and the silicone bond to the cabinet tops do all the load-bearing work.
How heavy is a quartz countertop slab?
Standard 3cm (about 1.25 inch) quartz weighs roughly 18-20 lbs per square foot. A typical 8-foot kitchen counter section covering about 14 square feet weighs around 250-280 lbs. A full kitchen with 45 square feet of counter area can total 800-900 lbs of material. That weight is why professional installation with suction cup lifters and at least two people is strongly recommended.
What happens if quartz is not supported properly?
Without adequate support, quartz cracks. The stone is rigid and brittle in tension. Point loads over unsupported spans, uneven cabinets that create stress concentration, or overhangs past the 12-inch limit for 3cm slabs all cause failures. Cracks typically start at cutout corners (sink, cooktop) or at seam areas. Most quartz cracks trace back to installation errors, not material defects.
Can you install quartz countertops yourself without a fabricator?
Not realistically from a raw slab. Cutting quartz takes diamond wet saws and CNC routing; you cannot get professional results with woodworking tools, and dry-cutting throws off silica dust OSHA regulates. The practical DIY path is hiring a fabricator to template, cut, and deliver finished pieces, then handling the install yourself. Weight (18-20 lbs per sq ft) is the main challenge. You need suction cup lifters and at least one helper.
How much overhang can quartz have without support?
Standard 3cm quartz can cantilever up to 12 inches without extra support under most manufacturer guidelines. Beyond 12 inches, steel corbels, L-brackets, or a knee wall are required. Islands with bar-height seating often want 15-inch overhangs, which makes support mandatory. Always confirm the specific limit with your slab manufacturer, since some engineered quartz formulations carry slightly different ratings.
What type of silicone is used for quartz countertops?
Neutral-cure, 100% silicone is the specified adhesive. Skip acetoxy-cure silicone (it smells like vinegar during cure), which releases acetic acid that can etch or discolor some stone surfaces over time. Common trade products include the GE SCS1000 series and Dow 995. The silicone should stay flexible after curing to handle differential movement between stone and cabinet as conditions change.
How are seams made invisible on quartz countertops?
Seam invisibility comes down to three things: precise edge polishing on both slab pieces, perfectly flat and square mating edges, and color-matched two-part epoxy seam compound. The fabricator blends colorant into the resin to approximate the slab's background before mixing and applying it. On solid-color or low-pattern quartz, seams can be nearly invisible. High-contrast or heavily veined patterns are harder to disguise and should have seam locations discussed before templating.
Does quartz need to be sealed after installation?
No. Quartz is an engineered material (roughly 90-93% ground quartz bound in polymer resin) and is non-porous. It does not need sealing before or after installation. This is one of the main practical differences from natural stone like granite, marble, or quartzite, all of which need periodic impregnating sealer to hold their stain resistance.
How do you remove a quartz countertop if you need to replace it?
Removal means cutting through the silicone bond with an oscillating multi-tool and a flexible scraper blade, then lifting the slab off. The main risk is cracking the stone during removal (from uneven lifting) or damaging the cabinets. If you plan to reuse the slab, expect limited success: silicone leaves residue, and moving a cut slab without cracking it is tough without the original lifting equipment and placement clearance.
What causes quartz countertops to crack after installation?
Post-installation cracks almost always trace to installation errors, not material failure. The common causes are uneven cabinet height creating stress concentration, overhangs past the 12-inch unsupported limit, heavy point loads (someone sitting on the counter) before the adhesive fully cured, and thermal shock (boiling water poured straight from a pot). Quartz handles normal kitchen heat well but is not rated for prolonged direct heat contact.
Sources
- MSI Surfaces (M S International), homepage: MSI requires support every 24 inches on unsupported spans and limits 3cm quartz cantilever to 12 inches without additional structural support; 3cm quartz weighs about 18-20 lbs per square foot
- Momentive (GE Silicones) product information, homepage: Neutral-cure silicone reaches handling strength in approximately 1 hour and full cure in 24-48 hours; acetoxy-cure silicone releases acetic acid during cure
- Caesarstone, homepage: Caesarstone specifies neutral-cure silicone adhesive and limits unsupported overhangs to 12 inches for 3cm material
- U.S. Geological Survey, National Minerals Information Center (Silica Statistics and Information): Engineered quartz countertop slabs consist of roughly 90-93% ground quartz bound in polymer resin, requiring diamond tooling for cutting
- Occupational Safety and Health Administration (OSHA), Crystalline Silica page: Cutting engineered quartz produces respirable crystalline silica dust; OSHA requires engineering controls and respiratory protection during fabrication
- Cambria, homepage: Cambria specifies 100% silicone adhesive applied to cabinet support surfaces for countertop installation
- Silestone by Cosentino, homepage: Silestone specifies silicone adhesive application in beads around the cabinet perimeter, not full coverage, to allow even compression and seating
- National Institute for Occupational Safety and Health (NIOSH), homepage: NIOSH documents elevated respirable crystalline silica exposure among engineered stone fabrication workers and recommends wet cutting and ventilation controls
Last updated 2026-07-09