TL;DR
- Fabricators reach for plastic composite shims on almost every stone and quartz install.
- Plastic doesn't compress, rot, or soak up kitchen moisture the way cedar does.
- Thin plastic shims from 1/16 to 1/4 inch cover the roughly 1/4-inch variation most cabinets have.
- Cedar and hardboard strips still work for lighter laminate, but plastic is the shop standard for heavy slabs.
Why do cabinets need shimming before countertop installation?
Floors are almost never flat. Subfloor deflection, settling foundations, tile lippage, and sloppy original cabinet installs all stack up. The National Kitchen and Bath Association recommends a countertop surface tolerance of 1/8 inch over a 10-foot run, and most installers shoot for that or better [1]. Real kitchens rarely cooperate.
Cabinets make it worse. A 30-inch base cabinet that sits 1/4 inch out of level front-to-back builds a stress ramp across the back edge of a slab. With granite or quartz, that stress piles up at the corners and along any cutout. Cracks happen. They almost never get covered under warranty, because the cause is installation error, not a material defect.
Shimming fills the gap between the top rail of the cabinet (or the box itself) and the underside of the counter. The point is full, even bearing across the length of the slab, so weight spreads out and the surface reads flat to a straightedge. Think of it less as leveling the countertop and more as killing point loads.
For kitchen countertops, a small high or low spot matters more than most homeowners guess. A 3cm granite slab is stiff, but not infinitely stiff. Let it bridge a gap, then set a heavy stand mixer on that unsupported span or lean on it hard, and something has to give.
What types of shims are used for countertop installation?
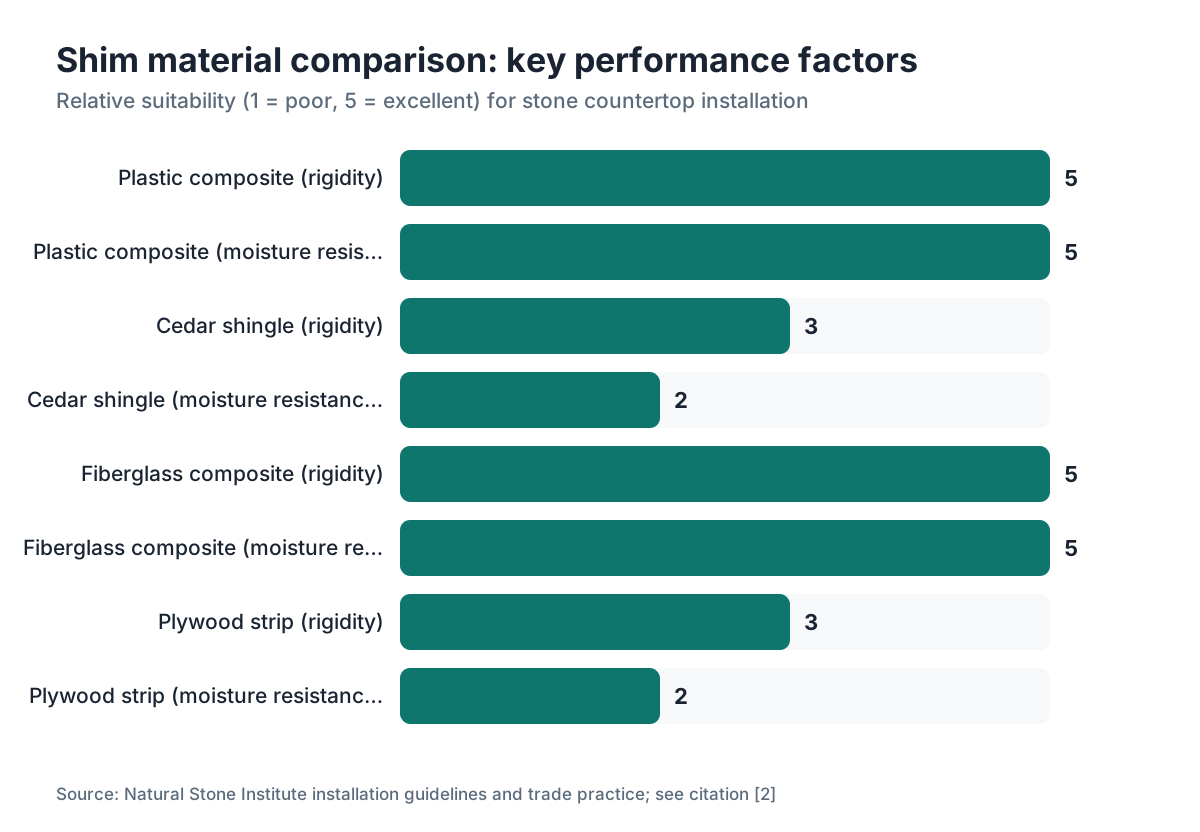
Four shim materials cover almost every job, and each has a real use case.
Plastic composite shims are the shop standard for stone and engineered quartz. Brands like Perma-Felt and the plastic shims sold through Fastcap show up on most install trucks. They don't compress under load, they ignore moisture, and they come in precise thicknesses from about 1/16 inch to 3/8 inch. Most fabricators carry 1/16", 1/8", and 1/4" plastic shims to every install. Because they're rigid, the bearing is predictable, which is exactly what you want under a 150-plus-pound slab.
Cedar shingle shims are the old carpentry standby, and they still turn up, mostly on laminate and tile work. They're tapered, so you can slide two together to dial in an exact height. The catch is compression. Under 200-plus pounds of granite over a couple of years, cedar can crush slightly and let the counter settle. Cedar also drinks moisture in a kitchen and can leave a ghost outline of discoloration on painted cabinet rails.
Composite and fiberglass shims (sometimes labeled structural shims) come out when you need a bigger bearing area or the gap is too wide for thin plastic. They're less common on countertops specifically, but some fabricators slide them under heavy island tops where the span is long and the load is high.
Scrap hardboard or plywood strips are the improvised option. Cut from 1/4" or 1/2" plywood, they're flat and consistent. They do fine under laminate or solid surface, where moisture is less of a worry and the weight is lower. Under stone, treat them as temporary.
For granite countertops, plastic wins almost every time. For laminate countertops or formica countertops, wood or hardboard strips are common and perfectly fine, because the weight is lower and the material tolerates a little flex.
| Shim Type | Compresses Over Time? | Moisture Resistant? | Best For |
|---|---|---|---|
| Plastic composite | No | Yes | Stone, quartz, all heavy slabs |
| Cedar shingle | Yes (slowly) | No | Laminate, tile, light surfaces |
| Fiberglass/composite | No | Yes | Heavy islands, long spans |
| Plywood/hardboard strips | Minimal | No | Laminate, solid surface, temporary |
Worth knowing: nobody formally certifies shim materials for countertops. The choice comes from trade practice, not a written standard. Fabricator forums and working installers landed on plastic because it holds up best in the field, not because a code told them to.
How much unlevel is too much to shim?
The honest answer gets uncomfortable. The practical shimming range for most installs is 0 to about 1/2 inch of total variation across a run. Past that, you're not really shimming anymore. You're papering over a cabinet install problem, and shimming is the wrong tool.
For stone, the NKBA installation standard puts cabinet tops within 1/8 inch of level over 10 feet before the countertop goes on [1]. Most installers shim out variation up to 1/4 inch without a second thought. Between 1/4 and 1/2 inch, experienced fabricators start asking whether the cabinets need adjusting first. Beyond 1/2 inch in a single run, shimming alone rarely produces a good result.
The bigger risk with large variation isn't the shim failing. It's a countertop that ends up visibly sloped. A 1/2-inch drop over 8 feet is subtle. A 1/2-inch drop over 3 feet looks obviously crooked to anyone standing at the sink.
For butcher block countertops, the tolerance loosens up a little, because the material is lighter and can be scribed to an irregular surface. For marble countertops and Cambria countertops, the same tight tolerances as granite apply.
Where exactly do you place shims under a countertop?
Placement matters as much as material. The goal is consistent bearing across the full footprint of the slab, with no point loads.
Shim the high-load spots first: corners, seam locations, and anywhere within 6 inches of an undermount sink cutout. Cutouts are mechanically weak because the slab spans open air in the middle, so the perimeter of the cutout needs solid bearing all the way around.
After corners and cutouts, run shims along the top rail of each cabinet roughly every 16 to 24 inches. That matches typical cabinet rail spacing and stops the slab from bridging. On a 96-inch run of base cabinets, expect 6 to 8 shim points at minimum.
Peninsulas and islands flip the logic a bit. Islands often overhang their base on multiple sides, so the shim points sit inside the overhang, holding the structure where the weight transfers down into the cabinet frame. Overhangs past 10 to 12 inches on stone need corbel or bracket support, not more shims, per most stone fabrication guidelines [2].
One detail that trips up DIYers: the shim goes under the countertop and in full contact with both surfaces, not bridging a gap on top of the cabinet rail. It has to touch the cabinet and the countertop underside at the same time. A shim that rocks is worse than no shim at all.
How do fabricators find the high and low spots before shimming?
The tool is almost always a 4-foot or 6-foot level, sometimes a longer straightedge or a laser for bigger kitchens. Most templaters mark the high point of the cabinet run with a pencil or tape, then measure the drop down to every low point. That tells them how many shims to bring and which thicknesses to stack.
Laser levels have become standard in larger shops. A rotating laser set to the height of the tallest cabinet rail reads every other cabinet in seconds. For a straightforward galley, a 6-foot level is still faster. For a complex L or U-shape with an island, the laser wins.
The measurement discipline is what actually matters. The high point of the cabinet run sets the countertop elevation. Every other cabinet top either matches it or gets shimmed up to it. Work to an average or a rough eyeball instead, and you get a counter that reads level in the middle but dips at the ends.
Some fabricators document all this during templating. Digital tools record the cabinet layout in 3D and flag unlevel conditions before the stone is cut. SlabWise's quoting and templating workflow, for example, lets fabricators log field measurements during the template stage, so the install crew knows what shim thicknesses to load before they leave the shop. That kind of pre-planning cuts install time on complex jobs.
Do you shim before or after applying silicone adhesive?
Shims go in first, before the silicone. Always.
Here's the logic. Silicone is flexible wet and still somewhat flexible cured, but it can't fill large gaps or carry structural load on its own. Apply silicone to an unlevel surface, set the slab, and the slab sinks into the low spots while the silicone squeezes out of the high spots. You end up with uneven bearing and a counter that may rock.
The right sequence: shim to level, verify with a straightedge, run a thin bead of silicone on the cabinet tops (or color-matched silicone in the gap between the wall and the counter's back edge), then set the slab. Let the silicone cure with the slab sitting in the shimmed position.
Silicone doesn't replace shims for structural gaps. Per manufacturer guidelines for engineered stone, silicone is an adhesive and sealant, not a filler [3]. Gaps past about 3/16 inch get shimmed, not caulked.
For countertop installation in general, the sequence is the same across stone, solid surface, and laminate.
Do you need to glue or fasten shims in place?
Usually not. On most installs, the weight of the slab pins the shims exactly where you set them. A 3cm granite slab for a typical 25-square-foot kitchen weighs 400 to 500 pounds. Those shims aren't moving.
That said, some installers dab a little construction adhesive or silicone on plastic shims at the corners before setting the slab, mostly on jobs where the slab gets shifted during fitting. It keeps the shims from wandering while the stone is positioned. Once the slab is down and the silicone cures, the shims are captured for good.
Wall-mounted floating shelves and suspended counters are different. Fastening matters there, because there's no gravity load holding the shim in place. For a standard base-cabinet install, adhesive on shims is optional.
One case where you do want to secure them: an island top that overhangs more than about 12 inches. Someone leaning on the overhang can lever the opposite edge up slightly. Then either the shims get adhered or the overhang gets a bracket, and usually both.
Can you use construction adhesive instead of shims?
No. Homeowners doing their own installs ask this a lot, and it sounds reasonable. Gap is 1/4 inch, so fill it with a fat bead of construction adhesive and set the slab. The trouble is that adhesive squishes under load. It never gives rigid, consistent support.
Construction adhesive and silicone are both viscoelastic. They flow slowly under sustained pressure, and a stone slab applies sustained pressure at every low spot. Over months the adhesive compresses unevenly, and the slab settles into a different shape than the one it was installed in. That movement cracks stone, breaks the seal at the sink, or opens seams.
A rigid shim gives a fixed, non-compressible bearing point. Then the adhesive or silicone bonds the slab to the shim and the shim to the cabinet. Each part does one job.
For Corian countertops and other solid surface materials, manufacturer installation guides are explicit: the substrate has to be flat and level to within 1/8 inch before the solid surface gets bonded down [4]. The material tolerates slight flex, but it isn't built to span voids.
What about shimming cabinets themselves before the countertop goes on?
Often this is the better fix, especially when the variation is large. If the cabinets sit 1/2 inch or more out of level, or the problem comes from an uneven floor rather than cabinet install error, adjusting the leveling legs or base shims before templating gives a cleaner result.
Most base cabinets sold since roughly the mid-2000s have adjustable leveling legs in the base. You reach them from inside the cabinet or with a screwdriver through the toe kick. Get every cabinet within 1/8 inch of level at the top rail before the template happens, and you cut shimming, get cleaner installs, and skip the long-term risk of shim compression under the stone.
No leveling legs, and the cabinets sit on floor shims? Check whether those shims are still solid. Old cedar shims at the base of a cabinet can compress or rot over 15 to 20 years, so cabinets that were once dead level slowly develop a lean. Replacing floor shims before the install is a lot cheaper than fighting a cracked slab two years later.
The templater should flag big discrepancies. On an honest job, if the cabinets are badly out of level, the fabricator tells the customer before the template is finalized, not after the stone is cut.
Are there any building codes or standards that specify shim requirements for countertops?
No federal building code speaks to countertop shimming directly. The International Residential Code, which most U.S. jurisdictions adopt with local amendments, covers kitchen cabinet installation under general carpentry provisions but says nothing about countertop shim materials or methods [5].
The closest thing to a formal standard comes from the NKBA, whose Kitchen and Bath Installation Manual states that countertop substrates must sit within 1/8 inch of level over any 10-foot measurement [1]. No inspector enforces it, but it's the benchmark fabricators and installers reference.
For natural stone, the Marble Institute of America (now part of the Natural Stone Institute) publishes technical bulletins on installation practice, including substrate flatness requirements [2]. Not codes either, but the closest the stone industry has to a formal standard.
Material makers set their own specs. Cambria, for instance, requires cabinets to be level and plumb and the countertop to have full bearing across its base before installation. Break those specs and you can void the warranty [7]. Read the installation guide for your specific material before you buy a single shim.
What thickness of shims should you buy for a typical countertop job?
Stock three thicknesses for most jobs: 1/16 inch, 1/8 inch, and 1/4 inch. That handles 95% of the variation you'll see in a normal residential install.
You can stack them. Two 1/8-inch plastic shims make a clean 1/4 inch. A 1/8 plus a 1/16 gives you 3/16. Keep the stack to three or fewer, because tall stacks can tip under lateral force before the slab lands.
For jobs with real variation (say, 3/8 to 1/2 inch), a single 3/8-inch plastic shim, or a 1/4-inch hardboard strip plus a 1/8-inch plastic shim, is more stable than stacking four thin ones.
Buy more than you think you need. A box of 50 plastic shims in one thickness runs about $8 to $15 at a tile or flooring supply house, or through distributors like Fastcap [6]. Running out mid-install and driving to a hardware store that only stocks cedar shingles is an avoidable headache.
For fabricators quoting jobs: shim cost is trivial and belongs in the installation labor line, not a separate material charge. Customers don't get why they're being billed for $3 of plastic chips. Build it in.
Frequently asked questions
Can I use regular wood shims from the hardware store for granite countertops?
You can, but most fabricators won't. Cedar and pine shims compress slowly under the sustained weight of stone, which can shift the countertop or bow it over time. Plastic composite shims cost about the same at tile supply houses and give rigid, non-compressing support. For granite or quartz, plastic is the better call. For laminate or solid surface where weight is lower, wood shims are fine.
How do I know if my cabinets are level enough for countertop installation?
Lay a 6-foot level across the cabinet top rails and check both along the wall and front-to-back. The NKBA standard calls for 1/8-inch tolerance over 10 feet. Most fabricators shim variation up to 1/4 inch without issue. Anything past 1/2 inch of total variation across a run usually means the cabinets themselves need adjustment before the template happens.
How many shims do I need for a typical countertop installation?
Plan for one shim every 16 to 24 inches along each cabinet run, plus extras at all four corners of each section and around any sink cutout. A standard 10-foot galley kitchen might use 12 to 18 shim points. Buy at least two boxes of 50 shims in each thickness (1/16", 1/8", 1/4") so you don't run short mid-job.
Do shims need to be removed after the countertop silicone cures?
No. Shims under a countertop are permanent. They stay put for the life of the installation. The weight of the slab holds them, and once the silicone cures they're effectively bonded in. Trying to pull shims after installation risks cracking the slab or breaking the silicone seal. Leave them alone.
What happens if you don't shim a countertop on unlevel cabinets?
The slab bridges the low spots and touches only the high points, which concentrates the load at those contact points instead of spreading it out. Over time that cracks stone at corners or cutouts. It also leaves the counter visibly sloped, opens gaps between the counter and backsplash, and can pull an undermount sink away from the stone as the adhesive carries load it wasn't built for.
Can I use grout or thinset instead of shims to level a countertop?
Grout and thinset get used as a bed under large ceramic tile countertops, but not as spot shims for stone slabs. They take 24 to 72 hours to cure, they're rigid once set (fine or problematic depending on whether the surface is truly flat), and repositioning is very hard. For any prefabricated countertop, shims are faster, more reversible, and more precise.
Do plastic shims leave marks on cabinet tops over time?
Not the way cedar can. Cedar shims can leave tannin stains or a ghost outline on painted cabinet rails after years of contact, especially with moisture involved. Plastic shims are inert and don't stain. If you're worried about the cabinet finish, a small square of felt tape under the shim adds a buffer with no structural downside.
Is shimming a countertop something a homeowner can do themselves?
The shimming itself is straightforward. The harder part is correctly finding the high point of the cabinet run and working from it systematically. For stone, the slab also has to be set and repositioned carefully, which usually takes two or three people at minimum. If you're comfortable with a level and you work methodically, shimming before a pro sets the stone is reasonable prep.
How do you shim a countertop around a corner or L-shaped kitchen?
Each leg of the L gets shimmed on its own, and the corner gets extra attention. The corner usually carries the seam or miter joint between two slabs, so full, even bearing on both sides of that joint is critical. Shim each run to level from the same reference point, usually a laser line or a common level reading at the corner cabinet. Check both legs with one long straightedge across the corner before setting the stone.
What shims do fabricators use for quartz or engineered stone specifically?
The same plastic composite shims as granite. Engineered quartz like Cambria or Silestone is dense and heavy (close to natural stone) and has the same substrate needs. The Cambria installation guide requires a flat, level substrate and full bearing under the countertop. Plastic shims in 1/16", 1/8", and 1/4" thicknesses cover the typical residential install.
How thick can shims be before you need to fix the cabinets instead?
Most experienced installers draw the line around 1/2 inch of total shimming in a single run. Past that, shimming alone puts visible slope in the countertop, the shim stack gets unstable, and the root cause (unlevel cabinets) tends to cause other problems like doors that won't hang right. Cabinet leveling legs or base shimming at the floor is the fix when variation clears half an inch.
Do butcher block countertops need shimming the same way stone does?
Butcher block is lighter (roughly 8 to 12 pounds per square foot versus 18 to 22 for 3cm granite) and can flex a little without cracking. Minor unlevel conditions up to about 1/4 inch often get handled by scribing or the slight flex of the wood. For variation bigger than that, shimming the cabinet top rails is still right. Butcher block also gets fastened down with screws rather than just silicone, which shifts the sequence a bit.
What's the difference between shimming for stone versus shimming for laminate?
Stone needs rigid, non-compressible support, because any flex or point load can crack it. Laminate like Formica is flexible and light, so wood shims or even hardboard strips work fine. Laminate counters also get screwed down from inside the cabinet, pulling them tight to the substrate, so minor high or low spots get mechanically pulled out. Stone can't be screwed down without risking a crack.
Sources
- National Kitchen and Bath Association, NKBA Kitchen and Bath Installation Manual: Countertop substrate must be within 1/8 inch of level over a 10-foot run
- Natural Stone Institute, Technical Bulletins and Installation Guidelines: Substrate flatness and full bearing requirements for stone countertop installation, including overhang guidelines
- Dow Chemical / Dow Silicones, Silicone Sealant Application Guidelines: Silicone sealants are adhesives and gap sealers, not structural gap fillers for voids over 3/16 inch
- Corian Design (DuPont), Corian Solid Surface Fabrication and Installation Guide: Substrate must be flat and level to within 1/8 inch before solid surface bonding
- International Code Council, International Residential Code (IRC): The IRC addresses general carpentry but has no specific countertop shimming code requirement
- Fastcap, Shim product listings and pricing: Plastic composite shims available from distributors in boxes of 50 in multiple thicknesses, typical price range $8-$15 per box
- Cambria, Cambria Installation Requirements: Cambria requires cabinets to be level and plumb and countertop to have full bearing before installation; non-compliance can void warranty
- Marble Institute of America (now Natural Stone Institute), Dimension Stone Design Manual: Stone countertop overhangs beyond 10 to 12 inches typically require corbel or bracket support per stone industry guidelines
- U.S. Department of Housing and Urban Development, Residential Construction Quality Guidelines: General residential construction tolerances for level surfaces in kitchen installations
- Oregon State University Extension Service, Wood Decay in Structures: Wood materials in moist kitchen environments can absorb moisture and decay over time, relevant to wood shim longevity
Last updated 2026-07-10