
TL;DR
- The most common countertop installation mistakes fabricators make are poor seam placement, weak substrate support, skipping a level check before setting stone, wrong adhesive or silicone choice, and no expansion gaps on wood-based tops.
- Most callbacks trace to one of these five.
- Almost all of them are avoidable with a disciplined pre-installation checklist.
Why do countertop installation mistakes happen so often?
Speed kills. The economics of stone fabrication push crews to move fast, and most installation errors are not ignorance. They are shortcuts taken under schedule pressure. A crew that sets four kitchens a week has done everything right a hundred times, which is exactly when complacency creeps in.
The other driver is bad information at handoff. A templater captures measurements, but if the substrate, the cabinet brand, or the sink model changes between template day and install day, nobody updates the ticket. The crew shows up, sets stone, and finds the problem mid-install.
The National Kitchen and Bath Association's 2023 industry report puts callbacks from installation errors among the top drivers of warranty cost for countertop fabricators [1]. That matches what shop owners say out loud: most warranty claims are not material defects. They are install problems that surface weeks after the job closed.
This article works through the mistakes by category, roughly in order of how often they cause real callbacks. Every one of them is preventable.
What happens when seams are placed in the wrong location?
A seam in the wrong spot is the most visible mistake you can make. Ugly at best, structurally weak at worst, and it fails on the customer's clock, not yours.
The standard guidance from the Natural Stone Institute (which absorbed the old Marble Institute of America) is that seams should never land over a void, over a sink cutout, or in a high-traffic zone like directly in front of the range [2]. Stone has almost no tensile strength. Quartz and granite both crack under bending loads, and a seam floating over a 33-inch sink opening is a bending load waiting to happen.
The right position for a seam is over a cabinet wall or a solid support point. On an L-shaped or U-shaped counter, seams usually go at the inside corner or where an apron or cabinet partition sits below. Vein direction matters too, if the customer paid for book-matching on a premium slab.
Where fabricators go wrong:
- Placing seams for slab yield instead of structure. Nesting software can flag a cut plan that drops a seam over a void, but if the fabricator ignores the warning or never turns that feature on, the problem lands on the install crew.
- Not showing seam location to the homeowner before cutting. Plenty of homeowners assume seams are invisible. They are not. A signed seam approval drawing, even a rough PDF sketch, kills the angry call three days later.
- Setting a seam only to find the cabinet wall shifted. Template dimensions should capture cabinet wall locations, not only the countertop perimeter.
A seam 2 inches off-center from a cabinet wall can be fine. A seam cantilevered 8 inches over a sink cutout fails eventually, and when it does, it takes the counter with it.
How does poor substrate preparation cause countertop failures?
Stone does not forgive a bad substrate. Twisted cabinet deck, and the top either cracks or rocks. Wet plywood, and the silicone bond dies. Cabinets that are not level with each other, and the installer has to shim, and shims are a point failure waiting to happen.
The right substrate for stone and engineered quartz is usually 3/4-inch exterior-grade plywood (or the manufacturer's equivalent) that is dry, flat, and screwed down tight [3]. Some fabricators skip the substrate on frameless European cabinets and let the box tops carry the slab. That works only when the box tops are continuous, sound, and level. Many are not.
Here is the mistake crews make most: they check level across a single run and call it done. Cabinets set by a different trade can be level individually while sitting 1/4 inch out of plane with the run next to them. Spread that gap across a 10-foot counter and you get a crack near the seam or a joint that never sits tight.
Before any stone goes down, the crew should:
- Check level across the entire counter footprint with a 4-foot or 6-foot level.
- Push on every cabinet box and watch for rock or flex.
- Confirm the substrate is dry. Moisture content above 19 percent in wood is the threshold the USDA Forest Products Laboratory names as the point where wood-degrading organisms become active, and it is also where adhesive bonds start to fail [4].
- Find any span longer than 24 inches without support and add a filler or plan for corbels.
On kitchen countertops in natural stone, a bad substrate almost always shows up inside the first year as a hairline crack at the weakest point, usually a seam or a sink corner.
What leveling errors do installers make that cause visible problems?
Setting stone on a surface that is not level is a different problem from setting it on a surface that is not flat. Both matter. They matter in different ways.
Out-of-level means the counter tilts. Water pools to the low side. Drawers and doors can bind if the cabinets are tied to the counter. A counter 1/8 inch out of level over 8 feet is invisible to most homeowners. Push it to 3/8 inch over 6 feet and they notice the first time they spill something.
Out-of-flat means high and low spots even when the overall plane reads level. This is the condition that cracks stone. A slab bridging a low spot in the middle carries load at the ends and nothing in the center. A 3 cm granite slab handles a fair amount of that. A 2 cm slab, or a long narrow piece like a windowsill extension, does not.
The fix for out-of-flat is not shimming the stone. It is correcting the substrate before the stone goes down. Shimming under a slab concentrates stress at the shim point. Some fabricators fill low spots on the cabinet deck with construction adhesive, which is fine as long as it cures fully before the stone lands.
A laser level or a precision straightedge, checked in several directions, takes about five minutes. Skipping it takes about five weeks off the counter's life at the weakest point.
Why do expansion gaps matter, and what happens when fabricators skip them?
Expansion gaps are mostly a wood-countertop problem, but they touch solid surface and laminate too. Natural stone and engineered quartz have very low thermal expansion (roughly 5 to 8 x 10^-6 per degree Celsius for granite [5]), so gaps for movement are rarely the issue. The substrate and the surrounding structure are what move.
Butcher block countertops are the clearest case. Solid wood swells and shrinks with the seasons. A 25-inch deep maple butcher block can move 1/4 inch or more across the grain between dry winter and humid summer [4]. Screw it down rigid through the cabinet deck with no slotted holes or clips and it cracks or warps. Every butcher block maker publishes fastening instructions for exactly this reason, and most call for slotted holes to let the wood move.
Laminate countertops and Formica countertops sit on a particleboard or MDF core that swells when moisture hits the seams or edges. Join two laminate sections and leave that joint unsealed, and the core drinks humidity until the seam opens. The fix is sealed edges and a waterproof seam filler, not plain contact adhesive.
Solid surface like Corian countertops needs a 1/16-inch expansion gap at every wall per the manufacturer, filled with color-matched caulk rather than silicone. Skip that gap and the surface buckles or chips at the backsplash line when it expands.
Skipping expansion gaps looks fine the day of install and shows up eight months later, right past the typical labor warranty.
How does incorrect adhesive or silicone selection cause problems?
Not all silicone is the same, and not every adhesive plays nice with every substrate. This sounds obvious, but adhesive callbacks are common enough to spell out exactly where crews slip.
To set stone on cabinets, the standard move is a continuous or intermittent bead of 100-percent silicone along the cabinet top, with the stone lowered into it. The silicone bonds the counter to the cabinet and cushions minor irregularities. Use a neutral-cure (oxime or alkoxy) silicone, not an acetic-acid-cure one. Acetic-cure silicone (the kind that reeks of vinegar as it sets) releases acetic acid while curing, which etches polished marble and calcite-based stone and can stain porous granite [6]. On marble countertops, acetic-cure damage shows up as dull halos where the bead sat.
For granite and quartz seams, fabricators use color-matched two-part epoxy. The mistakes: too little adhesive, over-clamping and starving the joint, or a color match that is close but wrong. A starved seam looks perfect on day one and opens in six months. An over-clamped seam squeezes out the adhesive and bonds on surface contact alone, which is not a structural joint.
Cambria countertops and other engineered quartz brands usually name which seam adhesives are approved. Use an off-brand epoxy and you can void the warranty. That is not theoretical: Cambria's published care and installation guidelines list approved seam adhesive systems by name [7].
One more adhesive miss: silicone on a dusty or damp surface. Stone fabrication throws off silica dust, and if the cabinet deck or the underside of the slab is coated when the silicone goes down, you have bonded to the dust layer, not the substrate. A dry-cloth wipe before setting takes ten seconds.
What sink cutout mistakes cause the most callbacks?
A sink cutout is a stress concentration point. A rectangular hole in a slab is basically a crack waiting to start at each corner, and how you handle those corners decides how long the stone lasts.
The most common cutout mistake is tight, square corners. Stone fractures in tension, and a perfectly square interior corner is a stress riser. Radius each interior corner with a diamond core bit or a template-guided router. A 1/4-inch radius is the minimum. A 1/2-inch radius is better for long undermount openings. The Natural Stone Institute's fabrication standards address this directly [2].
The second common mistake is wrong sizing. An undermount sink has to fit the cutout with the right reveal (the gap from sink rim to cutout edge, typically 1/8 to 3/16 inch). Too little reveal and the sink cannot clip up. Too much reveal and the stone hangs past the clip ring, creating a bending moment that can crack the counter over the sink.
Third is skipping reinforcement on thin slabs over sink spans. A 2 cm slab across a 33-inch undermount opening leaves about 12 inches of unsupported stone on each side of the cutout. Many fabricators laminate a strip of matching stone under the front and rear edges over the sink to build the effective thickness to 3 cm at the stress points. Skipping that on a 2 cm job to save material is a gamble.
For how sink and cutout choices ripple into material and labor planning, the countertop installation overview covers the full scope of a proper job.
What caulking and sealing errors show up after installation?
The joint between the counter and the backsplash moves more than any other. Cabinets settle, walls breathe, the counter shifts a hair with thermal cycles. Fill that joint with grout and it cracks within a year. The right material is a flexible silicone caulk, color-matched to the grout or stone.
The mistake fabricators make is leaving this joint to the tile setter or the general contractor. Nobody owns it, so it gets filled with whatever is on hand, sometimes non-sanded grout, sometimes nothing. Water gets behind it, the substrate swells, and the stone lifts at the back edge.
Sealing stone is a separate job from caulking, and people confuse the two constantly. Granite, quartzite, and marble absorb liquids at different rates by porosity. An impregnating sealer (silane or siloxane-based) cuts absorption but does not make stone stain-proof. The Natural Stone Institute recommends a water-drop test before sealing: if water soaks in under four minutes, the stone needs sealer [2].
The install mistake is sealing too soon or not at all. Stone that was wet during polishing or transport traps moisture under a sealer if you seal before it dries. Stone left unsealed and hit with red wine or oil can stain within hours. The right sequence: install, let the stone reach room temperature and dry, then seal per the manufacturer's instructions.
For keeping sealed surfaces clean after install, the pieces on how to clean stone countertops and how to clean quartzite countertops are good starting points for homeowners.
How do measurement and template errors translate into installation problems?
Template errors happen upstream, but they surface at install. A template 1/4 inch off at a wall gives you a stone that will not sit flush, and now the installer either grinds it on-site (possible, slow, risky) or hauls it back to the shop.
The most common template errors:
- Walls measured as straight when they are not. Almost no wall is truly straight. A template should record the actual wall profile, not assume a line. Laser templating handles this automatically. Stick templating needs real attention to bowed walls.
- Diagonal or radius corners measured to the wrong reference. Measure a curved corner to the outside of the arc, cut to the inside, and the piece is wrong.
- Missing or wrong appliance dimensions. A range that is 30 1/4 inches wide, not a clean 30, will not fit a cutout built to spec. Template docs should include make and model for every appliance next to a counter.
- Ignoring door swing or drawer pull clearance at inside corners. A 90-degree inside corner that looks fine on paper can trap a drawer pull.
Shops that track remakes by root cause almost always find templating errors in the top two or three, right next to seam placement and substrate. Running a shop well means measuring that number and treating it as real.
What does sloppy job site communication cost fabricators?
A lot of install mistakes are not technical. They are organizational. The crew shows up and nobody mentioned the homeowner changed the sink. The cabinets are not set. The plumber left a fitting right where the counter needs to sit. Coordination failures, and they cost money.
A pre-installation site check, separate from templating, is standard at shops with low callback rates. Done 24 to 48 hours before install day, it confirms the cabinets are set and level, appliances are on-site or their dimensions are locked, the space is clear, and no utility is in the way.
For higher volume, a digital job packet cuts information loss between office and field: photos from the template visit, a signed seam approval, and a checklist shared with the crew. Fabrication software that links the template, the cut plan, and the install job in one record makes this easier. SlabWise, for example, carries quote data through to job documentation so the install crew sees exactly what the templater captured, without anyone re-keying it.
The cost of a bad install day runs past the return trip. It is the homeowner's lost day off work, the downstream trades stuck waiting on the counter, and the review that posts before you can fix anything. One callback that turns into a dispute can eat more than the whole margin on the original job.
Which mistakes are most expensive to fix after the fact?
Not all mistakes cost the same. Some are a ten-minute fix on install day. Others mean pulling the stone, which almost always means breaking it.
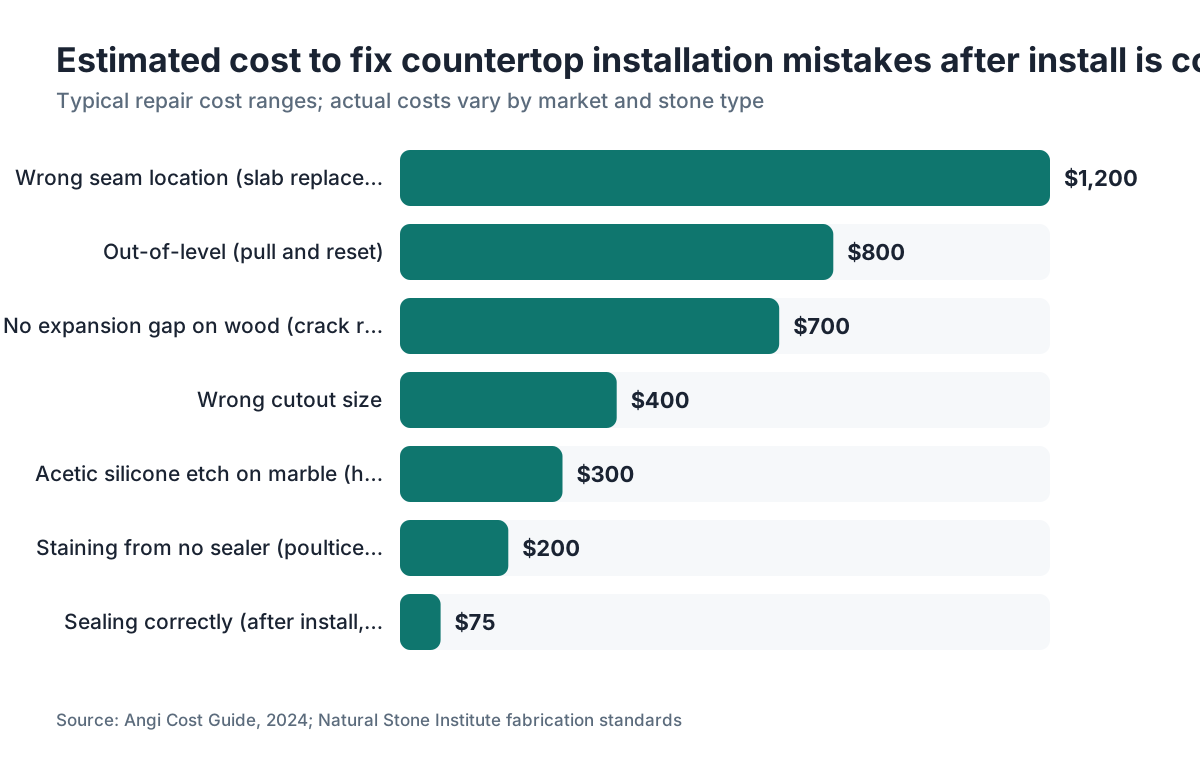
The table below ranks common mistakes by typical cost-to-fix, using industry repair pricing ranges. These are rough. Actual cost swings with your market, the stone, and whether the piece survives removal.
| Mistake | Fix if caught during install | Fix after install complete |
|---|---|---|
| Seam over a void | Reposition before adhesive sets: minimal cost | Remove, likely break slab, recut: $400-$1,200+ |
| Wrong sink cutout size | Enlarge cutout on-site: $50-$150 | Same, or pull counter to shop: $200-$500 |
| Out-of-level substrate | Shim and re-set: $75-$200 | Pull, correct cabinets, reinstall: $300-$800 |
| Acetic silicone on marble | Wipe off before cure: free | Hone and re-polish affected area: $150-$400 |
| No expansion gap (wood) | Correct mounting before screwing down: minimal | Crack repair or replacement: $200-$1,000+ |
| Missing or wrong sealer | Apply sealer after install: $50-$100 | Poultice stain treatment: $100-$300, or replacement |
| Tight cutout corners (cracked) | N/A, piece is cracked | Replace counter: full material + labor cost |
The worst mistakes are the ones you cannot correct in the field: a cracked piece, a cutout mis-cut oversize, a seam that fails structurally. Those mean reordering stone, and at current prices (roughly $40 to $200+ per square foot for natural stone, depending on material and market [8]) prevention is the only strategy that makes financial sense.
How can fabricators build a pre-installation checklist that actually works?
A checklist works only if the crew uses it and someone verifies they did. A PDF sitting on a clipper's phone that never gets filled out is not a checklist. It is a document.
A practical pre-installation checklist has two parts: a site check before install day, and an on-site check at the start of install.
Pre-install site check (24-48 hours out):
- Cabinets set, level, and secured
- Substrate material confirmed and dry
- Sink model on-site and matches the template
- Appliance cutout dimensions verified against the template
- Utilities (plumbing stubs, electrical boxes) positioned correctly
- Seam approval signed by homeowner or GC
On-site check at the start of install:
- Re-check level across the full counter footprint
- Confirm the substrate is clean and dry
- Confirm the correct silicone type for the stone
- Review seam locations against the signed approval
- Inspect stone pieces for transit damage before setting
- Confirm cutout corners are radiused
- Flag any wall bowing that affects fit
The on-site check runs about fifteen minutes for a full kitchen. Shops that make it non-negotiable, and that log which crew member ran it on every job, see measurable drops in callback rates within six months.
To close the loop between quoting, templating, and install documentation, SlabWise's job management tools are built to hold this information in one place across the full job lifecycle. Worth a look if your current process leans on paper or scattered spreadsheets.
Frequently asked questions
Can a homeowner tell if their fabricator made installation mistakes?
Yes, often within weeks. Watch for a counter that rocks when you press on it (bad substrate or shimming), caulk or grout cracking at the wall joint within a year (wrong material or missing expansion gap), visible seams over the sink opening, water pooling to one side (out-of-level), or staining near the sink clip points (unsealed stone). Photos taken right after install give you a baseline to compare against.
How long does a countertop seam typically last if done correctly?
A properly placed and filled seam over solid support, using the right two-part epoxy, should last the life of the counter with no movement or opening. Seams fail early when they sit over a void, when the epoxy was under-mixed or under-filled, or when the joint was clamped so tight it starved of adhesive. There is no standard industry warranty period specifically for seams; most fabricator labor warranties run one to two years.
Is it normal for a granite countertop to crack after installation?
Cracking is not normal and almost always points to a structural problem: a seam over a void, a sink cutout with no corner radius, an unsupported span, or a substrate that moved. Natural stone has almost no tensile strength, so it cracks at stress points if the install does not spread load properly. A crack in the first year is nearly always an installation or substrate issue, not a material defect.
What type of silicone should fabricators use to set stone countertops?
Use neutral-cure silicone (oxime or alkoxy chemistry) for all stone installs, and definitely on marble, limestone, and any calcite-based stone. Acetic-acid-cure silicone releases acetic acid as it cures and can etch or stain polished stone. Neutral-cure products are widely available from adhesive makers and clearly labeled, and they skip the strong vinegar smell of acetic-cure products.
How much overhang can a stone countertop have without support?
The Natural Stone Institute's fabrication standards recommend a maximum unsupported overhang of about 6 inches for 3 cm stone and about 4 inches for 2 cm stone before corbels or brackets are required. Breakfast bar overhangs of 12 to 15 inches are common but need proper support. As a rule of thumb, any overhang past one-third of the total counter depth needs support, and the stone matters: quartzite and granite handle bending better than marble or travertine.
Should fabricators seal stone before or after installation?
After installation is standard for most jobs, once the stone reaches room temperature and any moisture from shipping or storage has left. Sealing before install is sometimes done on very porous stone, but it risks trapping moisture under the sealer and hurting the silicone bond at the cabinet top. Always follow the sealer maker's instructions; most specify a minimum 24-hour cure before the surface touches water.
What is the most common reason a countertop installation callback happens?
Based on shop owner reports and NKBA industry data, the top callback cause is a problem that was visible or detectable at install time but never addressed: a counter not quite level, a seam slightly gapped, or backsplash caulk in the wrong material. Second most common is a substrate issue nobody checked before setting stone. True material defects are a small slice of callbacks.
Do laminate countertops have different installation requirements than stone?
Yes. Laminate and post-form counters rely on contact cement bonding to a particleboard or MDF core, and that core is vulnerable to moisture. Seam edges have to be sealed with a color-matched seam filler, more than contact-cemented together. Laminate also needs continuous support and cannot span gaps the way 3 cm stone can. End caps and edge profiles go on before the counter is set so the edges are protected from the start.
How does a fabricator fix a countertop seam that is opening up?
If the seam is opening because it sat over a void or lost its adhesive bond, the correct fix is to remove the stone, address the structural cause, and re-set with fresh epoxy. If the opening is tiny (under 1 mm) and purely cosmetic, a color-matched seam filler can be pressed in and scraped flush. Do not re-glue an opening seam from the top without fixing why it opened. It will open again.
What overhang or clearance should fabricators leave around appliances?
Standard counter thickness means the counter edge usually sits 1.5 to 2 inches above the top of a slide-in range. Most dishwasher installs leave no gap at the top. For cooktops, the manufacturer specifies the cutout to the nearest 1/8 inch, and the counter has to be cut to that spec. The most common appliance error is cutting a cooktop opening to a nominal size without confirming the actual dimensions from the installation sheet.
Can a fabricator fix a countertop that is out of level after the silicone has cured?
It depends on how far out it is and how it was set. If the counter is bonded with silicone only (no mechanical fasteners), it can sometimes be broken free carefully, the substrate corrected, and the counter re-set with new silicone. That works maybe half the time without cracking the stone. If it is significantly out of level, the safer answer is pulling and resetting, which carries real risk of breaking the piece.
Do butcher block and wood countertops need a different installation approach?
Yes, very different. Solid wood counters must be fastened with slotted mounting holes or clip systems that allow seasonal movement across the grain. Rigid fastening causes cracking or warping, often within one heating season. The substrate must be flat but the wood should not be glued to the cabinet top. Most butcher block makers publish specific fastening instructions, and following them is the only way to avoid callbacks on wood installs.
What is the best way for homeowners to protect themselves from installation mistakes?
Ask to see a seam placement drawing before the stone is cut, and sign it. Be present at installation or send someone who can photograph the substrate before stone goes down. Confirm in writing what silicone will be used if you have marble or limestone. Ask what warranty the fabricator offers on labor specifically. And walk the job the day of install, pressing gently on the counter at the seams and checking for rocking before the crew leaves.
Sources
- National Kitchen and Bath Association, NKBA Business and Industry Report 2023: Callbacks from installation errors are among the top drivers of warranty cost for countertop fabricators
- Natural Stone Institute, Fabrication Standards and Technical Documents: Seams should not land over voids or sink cutouts; interior cutout corners should be radiused; absorbency testing guidance for sealing
- Marble Institute of America (now Natural Stone Institute), Dimension Stone Design Manual: Recommended substrate for stone countertops is 3/4-inch exterior-grade plywood, dry and flat
- USDA Forest Products Laboratory, Wood Handbook: Wood as an Engineering Material (General Technical Report FPL-GTR-282): Moisture content above 19 percent in wood is the threshold above which wood-degrading organisms become active; solid wood expands and contracts seasonally with humidity
- USGS, National Minerals Information Center: Dimension Stone: Granite has a thermal expansion coefficient of roughly 5 to 8 x 10^-6 per degree Celsius
- Natural Stone Institute, Care and Cleaning for Natural Stone Surfaces: Acetic-acid-cure silicone can etch polished marble and calcite-based stones during curing; neutral-cure silicone is recommended for stone
- Cambria, Cambria Care and Installation Guidelines: Cambria specifies approved seam adhesive systems; using non-approved adhesives can void the warranty
- Angi, Countertop Installation Cost Guide 2024: Natural stone countertop material costs range from roughly $40 to $200+ per square foot depending on material and market
- National Kitchen and Bath Association, NKBA Planning Guidelines: Standard countertop overhang and clearance guidelines for appliances and seating areas
- Occupational Safety and Health Administration (OSHA), Crystalline Silica: Stone fabrication and cutting produces respirable silica dust; relevant to on-site grinding and cutting practices during installation
Last updated 2026-07-10