TL;DR
- Inside corner countertop joints are almost always cut at 45 degrees on each piece.
- The two angles add up to 90 degrees, which matches a square kitchen corner.
- When a corner is off (and old houses are always off), each cut is half the measured angle: an 88-degree corner gets two 44-degree cuts.
- Waterfall edges and diagonal walls use the same math, just rotated.
What angle do fabricators cut for an inside corner countertop?
The standard inside corner cut is 45 degrees on each slab piece. Two pieces, each cut to 45 degrees, meet at the corner and form a 90-degree joint. That matches a normal square kitchen corner where two walls meet at a right angle.
This holds for granite, quartz, quartzite, marble, and most engineered stone. It is also the default for laminate countertops and solid surface like Corian, though the technique differs a bit because those materials can be glued and sanded flush instead of epoxied like stone.
The 45-degree miter is not about looks alone. It gives you the longest glue surface at the joint compared to a simple butt joint, which makes the seam stronger. On a butt joint the glue surface is just the thickness of the slab, typically 2 cm (about 3/4 inch) or 3 cm (about 1-3/16 inches). On a 45-degree miter that same thickness divided by the sine of 45 degrees stretches the contact face to roughly 1.4 times the slab thickness. That extra bonding area matters on stone, which cannot flex to absorb stress the way wood can.
Why 45 degrees and not some other angle?
Geometry. A standard kitchen corner is 90 degrees. Split it evenly between two pieces and you divide by two: 90 / 2 = 45. Both cuts are identical, which simplifies setup on a CNC bridge saw or angle grinder because you dial in one angle and cut both pieces the same way.
Fabrication software and CNC machines (common in shops since the mid-2000s) default to 45-degree miters for L-shaped layouts for exactly this reason [1]. The operator does not have to think about complementary angles. They just flip the piece.
A butt joint, where one piece runs the full length and the other butts up to its edge at 90 degrees, is simpler but weaker and less polished. You see butt joints on laminate sometimes, especially older post-form tops. On natural stone a butt joint is almost never used at an inside corner because the thin glue line tends to crack over time.
There is also symmetry. With a 45-degree miter both pieces show the same amount of cut edge at the seam. Use a 30-60 split instead and one piece shows a longer cut face, so the joint looks lopsided unless you planned for that on purpose.
What happens when the kitchen corner is not exactly 90 degrees?
This is where the real work starts, and where a lot of templating errors happen. Old houses run 89 degrees, 91 degrees, or further off. Cut both pieces at exactly 45 degrees into an 88-degree corner and you get a gap on one side of the seam.
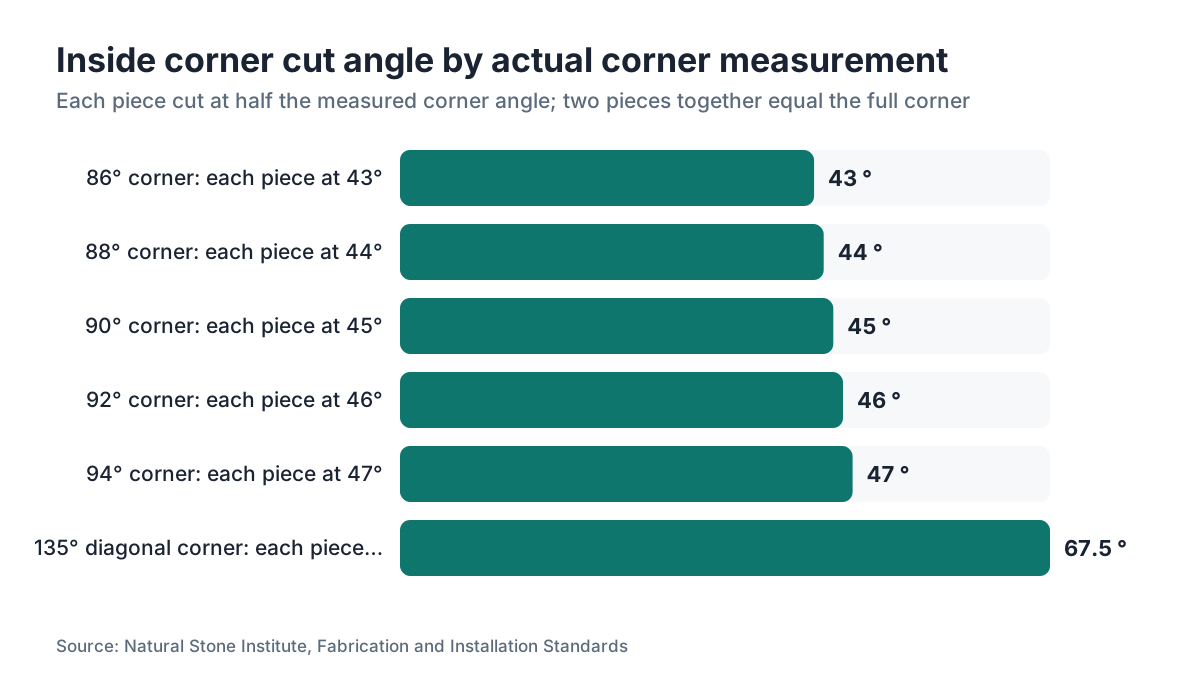
The fix is simple once you measure right. Measure the actual inside corner angle with a digital angle finder or a reliable bevel gauge. Divide that angle by two. That is your cut angle for each piece [2]. An 88-degree corner gets two 44-degree cuts. A 92-degree corner gets two 46-degree cuts.
Digital templates (laser or arm-based systems like Laser Products Industries or Proliner) capture the actual corner angle and feed it straight into the CNC file [3]. Manual templates built from cardboard or luan do the same job if the templater is careful. Either way, the measurement comes first and the cut angle comes from it. You never assume.
On site, installers often fill a small gap with color-matched epoxy and polish it down. A gap larger than about 1/16 inch is visible and counts as a fabrication error, not a normal tolerance. The Marble Institute of America (now part of the Natural Stone Institute) historically cited a maximum acceptable seam width of 1/16 inch for polished stone surfaces [4].
How is a 45-degree miter cut made in a stone fabrication shop?
Most shops make inside corner miter cuts on a CNC bridge saw or a manual bridge saw with a tilting blade head. The blade tilts to 45 degrees, the slab sits on the cutting table, and the saw makes a straight pass. On a CNC machine the cut angle and position come from the digital template file, which cuts down human error.
After the saw cut, the mitered edge gets polished to match the finished edges on the rest of the piece. Polish level matters. If the top is high-gloss and the miter face is left rough from the saw, the seam looks dull and uneven after installation. Good shops polish the miter face to at least match the top surface sheen.
For quartz and engineered stone like Cambria, the process is the same, but fabricators often pay extra attention to seam placement because the pattern in engineered stone can break at a miter if the pieces are not oriented carefully.
On site, the two mitered pieces get dry-fit first. The installer checks that the faces meet flush and the seam gap is even. Then epoxy or polyester adhesive, color-matched to the stone, goes on, the pieces are pressed together, and clamps or suction cups hold them while the adhesive sets. Excess adhesive gets shaved off with a razor blade and the seam is hand-polished.
What angle is used for a waterfall edge inside corner?
A waterfall edge is a different animal. The countertop surface wraps down the side of a cabinet or island to the floor, making a continuous vertical panel. Where the horizontal top meets the vertical panel you have an inside miter, and that joint is also cut at 45 degrees on each piece.
The difference from a standard L-shaped corner is orientation. On a waterfall, one piece is horizontal and one is vertical, and the 45-degree cut on each creates a joint that turns 90 degrees downward rather than across. The geometry is identical. The orientation is rotated.
Waterfall miters are more visible than countertop-to-countertop miters because they sit at eye level on the side of an island. So the polish on the miter face has to be perfect, and the grain or pattern match between the top piece and the vertical piece matters a lot. Fabricators who do a lot of waterfall work often book-match the slabs, flipping one piece so the veining mirrors across the joint [5].
For granite countertops, book-matching is harder because granite's pattern is random. For marble or quartzite with strong linear veining, a book-matched waterfall miter is one of the most striking things a skilled fabricator can pull off.
Is the miter angle different for L-shaped versus U-shaped countertops?
No. L-shape, U-shape, or a peninsula with multiple corners, each inside corner uses the same calculation: measure the actual corner angle, divide by two, cut each piece at that half-angle. In a U-shaped kitchen you have two inside corners, and each one gets measured and cut on its own because the two corners are rarely identical.
The complication in U-shaped layouts is piece sequencing. The center piece (the one spanning the back wall) usually gets cut first because its length is fixed by the two side walls. Then the two side pieces are cut to meet it. Order matters, because measurement errors compound if you are sloppy about which piece is the reference.
A note for homeowners reading this on a kitchen countertops project: the corner angle problem is exactly why templating happens before fabrication, not after. The fabricator sends someone to measure your actual kitchen before cutting anything. If a contractor offers to skip templating and work from builder plans, that is a red flag. Builder plans are rarely accurate to the half-degree that matters for miter cuts.
What about the inside corner where two backsplash pieces meet?
Backsplash inside corners get handled differently from countertop surface miters. On a full-height backsplash (a 4-inch slab piece or a full slab going to the upper cabinets), the inside corner is sometimes mitered at 45 degrees to match the countertop. More often, especially on tile backsplashes, the inside corner uses a simple butt joint or a radius cove cut instead of a miter [8].
For slab backsplashes in stone, a mitered inside corner looks cleaner and holds up better than a butt joint, for the same reasons as at the countertop level. The cut angle is again half the actual wall angle.
On butcher block countertops with an integral backsplash, the inside corner is usually coped or routed with a cove bit rather than mitered, because wood can be shaped that way without a fragile thin miter edge that chips. Wood also moves with humidity, so a coped joint tolerates that movement better than a rigid miter [10].
What tools measure the angle for an inside corner countertop template?
Three approaches, low-tech to high-end.
A mechanical bevel gauge (also called a sliding T-bevel) is the simplest. Press it into the corner, lock the angle, then read it off with a protractor. Accurate to maybe plus or minus 1 degree if you are careful.
A digital angle finder is better. Hold it in the corner and read the angle right off a display. Most digital angle finders used in trades are accurate to 0.1 degree, well past what countertop work needs [2]. These run $20 to $80 at a hardware store.
Laser templating systems and arm-based digitizers (like the Prodim Proliner) are what professional shops use for complex jobs. They capture corner angles as part of the full template and feed the data straight to CNC cutting files, which kills the transcription error between measuring and cutting [3]. Shops that invest in digital templating see tighter seams and fewer remakes.
For DIY laminate or Formica countertops, a digital angle finder plus a circular saw with a tilting base plate gets it done. The tolerance on laminate is more forgiving than stone because you can fill small gaps with caulk and the seam is less exposed.
How tight should an inside corner countertop seam be?
Aim for a seam you can barely feel with a fingernail. The Natural Stone Institute (which absorbed the Marble Institute of America in 2015) publishes fabrication and installation standards for dimensional stone. Their guidelines call for seams that are "tight, filled, and color-matched," with the commonly cited acceptable maximum being 1/16 inch (about 1.5 mm) on polished surfaces [4].
A seam visible as a dark line from standing height is usually acceptable but not premium work. A seam with a gap wide enough to catch debris is a quality problem, full stop.
Temperature and humidity move stone a little. Granite expands about 4 to 8 millionths of an inch per inch per degree Fahrenheit [6]. Over a 6-foot run that is almost nothing, so thermal expansion does not drive inside corner seam width. What actually opens seams over time is cabinet settling, subfloor movement, or bad support under the seam.
Shops that use SlabWise for quoting and job tracking can log seam quality notes per job, which helps when a customer calls back months later about a seam. That kind of job-level record is handy for fabricators tracking their own quality trends.
What are common mistakes with inside corner countertop cuts?
Assuming the corner is exactly 90 degrees is the most frequent error. Even in new construction, corners run off by 1 to 3 degrees routinely. Cut both pieces at exactly 45 degrees without measuring the real corner and you get a gap on one face of the miter.
Not polishing the miter face is another common one. The saw cut leaves a rough surface. Skip polishing that face before installation and the seam looks matte against a glossy top. Some shops polish to a lower grit on the miter face than on the top, which shows up as a color mismatch.
Cutting the wrong piece. On an L-shaped layout you have a left piece and a right piece, and the 45-degree cut runs in a specific direction on each. Cut both the same way and you get two left pieces. Sounds obvious. It still happens, especially when pieces get flipped on the cutting table without a clear marking system.
Over-clamping at installation. Pull the two mitered faces together too hard and you push adhesive out and create a ridge at the seam surface. The faces should meet with hand pressure once the epoxy is on, and clamps or ratchet straps should hold that position, not force the pieces tighter than they naturally fit.
Can you fix a bad inside corner cut on an installed countertop?
Sometimes. It depends on how bad the problem is.
A small gap (under 1/8 inch) can often be filled with color-matched epoxy, sanded, and polished. A skilled fabricator makes that nearly invisible on solid colors. On busy-veined stone the repair is harder to hide.
A large gap, or a step where one piece sits higher than the other at the seam, is much harder to fix in place. The right solution is usually to remove one piece, recut it, and reinstall. That means the piece has to come out without wrecking the rest of the installation, which is not always possible once epoxy has cured and the piece is fully set.
On marble countertops and other softer stones, the miter faces can sometimes be ground down in place with a hand grinder and polishing pads if the gap is a fit issue. That takes real skill and the right equipment to avoid damaging the top surface.
The honest answer: a bad inside corner cut is cheaper to fix before installation than after. That is why dry-fitting both pieces in the shop or on site before applying adhesive is standard practice, not optional.
Frequently asked questions
Is an inside corner countertop cut always 45 degrees?
Almost always, when the corner is 90 degrees. The 45-degree cut on each piece adds up to exactly 90 degrees at the joint. When a corner is not square, each cut angle is half the actual measured corner angle. So an 88-degree corner gets two 44-degree cuts, and a 92-degree corner gets two 46-degree cuts. Measure first, then calculate.
What is the difference between a miter cut and a butt joint at a countertop corner?
A miter cut angles both pieces at 45 degrees so the joint bisects the corner. A butt joint runs one piece straight and butts the second piece against its edge. Miter joints have a larger glue surface and look cleaner. Butt joints are simpler to cut but weaker and more visible. On natural stone, miters are standard. Butt joints show up on older or budget laminate countertops.
How do fabricators handle inside corner cuts on quartz countertops?
The same 45-degree miter process applies to quartz. The blade on a bridge saw tilts to 45 degrees and makes a straight cut. Quartz is slightly more uniform in thickness than natural stone, which helps seam consistency. Pattern alignment at the seam takes extra planning on quartz with strong linear designs. The miter face gets polished to match the top surface finish before installation.
Can I cut an inside corner countertop miter myself as a DIY project?
For laminate or Formica, yes, with a circular saw that has a tilting base plate and a digital angle finder. Measure the actual corner angle, divide by two, set the saw, and cut with a sharp blade. For stone, no. Stone needs a wet bridge saw, diamond blades, and polishing equipment. Cutting granite or quartz with a circular saw is dangerous and almost always produces a bad result [7].
What adhesive is used to join inside corner countertop pieces?
Polyester or epoxy adhesive is standard for stone. Most fabricators use two-part polyester for granite and quartz because it sets fast, about 10 to 15 minutes working time. Epoxy comes out when more open time is needed or when the stone reacts badly to polyester (some marbles can discolor). The adhesive gets color-matched with pigment kits. Solid surface like Corian uses a manufacturer-specific joining adhesive.
How do I measure the angle of my inside corner before ordering countertops?
Use a digital angle finder, $20 to $80 at hardware stores. Hold it flat in the inside corner and read the angle. Write the number down and share it with your fabricator. Better yet, tell your fabricator you want them to template in person before fabrication. Professional fabricators use digital templating systems that capture corner angles precisely and feed them straight into CNC cutting files.
Why does my inside corner countertop seam have a gap on one side?
The likely cause is that the cuts were made at exactly 45 degrees but the actual corner is not exactly 90 degrees. If the corner is 88 degrees, a 45-45 miter leaves a 2-degree gap on one face. The fix is to recut one piece at the correct half-angle based on the actual measured corner. Small gaps under 1/16 inch can be filled with color-matched epoxy.
What is an acceptable seam width for an inside corner countertop joint?
The Natural Stone Institute cites a maximum acceptable seam width of 1/16 inch (about 1.5 mm) for polished stone surfaces. In practice, high-quality shops aim for seams tight enough that you can barely feel them with a fingernail. Seams filled with color-matched epoxy and polished flush are the standard finish. A gap wide enough to catch food debris is a quality problem the fabricator should address.
Does the angle change for inside corners on thick countertops, like 6 cm mitered edges?
No, the corner angle stays the same. A 6 cm (double-stacked or true thick slab) countertop still uses a 45-degree miter at a 90-degree inside corner. The larger miter face makes the joint stronger and easier to clamp. Some fabricators like thick miters because there is more polished face to work with when blending the seam. The calculation is always half the actual corner angle, regardless of thickness.
What angle is used for a 45-degree angled inside corner, like in a diagonal kitchen layout?
A diagonal wall creates a corner that is 135 degrees on the inside face, not 90. To miter into it you divide 135 by 2, giving 67.5 degrees on each piece. That is a much shallower cut than the standard 45-degree miter. CNC machines handle it easily once programmed, but it is less common on a manual bridge saw and needs careful setup. Always measure the actual corner angle rather than assuming.
How does countertop installation handle inside corners that are slightly out of square?
Two ways. First, the fabricator cuts the pieces to the exact measured angles so the miter fits the real corner. Second, if a small gap remains at the wall where the countertop meets the backsplash, caulk fills it and the backsplash or tile covers it. The seam between the two countertop pieces, though, needs to be cut correctly. Caulk covers the wall gap, not the joint between the stone pieces.
Is the inside corner angle different for outdoor countertops or BBQ setups?
No, the geometry is the same. An outdoor kitchen inside corner at 90 degrees still uses two 45-degree miter cuts. The material may differ (porcelain and concrete are common outdoors) and the adhesive needs to be rated for exterior use, but the cutting angle calculation is identical. Thermal expansion matters a bit more outdoors, so some fabricators leave a slightly wider seam and fill with flexible exterior-grade sealant rather than rigid polyester.
Can the inside corner seam be avoided entirely in countertop design?
Sometimes. If the countertop is a simple L-shape and one run is short enough, a fabricator might cut the entire L from a single slab, eliminating the inside corner seam. This needs a slab large enough and a CNC machine or bridge saw with enough travel. Slabs rarely exceed about 10 feet by 5 feet, so long L-shaped layouts almost always need a seam. Ask your fabricator if your layout is compact.
Sources
- Natural Stone Institute, Fabrication and Installation Standards: CNC bridge saws and fabrication software default to 45-degree miters for L-shaped countertop layouts, treating both cuts as identical angles derived from the measured corner.
- NIST, Handbook 44 (Specifications, Tolerances, and Other Technical Requirements for Weighing and Measuring Devices): Digital angle finders used in trades are accurate to 0.1 degree, sufficient for countertop miter calculations.
- Natural Stone Institute, Dimension Stone Design Manual, Countertop Seam Standards: Maximum acceptable seam width for polished stone countertop surfaces is 1/16 inch (approximately 1.5 mm).
- Natural Stone Institute, Technical Bulletin: Waterfall Edge Applications: Book-matching slabs for waterfall miter joints is an accepted technique, especially for stone with strong linear veining patterns.
- U.S. Geological Survey, physical properties of granite and dimension stone: Granite has a low coefficient of thermal expansion, roughly 4 to 8 millionths of an inch per inch per degree Fahrenheit, so thermal movement over a countertop run is minimal.
- OSHA, Stone and Marble Cutting Operations Safety Guidance: Stone cutting with wet bridge saws and diamond blades requires appropriate guarding and training; attempting to cut granite with a standard circular saw creates safety hazards.
- American National Standards Institute, ANSI A108 Tile and Stone Installation Standards: Inside corner butt joints on tile and stone backsplashes are addressed separately from countertop surface miter joints in installation standards.
- OSHA, Respirable Crystalline Silica standard for general industry: Dry cutting of stone is restricted under OSHA silica exposure rules; wet cutting with diamond blades is the standard in professional shops.
- University of Florida IFAS Extension, wood properties and moisture movement: Wood species used in butcher block countertops expand and contract with humidity, making cope and rout inside corner treatments preferable to rigid miters in wood applications.
Last updated 2026-07-11