TL;DR
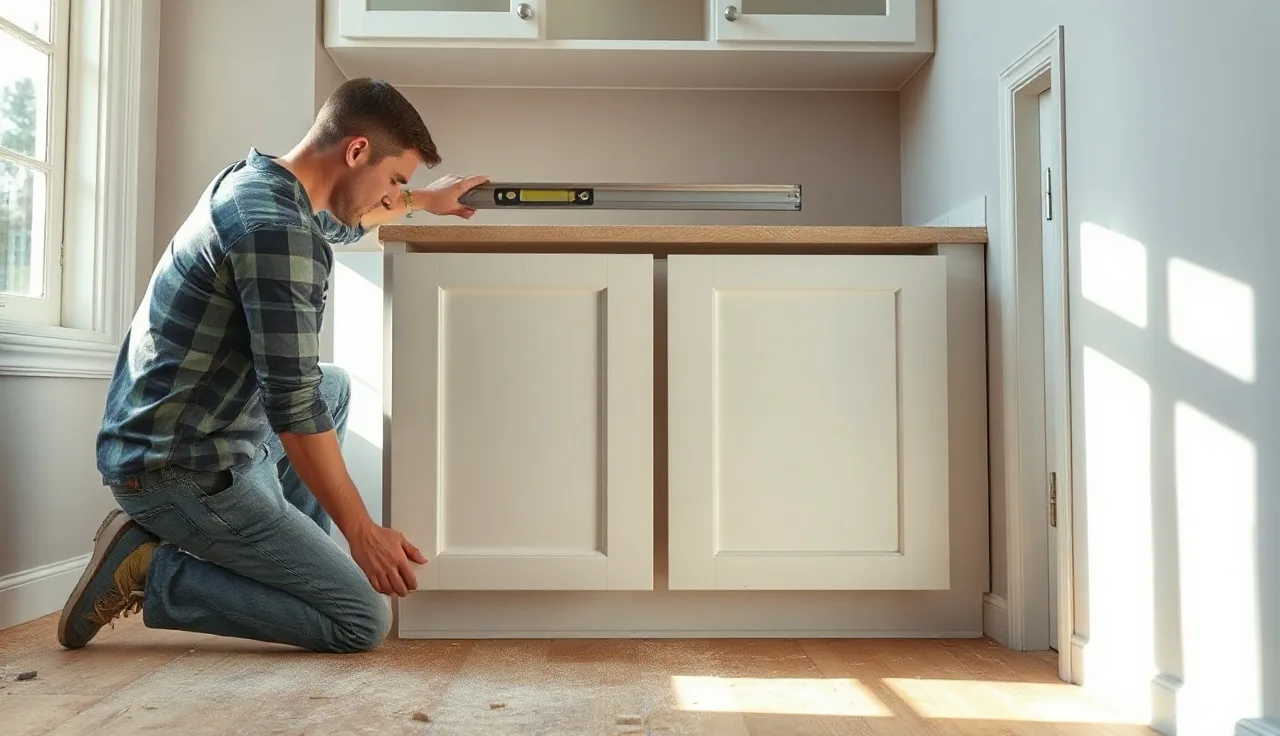
- Cabinets need to sit within 1/8 inch of level across their full run before any countertop goes down.
- Check with a 4-foot level and a long straightedge.
- Shim low spots with composite or hardwood wedges, screw the boxes to studs, and confirm the plane is flat before the fabricator templates.
- The whole job takes two to four hours with basic tools.
Why does cabinet leveling matter so much for countertops?
Stone cracks. That is the short answer. A slab of granite or quartz sitting on an uneven cabinet run picks up stress at every high point, and those points fracture, sometimes the moment installers set the slab down, sometimes months later. The slab does not flex. The cabinets are the foundation, and foundations have to be flat.
This is not only a stone problem. Laminate countertops bow and gap at seams when the substrate wanders. Butcher block countertops cup or split along glue lines. Even Corian countertops and other solid-surface materials, which tolerate a little flex, lose joint quality if the base is far out of plane.
The practical standard in fabrication is 1/8 inch across any 10-foot run [1]. Some shops tighten that to 1/16 inch for thinner slabs, and they are right to: 2 cm material cracks more easily than 3 cm. Ask your specific fabricator before templating, because their tolerance is the one that binds you.
There is a warranty angle too. Most engineered stone makers, including Cambria [1], put substrate flatness on the installer in their written guidelines, and they exclude cracks caused by an unlevel base. You paid a lot for that slab. Spending two hours on leveling to protect it is simple math.
What tools do you need to level cabinets?
You do not need specialty gear. Here is what actually gets used.
Level. A 4-foot spirit level is the minimum. A 6-foot or 8-foot level is better because it spans multiple boxes and reads the overall plane instead of one local dip. Digital levels are nice, not required.
Long straightedge. A 6- to 8-foot aluminum mason's straightedge (or the factory edge of a melamine sheet) laid across the cabinet tops finds the humps and lows a level misses.
Tape measure and pencil. You mark the high point, then measure down to every other cabinet top.
Shims. Composite plastic shims resist compression and moisture better than wood over time. Hardwood wedge shims work fine too. Cedar shingles are traditional and still acceptable, though they compress a little under heavy stone.
Drill and screws. 2-1/2-inch to 3-inch coarse-thread screws fasten the boxes to studs once leveled.
Stud finder. You want real stud locations, not guesses.
Laser level (optional, very useful). A self-leveling cross-line laser set at cabinet-top height lets you read the gap at every box at once instead of shuffling a spirit level down the run. For a long L-shape or an island, a laser saves real time [2].
How do you find the high point before you start shimming?
Find the high point first. Most DIYers skip this step, and skipping it causes trouble. Shim random low spots without knowing where the high point is, and you end up lifting some cabinets so far that doors hit the ceiling or the toe kick gap vanishes.
Here is the sequence:
- Set your long straightedge or 4-foot level on top of the run and find every high point. Mark each box's top rail with a pencil.
- Identify the single highest point in the whole run. Every other cabinet gets shimmed up to match it, never pushed down.
- Measure the gap between the straightedge (resting on that high point) and each lower cabinet top. Write the number on a piece of tape stuck to the front of each box.
- On an L-shaped or U-shaped kitchen, survey each run separately, then reconcile the corner.
A self-leveling laser is the easiest tool here. Set it on a tripod or clamp it at cabinet-top height, spin the line along the tops, and read the gap at each box directly. On a 12-foot run of base cabinets, a laser cuts this survey from about 30 minutes to 10 [2].
Check one thing before any of this. Make sure the cabinets actually sit on the floor, not on debris, an old flooring lip, or a folded-over underlayment edge. Clean under each box before you measure.
How do you shim cabinets to level them?
Shimming is physical, not complicated. Work from the high point outward.
Step 1: Loosen the cabinets. If the boxes are already screwed to the wall, back the screws out enough that they can move vertically. Do not pull the screws all the way.
Step 2: Slide shims under the low boxes. At each cabinet that needs to come up, slide shim pairs (one from the front, one from the back, overlapping like scissors) under the base. Tap them in with a hammer until the level reads flat across the top and plumb on the face.
Step 3: Check both directions. Level front-to-back as well as side-to-side. Front-to-back gets ignored constantly, and it makes a countertop look tilted toward or away from the wall.
Step 4: Screw to studs. Once a box sits at the right height, drive 2-1/2-inch screws through the back hanging rail into the studs. The studs carry the load. Drywall anchors will not hold a cabinet bearing stone, which runs 15 to 20 pounds per square foot for 3 cm granite [3].
Step 5: Score and snap the shim tails. With the screws in, score the excess shim with a utility knife and snap it flush with the base. This matters if you are installing toe kicks that have to sit flat.
Step 6: Recheck. Run the straightedge across the full run one more time. Check the diagonals on any L-shape. No point should rock, and no gap should exceed 1/8 inch [1].
What if the floor is so uneven that shimming alone won't work?
Sometimes the floor has a wave or hump that shims cannot fix without lifting cabinets so high they become useless. A 1-inch variation over 10 feet is common in older homes, and that is too much for shims alone.
You have a few options.
Self-leveling underlayment. For a floor that dips in the middle or in one area, a pourable self-leveling compound fills the lows. You prep, prime, pour, and wait for the cure before setting cabinets. Products like Ardex and Mapei call for a 24-hour cure before you load the surface [9][10]. This is the cleanest fix, and it adds a day.
Plywood platform. Some installers build a level plywood platform (a sleeper platform) across the whole cabinet footprint using pressure-treated lumber or plywood shimmed level, then set every cabinet on top. Common in commercial kitchens, and it works in homes too. It raises the finished counter a little, so measure clearance to your uppers first. Standard clearance from countertop to the bottom of upper cabinets is 18 inches [4].
Grinding a high spot. If a single hump in a tile or concrete floor throws everything off, a 4-inch angle grinder with a diamond cup wheel takes it down. Dusty, but often the most direct fix.
For most residential kitchens, shims handle the variance. The self-leveling route makes sense when you are already deep in a full renovation and the floor is genuinely bad.
How level do cabinets need to be for different countertop materials?
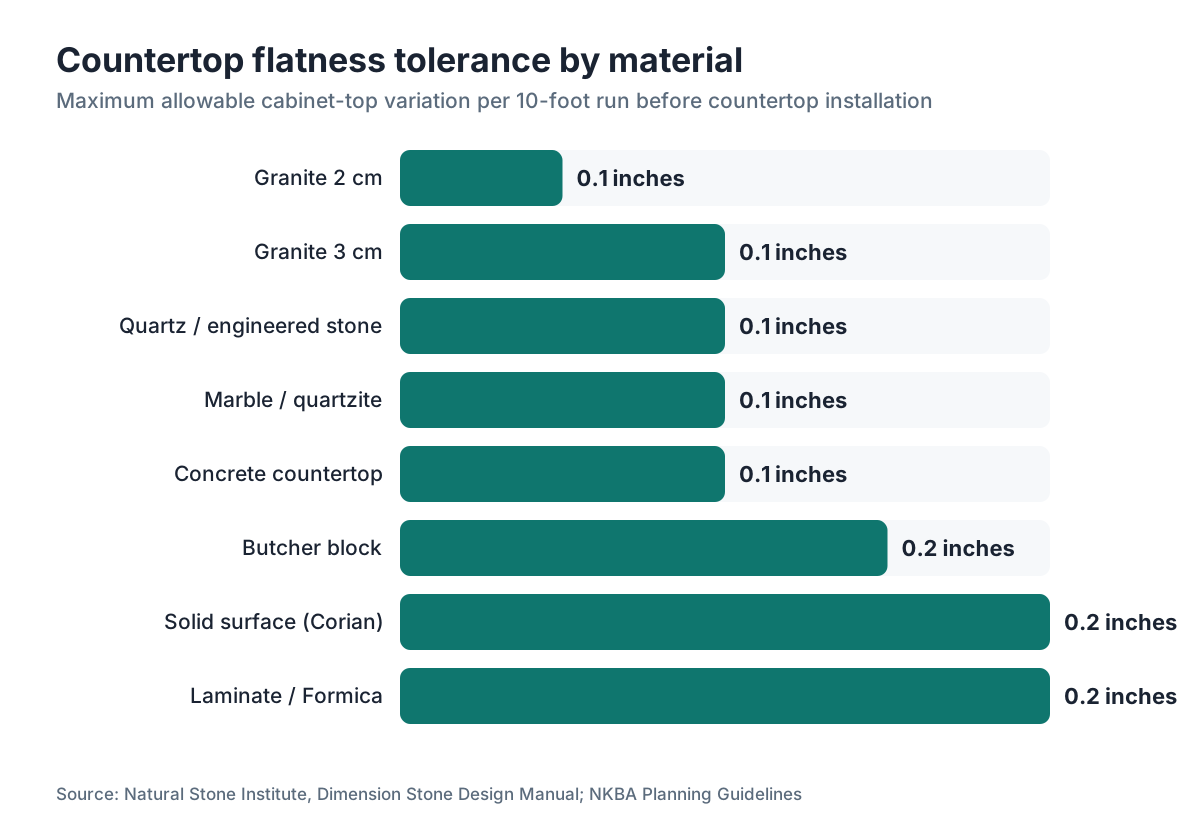
Tolerance varies by material. Knowing the threshold for your countertop type tells you how much effort the job deserves.
| Countertop Material | Typical Flatness Tolerance | Notes |
|---|---|---|
| Granite (3 cm) | 1/8 inch per 10 ft | Standard industry spec [1] |
| Granite (2 cm) | 1/16 inch per 10 ft | Thinner slabs crack more easily |
| Quartz / engineered stone | 1/8 inch per 10 ft | Most manufacturers require this in writing |
| Marble | 1/8 inch per 10 ft | Softer stone, same structural risk |
| Quartzite | 1/8 inch per 10 ft | Similar to granite |
| Butcher block | 3/16 inch per 10 ft | More forgiving, but glue lines split if severe |
| Laminate / postform | 1/4 inch per 10 ft | Adhesive-backed, some flexibility |
| Solid surface (Corian, etc.) | 1/4 inch per 10 ft | Can be scribed; most flexible option |
| Concrete | 1/8 inch per 10 ft | Heavy and brittle; same as stone |
For granite countertops and marble countertops, there is no room for interpretation. The 1/8-inch standard is the point where stress in the stone turns structural. For laminate countertops and Formica countertops, you get more latitude, though seams gap if the base is really uneven.
Planning any kitchen countertops project? Ask your fabricator before the template appointment. Their requirement may be tighter than the table above, and their number wins.
Do you need to level cabinets for an island differently than wall cabinets?
Islands are trickier in one way: you cannot anchor them to a wall, so all the load rides on the floor attachment and the cabinet's own structure.
Level an island the same way, high-point method with shims, but pay extra attention to the floor fastening. Most freestanding island cabinets screw down through the toe kick into a floor cleat, or through the cabinet bottom straight into the subfloor. Use 2-1/2-inch screws into solid subfloor, not into the finish flooring.
An island also needs a flatness check across its own top, since it usually has no wall to reference. Run the straightedge diagonally, more than along the long axis, because a twist (two corners high, two low) will rock any rigid top you set on it.
Big islands take real weight. A 6-foot island in 3 cm quartzite can run 200 pounds or more [3], and some fabricators add support legs or corbels mid-span for that. Check the overhang spec for your material. Most stone shops limit unsupported overhang to 10 to 12 inches without corbels [5].
Should you check cabinet level before or after the fabricator templates?
Before. Always before. This is the single biggest scheduling mistake homeowners make.
The template is cut to the exact dimensions of the space as it exists on template day. If the cabinets shift or get re-leveled after templating, the countertop may not fit. Seams move. The front edge stops aligning with the cabinet faces. Gaps open at the wall.
The right order is: install cabinets, level and fasten them fully, set the sink (or at least confirm its position), confirm appliance locations, then call for the template. Once the template is done, nothing moves.
Most professional fabricators check level themselves during the template visit and flag concerns, but they are not there to fix your cabinets. Find a problem on template day and the visit usually gets rescheduled, which costs time and often a second template fee.
Fabricators using digital templating software (SlabWise captures precise field measurements and turns them straight into shop drawings and cut files) produce the most accurate templates, but they are only as accurate as the surface being measured. A flat, level cabinet run is what makes digital templating work.
For the full run-through of installation day, see countertop installation.
What about plywood subtops, do you need one?
A plywood subtop (also called a cabinet subtop or substrate) is a layer of 3/4-inch plywood screwed across the cabinet tops before the countertop goes down. It was standard for decades, especially under laminate and tile.
For modern stone and engineered stone, most fabricators do not require one. Many actively do not want it, because it adds height, changes the finished elevation, and can bring its own flatness problems if the plywood warps or went down uneven.
What stone shops do require is that the cabinet top rails (the wood frame at the top of each box) are present, solid, and in the same plane. The perimeter rail is where the silicone or adhesive bead goes. On frameless cabinets (European-style, with a particleboard or plywood top panel), the top panel does the same job.
Plywood subtops are still standard for butcher block countertops and laminate, where you need a continuous, screwable surface. They also help under thin or fragile materials, where you want load spread across the whole bottom rather than just the perimeter rails.
Unsure? Ask your fabricator directly. Their preference beats any general rule, including this one.
How do you check your work before the fabricator arrives?
Run through this the day before the template appointment.
- Straightedge test across the full run. No gap over 1/8 inch anywhere. Check every direction: along the wall, front-to-back, and on the diagonal for any L or U layout.
- Cabinet-to-wall gap. The back of the countertop gets scribed to the wall, but flag extreme wall irregularities (more than 3/4 inch) with the fabricator in advance.
- All cabinets fastened to studs. Shake each one gently. Nothing should move.
- Sink base confirmed. The sink cutout gets locked in at templating. Undecided on sink type? Decide now. Undermount sinks need the hole cut in the slab at the shop.
- Cooktop or range location confirmed. Note whether any appliance is slide-in versus freestanding, because that changes the countertop edge at the opening.
- Finished flooring in place. Installing tile or hardwood after the counters? Tell the fabricator. The slab may need to be scribed higher, or a reveal gap planned.
- No loose debris on cabinet tops. The templater needs clean access to every surface.
A quick phone video of the whole space, panning for obvious highs and lows, is worth the minute. Send it to the fabricator if any condition looks unusual.
Can unlevel cabinets cause problems after the countertop is already installed?
Yes, and the timeline runs from immediate to months out.
The fastest problem is cracking during install. Force a slab down onto high points, or clamp a seam tight over an unlevel base, and stress fractures can appear while the adhesive is still wet.
The slow problem is differential settlement. Wood cabinets, especially ones shimmed with compressible junk like cedar or cardboard (never use cardboard), slowly give under the weight of stone. A 30-square-foot granite top weighs 400 to 600 pounds [3]. Over six to twelve months, even small compressions crack a seam or open a gap at the wall.
There is a livability problem too. Unlevel counters pool water in one corner. Cutting boards rock. A rolling pin drifts on its own. Minor on their own, but together they tell you the install was off.
Suspect your existing counters sit on unlevel cabinets? Set a marble or a small level on the surface. If it rolls straight for one corner, the base is likely out. From there the fix depends on how bad it is and whether the slab is already glued down. Small adjustments after the fact are possible sometimes, and always harder than getting it right the first time.
Frequently asked questions
How much out of level can cabinets be before countertops crack?
The standard fabrication tolerance is 1/8 inch across any 10-foot run for stone like granite, quartz, and marble. For 2 cm (thinner) slabs, some fabricators tighten that to 1/16 inch. Variations past 1/8 inch create stress that can crack stone during installation or later as the slab bears its own weight over time.
What is the best shim material for leveling cabinets under stone countertops?
Composite plastic shims are the best choice under stone because they resist compression and moisture better than wood over time. Hardwood wedge shims are a solid second option. Avoid cedar shingles for primary load-bearing shims under heavy stone, since they compress slowly. Never use cardboard or foam, which crush and let the cabinet shift.
Can I level cabinets after the countertop is already templated?
You should not. The template is cut to the exact dimensions of the space as it existed on template day. Re-leveling after templating can move seam locations and edge alignments, making the fabricated slab a poor fit. If you find a leveling problem after templating, tell the fabricator immediately so they can retake measurements before cutting.
Do I need a plywood subtop under granite or quartz countertops?
Most stone fabricators do not require a plywood subtop, and many prefer to skip it. They rely on the cabinet top rails or top panels as the bearing surface. A subtop adds height, can warp, and may introduce its own flatness problems. Confirm the preference with your specific fabricator, since it varies by shop and material.
How do I level cabinets on an uneven tile floor?
Use the high-point method: find the highest tile or grout line under any cabinet, set that as your reference plane, and shim every other cabinet up to match. For variations over 1/2 inch, a self-leveling underlayment compound poured before cabinet installation beats stacking multiple shims. Composite stacks taller than about 3/4 inch get unstable under heavy stone.
How long does it take to level kitchen cabinets before a countertop installation?
For a typical kitchen with 15 to 25 linear feet of base cabinets, expect two to four hours if floor variation is modest (under 1/2 inch). Complex layouts, L-shaped or U-shaped runs with islands, or floors with big variations can take a full day. A laser level cuts survey time a lot compared to working with only a spirit level.
Can a fabricator level the cabinets during the template visit?
A template technician is there to measure, not to fix your cabinets. If they find real levelness problems, many will note it and reschedule the visit until it is corrected, which often means a second trip fee. Having cabinets level and fully fastened before the templater arrives is the homeowner's or contractor's job.
Do frameless (European-style) cabinets need different leveling procedures?
The procedure is the same, but frameless cabinets rely on their top panel rather than a face frame rail as the bearing surface. Make sure the top panel is solid, undamaged, and flush with adjacent boxes. Frameless cabinets often have adjustable leveling legs built in, which speeds the job since you turn a leg instead of tapping in shims.
How do I check that cabinets are level front to back, more than side to side?
Place your 4-foot level running from the wall to the front edge of the cabinet top. It should read level or pitch very slightly toward the front (1/16 inch is fine and helps drainage). A cabinet that tilts toward the wall pools water at the back of the countertop and can look noticeably wrong once the counter is on.
What happens if one cabinet is high and I can't lower it?
You cannot push a cabinet down, only shim others up to match. If one box is genuinely too high from a floor hump or a structural issue, your options are: grind the floor hump down, have a carpenter shave the cabinet base, or accept a counter that runs slightly high in that area. Standard counter height is 36 inches; document any deviation for the fabricator.
Does cabinet leveling matter for laminate or Formica countertops too?
Yes, though the tolerance is more forgiving. Laminate and Formica handle up to about 1/4 inch variation per 10 feet without visible problems. Past that, seams open, the front edge gaps away from cabinet faces, and postform cove sections pull off the wall. Level cabinets also make laminate installation faster because scribing and trimming drop way down.
Should cabinets be screwed to the wall before the countertop goes in?
Yes. Every cabinet has to be fully fastened to wall studs, more than shimmed, before the countertop goes on. Stone weighs 15 to 20 pounds per square foot and relies on the cabinets staying exactly put. A cabinet that is shimmed but not screwed can tip or shift under that load. Use 2-1/2-inch to 3-inch screws into actual studs, not drywall anchors.
What is the standard countertop height, and does shimming change it?
Standard base cabinet height is 34-1/2 inches, and with a countertop the finished surface lands around 36 inches, the residential standard. Shimming adds height, so 1/4 inch of shims to bring low cabinets up to the high point makes the counter 1/4 inch higher there. For most kitchens that is imperceptible, but note it if you have an integrated appliance with a fixed height.
Sources
- Natural Stone Institute (formerly Marble Institute of America), Dimension Stone Design Manual: Industry standard flatness tolerance of 1/8 inch per 10-foot run for stone countertop substrates; substrate flatness is the installer's responsibility
- U.S. Department of Energy, Office of Energy Efficiency and Renewable Energy (Building Technologies): Laser levels reduce layout survey time on residential renovation tasks
- Natural Stone Institute, Technical Bulletin on Stone Weight and Structural Loads: 3 cm granite weighs approximately 15 to 20 pounds per square foot; a 30 sq ft slab weighs 400 to 600 pounds
- National Kitchen and Bath Association, NKBA Kitchen Planning Guidelines: Standard clearance between countertop surface and bottom of upper cabinets is 18 inches
- Natural Stone Institute, Countertop Fabrication Guidelines for Overhang Support: Most stone fabricators limit unsupported overhang to 10 to 12 inches without corbels or additional support
- Cambria, Installation and Care Guidelines (official product documentation): Cambria installation guidelines state substrate flatness is the installer's responsibility and cracks from unlevel bases are not warranted
- International Code Council, International Residential Code (IRC): Structural fastener requirements for cabinet attachment to wall framing members
- NKBA, Kitchen and Bath Planning Guidelines with Access Standards: Standard residential countertop finished height is 36 inches; standard base cabinet height is 34-1/2 inches before countertop
- Tile Council of North America, Handbook for Ceramic, Glass, and Stone Tile Installation: Self-leveling underlayment products require 24-hour cure time before setting loads on the surface
- Ardex Americas, Self-Leveling Underlayment Product Data Sheets: Pourable self-leveling compounds can correct floor irregularities before cabinet installation in residential kitchens
Last updated 2026-07-10