TL;DR
- Stone countertops weigh 15 to 20 pounds per square foot, enough to overwhelm cabinets built for laminate.
- Before the fabricator arrives, check every cabinet box for level and plumb, confirm the boxes are screwed to wall studs, and add a plywood subtop or blocking wherever the top rails are weak.
- Most kitchens need 2 to 4 hours of prep, not new cabinets.
Why does cabinet reinforcement matter for stone countertops?
Stone is heavy, and cabinets that carried laminate for 20 years were never asked to hold this kind of weight. A 30-square-foot island top in 3/4-inch granite runs roughly 450 to 600 pounds before you cut the sink hole. Stock cabinets from home centers are built for laminate or solid-surface tops that weigh 3 to 5 pounds per square foot. Granite, quartzite, and marble land at 15 to 20 pounds per square foot in 3/4-inch material, and 3 cm (about 1-3/16 inch) slabs push that to 19 to 23 pounds per square foot [1].
That gap matters in two ways. The cabinet boxes can rack or bow if they were never fastened well to the wall or to each other. And the top rail, the part the countertop rests on, is usually just 3/4-inch particleboard or MDF. Under a steady point load, those rails compress and go uneven, which puts stress on a slab that has almost no give before it cracks.
Granite has a modulus of rupture around 1,500 to 2,000 psi, which is a fancy way of saying it breaks instead of bends [2]. Any cabinet sag past 1/8 inch across a span concentrates stress at the low point and eventually splits the stone. Cabinet prep is not cosmetic. It is structural, and it decides whether your countertop lasts.
How much do stone countertops actually weigh?
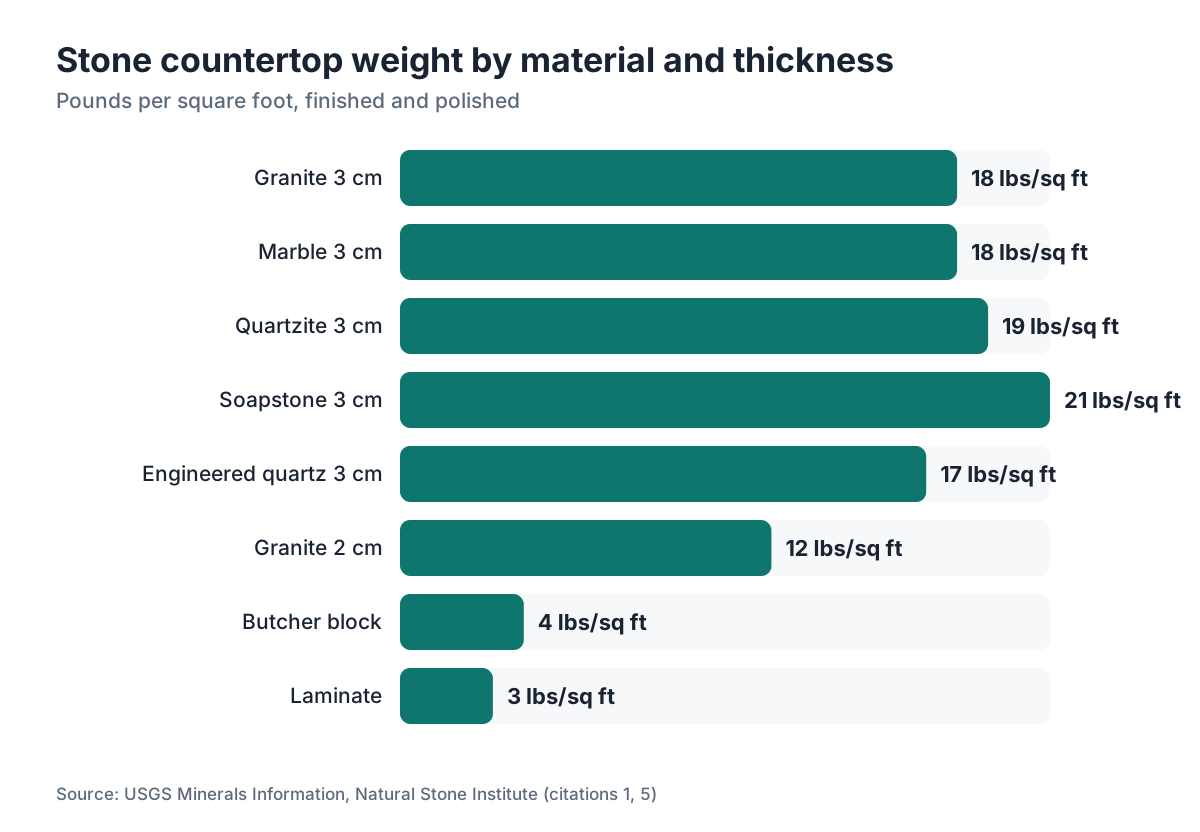
A 3 cm granite top weighs about 18 pounds per square foot, so a 10-foot run of 25-inch-deep counter comes in near 500 pounds. Here is a quick reference by material and thickness, based on published densities and standard slab dimensions. These figures are per square foot of finished, polished stone.
| Material | 2 cm thickness | 3 cm thickness |
|---|---|---|
| Granite | 11 to 13 lbs/sq ft | 16 to 20 lbs/sq ft |
| Marble | 11 to 13 lbs/sq ft | 16 to 20 lbs/sq ft |
| Quartzite | 11 to 13 lbs/sq ft | 17 to 21 lbs/sq ft |
| Engineered quartz (e.g., Cambria) | 10 to 12 lbs/sq ft | 15 to 18 lbs/sq ft |
| Soapstone | 13 to 15 lbs/sq ft | 19 to 23 lbs/sq ft |
| Butcher block | 3 to 5 lbs/sq ft | N/A |
| Laminate (Formica) | 2 to 4 lbs/sq ft | N/A |
The numbers for granite countertops and marble countertops are nearly identical because both are silicate or carbonate minerals with densities around 160 to 175 pounds per cubic foot [1]. Engineered quartz like Cambria countertops runs a touch lighter because of the polymer binder mixed into the stone.
Back to that 500-pound run. Four standard base cabinets share the load, so each carries about 125 pounds on its top rail. That is fine if the cabinet is built well and fastened tight. It is marginal if the box has shifted, the shims have compressed, or the top rails were never glued and stapled properly in the first place.
What tools and materials do you need before you start?
You do not need a cabinet shop for this. Basic carpentry tools and a short materials list cover almost every kitchen.
Tools: a 4-foot level (a 2-foot level misses gradual sags), a tape measure, a stud finder, a drill, a circular saw or table saw for ripping plywood, a jigsaw for cutouts, a screw gun, and clamps. A laser level earns its keep here. A $40 rotary laser from a home center shows you every cabinet height across the run in seconds instead of leapfrogging a spirit level down the counter.
Materials: 3/4-inch cabinet-grade plywood (not OSB, not particleboard) for subtops and blocking; 2-1/2-inch to 3-inch cabinet screws; construction adhesive; composite plastic shims, which hold their size better than wood over time; and silicone caulk to seal any plywood edges near a sink.
Budget $50 to $150 in materials for a typical kitchen, depending on how much plywood you cut. Hire a carpenter for the prep and expect $200 to $500 in labor, driven by your market and how rough the existing cabinets are.
How do you inspect cabinets before the stone arrives?
Start with level, then work through plumb, box-to-box fastening, wall anchoring, and water damage. Run your 4-foot level across every top rail in both directions. The target most fabricators work to is within 1/8 inch over 10 feet [3]. Many want the surface within 3/16 inch before they will set stone without shimming, and some refuse to shim a heavy slab at all because silicone shimming is a liability they will not carry.
Check plumb on every cabinet face. A box that leans toward or away from the wall puts a twisting load on the countertop overhang.
Check that adjacent boxes are screwed to each other. Open every door and look for the face-frame screws (or confirmat screws on frameless boxes) that tie the cabinets together. Missing or loose, and the boxes drift and create a lip at the seam between two pieces of stone. That lip telegraphs as a visible misalignment even after a perfect seam.
Check fastening to the wall. Every base cabinet needs at least two screws into wall studs through the hanging rail at the back. Standard stud spacing is 16 inches on center, so a 24-inch cabinet gets two fastener points [4]. Grab the cabinet and pull hard. Any movement means it is either shimmed on an unlevel floor without wall anchoring, or the screws have pulled through the rail.
Look for water damage last. Soft spots in the cabinet bottom or swelling in the top rail mean the particleboard has lost most of its strength. You can skin the top with plywood, but if the box sides are shot, replace the box before you set 500 pounds of stone on it.
How do you level and shim base cabinets properly?
Level from the high point, never the low point. Find the highest corner in the whole run with your level or laser, then bring every other cabinet up to meet it. You cannot lower a floor, so you always build up.
For adjustments under 1/4 inch, composite plastic shims under the legs or base do the job. Most modern base cabinets have adjustable legs; a flat-blade screwdriver turns the foot up or down. Older site-built boxes usually need shims under the base.
For adjustments over 1/4 inch, you have two real options. One is a solid wood filler strip ripped to the exact thickness, glued and screwed under the low side. The other is adjustable legs set to height and then locked. Do not stack a bunch of loose thin shims. They compress and shift under load, and the counter goes out of level a month later.
Once the cabinet is level, check that the face frames of adjacent boxes sit flush. A flush face frame at the front usually means the top rails are close to coplanar. If the faces line up but the tops do not, the box is twisted, and it needs to come off the wall, get squared, and get re-hung.
Fabrication software like SlabWise lets shops record field conditions like out-of-level cabinets right in the job file, so the templating crew knows what waits for them before they load the truck. That one note between homeowner and fabricator kills a lot of day-of surprises.
Do you need a plywood subtop (buildup layer) under stone?
Not always. Three things decide it: the cabinet construction, the stone thickness, and the span.
For 3 cm stone on fully assembled, wall-fastened cabinets with solid top rails, a subtop is often optional. Plenty of US fabricators set 3 cm granite straight on the rails and call it done. The slab is stiff enough to bridge small gaps.
For 2 cm stone, a plywood subtop is almost always required. Two-centimeter material (about 3/4 inch) has very little beam strength and cracks across unsupported spans past about 18 inches, especially around sink cutouts where two sides of the slab are gone. The Marble Institute of America (now part of the Natural Stone Institute) has long recommended a minimum 3/4-inch plywood substrate under 2 cm stone [5].
For cabinets with weak or damaged top rails, add a subtop no matter the stone thickness. A full sheet of 3/4-inch plywood spreads the load across every rail at once and kills the point loading.
For spans over 24 inches with no cabinet below, plan on a subtop plus a support bracket. Seating overhangs of 12 to 15 inches are fine unsupported in 3 cm stone. Longer than that, you need steel or wood corbels.
Installing the subtop is simple. Cut 3/4-inch plywood to the cabinet footprint, leaving the overhang dimension at the front. Run a bead of construction adhesive on every top rail. Screw down through the plywood into the rails every 8 to 12 inches. Check for flat one more time after the screws are set, because driving into a low rail pulls the plywood down and creates a fresh dip right where you did not want one.
How do you add support for an island or peninsula?
Islands and peninsulas carry the same weight as perimeter cabinets with one extra problem: they often have no wall attachment at all. A free-standing base has to route every pound through its own frame and legs to the floor.
Start with the floor connection. Most code-compliant island cabinets in the US are toe-kicked and shimmed but never bolted down. Fine for laminate. For stone, confirm the base cannot slide or tip. The standard method is to secure the base with L-brackets at the toe kick into the subfloor. If the subfloor is concrete (common in slab-on-grade construction), use concrete anchors [6].
Check the internal structure next. Many IKEA-style and budget islands use thin particleboard for shelves and side panels, with top rails that are 3/4-inch particleboard edge-glued to the sides. That glue joint fails under steady shear. Reinforce it with a 2x4 or 2x6 ledger inside the cabinet, running front to back, screwed through the side panels.
For large islands over 4 feet on the long dimension, add a center support leg or a mid-span ledger. A 6-foot island top at 25-inch depth in 3 cm granite carries roughly 190 pounds. With no mid-span support, the two ends hold that load across a 6-foot span and the slab turns into a beam. Stone is a terrible beam. A single center leg or a steel channel welded to the base frame takes the bending stress out entirely.
Seating overhangs follow the same rules as everywhere else. 3 cm stone cantilevers 10 to 12 inches safely with no bracket. From 12 to 15 inches, most fabricators and the Natural Stone Institute call for steel corbels at 18 to 24 inch intervals [5]. Past 15 inches, you are into engineered bracket territory and should get it drawn up.
What do you do about a corner cabinet or lazy Susan base?
Corner cabinets run out of level more than any other box, because the blind-corner unit often sits differently than the straight run beside it. Put your level on the corner rail specifically before the fabricator templates, and fix it there.
Lazy Susan bases have a spinning mechanism inside that sometimes sits proud of the top rail. Drop or remove the rotating shelf hardware before template day, and leave clearance for anything that pokes above the rail line.
For L-shaped layouts, the miter joint (the diagonal cut at the inside corner) lands right over that corner cabinet. That joint is the single most stress-sensitive point on the whole countertop. Any flex in the corner cabinet cracks the miter over time. If you add a subtop anywhere, the corner is where it pays off most.
How do you handle wall cabinets and upper support?
Upper wall cabinets never carry stone weight, so reinforcement is not the issue up there. Clearance and fastening are. The installer needs open wall space above the counter to swing and set the slab.
Make sure every upper cabinet is fully screwed to studs through the hanging rail before stone day. A loose upper that gets bumped during a heavy carry can drop or gouge the slab. The Kitchen Cabinet Manufacturers Association standard calls for wall cabinets fastened through a 3/4-inch rail into studs with a minimum #10 screw [7].
Clearance between the uppers and the future countertop should be 15 to 18 inches for comfortable prep, but structurally you just need enough room to slide the slab in from the front. For a 25-inch-deep counter going under a 12-inch-deep upper, that usually means the uppers sit at 54 inches above finished floor or higher.
What should you tell your fabricator before template day?
Tell the truth about your cabinet condition before the templating crew shows up. That one habit prevents most bad installation days. A fabricator who knows a run is 1/4 inch out of level can plan to shim or tell you to fix it first. A fabricator who shows up to an unlevel base after the slab is already cut has no good options left.
What to communicate:
-
Whether the cabinets are frameless or face-frame construction. Frameless boxes (common in European-style kitchens) often have a different top-rail situation.
-
Whether a plywood subtop is in place, or the fabricator is setting straight on the rail.
-
The exact overhang dimension you want at the front, and where any seating overhangs are.
-
The location of the sink and any cooktop. Fabricators need to know if a farmhouse or apron sink drops below the cabinet line, because the counter gets cut differently.
-
Any spot where cabinets are less than dead level. Most fabricators can absorb up to 3/16 inch of variation with small silicone pads, but they want the heads-up in advance.
Shops running job-management tools can log all of this from the first sales call and hand it straight to the field crew. That kind of coordination is what solid countertop installation planning runs on.
Are there building code requirements for cabinet reinforcement?
No single national code section says "reinforce cabinets before stone countertops." But the International Residential Code (IRC) requires structural elements to be adequate for the loads placed on them, and interior finish work that affects structural adequacy falls under the general workmanship standards a local jurisdiction adopts [8].
In practice, most cities do not require a permit for a countertop swap unless it moves plumbing or gas. If the countertop is part of a larger kitchen remodel that does pull a permit, an inspector can flag inadequately supported counters as a workmanship problem under the adopted IRC or a local amendment.
The standards that actually drive this work come from the Natural Stone Institute (NSI), the Kitchen Cabinet Manufacturers Association (KCMA), and the National Kitchen and Bath Association (NKBA). KCMA certifies cabinets to ANSI/KCMA A161.1, which sets structural performance tests for cabinet boxes [7]. A cabinet that passed A161.1 is rated to hold countertop loads, but that rating assumes the box is installed, fastened, and level, more than sitting on the floor unanchored.
Hire a licensed contractor for the full remodel and the code responsibility is theirs. Manage the project yourself and hire only a stone fabricator for the swap, and the cabinet prep is entirely on you.
What are the most common mistakes homeowners make during cabinet prep?
Skipping the level check is the number one error. Homeowners assume the cabinets are level because the old countertop looked fine. Laminate flexes and conforms to whatever is under it. Stone does not, and it will find every high and low spot.
Over-shimming without fastening comes next. Shim a cabinet 1/2 inch off the floor and skip the wall screws, and you have built a wobble point. The cabinet reads level with a bubble but shifts the moment the slab lands.
Using OSB as a subtop is a quiet mistake with slow consequences. OSB and particleboard both drink moisture and swell, and OSB has inconsistent thickness across a sheet. Cabinet-grade plywood is the right material, full stop. Butcher block countertops sometimes go over OSB because wood tolerates minor flex. Stone does not.
Not reinforcing the corner. As covered above, the corner is where the most stress-sensitive joint in the stone lands, and it is also the box people forget.
Ignoring a failing box and hoping it holds. A cabinet with a rotted bottom or delaminating sides does not improve under 200 pounds of stone. Replace it, or at minimum clad it in plywood if the damage is only the visible surface and the structure is intact.
Ripping out the old countertop too early. Some fabricators want to template against the existing surface before demolition. Confirm the sequence with your fabricator before you pick up a pry bar.
For a broader look at kitchen countertops and how different materials interact with cabinet requirements, that context helps you choose the material before you start the prep.
How long does cabinet reinforcement take, and when should you call a professional?
A straightforward kitchen with level, well-fastened cabinets that need minor shimming and a plywood subtop takes a competent DIYer 2 to 4 hours. That covers ripping plywood, drilling, screwing, and a final level check.
A kitchen that needs full releveling of a multi-run layout runs 4 to 8 hours. If wall studs sit in unexpected spots and you have to add blocking inside the wall, tack on another 2 to 3 hours.
Call a carpenter or cabinet installer if any of these apply:
- A cabinet box shows structural damage (rotted base, delaminated sides, broken joints)
- The floor is out of level by more than 1/2 inch across the run, which means the floor gets addressed first
- You are adding a free-standing island that needs a concrete anchor on a slab floor
- The job involves moving or adding cabinets as part of the remodel
A licensed carpenter charges $75 to $125 per hour in most markets. A half-day of prep at $100 an hour runs about $400, and it beats the cost of a cracked $3,000 countertop that failed because the cabinets were not ready.
Fabricators using job-tracking software like SlabWise can flag jobs where the site-visit notes point to questionable cabinets, then follow up with the homeowner before the slab is cut. That saves everyone the awkward conversation of refusing to set on an unready substrate on installation morning.
Frequently asked questions
Can I set a granite countertop directly on cabinet top rails without a plywood subtop?
Yes, for 3 cm stone on solid, well-fastened cabinets with intact rails. The slab is stiff enough to bridge the typical rail-to-rail span of 8 to 10 inches. For 2 cm stone, or any cabinet with soft, damaged, or crumbling particleboard rails, a 3/4-inch plywood subtop is the safer call and cuts the risk of cracking around cutouts substantially.
How level do my cabinets need to be before the stone installer comes?
Within 1/8 inch over 10 feet is the target most fabricators work to. Many can shim to 3/16 inch on installation day. Past that, they will usually ask you to fix the cabinets first or decline to warranty the work. Confirm with your specific fabricator before assuming they will handle any leveling on-site, because policies vary shop to shop.
How do I fasten cabinets to the wall if I can't find studs?
Use a quality electronic stud finder, then verify with a small finish nail. Studs in most US homes sit 16 inches on center, so once you find one, mark every 16 inches from there. If you truly cannot reach a stud, a 3-inch toggle bolt or a self-drilling anchor rated for 100-plus pounds works as a backup, but a screw into solid stud is always the primary method.
How long can a stone countertop overhang without support?
Natural Stone Institute guidelines put the unsupported overhang limit for 3 cm stone at roughly 10 to 12 inches. For 2 cm material it is closer to 6 to 8 inches. Past those distances you need corbels or steel brackets. A seating overhang of 12 to 15 inches is common in 3 cm stone and holds up fine with corbels spaced 18 to 24 inches apart.
Do I need a permit to reinforce cabinets before a countertop swap?
In most jurisdictions, a countertop replacement is a cosmetic remodel that needs no permit unless it moves plumbing or gas. Cabinet reinforcement that does not alter the building structure usually falls under the same exemption. Check your local building department if you are unsure, because rules vary by city and county and some areas are stricter than others.
What is the best plywood to use for a countertop subtop?
3/4-inch cabinet-grade (AC or BC) plywood is the standard. It is dimensionally stable, has a smooth face for good adhesion, and resists the edge compression that ruins particleboard and OSB. Near a sink, seal the cut edges and the underside with a waterproof primer or exterior-grade finish to slow moisture absorption where drips and leaks tend to happen.
My island cabinet is not attached to the floor. Is that a problem for stone?
It can be. A free-standing island that cannot slide or tip under normal kitchen activity may be fine, but the weight plus daily lateral bumps can shift an unanchored base over years. Securing the island to the subfloor with L-brackets at the toe kick, or to a concrete slab with anchors, is a cheap step that protects a big countertop investment.
Can I do the cabinet prep myself or do I need a professional?
For minor shimming and a plywood subtop on sound cabinets, this is a realistic DIY job for anyone comfortable with a drill and a level. It gets harder if boxes need to come off the wall and get re-hung, if the floor is badly out of level, or if there is structural damage. In those cases, paying a carpenter for a half-day saves you from a much larger problem later.
What happens if the cabinets are not reinforced properly and the stone cracks?
A cracked countertop caused by inadequate cabinet support is generally not covered under a fabricator's warranty, because the prep is the homeowner's job. Repairing a crack in granite or quartz is possible but usually visible. Replacing a cracked section can cost as much as the original piece if a matching slab is gone. The reinforcement work costs a fraction of a replacement.
Does quartz engineered stone need the same cabinet prep as natural stone?
Yes, essentially the same. Engineered quartz like Cambria or Silestone weighs 15 to 18 pounds per square foot in 3 cm thickness, comparable to granite. It has similar rigidity and the same intolerance for flex in its support surface. The prep process, including leveling, fastening to studs, and adding a subtop where needed, applies exactly the same way.
How do I check if my cabinet top rails can handle the stone weight?
Press down hard on the top rail with both hands and feel for flex or give. Open a door and look at the rail's cross-section at the front; solid plywood is fine, but soft or delaminating particleboard is a red flag. If the rail flexes under hand pressure, it will not survive 500 pounds of stone. A plywood subtop spreads the load and fixes the problem.
Should I remove the old countertop before or after the fabricator templates?
Ask your fabricator their preference first. Many prefer to template against the existing surface because it gives them a reference for exact dimensions, especially in older kitchens where walls are not square. Others want a clear substrate. Pulling the old top early without checking can complicate the template and cause fit issues on installation day.
What is the right screw size for fastening cabinets to wall studs?
A 2-1/2 to 3-inch coarse-thread cabinet screw (sold as a #8 or #10 cabinet or deck screw) into a stud gives good holding power through a 3/4-inch hanging rail and into at least 1-1/2 inches of stud. Two screws per stud location is standard. Pre-drill to avoid splitting the rail, especially near the ends.
Sources
- USGS National Minerals Information Center: Stone (Dimension): Granite and marble have densities of approximately 160 to 175 lbs per cubic foot, supporting the per-square-foot weight calculations for 2 cm and 3 cm slabs.
- Natural Stone Institute, Technical Bulletins: Granite modulus of rupture is approximately 1,500 to 2,000 psi; stone breaks rather than bends under overload.
- National Kitchen and Bath Association, NKBA Planning Guidelines: Industry standard for countertop bearing surface flatness is within 1/8 inch over 10 feet prior to stone countertop installation.
- International Residential Code, IRC R602 Wall Framing (ICC): Standard residential stud spacing is 16 inches on center, meaning a 24-inch cabinet should have at least two stud-anchored fastener points.
- Natural Stone Institute, Dimension Stone Design Manual: A minimum 3/4-inch plywood substrate is recommended for 2 cm stone installations; unsupported overhangs in 3 cm stone should not exceed 10 to 12 inches without corbel support.
- International Residential Code, IRC R301 Design Criteria (ICC): Structural elements must be adequate for imposed loads; concrete anchor requirements apply when securing to slab-on-grade floors.
- Kitchen Cabinet Manufacturers Association, ANSI/KCMA A161.1 Performance and Construction Standard for Kitchen and Vanity Cabinets: ANSI/KCMA A161.1 specifies structural performance tests for cabinet boxes; wall cabinets must be fastened through a 3/4-inch rail into studs with minimum #10 screws.
- International Residential Code, IRC R301 General (ICC): The IRC requires all structural elements to be adequate for imposed loads; interior finish work affecting structural adequacy falls under general workmanship standards adopted by local jurisdictions.
- OSHA, Ergonomics eTool: Heavy Lifting: Referenced for context on weight handling; a 30-square-foot granite countertop section at 15 to 20 lbs/sq ft weighs 450 to 600 lbs, requiring mechanical assistance or a multi-person crew.
- U.S. Census Bureau, American Housing Survey: Kitchen remodeling is among the most common home improvement projects; provides context for countertop replacement frequency in US housing stock.
Last updated 2026-07-11