TL;DR
- Granite countertops get attached with 100% silicone caulk on the cabinet rails, plus two-part epoxy at seams.
- Small silicone beads every 6 to 8 inches hold the slab and let cabinets flex without cracking the stone.
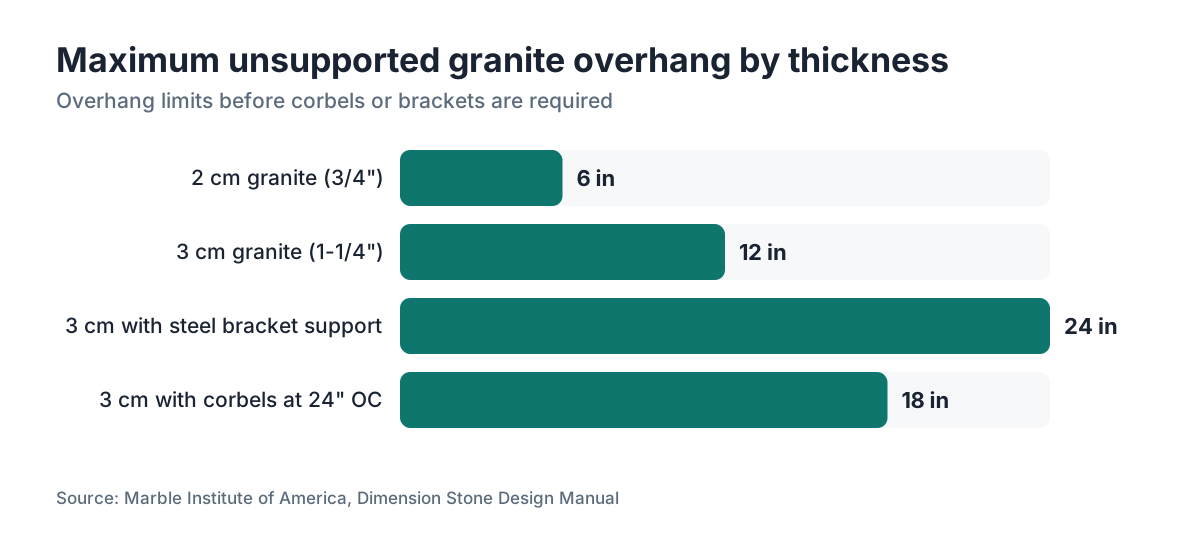
- Overhangs past 12 inches need corbels or steel brackets.
- Plan on 2 to 4 hours of work, then a 24-hour cure before use.
What do you actually need before you start attaching granite?
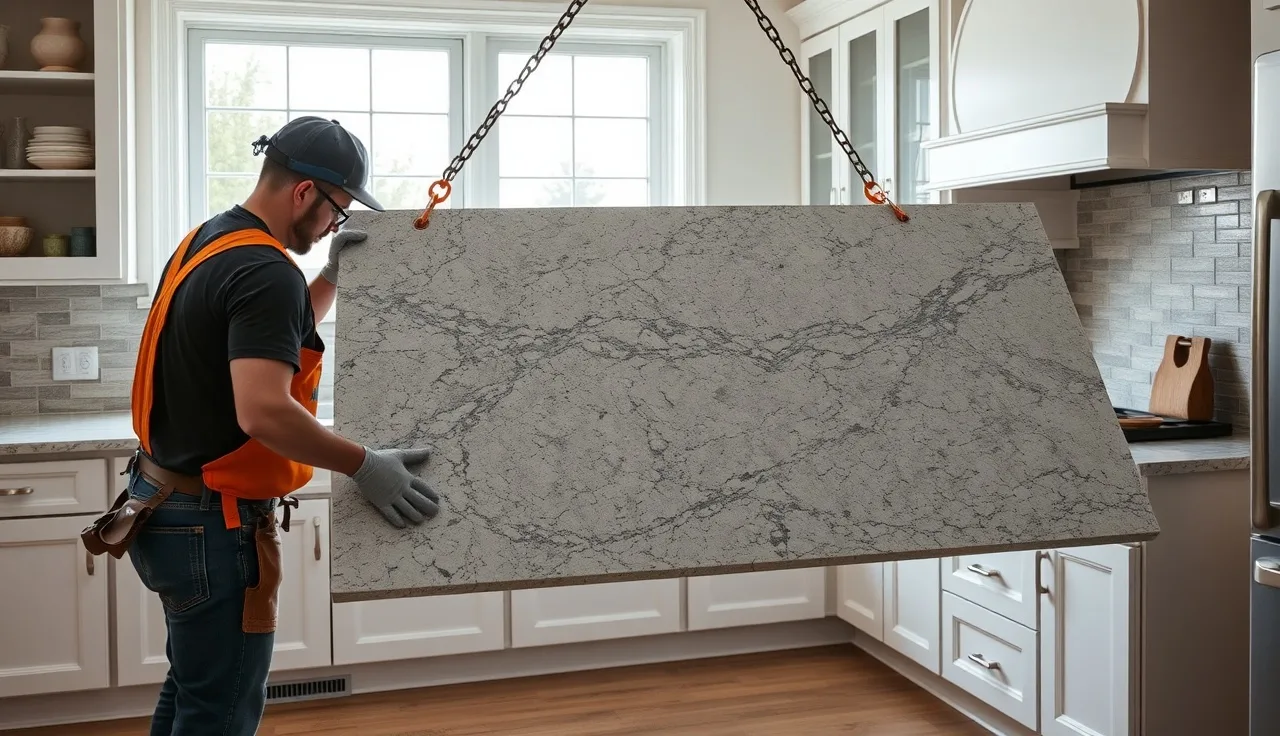
Stage every tool and material before the slab touches the cabinet. Granite doesn't forgive. Once a 200-pound slab lands in the wrong spot, moving it again without chipping an edge or cracking a seam is genuinely hard.
Here's the material checklist:
- 100% silicone caulk (kitchen/bath grade, neutral-cure, color-matched to the underside of your slab if it's visible)
- Two-part epoxy (for seams and any unsupported spans)
- Denatured alcohol or acetone (surface prep)
- Blue painter's tape
- A caulk gun
- Shims (plastic cabinet shims, not wood, which compresses over time)
- A level, at least 48 inches long
- Suction cup handles rated for stone (most rent for $15 to $25 a day at tool rental shops)
- Safety gear: cut-resistant gloves, closed-toe shoes, safety glasses
Most residential kitchens also need at least two extra people. A standard 96-by-26-inch granite slab in 3 cm thickness weighs roughly 18 to 20 pounds per square foot [1], which puts a full kitchen run at 300 to 500 pounds. OSHA recommends team lifts and mechanical assists for anything over 50 pounds [11]. Plan for that.
One tool people skip and later regret: a rubber mallet. You need it to tap shims and nudge the slab into position without cracking the stone.
What type of adhesive should you use to attach granite?
Use 100% silicone for the field bond (slab to cabinet) and two-part epoxy for seams and any spot where two pieces of granite need a structural connection. That's the whole answer. The rest is why.
Silicone stays flexible after it cures. Cabinets rack a little over time as a house settles and humidity swings back and forth. A rigid glue locks the slab to something that keeps moving, and that stress lands on the thinnest part of the granite, usually near a cutout. Flexible silicone soaks up the movement instead. [2]
Two-part polyester or epoxy resin is the standard for seaming. Fabricators color-match it to the stone. If you're setting a factory-cut seam yourself, this is what goes in the joint. It cures hard, and in a clean, tight seam the bond is stronger than the stone around it.
Construction adhesives (Liquid Nails, PL Premium, and the like) are a bad choice. They're miserable to remove if the counter ever has to come off, and they don't allow for differential movement. Installation guides from the natural stone trade specifically warn against them for stone. [3]
Where two slabs meet at an L, some fabricators add a metal mounting bracket underneath along with the epoxy. Smart on larger slabs, and it costs almost nothing.
| Adhesive type | Use case | Flexibility | Removable? | Typical cost |
|---|---|---|---|---|
| 100% silicone | Slab to cabinet field bond | High | Yes, with scoring knife | $8-15/tube |
| Two-part epoxy/polyester | Seams, structural spans | Low (rigid) | No | $20-50/kit |
| Construction adhesive | Not recommended | Medium | Very difficult | $6-12/tube |
| Mechanical brackets | Overhangs, heavy unsupported spans | N/A | Yes | $15-40/pair |
How do you prepare the cabinet surface before setting granite?
Prep is where DIY installs go sideways most often. Skip it and you get adhesive failure, or a slab that reads level but isn't.
Start by checking the cabinet tops with your long level. If any rail sits more than 1/8 inch out of level across the run, shim it now. Granite won't conform to a surface the way laminate does. A high spot creates a stress concentration; a low spot leaves the slab spanning unsupported. [4]
Once level checks out, wipe every cabinet top rail with denatured alcohol or acetone. That pulls off dust, grease, and any wax or paint overspray. Let it flash off, about 5 minutes at room temperature.
If your cabinets have a plywood subtop (a sheet of 3/4-inch plywood across the cabinet rails), clean it the same way. Subtops are common in older kitchens and give continuous support, but they have to be clean and flat.
Hunt for obstructions before the slab does. Electrical boxes, plumbing rough-ins, cabinet hardware, anything that keeps the slab from sitting flat. A cabinet mounting screw driven a hair too high is a classic one. Find it with your hand, not with 300 pounds of stone.
Mark the final position of each slab on the cabinet rails in pencil before any adhesive goes down. You'll thank yourself when you have 30 seconds to place a heavy slab before the silicone skins over.
How do you actually set and attach the granite slab?
Run this in order. Don't freelance the sequence.
Step 1: Dry-fit first. Set the slab in place with no adhesive. Confirm the fit at the wall, at any seams, at every edge. Check overhang on all sides. Fix anything now. Lift it back off.
Step 2: Apply silicone to cabinet rails. Run 100% silicone along each rail that contacts the granite. Use a serpentine or dot pattern: a small bead (about 3/8 inch across) every 6 to 8 inches works for most installs. A continuous bead can trap air and block proper contact. [5] Don't overdo it either, or squeeze-out ends up in the cabinet interiors or on the visible underside of the slab.
Step 3: Set the slab. Helpers stationed, suction cups on, lower the slab straight down onto the rails. Don't slide it after it touches the silicone. Sliding smears the adhesive and leaves voids. Drop it onto the marks.
Step 4: Confirm position and level. Check your pencil marks and your level right away. Tap tiny adjustments with the rubber mallet on a wood block, never on bare granite. Check seams if you have them.
Step 5: Secure at seams. For a multi-piece install, spread two-part epoxy on the seam edges and press them together. Hold the joint tight with seam setter clamps or color-matched tape on top while the epoxy cures. Most polyester seam adhesives give you 5 to 10 minutes of working time and reach handling strength in about 30 minutes. [6]
Step 6: Tape and let cure. Run painter's tape at the wall line and any exposed edges to keep the slab from shifting during cure. No weight on the counter, and no opening cabinet doors that could rack the frame, for at least 24 hours. Full silicone cure runs 24 to 72 hours depending on temperature and humidity.
Step 2 takes maybe 10 minutes. Step 6 is pure patience. The tricky part is Step 3, and that's a people problem, not a skills problem.
How much overhang can granite have without support?
The industry maximum for unsupported 3 cm (1-1/4 inch) granite is 12 inches. For 2 cm (3/4 inch) granite, the limit drops to about 6 inches. The Marble Institute of America's Dimension Stone Design Manual, which most fabricators follow, caps 3 cm overhang at no more than 1/3 of the total slab depth without added support. [7]
On a standard 25.5-inch-deep countertop, 1/3 depth is about 8.5 inches. That keeps a typical 1.5-inch overhang well inside the safe zone. But islands often run 12 to 15 inch seating overhangs, and those need corbels or steel brackets.
Corbels should sit no more than 24 inches apart along a seating overhang, and each one should reach at least 2/3 of the overhang depth. A 15-inch overhang wants corbels at least 10 inches deep. Screw them to the cabinet box with 2.5-inch screws driven into solid wood or blocking, more than the cabinet skin.
Steel L-brackets are an alternative to decorative corbels, and they're often stronger. They mount flush to the underside of the cabinet top, then the granite rests on them. For a 12-inch seating overhang on an island, two or three 10-inch steel brackets across the span carry the load easily.
Silicone alone never holds a seating overhang. It holds the slab down against lifting. It gives you almost nothing against the lever force of a cantilever with someone leaning on it.
How do you attach granite at the wall, backsplash, and sink cutout?
The back edge gets a thin bead of silicone where it meets the wall or backsplash tile. Not grout. Grout is rigid; silicone takes up the slight movement between counter and wall without cracking. Match the silicone to your grout color as close as you can, or run a clear formula. Kitchen and bath silicone is rated for wet areas; general-purpose silicone is not, so read the label. [8]
An integral backsplash (a piece of granite that rises 4 to 6 inches up the wall as part of the assembly) gets its horizontal-to-vertical joint epoxy-bonded and usually doweled or rodded by the fabricator before delivery. Your only job is siliconing the top edge of the backsplash to the wall.
At the sink cutout, the undermount sink doesn't attach to the granite during the counter-setting step. It clips from below with undermount clips the fabricator already epoxied to the underside of the stone. You fasten the sink to those clips after the counter is set and cured. No pre-set clips? That's a fabricator conversation, not a job-site improvisation.
For countertop installation around a freestanding cooktop or range, leave the manufacturer's clearance on all sides. Run a thin bead of heat-resistant silicone along the front edge where the granite meets the range frame. Leave the back of the range opening open; that gap ventilates the cabinet below.
Doing a kitchen countertop replacement and keeping the old tile backsplash? Tape the tiles before you set the slab. Getting silicone out of porous tile grout is miserable.
Can you attach granite directly to cabinets without a plywood subtop?
Yes, and most modern installs do exactly that. Factory-built frameless cabinets have flat, level top rails that give granite plenty of contact area. A plywood subtop adds cost and height without helping much when the rails are already flat.
The exception is older face-frame cabinets where the top rail is narrow (sometimes under 2 inches) or the rails don't share the same plane across a run. There, a 3/4-inch plywood subtop brings everything to one flat plane and gives the silicone more surface to grab. Installing over lower cabinets built in the 1970s or 1980s? Level them carefully and think hard about a subtop.
Another case for a subtop: very long spans (over 8 feet) with no intermediate cabinet wall or divider. A subtop ties the cabinets together so no single box racks under the slab weight.
A subtop also makes sense if you're setting granite over a tile counter you're covering instead of removing. Screw 3/4-inch plywood over the tile (after confirming the total height still works with your appliances), level it, and treat that plywood as your substrate.
What's the right process for a two-piece granite installation with a seam?
Most kitchens carry at least one seam, either at an L-corner or because the run is longer than the fabricator can transport or the material allows. Where the seam lands and how it's set matters more than most homeowners expect.
Fabricators should cut seams somewhere low-visibility: away from the center of a long run, never over an unsupported span, ideally over a cabinet wall or rail for support. A seam over dead air flexes and eventually cracks. [6]
For the DIYer handling a two-piece set:
- Dry-fit both pieces. Confirm the seam gap is tight and even (a well-cut seam should read 1/32 inch or less).
- Apply silicone to the cabinet rails under each piece separately.
- Set the larger piece first.
- Mix the two-part epoxy seam adhesive to the manufacturer's ratio (usually 1:1 by volume for polyester seam adhesives). Spread it on both edges of the seam.
- Lower the second piece and press the seam tight. Hold it with clamps or color-matched tape.
- Clean any squeeze-out right away with acetone, before it cures.
- Let the seam epoxy hit handling strength (usually 20 to 30 minutes) before you pull clamps or tape.
If the two pieces don't sit flush at the seam surface, a seam setter tool (two suction cups joined by a screw mechanism) pulls both pieces to the same height. Rent one. A 1/32-inch height difference at a seam looks tiny and feels like a canyon every time a hand slides over it.
For fabricators running multi-piece jobs across a full kitchen, SlabWise helps with nesting and material optimization before anything gets cut, which cuts seam count and waste.
How do you remove a granite countertop that's already been attached?
This comes up more than people expect: a repair, a renovation, a botched install.
If the counter went down with silicone (the way it should), removal is straightforward but slow. Score the silicone bead at the wall and along every cabinet rail with a thin utility knife or a silicone removal tool. Work the blade horizontally under the slab edge to get between granite and rail. Once the silicone is cut all the way around, the slab lifts off with suction cup handles.
Don't pry against the granite edge. Prying puts lever force on the thinnest, most chip-prone part of the slab. Cut the silicone and lift straight up.
If someone used construction adhesive (this is exactly why it's a bad idea), expect to accept some damage to the cabinet tops. That adhesive grips wood hard enough that breaking the bond can tear up the rail surface.
For undermount sinks, release the clips from below before you try to move the counter. Lifting a slab with the sink still clipped adds weight in an awkward spot and risks cracking the stone at the cutout, which is already the most stressed point in the slab.
With the granite off, scrape residual silicone from the cabinet tops with a plastic scraper. Finish with a wipe of mineral spirits. Skip metal scrapers on wood cabinet tops.
How is attaching granite different from attaching other countertop materials?
The core difference: granite (and stone in general) can't flex or get trimmed on-site the way laminate or solid surface can. So prep and fit precision carry more weight.
Laminate countertops and Formica countertops usually screw down through corner blocks inside the cabinet, which is faster and reversible. The material bends slightly to follow the cabinet surface, so it forgives small flatness errors. Granite forgives nothing.
Butcher block countertops screw through corner blocks with slotted holes so the wood can move with the seasons. You'd never do that with granite, which doesn't move seasonally.
Corian countertops and other solid surface use contact cement or the manufacturer's adhesive and seam invisibly on-site. Granite seams, even good ones, always show to some degree.
Marble countertops and quartzite attach the same way as granite (silicone field bond, epoxy seams) because they're also natural stone with similar density and brittleness. The 12-inch unsupported overhang rule carries over too.
Engineered stones like Cambria countertops follow the manufacturer's guidelines, which for most brands mirror the stone approach: silicone adhesive, no rigid glues, corbels past 12 inches.
One rule holds across every countertop material: don't attach anything for keeps until you've dry-fit it and confirmed it's flat, level, and where it belongs.
What can go wrong and how do you avoid the common mistakes?
A handful of failures show up again and again.
Too much adhesive. A thick layer of silicone under a slab gives you a spongy, non-rigid connection. Thin beads every 6 to 8 inches give you firm contact with enough give. More is not better.
Setting on a dirty substrate. Silicone bonds badly to a greasy rail. Clean with alcohol, wait for it to flash, then apply.
Not checking level first. A high spot in the run becomes a stress riser under the slab. Find it with a level before the stone goes down, not after.
Sliding the slab after contact. It smears the adhesive, creates voids, and drags grit under the stone. Lower it onto the right spot instead.
Grouting the wall-to-counter joint. Grout cracks within months. Silicone caulk belongs there.
Not supporting the cutout during transport. The sink cutout weakens the slab a lot. Carry any slab with a cutout with a helper positioned to hold that section. A slab that survives fabrication can still crack during install from careless handling.
Rushing the cure. Silicone wants 24 hours minimum, and that's at 70 degrees F with moderate humidity. Cold garages and winter installs take longer. Give it 48 hours if you're unsure.
For fabricators thinking about estimating and material management on granite jobs, SlabWise handles quoting and nesting. That's a different part of the workflow, upstream of everything here.
Does granite need to be sealed after installation?
Sealing is maintenance, not attachment, but people ask in the same breath and the timing matters. Don't seal until the silicone has fully cured, because silicone off-gassing can interfere with some penetrating sealers. Wait the full 24 to 72 hours after install.
Most granite wants a penetrating (impregnating) stone sealer. The old water test still works: pour a tablespoon of water on the surface. If it beads, the stone doesn't need sealing or was already sealed at the shop, which most fabricators do before delivery. If the water darkens the stone and soaks in under 4 minutes, seal it. [9]
Some granites run dense enough that they never need sealing. Others, like the more porous light-colored ones, may want resealing every year. Darker granites tend to be denser and less porous.
For cleaning after install and ongoing care, granite follows the same rules as most natural stone: mild dish soap, warm water, no acidic cleaners. Our guide on how to clean stone countertops has the details.
Frequently asked questions
How long does it take silicone to cure when attaching granite?
Most 100% silicone caulks skin over in 30 to 60 minutes but reach full cure in 24 to 72 hours depending on temperature and humidity. Keep weight off the counter and don't stress the cabinet frame for at least 24 hours. In cool or humid conditions, 48 hours is safer. Two-part polyester seam epoxy reaches handling strength in 20 to 30 minutes but keeps hardening for several hours.
Can I attach granite countertops myself or do I need a professional?
A careful DIYer can do it, but it takes at least three people for a standard kitchen run, proper suction cup tools, and real surface prep. The risk isn't skill, it's the weight. A 3 cm granite slab weighs 18 to 20 pounds per square foot. Injury and slab damage are both real without enough helpers and the right gear. Seaming also demands precision that's hard without practice.
What kind of silicone should I use to attach granite?
Use 100% silicone caulk rated for kitchen and bath. Neutral-cure formulas are preferred because acetoxy-cure silicones off-gas acetic acid while curing, which can react with some stone surfaces. Look for 'neutral cure' or 'stone safe' on the label. GE Advanced and Dow 995 are common in the trade. Avoid general-purpose or paintable caulks, which are not 100% silicone.
Do I need to screw down granite countertops?
No. Granite is never screwed down. Drilling the slab for fasteners creates stress concentrations and risks cracking. The adhesive bond (silicone to cabinet rails, epoxy at seams) plus the slab's own weight (often 200 to 400 pounds for a kitchen run) holds it securely. Mechanical brackets support overhangs from below; they don't fasten the slab down from above.
How do you attach granite over existing tile countertops?
If the tile is sound (no hollow spots, everything firmly bonded), screw a 3/4-inch plywood layer over it, confirm the height still works with your appliances and dishwasher, then attach the granite to the plywood with silicone as normal. If any tiles are loose, pull them first. Check that plywood plus granite thickness doesn't make the counter height awkward or block the dishwasher opening.
How much does it cost to have granite countertops professionally installed?
Professional installation typically costs $10 to $30 per square foot on top of material, per National Kitchen and Bath Association cost data. Most fabricators bundle install into the total price, which usually covers template, fabrication, and installation. Standalone install-only services are less common and usually cost more per hour because they mean separate site visits. Always confirm whether installation is in your fabricator quote.
Can granite countertops crack during installation?
Yes. The common crack spots are sink cutouts, cooktop cutouts, and faucet-hole notches, all places where the stone cross-section narrows. Cracks during install usually trace back to poor carrying technique (not supporting the cutout zone), setting the slab on an unlevel surface with a high spot, or dropping one end during placement. Suction cup handles and keeping the slab horizontal while moving it prevent most of these.
Do you attach the backsplash to the wall the same way as the countertop?
If the backsplash is a separate piece of granite (4-inch or 6-inch riser), it gets silicone on the wall face and silicone or epoxy at the joint where it meets the counter surface. The joint between the horizontal counter and the vertical backsplash should be silicone caulk, not grout, because the two surfaces move slightly against each other. Grout there cracks within a year in most kitchens.
How do you attach granite to a kitchen island?
Same process as the perimeter cabinets: clean the cabinet tops, run silicone beads on all rails, lower the slab, then check level and position immediately. Islands almost always have seating overhangs, so check the overhang dimension first. Anything past 12 inches on a 3 cm slab needs corbels or steel L-brackets attached to the island cabinet box, spaced no more than 24 inches apart along the overhang.
How long after attaching granite can I use the sink?
You have to connect the plumbing before using the sink, and you should do that only after the silicone cures (24 hours minimum). Undermount sink clips go in after the counter is set, so the sequence is: set counter, cure overnight, attach undermount sink clips, connect plumbing, caulk around the sink rim with silicone, cure again. Most fabricators want a 48-hour window before full use.
What's the difference between using epoxy and silicone for granite installation?
Silicone stays flexible after curing and handles the field bond between slab and cabinet. It allows minor movement and is fairly easy to remove later. Epoxy is rigid and handles seams, where two pieces of granite bond permanently and flush. Using rigid epoxy for the field bond is a mistake because it can't take up the slight racking of cabinets over time, so it concentrates stress in the stone.
Can you reuse granite countertops after removing them?
Sometimes. If the granite was attached with silicone and removed carefully (scored with a utility knife, lifted straight up, no prying), the slab often comes off undamaged and reusable. The main risk is at seams, which are epoxy-bonded and rarely survive removal intact. Single-piece sections without seams have a better shot at reuse. Inspect every edge closely before reinstalling.
Do granite countertops need support in the middle for long spans?
A single piece of 3 cm granite spanning more than about 36 to 48 inches with nothing underneath can develop stress over time, especially with weight applied at the center. Most cabinet runs have a wall or divider every 30 to 36 inches for intermediate support. For open spans wider than that, add a support rail or a plywood subtop across the gap. Check with your fabricator if you have an unusual open span.
Sources
- Natural Stone Institute, Stone Weight Reference: Granite at 3 cm thickness weighs approximately 18-20 pounds per square foot
- Natural Stone Institute, Fabrication and Installation Technical Manuals: 100% silicone is recommended for field bonding natural stone to cabinet rails because of its flexibility
- Tile Council of North America, Handbook for Ceramic, Glass, and Stone Tile Installation: Rigid construction adhesives are not recommended for natural stone countertop bonding due to differential movement
- National Kitchen and Bath Association, Installation Standards: Cabinet rail flatness tolerance for stone countertop installation is 1/8 inch across the run
- Marble Institute of America, Dimension Stone Design Manual: Silicone beads should be applied in a dot or serpentine pattern every 6-8 inches for stone countertop adhesion
- Natural Stone Institute, Countertop Seaming Guidelines: Seams must be located over cabinet walls or rails, not over unsupported spans; polyester seam adhesive working time is 5-10 minutes
- Marble Institute of America, Dimension Stone Design Manual VII: Maximum unsupported overhang for 3 cm granite is 12 inches or no more than 1/3 of slab depth
- ASTM C920, Standard Specification for Elastomeric Joint Sealants: Silicone sealants rated for kitchen and bath are suitable for stone-to-wall joints; general purpose silicone is not rated for wet area use
- Natural Stone Institute, Care and Cleaning of Natural Stone: The water absorption test (water darkens stone in under 4 minutes) indicates stone requires penetrating sealer
- National Kitchen and Bath Association, 2023 Design and Installation Cost Survey: Professional countertop installation typically costs $10-30 per square foot in addition to material cost
- U.S. Occupational Safety and Health Administration, Material Handling and Ergonomics: Safe lifting guidelines recommend team lifts and mechanical assists for objects exceeding 50 pounds
- American National Standards Institute, ANSI A108 Tile Installation Standards: Flexible sealant (silicone) is required at changes of plane and where countertop meets wall; grout is not suitable at these joints
Last updated 2026-07-09