TL;DR
- Granite countertops attach with a continuous bead of 100% silicone on cabinet top rails, plus two-part epoxy at seams and mechanical clips on unsupported spans.
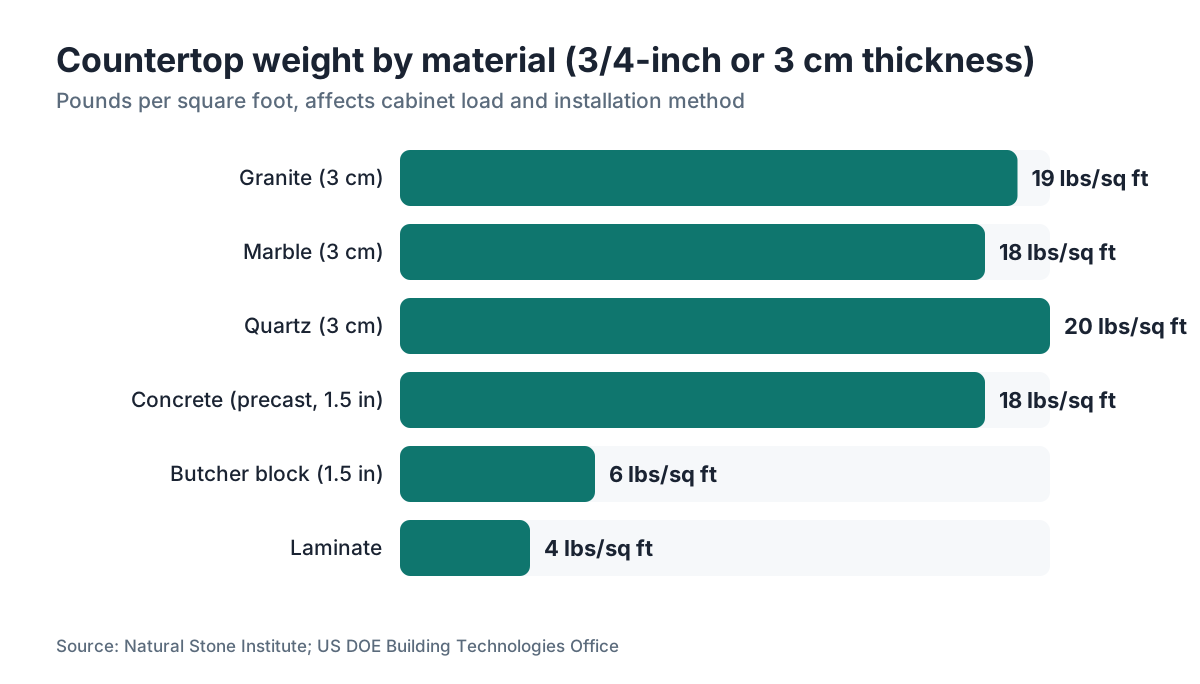
- Slabs weigh 13 to 20 lbs per square foot, so cabinet structure comes first.
- Professional installation runs roughly $200 to $500 per slab and most fabricators fold it into the quote.
What actually holds a granite countertop in place?
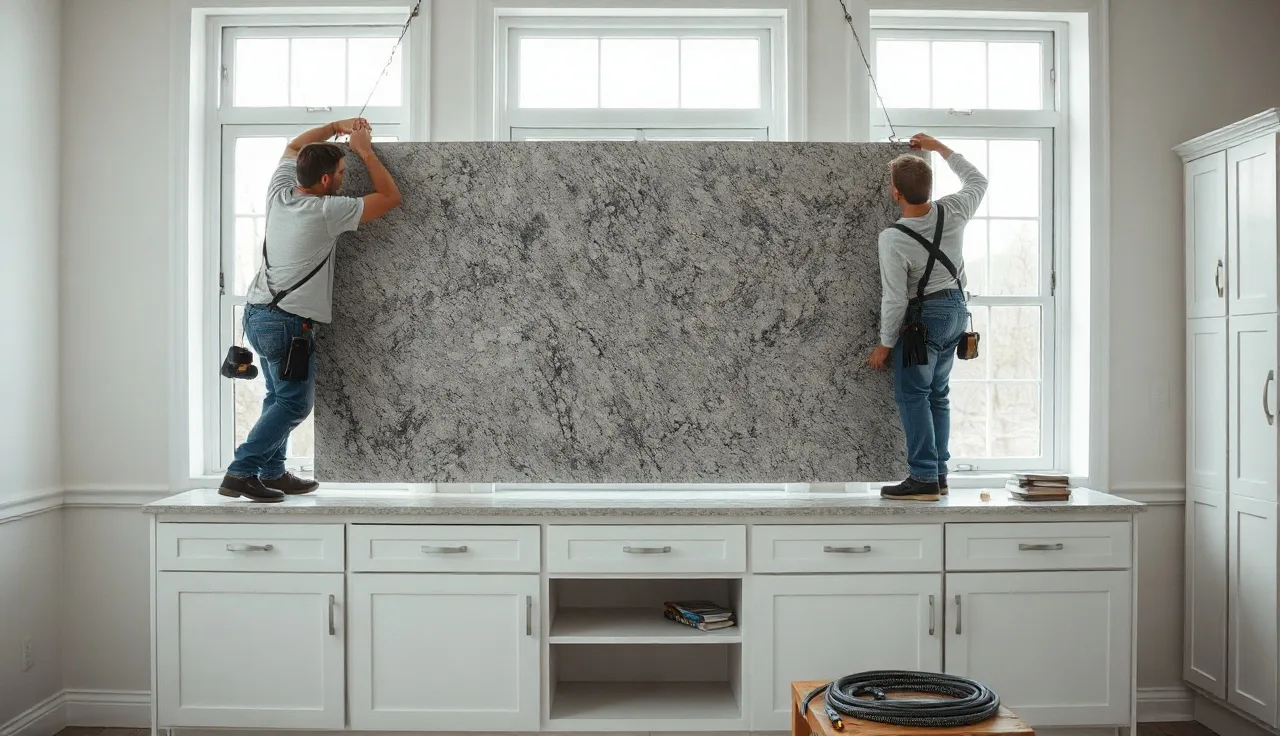
Gravity does most of the work. A granite slab weighs roughly 13 to 20 pounds per square foot [1], so a standard 25-square-foot kitchen section can hit 375 to 500 lbs before anyone opens a tube of adhesive. Spread that weight across cabinet top rails and you get enormous friction on its own.
Friction alone won't cut it, though. Countertops have to be locked against sideways movement, especially along walls where appliances push and pull, and at seams where two pieces meet. The standard attachment system combines three things: a bead of 100% silicone caulk on every cabinet rail the slab touches, construction adhesive or epoxy where the slab overhangs a solid nailer, and mechanical clips or brackets across long unsupported spans.
Silicone is the first choice for bonding to cabinets because it stays flexible. Wood cabinets swell and shrink with humidity. A rigid adhesive like polyurethane construction adhesive will pop the bond over time, or worse, crack the stone at a corner. Silicone moves with the cabinet without losing grip. That flexibility is why fabricators almost never use canned foam or standard wood glue anywhere in this assembly.
How much does granite weigh, and why does it matter for attachment?
Weight is the number homeowners underestimate most. Standard 3/4-inch (2 cm) granite runs about 13 lbs per square foot. The more common 1.25-inch (3 cm) slabs run 18 to 20 lbs per square foot [1]. A 10-foot run at 25 inches deep can easily hit 350 to 450 lbs in 3 cm material.
That weight drives every other decision. Cabinets in homes built before the 1990s were often designed around laminate, which weighs just 3 to 5 lbs per square foot [2]. Drop granite on top without checking the structure and you can overload the top rails, make drawers stick from frame deflection, and in bad cases pull face frames off the cabinet box. Before any attachment starts, confirm the top rails are at least 3/4-inch solid plywood or hardwood (not bare particleboard) and that the cabinet floor is screwed to wall studs.
Islands are the highest-risk case because the cabinet often has no wall to help carry the load. A 6-foot island with a 12-inch overhang on one side might put 80 to 100 lbs of cantilevered load on the cabinet edge with nothing underneath. That's where corbels, legs, or steel rods epoxied into the stone stop being optional and become mandatory.
What adhesives and materials do you actually need?
Here's the short list for a standard kitchen install.
- 100% silicone caulk (clear or color-matched). This is your primary bond to the cabinet rails. Budget one standard 10-oz tube per 8 to 10 linear feet of cabinet contact. GE Advanced or Dow 795 are common shop choices.
- Two-part epoxy (for seams). Fabricators use color-tinted epoxy at joints between slab sections. It bonds stone to stone, fills the gap, and sands flush. Akemi and Tenax make the most widely stocked products in the trade.
- Construction adhesive (for nailers and backsplash ledgers). Loctite PL Premium or a similar polyurethane bonds stone to a wood nailer on unsupported overhangs. Apply it sparingly because it's rigid, and expansion or contraction can stress the stone.
- Mounting clips or L-brackets. Stainless or zinc-plated clips screw into the cabinet rail and hook under the stone edge. They earn their keep at corners and on spans longer than 36 inches with no cabinet support underneath.
- Shims (plastic or composite). Never wood. Wood shims compress, rot, and change dimension. Plastic shims hold their height forever and matter for leveling before the adhesive sets.
For granite countertops specifically, keep solvent-based adhesives away from polished surfaces. Any seepage etches the finish and leaves a permanent haze.
How do you level and position the slab before gluing it down?
Positioning is 80% of the job. Once the silicone skins over, you have maybe 10 to 15 minutes before movement turns destructive, so everything has to be right before you pull the caulk gun.
Set the slab dry first. Lift it into place (two people minimum for anything over 50 lbs, three or four for a full slab), then check level in both directions with a 4-foot level. Cabinets are rarely level stud to stud. Shim the low spots with plastic shims on the top rail. Common shim thicknesses run 1/16 to 1/4 inch, and stacking is fine. Mark the shim positions with tape so you can set them back exactly the same after you flip the stone for adhesive.
Check your overhangs. Standard overhang past the cabinet face is 1 to 1.5 inches [4]. On a dishwasher side or a range, confirm the appliance still fits once the stone is in. Measure from the cabinet face to the wall on both ends of the run and make the countertop parallel to the wall rather than centered on the cabinets. Walls are rarely straight.
For seams, keep them off the centerline of a sink cutout and out of high-traffic corners. Seams are structural weak points. A seam directly under where someone leans their weight or sets down heavy pots will crack eventually.
Step-by-step: how to attach a granite countertop to cabinets
Once you've done a full dry fit and confirmed level, overhang, and seam placement, here's the actual sequence.
-
Remove the slab and set it upside-down on padded sawhorses or on the floor over carpet scraps. Never set granite face-down on a hard floor without padding.
-
Apply silicone to the cabinet top rails. Run a 3/8-inch continuous bead along every rail the slab will touch. Don't glob it on, and don't spread it thin. A consistent bead compresses to about 1/8 inch when the stone sits down, which is the right amount for a flexible bond without squeeze-out that's a mess to clean.
-
Set your plastic shims back in the marked positions before the stone goes down.
-
Lift the slab into position and lower it slowly, starting at the back wall and setting the front edge last. Two people makes it a coordination job. Three makes it safe. Don't slide the stone across the cabinets or you'll smear the silicone out of place.
-
Check level again right away. Your working window is short. Adjust shims by lifting one edge a hair at a time.
-
For mechanical clips: screw them into the cabinet rail from inside the cabinet, hooking under the stone edge. Space them every 18 to 24 inches on long runs.
-
Run a bead of silicone between the countertop and the backsplash or wall. This bead seals against water. It isn't structural. Smooth it with a wet finger and let it cure before using the sink.
-
If there's a seam, do it after both slabs are set and aligned. Mix the two-part epoxy per the manufacturer's ratio (usually 1:1 by volume for Akemi-type products), tint it to match the stone, and work it into the joint. Pull the edges flush with seam setters or suction clamps and let it cure fully (typically 30 to 60 minutes for most countertop epoxies) before releasing.
-
Clean squeeze-out with a plastic scraper and denatured alcohol before it cures. Cured silicone on a polished granite face is miserable to remove without scratching.
Do you need mechanical fasteners or clips, or is adhesive enough?
For most standard cabinet installs, silicone alone is enough. The stone's weight and its full-length contact with the cabinet rails means the assembly won't budge under normal household use.
Clips earn their place in specific situations. Overhang more than 6 inches past a cabinet rail with nothing underneath, and you need mechanical support. Codes vary, but the general fabrication rule of thumb is that unsupported overhangs over 6 inches want corbels or hidden steel brackets, and overhangs over 12 inches need legs or full support [4]. The stone can't cantilever that much weight without risking a crack at the cabinet edge, which acts as a fulcrum.
Corner joints, where two sections meet at 90 degrees, also do better with aluminum or stainless corner brackets epoxied to the underside. They hold the two pieces in plane so one section can't ride higher than the other over time.
Waterfall island edges, where the stone drops vertically to the floor, need a different approach entirely: threaded rod anchors epoxied into the stone with two-part anchoring epoxy, then bolted to a steel frame or the cabinet structure. That's past DIY for most people, and fabricators who build waterfalls have jigs made just for the rod placement.
How do you attach granite to an island with a large overhang?
Island overhangs are the toughest attachment scenario. A typical breakfast bar overhang runs 12 to 15 inches so someone can sit with their knees under the stone. That's a big cantilever for a material with high compressive strength but low tensile strength. Granite doesn't bend. It breaks.
The standard professional approach for overhangs of 10 to 15 inches uses steel rods or bars embedded in or across the substrate. Two paths work. You can surface-mount steel angle brackets screwed to the cabinet top and extending out to catch the underside of the stone. Or you can epoxy threaded rod into the granite at the cabinet edge and bolt it through into the cabinet structure. The rod method is cleaner because the hardware hides, but it means drilling into the stone from underneath before install, which is a shop task.
Corbels are the third option and the most visible. Decorative stone or metal corbels attach to the cabinet side panel every 24 to 36 inches and carry the overhang from below. Some people like the look. Others find it fussy. Structurally they work fine, as long as they're bolted through the cabinet side rather than face-screwed into it.
For kitchen countertops with seating overhangs, the fabricator should design the support in at the template stage, not improvise it on install day.
What's the right way to attach granite at a seam?
Seam work is where amateurs and pros split hardest. A bad seam is obvious, permanent, and weak.
The professional process: both slabs go in dry first, aligned exactly. The seam gap gets cleaned with acetone to strip any dust, oil, or moisture that would contaminate the bond. Then two-part color-tinted epoxy is mixed and worked into the joint. Suction clamps or seam setters pull the two edges tight and hold them flush while the epoxy cures. Squeeze-out gets cleaned before it sets. After cure, the seam is hand-polished with diamond pads to match the surrounding finish.
The epoxy is structural, not cosmetic. It holds the two pieces together horizontally. The silicone under each piece holds it to the cabinet. The seam epoxy holds the pieces to each other. Skip it and just butt the edges together, and they'll drift apart over months as the cabinets move.
Seam width matters. A tight seam (under 1/16 inch) looks best but demands precision cuts from the fabricator. A seam over 1/8 inch gets harder to match with tinted epoxy and shows in most stones. Some fabricators quote a 1/16-inch gap tolerance as standard. Ask before the job.
Can you DIY granite countertop installation, or should you hire a pro?
Honest answer: it depends on the size of the job and your setup.
A small bathroom vanity top, under 20 square feet and under 50 lbs, pre-cut from a home improvement store, is genuinely DIY-friendly. Set it on a bed of silicone, level it, done. The sink cutout is pre-made, the edges are polished, and there are no seams.
A full kitchen with an island, an undermount sink, and two or three slab sections is a different animal. Moving 400-pound slabs without cracking them or hurting someone is a real physical problem. Fabricators use suction cup lifters, A-frames, and sometimes forklifts. DIY teams use muscle and plywood slides. The margin is thin.
Beyond the physical risk, any mistake at a seam or a sink cutout is expensive to fix. Fabricators warranty their installs. If a seam opens or a slab cracks at an undermount sink in the first year, a pro shop comes back. DIY it and something breaks, you're buying a new slab.
If you're gathering prices and want to see what's driving the number, SlabWise's instant quote tool shows how material, edge profile, and cutout choices move the total before you walk into a showroom.
For reference, professional installation on granite runs roughly $200 to $500 per slab depending on region and complexity [5], usually 10 to 20% of the total project cost. That's money well spent on the physical part even if you did everything else yourself.
How do you remove a granite countertop without breaking it?
Removing granite comes up often in remodels where the stone gets reused or replaced. The process is roughly the reverse of installation, with more caution about the silicone bond.
Start by pulling the sink, faucet, and any nearby appliances. Disconnect the plumbing and let the area dry. Score the silicone bead at the wall and backsplash line with a utility knife. Then work a flexible putty knife or a specialty countertop removal blade between the stone and the cabinet rail to cut the silicone bond. Go slow along the entire perimeter. Cut every inch of adhesive contact before you try to lift, because prying a section that's still bonded at one end is exactly how slabs crack.
Remove any mechanical clips from inside the cabinet before lifting.
Once the bond is fully cut, lift straight up. Don't pivot or lever from one end. Two people minimum, and for anything over 50 lbs, three people or a suction lifter is the safe call.
If the slab was set in construction adhesive instead of silicone (it happens with some older installs and some DIY jobs), removal gets much harder. Construction adhesive bonds rigidly, and your options are slow prying with a reciprocating saw blade between stone and substrate, or accepting that the cabinet tops need refinishing after. Silicone is almost always the right call precisely because future removal stays clean.
What can go wrong with granite attachment, and how do you fix it?
The most common problem after install is a rising seam: one section sits slightly higher than the one next to it. It happens when shim heights didn't match, or when one cabinet rail was higher and the installer didn't catch it. Caught inside the silicone cure window (usually 24 to 48 hours for full cure on most silicones [6]), you can sometimes re-shim. After full cure, you're either living with it or pulling the stone entirely.
Second most common: a cracked slab at the undermount sink cutout. The corners of a rectangular cutout concentrate stress. A crack usually runs from a corner toward the cabinet edge. It's almost always a support problem, either the cabinet rail under the front of the sink wasn't carrying the stone on both sides of the cutout, or someone sat on the countertop edge near the sink. Fix means professional epoxy repair (visible in some stones) or slab replacement.
Silicone bond failure at the backsplash is cosmetic, not structural. The bead opens and you get a gap. Cut out the old silicone with a utility knife and razor, clean with alcohol, and re-caulk. Do this every 5 to 10 years as maintenance.
For ongoing care of the surface itself, see our guide on how to clean stone countertops.
Movement at the seam (two pieces drifting apart) means the seam epoxy failed. It's rare with proper install but happens if the surfaces weren't clean before bonding or the joint was too wide. Professional repair means re-epoxying after cleaning both faces.
How does granite attachment compare to other countertop materials?
Not every material attaches the same way, and knowing the differences helps if you're picking between surfaces or juggling several countertop types in one project.
Quartz countertops install almost identically to granite: silicone to the cabinet rails, epoxy at seams, clips at overhangs. The main difference is quartz runs slightly denser and more consistent in thickness, so leveling is sometimes easier. Seams are harder to hide because engineered patterning rarely matches at a cut.
Marble countertops follow the same process as granite but need more care about adhesive selection, since marble is more porous and reactive to solvents.
Butcher block countertops use a completely different strategy: they get screwed from inside the cabinet through slotted holes that allow seasonal wood movement. Don't glue butcher block down rigidly or it will crack as it moves with humidity.
Laminate countertops are usually glued with contact cement to a particleboard substrate that's screwed to the cabinet from below. Lighter, simpler, but the adhesive is permanent and the substrate is vulnerable to water.
Concrete countertops vary wildly by pour method. Precast concrete installs like stone. Cast-in-place concrete is formed and poured right on the cabinet, with no lifting at all.
| Material | Primary attachment | Seam method | DIY-friendly? |
|---|---|---|---|
| Granite | Silicone + clips | 2-part epoxy | Small jobs only |
| Quartz | Silicone + clips | 2-part epoxy | Small jobs only |
| Marble | Silicone + clips | 2-part epoxy | Small jobs only |
| Butcher block | Screws (slotted) | Glued butt joint | Yes |
| Laminate | Contact cement | Routed/glued | Yes |
| Concrete (precast) | Silicone | Epoxy or grout | With experience |
What building code or safety rules apply to granite countertop installation?
Most residential countertop work isn't covered by a specific prescriptive code section the way framing or electrical is. The International Residential Code (IRC), which most U.S. jurisdictions adopt [7], addresses cabinet and countertop attachment only indirectly, through general structural loading provisions. The installer carries the responsibility for a sound assembly under reasonable use loads.
Where code applies directly is at the sink. Undermount installs near a disposal often require a licensed plumber for the drain connection in jurisdictions that define that work as permit-required. The countertop install itself is generally not permit-required in most municipalities, but the plumbing and gas (if a cooktop) connections are.
For islands used as breakfast bars, ADA accessibility guidelines (if the home is subject to them, as with new construction in multifamily settings) set countertop heights and clear floor space. The Fair Housing Act accessibility requirements under 24 CFR Part 100 [8] apply to new residential construction, not existing home renovations, but it's good to know if you're doing a major remodel in a covered building.
On the product side, adhesives used indoors must meet VOC (volatile organic compound) limits under EPA rules if you're in a regulated air district [9]. Low-VOC silicone and epoxy formulations are everywhere now and are the standard choice for interior work.
Frequently asked questions
Do you have to glue granite countertops down?
You don't need a full adhesive coating, but you do need to secure the stone against horizontal movement. A continuous bead of silicone on the cabinet rails is the standard minimum. On unsupported overhangs or at seams, additional adhesive or mechanical clips are necessary. Gravity holds most of the weight, but silicone keeps the slab from shifting over time.
How long does silicone take to cure under granite?
Most 100% silicone caulks skin over in 30 to 60 minutes and reach full cure in 24 to 48 hours at normal indoor temperature and humidity. Hold off on using the sink or loading anything heavy near seams until the full cure. Low temperatures or very dry air slow curing. Check the product datasheet for the brand you're using.
What kind of silicone do you use to attach granite?
Use 100% silicone, not silicone-latex or acrylic-latex blends. Look for a product rated for kitchen and bath or for stone installation, clear or color-matched to your cabinet finish. GE Advanced Silicone and Dow 795 are common in professional shops. Skip anything with anti-mold additives if it will contact porous stone, since some formulations can stain.
Can granite countertops be installed without an undermount sink first?
Yes, and it's often the right sequence. The granite is templated after the cabinets are set, then the sink cutout is made in the shop before the stone comes to site. The sink is typically installed after the stone is set, from below, with mounting clips and silicone against the underside of the stone. Installing the sink first and trying to position the stone around it is much harder.
How do you attach granite to cabinets without drilling?
Silicone adhesive on the cabinet rails handles most of the job with no drilling into stone or cabinet. Mechanical clips screw into the cabinet rail from inside, so no drilling into the granite. The only time you drill into the stone is for threaded-rod overhang support on large islands, and that's a shop-side task done before delivery.
Is it safe to sit on granite countertop overhangs?
It depends on how the overhang is supported. An unsupported overhang past 6 inches is a structural risk under point loads, which is exactly what a person sitting on the edge creates. If it's properly supported with corbels, steel brackets, or legs rated for the load, sitting on it is fine. If the only support is the cabinet edge acting as a cantilever, don't sit on it.
How do you fix a gap between granite and the wall?
A gap at the backsplash or wall is normal given how uneven walls are. The fix is a bead of color-matched silicone caulk. Don't use grout here, it cracks. Clean both surfaces, run painter's tape on both sides for a clean line, apply the silicone, tool it smooth with a wet finger, and pull the tape before it skins. This seam needs redoing every 5 to 10 years.
Can you reuse granite countertops after removing them?
Yes, if the removal is careful. The main risk is cracking at seams or cutouts while cutting the silicone bond. A slab that comes off in one undamaged piece can be re-templated and reused elsewhere. The polished surface isn't affected by a careful removal. The stone may need re-cutting or new cutouts if the new kitchen has a different sink or cooktop location.
What holds granite countertops to walls without upper cabinets?
For wall-mounted floating shelves or open designs without uppers, the countertop still sits on the base cabinet structure. The wall plays no structural role in most installations. Backsplash silicone is just a water seal. If a countertop truly has to attach to a wall without base cabinets, it needs steel ledger brackets lag-bolted into studs, which is a specialized structural install.
How long does it take to install granite countertops?
A professional two-person crew can install a standard kitchen of three to four slab sections with one seam and an undermount sink in two to four hours. Complex jobs with multiple seams, a waterfall island, or difficult access take a full day. The adhesive needs 24 hours before you use the sink. Plumbing reconnection usually happens the same day once the stone is in.
Do you need to support granite at the dishwasher opening?
Yes. The dishwasher opening leaves a gap in the cabinet rail support. Most installers add a wood nailer or steel support across the front of the opening, tied to the adjacent cabinet stiles, so the granite has a continuous support surface. Without it, the stone spans the opening unsupported and can crack under load over time.
Can you attach granite directly to plywood instead of cabinets?
Yes. Many installs use a 3/4-inch plywood substrate on top of the cabinet carcasses for a flat, consistent support surface. The plywood is screwed to the cabinet rails, then the granite sits on silicone applied to the plywood. This works well for older cabinets with uneven or damaged top rails and gives the installer more control over the final countertop height.
Sources
- Natural Stone Institute, Stone Weight Reference: Granite slabs weigh approximately 13 lbs per sq ft at 2 cm thickness and 18 to 20 lbs per sq ft at 3 cm thickness
- US Department of Energy, Building Technologies Office: Laminate countertop surfaces weigh approximately 3 to 5 lbs per square foot, substantially less than stone alternatives
- Marble Institute of America (now Natural Stone Institute), Installation Guidelines: Standard countertop overhang past cabinet face is 1 to 1.5 inches; overhangs exceeding 6 inches require additional support
- HomeAdvisor / Angi, Granite Countertop Installation Cost Guide: Professional granite countertop installation costs approximately $200, $500 per slab depending on region and job complexity
- Dow Chemical Company, Dow 795 Silicone Building Sealant Technical Data Sheet: 100% silicone sealants typically skin over in 30 to 60 minutes and reach full cure in 24 to 48 hours at standard interior conditions
- International Code Council, International Residential Code (IRC): The IRC governs residential structural requirements in most US jurisdictions; countertop installation falls under general structural loading provisions rather than specific prescriptive rules
- US Department of Housing and Urban Development, Fair Housing Act Accessibility Requirements, 24 CFR Part 100: Fair Housing Act accessibility requirements under 24 CFR Part 100 apply to new residential construction in covered buildings, specifying countertop heights and clear floor space
- US Environmental Protection Agency, Consumer and Commercial Products Rule, 40 CFR Part 59: EPA VOC regulations under 40 CFR Part 59 limit volatile organic compound emissions from adhesives and sealants used in consumer and commercial applications
- Natural Stone Institute, ANSI/NSI 373 Sustainable Production Standard: Natural Stone Institute sets industry standards for fabrication and installation practices for stone countertops in the United States
Last updated 2026-07-09