TL;DR
- A touch-up kit for countertop installers is a set of color-matched fillers, adhesives, tinting pigments, and finishing tools used to repair chips, hide seams, and fix small defects on stone, laminate, quartz, or solid surface countertops.
- A basic kit costs $20 to $80.
- Professional multi-surface kits run $100 to $300, and most single chip repairs use under $5 of material.
What does a countertop touch-up kit actually contain?
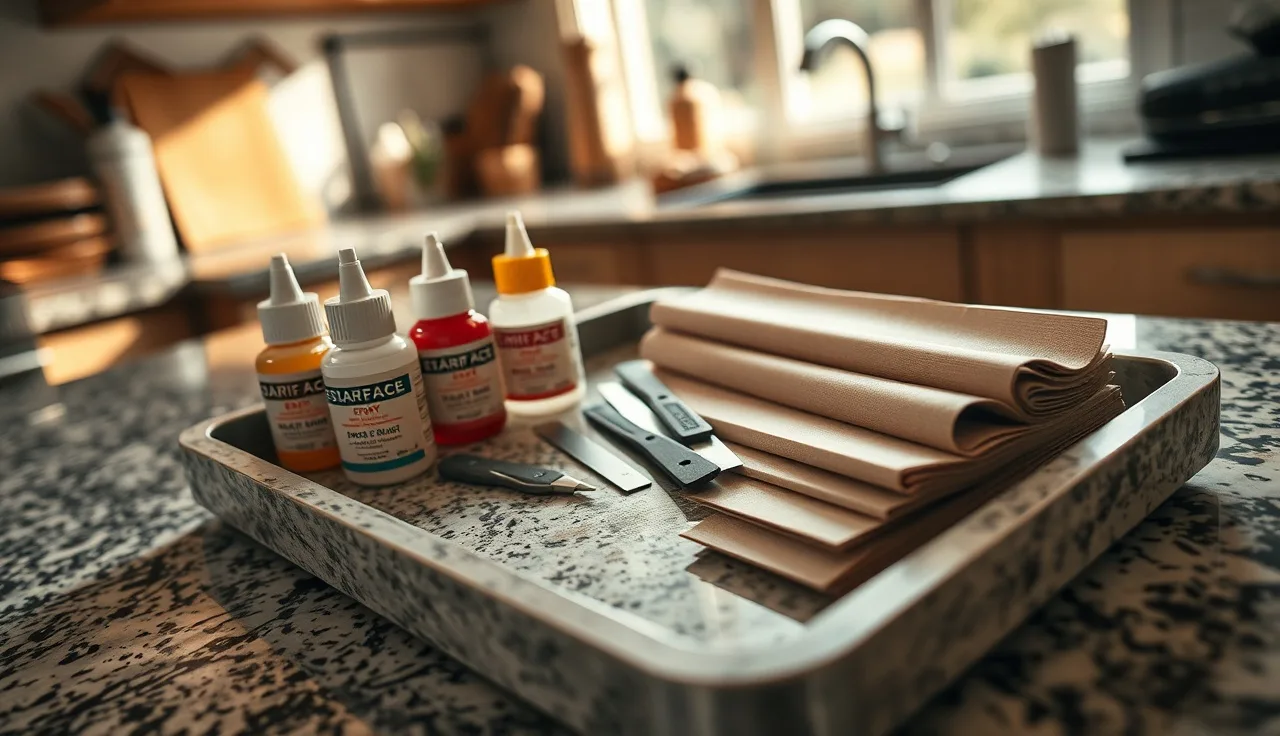
A touch-up kit is a set of color-matched fillers, mixing components, applicators, and finishing tools that turn a chip or open seam into an invisible repair. The exact contents depend on the surface, but almost every kit sold to fabricators shares a core set of parts.
First, a color filler. Stone kits use an epoxy-based compound or a UV-cure resin tinted to match common granite, marble, and quartz colors. Laminate kits use a paste that looks and behaves more like thick paint. Solid surface kits (Corian, for example) ship with acrylic compounds that bond chemically to the base material.
Second, a hardener or catalyst. Two-part epoxy systems mix a resin with a hardener at a set ratio, usually 1:1 or 2:1 by volume. Get this wrong and the repair either stays gummy forever or kicks off before you can work it.
Third, colorants or tint chips. Better kits include dry pigments or tinted liquid drops so you can dial in a close match instead of settling for one of five pre-mixed tubes. Stone is rarely one flat color. A filler that's slightly off reads as a repair from three feet away.
Fourth, applicators. Plastic spatulas, putty knives, and fine-tip syringes for packing material into tight seam gaps without smearing it across the surrounding surface.
Fifth, finishing tools. A razor blade or flat scraper to level cured filler flush, wet-dry sandpaper from about 400 to 2000 grit, and often a small polishing compound and pad to bring back sheen after sanding.
Sixth, a sealer or topcoat. Some kits add a small bottle of penetrating sealer or a clear UV-stable resin to protect the repair and match its sheen to the field around it.
Specialty kits go further. A few add a UV lamp for light-cure resins, a color-match fan, or a small heat gun for speeding up cures on laminate.
What surfaces can a touch-up kit repair?
A touch-up kit can repair natural stone, engineered quartz, laminate, solid surface, and wood, but each surface needs its own chemistry. Read any kit sold as "universal" with some skepticism.
Natural stone (granite, marble, quartzite, travertine) usually gets an epoxy or polyester resin mixed with stone dust or pigment. On polished granite the hard part is matching gloss level, not color. Chips on an eased or bullnosed edge are the most common stone repair a fabricator sees on a job site.
Engineered quartz (Silestone, Cambria, MSI Q) takes a similar epoxy approach, but quartz color is consistent and its particle distribution is tight. A shade mismatch shows more on quartz than on a busy granite slab. For Cambria countertops specifically, the maker publishes approved repair procedures and sells color-matched kits through its dealer network.
Laminate countertops (Formica, Wilsonart, and others) develop chips and edge separations, not the deep gouges you see in stone. Laminate countertops respond well to a paste-type filler finished with a matching color marker or laminate repair paint. Formica countertops can sometimes be fixed with the brand's own touch-up kit, worth having if you install a lot of it.
Solid surface (Corian, Avonite, Staron) has an edge here. The material is homogeneous through its full thickness, so it can be sanded and re-polished without any filler at all [10]. Corian countertops get repaired by trained fabricators using a process closer to woodworking than stone work. Small chips fill with a color-matched solid surface adhesive.
Butcher block and wood countertops use wood filler, stainable epoxy, or a mix of sawdust and glue. Butcher block countertops are almost always oil-finished, so any repair also needs a fresh coat of food-safe oil over the area.
Soapstone and quartzite each have quirks. Soapstone chips get filled with dark epoxy and then re-oiled. Quartzite acts like marble chemically but is harder, so color-matching means matching translucency as well as hue. See the SlabWise guide on how to clean quartzite countertops for how surface treatments change future repair visibility.
When should an installer use a touch-up kit on a job site?
Use a touch-up kit before you walk out the door, not after the homeowner calls to complain. The right moment is while you still have color-matched material mixed and the surface is open and accessible.
Any chip at a sink or cooktop cutout that happened during templating or cutting should be repaired during installation. Cutout edges are the highest-stress point on most countertop installations [1], and a small unfilled chip there will spread if it takes a thermal shock from a hot pan set nearby.
Seam lines showing a gap wider than a credit card (about 0.76 mm) should be filled. A tight seam packed with color-matched epoxy is stronger than an open gap and looks far cleaner. Most fabricators target a finished seam gap under 1/16 inch (1.6 mm), though busier stone patterns hide slightly more [2].
Corner chips on outside corners show up constantly during transport and setting, and they're prime touch-up candidates. Inside corners are less visible but still matter, because liquids pool there and creep under the slab if the joint is left open.
Any spot where the stone was drilled and the surrounding material micro-cracked deserves a drop of low-viscosity resin before sealing. The crack stays invisible until the surface gets wet. Then it reads as a dark line.
How much does a countertop touch-up kit cost?
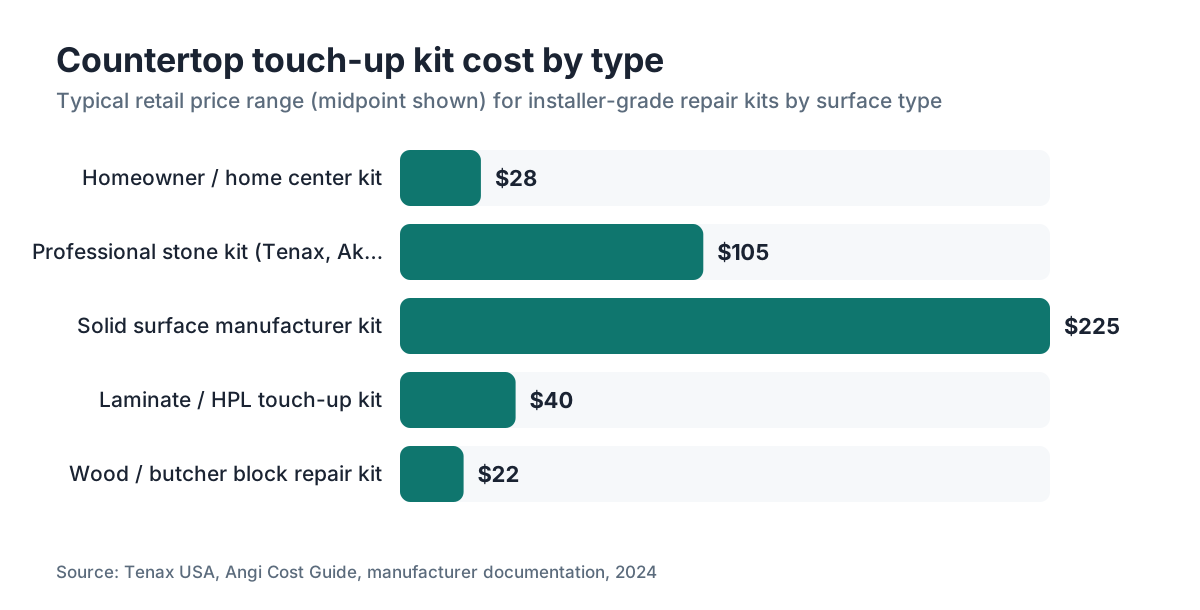
A countertop touch-up kit costs $15 to $300 depending on format and who it's built for. Homeowner kits run $15 to $40. Professional stone kits run $60 to $150. Solid surface manufacturer kits run up to $300. On a per-repair basis, most stone chips use less than $5 of material, so the kit is mostly a setup cost spread across many jobs.
A homeowner-grade kit from a home center (Loctite, Klass Kote, or store-brand versions) comes with two or three pre-mixed colors plus a small applicator set. These handle a single repair on a beige granite or white quartz fine, as long as the match is close.
A professional stone repair kit from Tenax, Akemi, or Integra Adhesives runs $60 to $150 and adds a broader color palette, tint pigments for custom mixing, UV-cure options, and better polishing compounds. This is what most shops stock.
A full solid surface repair kit, with the right adhesive compounds, color chips, and refinishing materials, runs $150 to $300 when sourced from the material maker.
Wood and butcher block materials cost the least. A stainable epoxy wood filler and a food-safe oil finish together rarely top $30.
| Kit Type | Price Range | Best For |
|---|---|---|
| Homeowner / home center | $15 to $40 | Single repair, limited color range |
| Professional stone (Tenax, Akemi) | $60 to $150 | Fabricator shop, natural stone jobs |
| Solid surface manufacturer kit | $150 to $300 | Corian, Avonite, Staron installs |
| Laminate / Formica touch-up kit | $20 to $60 | Chip and edge repair on HPL surfaces |
| Wood / butcher block repair | $15 to $30 | Oil-finish wood countertops |
How do you use a stone countertop touch-up kit step by step?
You repair a stone chip in six steps: clean, mix, apply, cure, level, seal. This covers a typical chip on polished granite or quartz. Other materials follow the same sequence but swap the chemistry. Hands-on time runs 20 to 30 minutes plus cure time.
Step 1: Clean the repair area. The chip or crack has to be free of dust, grease, and loose material. Wipe it with acetone or denatured alcohol and let it dry fully before you touch anything else. Contamination under an epoxy repair is the number one reason repairs peel out later.
Step 2: Mix your filler. With two-part epoxy, follow the maker's ratio exactly. Most stone repair resins are 1:1 by volume [3]. Mix on a plastic or glass palette, never cardboard, which soaks up hardener and throws off your ratio. Add tint pigments in small increments and check against the dry stone, not the wet mix, because colors shift as epoxy cures.
Step 3: Apply. Use a fine plastic spatula or a toothpick-size tool to pack filler into the chip, overfilling slightly so there's material to remove once it hardens. For a seam, a thin bead of seam-setter adhesive from a syringe tip beats a putty knife.
Step 4: Let it cure. Two-part epoxies at room temperature reach handling strength in 30 to 60 minutes and full cure in 24 hours [3]. UV-cure resins set in 30 to 90 seconds under a lamp, which is why many fabricators switch to them for job-site speed.
Step 5: Level the repair. Once cured, hold a fresh razor blade flat against the surface and shave the proud material down close to flush. Follow with 400-grit wet-dry sandpaper, then 800, then 1500 to 2000, keeping the pad flat. On polished surfaces, finish with polishing compound and a felt pad or a variable-speed grinder at low RPM.
Step 6: Seal. Apply a small amount of penetrating sealer or the kit's topcoat over the repair and the field around it. This protects the epoxy (which can yellow slightly over years without UV protection) and evens out the sheen.
Most experienced fabricators carry a UV-cure kit for one reason: it kills the wait.
What are the most common mistakes installers make with touch-up kits?
The biggest mistake is grabbing the wrong color. Color-matching stone is genuinely hard. The background color, the grain size, and the veining direction all interact. Fabricators who do a lot of stone keep a color-match fan from their adhesive supplier and spend two minutes finding the right blend before mixing. Skip that and grab the "closest" pre-mixed tube, and you get a repair that looks fine in the shop and terrible in kitchen daylight.
Over-filling, then grinding too hard. Overshoot and you have to sand aggressively to level the repair, which changes the surrounding finish. On polished granite that leaves a dull halo you can't remove without re-polishing the whole section with a floor machine.
Using a kit past its shelf life. Epoxy hardeners degrade. A hardener that sat in a hot truck for two summers may not cure fully, leaving a repair that stays soft or tacky. Most professional stone repair adhesives last 12 to 18 months when stored right [3]. Date your kits.
Skipping the acetone clean on a greasy kitchen surface. On an existing kitchen (versus a new install), the old top has cooking oil worked into any porous area, and epoxy won't bond to oil. Clean it, let it dry, then repair.
Using the wrong chemistry for the material. Polyester adhesives work for many granite repairs but can react badly with some engineered quartz products. Check the adhesive maker's compatibility notes for the specific brand of quartz in front of you.
Can homeowners use a touch-up kit themselves, or should they call a fabricator?
Homeowners can handle small laminate chips, minor edge touch-ups on wood, and filling a small seam gap on light-colored quartz. The skill ceiling on those is low, and a bad repair is easy to spot but rarely does structural harm. Natural stone is where DIY gets risky.
Stone repairs are harder. The color-match work and the polishing sequence take practice. A homeowner who makes a visible mess of a granite chip has usually made things worse, because now a fabricator has to remove the botched repair before doing the real one. On marble countertops the risk climbs, because marble is softer and more reactive, and the wrong product can etch the surface.
For a chip bigger than about a quarter inch across, or any crack running through a seam, call a fabricator. A single natural stone chip repair usually costs $100 to $250 [4]. That's far less than replacing a section.
On kitchen countertops around sinks, where repairs cluster, water getting under a bad repair does more damage than the original chip ever would. Get it done right.
Shops that track repair calls in quoting software (SlabWise, for one, lets fabricators log repair visits separately from new installs so you can see which materials generate the most callbacks) report that roughly 60 to 70% of post-installation service calls involve edge chips on natural stone, based on informal surveys at fabrication industry conferences. Treat that figure as a rough field estimate, not a hard study number.
What is the difference between a seam filler and a touch-up kit?
A seam filler bonds two slabs together during install. A touch-up kit repairs damage after install. People use the terms interchangeably, but the difference is real and it changes what you stock.
A seam filler (or seam setter) is a color-matched adhesive used to fill the gap between two stone slabs during countertop installation. You apply it while the joint is still clamped, and its main job is structural: bonding the two pieces and blocking water at the joint. Integra Adhesives, Tenax, and Colorfast all sell seam setter lines for this. These adhesives have a working time of 5 to 20 minutes depending on formula [9].
A touch-up kit is a broader set of repair materials used after the install is done. It might include a seam-setter-type adhesive as one part, but it also carries the grinding and polishing tools you need to make a repair disappear.
For a truck kit, carry both. Keep a seam setter in the colors that match your most common inventory, plus a general touch-up kit for post-cure repairs and field calls.
How do you match the color when doing a stone countertop repair?
Match the dominant background color first, then layer in movement, then check under multiple light sources. This is the skill that separates an invisible repair from an obvious one.
Start with the background. Most stone has a dominant ground color: a tan, a gray, a cream. Your epoxy base should match that, not the specks or veins.
Then add movement. Real stone has depth. A flat-colored fill looks flat even when the shade is technically right. Swirling in a small amount of a contrasting pigment before you fully mix can fake the visual depth of stone texture.
Check the color under multiple light sources. The repair gets viewed under kitchen lighting, natural daylight, and sometimes harsh task lighting. A match that looks perfect under fluorescent shop lights can look wrong under warm incandescent bulbs. This is metamerism, a known problem in color-matching [5]. Some fabricators carry a small daylight-balanced LED panel to check color on site.
Wet versus dry. Fresh polished epoxy reads differently from stone that's been sealed for years. Wet both the repair and the surrounding area with a little mineral oil or the same sealer you plan to use, and check the match in that wet state. That's closer to the long-term look.
On heavily veined stone like white marble or calacatta, the goal isn't a perfect invisible repair. It's a repair that reads as natural variation at viewing distance. Copying a complex vein pattern in epoxy at full scale almost never works. A simplified fill beats an over-detailed one that looks painted.
What should a fabricator keep in a truck touch-up kit?
A truck kit should hold pre-mixed seam colors, a tint kit, UV-cure resin, a UV lamp, graded sandpaper, polishing compound, razor blades, acetone, and material-specific extras for laminate or wood. The whole setup fits in a small case or a gallon zip-lock and costs $80 to $120 to stock. Driving back to the shop for repair materials is lost time and it dents the homeowner's confidence.
Core inventory for a stone-focused shop:
Two or three pre-mixed seam setter colors covering your most common slabs (usually a light neutral, a medium gray, and a darker color for black or brown stone).
A tint kit with 8 to 12 pigment colors so you can blend toward less common slabs.
A UV-cure resin for fast chip repairs. This is the single biggest time saver in field work.
A UV lamp. A small pen-style or panel lamp that runs on a battery pack.
Wet-dry sandpaper in 400, 800, 1500, and 2000 grit.
A polishing compound suited to the stone you work with most.
Razor blades, fresh, in a snap-off holder.
Acetone in a small squeeze bottle for surface prep.
A tube of laminate edge repair paste if your shop does any laminate work.
Food-safe mineral oil or butcher block oil if you install wood tops.
Replace consumables (sandpaper, acetone, razors) as you burn through them. Check adhesive and resin shelf dates every six months.
Are there touch-up kits made specifically for quartz vs. natural stone?
Yes, and the difference matters more than many fabricators think. Quartz kits use tinted UV-cure or epoxy resins built to match a dense, uniform matrix. Natural stone kits rely on custom-tinted epoxy that's forgiving because the stone's own veining hides small variation.
Engineered quartz contains about 90 to 93% ground quartz aggregate bound with polymer resin, usually polyester or epoxy [6]. The repair material has to match that dense, consistent matrix. Tinted UV-cure resins from Tenax or Akemi marketed for quartz work well because they cure to a similar visual density.
Natural stone like granite has crystal structure and natural veining that forgives slight color variation. Repair chemistry matters less on granite than on quartz, where a color miss reads immediately against the uniform background.
For granite countertops, a standard stone epoxy with custom tinting usually does the job. For solid-color or lightly patterned quartz, call the maker's technical line and ask for their recommended approach. Silestone (Cosentino) and Caesarstone both publish repair guidance online or through dealer support [7].
Natural quartzite is a metamorphic rock, not an engineered product, so its repair approach matches granite. For keeping quartzite in shape after a repair, the SlabWise guide on how to clean stone countertops covers the sealing and cleaning that protects repair work long-term.
What is the shelf life of touch-up kit materials, and how should they be stored?
Two-part epoxy resins last 12 to 24 months when stored between 60 and 80 degrees Fahrenheit and kept sealed. UV-cure resins are shorter-lived and sensitive to heat and light. Pigment pastes and tint drops last several years. Shelf life is a real operational issue for shops that repair occasionally instead of every day.
Two-part epoxy resins keep 12 to 24 months from manufacture in that 60 to 80 degree range. The hardener degrades faster than the resin [3]. Storing kits in a truck that hits summer heat above 90 degrees can cut that effective shelf life in half.
UV-cure resins react to both heat and light. Keep them in a dark container or a UV-blocking bag. Even ambient UV from a shop window can start curing an open UV resin, and heat above 85 degrees speeds up degradation of the photoinitiator chemistry [8].
Pigment pastes and tint drops are the most stable part of the kit. Sealed and away from temperature extremes, most colorants last several years.
Practical rule: date every kit when you buy it. Check hardeners every spring. If a two-part kit has been open or baking in a hot truck for more than 18 months, replace it. A failed repair from dead hardener costs more in re-do labor than a $60 replacement kit.
Laminate and wood materials (paste fillers, color markers) are more forgiving. Most last three to five years sealed.
Frequently asked questions
What is a countertop touch-up kit?
A countertop touch-up kit is a set of color-matched fillers, adhesives, tinting pigments, and finishing tools that fabricators and homeowners use to repair chips, fill seams, and correct minor damage on stone, quartz, laminate, or solid surface countertops. Basic kits start around $20. Professional kits run up to $300 depending on surface type and number of included colors.
Can I use a touch-up kit on quartz countertops?
Yes, but quartz needs a UV-cure or epoxy resin formulated for engineered stone, not a generic wood or laminate filler. Because quartz has a very uniform look, color matching is harder than on busy natural stone patterns. Makers like Caesarstone and Silestone offer brand-specific kits or publish approved procedures through their dealer networks.
How long does a countertop chip repair take to cure?
Two-part epoxy repairs reach handling strength in 30 to 60 minutes at room temperature and full cure in 24 hours. UV-cure resins set in 30 to 90 seconds under a UV lamp, which is why many professional installers now prefer them for field repairs. Temperature below 60 degrees Fahrenheit slows epoxy cure and can cause incomplete hardening.
What is the difference between a seam filler and a touch-up kit?
A seam filler is a structural color-matched adhesive applied during installation to bond and fill the joint between two stone slabs. A touch-up kit is a broader repair package used after installation, with chip fillers, tinting pigments, and polishing tools. Professional fabricators carry both: seam fillers for new installs, touch-up kits for field repair calls.
How do I match the color when repairing a granite chip?
Start with the dominant background color, then add small amounts of contrast pigment to mimic stone depth. Check the match under multiple light sources, including natural daylight, because colors can shift between light types (a phenomenon called metamerism). Wet both the repair and the surrounding stone with mineral oil before checking, which approximates the long-term sealed look.
How much does a professional stone repair cost if I call a fabricator?
A single chip repair on natural stone from a professional fabricator typically costs $100 to $250, depending on chip size, stone type, and travel distance. A crack running through a seam may cost $200 to $500 or more, especially if re-polishing the area is needed. Repairing rather than replacing almost always saves money when damage is limited to one area.
What happens if I use a touch-up kit wrong on marble?
Marble is softer and more reactive than granite or quartz. The wrong acidic product can etch the surface, and over-aggressive sanding creates a dull halo that's very hard to remove without professional re-polishing. A poor repair also leaves a second layer of work for any fabricator who later tries to fix it. On marble, call a professional for anything bigger than a very small chip.
Do touch-up kits work on laminate countertops?
Yes, laminate-specific paste fillers and color-matched markers work well for surface chips and edge separations on high-pressure laminate countertops. These repairs skip the mixing and curing chemistry of stone epoxy, so they're more homeowner-accessible. The color range is limited, so matching less common patterns can be tough without a laminate maker's own touch-up kit.
What touch-up products work on butcher block countertops?
Stainable wood epoxy filler is the standard choice for deep gouges. For shallow scratches, light sanding with 150-grit followed by a fresh coat of food-safe mineral oil or butcher block oil often removes the damage entirely. The key follow-up is re-oiling the whole surface, more than the repaired area, so the finish stays even.
How often do installers need to use touch-up kits?
On a typical residential install, an experienced crew uses a touch-up kit on roughly 30 to 50% of jobs, mostly for minor edge chips from transport and cutout work. On jobs with natural stone, complex sink cutouts, or long seam runs, the rate is higher. A kit stocked in the truck eliminates a separate service call and leaves the homeowner with a finished product on day one.
Are UV-cure touch-up resins better than two-part epoxy for stone repairs?
For speed, yes. UV-cure resins set in under two minutes with a lamp, which matters when you're on site and need to polish out a repair before the homeowner sees the work in progress. Two-part epoxies give a longer working time for complex color blending and tolerate storage temperature swings better. Many fabricators carry both: UV-cure for quick chips, two-part for larger seam repairs.
Does touching up a chip affect the countertop warranty?
It depends on the material and who does the repair. Most natural stone countertops carry no material warranty covering fabrication chips. Engineered quartz brands like Silestone and Caesarstone have limited warranties, and some specify that repairs must follow approved procedures to keep coverage. Before a DIY repair on a quartz top still under warranty, check the maker's warranty document or call dealer support.
Sources
- Natural Stone Institute (formerly MIA+BSI), Dimension Stone Design Manual: Sink and cooktop cutout edges are high-stress zones on countertop installations where chips most commonly originate during cutting and handling.
- National Kitchen and Bath Association, NKBA Planning Guidelines: Industry standard seam gap target on residential countertop installations is under 1/16 inch (approximately 1.6 mm) as a finished specification.
- Tenax USA, Stone Adhesive and Repair Product Technical Data Sheets: Most stone repair epoxies have a 1:1 mix ratio by volume, typical handling strength in 30 to 60 minutes, and a shelf life of 12 to 18 months when stored correctly.
- Angi, Countertop Repair Cost Guide: Professional stone chip repair on natural stone countertops typically costs $100 to $250 per repair depending on stone type and damage size.
- National Institute of Standards and Technology (NIST), color and appearance metrology resources: Metamerism causes two color samples that appear to match under one light source to look different under another, a known problem in color-matching applications including stone repair.
- Natural Stone Institute (formerly MIA+BSI), engineered stone reference guidance: Engineered quartz slabs typically contain 90 to 93% ground quartz aggregate bound with polyester or epoxy polymer resin.
- Caesarstone, Care and Maintenance Documentation: Caesarstone publishes approved repair procedures and recommends contacting authorized dealers for color-matched repair materials to maintain product performance.
- Akemi GmbH, UV Resin Technical Data Sheet: UV-cure stone repair resins are sensitive to heat above approximately 85 degrees Fahrenheit and ambient UV exposure, both of which accelerate photoinitiator degradation and reduce effective shelf life.
- Integra Adhesives, Seam Setter Product Line Documentation: Stone seam setter adhesives have working times of 5 to 20 minutes depending on formulation, and are designed for structural bonding of countertop joints as well as color-matched appearance.
- DuPont Corian, Fabrication and Installation Guide: Corian and other solid surface materials are homogeneous through their full thickness, allowing sanding and re-polishing as a primary repair method with color-matched acrylic adhesive for deeper damage.
Last updated 2026-07-11