
TL;DR
- Most chips found at install repair invisibly with a color-matched two-part epoxy or UV-cure resin.
- You apply it in thin layers, cure it, level it flush with a razor blade, then polish to match the finish.
- Plan on 30 to 90 minutes depending on chip depth.
- Fixing it on-site beats sending a slab back to the shop by a wide margin.
What causes chips on stone countertops during fabrication and install?
Chips almost always land on the edge, and almost always during one of three moments: the cut, the transport, or the drop-in. When a CNC or bridge saw exits a tight radius or a sink cutout, the blade can blow out a small chunk on the underside of the profile. Rough handling in transit, especially slabs shifting in the truck without enough padding, cracks or nicks a finished edge. Then there's the final lift-in over the cabinet box, the moment installers dread most. One wrong angle and a corner catches the cabinet rail.
Stone type changes the whole picture. Granite and quartzite are brittle and granular, so their chips run small and jagged, like a divot in asphalt. Marble chips cleaner but deeper because it cleaves along crystal planes. Engineered quartz (brands like Cambria, Silestone, and MSI Q) behaves differently: the polymer binder holds the edges together better, but when a chip does happen, it often exposes a lighter, almost chalky interior that reads nothing like the surface color. That interior mismatch is the hardest repair problem in the shop.
Edge damage is the leading cause of countertop rejection at delivery, ahead of veining mismatches and surface scratching, according to Natural Stone Institute reference data [1]. So this is not a rare edge case. It happens on real jobs, to experienced crews.
Can a chip in a stone countertop actually be repaired, or does the slab need to be replaced?
Most chips at install repair to a standard that satisfies the homeowner and holds up for years. A small number don't, and the difference comes down to three things: location, size, and the stone's color pattern.
A chip is repairable when it is:
- Smaller than roughly 1 inch across at its widest point
- On an edge or corner, not in the middle of a field seam
- On a stone with enough veining or speckle that a filled spot hides in the pattern
A chip is not repairable (or not worth attempting) when it is:
- Larger than 1.5 inches, especially one that has taken out a visible section of the slab face
- On a pure white or solid black stone with no pattern movement, where any fill reads as a gray blob
- Part of a crack that runs beyond the chip into the field of the slab, which points to a structural problem, not a cosmetic one
For engineered quartz, call your distributor before you commit to a repair. Some manufacturers train and certify repair technicians and sell color-matched filler kits (Cambria is one). An unauthorized repair on a slab still under warranty can void that warranty, so have the conversation before you open your epoxy kit [2].
Here's the shop rule I'd use: if you can make the repair invisible under normal lighting at normal viewing distance (standing, not crouching with a flashlight), do it. If you can't, replace the piece. A replacement almost always costs less than a callback, a dispute, and a soured relationship with that GC or homeowner.
What materials do you need to repair a chip in stone at install?
The core kit is short. You need:
- Color-matched two-part epoxy or UV-cure acrylic resin
- Pigment tints (transparent and opaque, in the relevant color family)
- Mixing sticks or a static mix nozzle
- Acetone or denatured alcohol for surface prep
- A razor blade or flat scraper
- 400, 800, and 1500-grit wet/dry sandpaper
- A polishing pad or buffing wheel matched to the stone's finish (honed vs. polished)
- Painter's tape
- For UV resins: a UV lamp (365 to 405 nm covers most resin products)
Epoxy vs. UV resin comes down to time. Epoxy is cheaper and forgiving on timing. You mix, fill, and come back in 30 to 60 minutes to scrape and sand. UV resin cures in seconds under the lamp, which is faster on the job site, but you get less working time to blend colors and you have to buy the lamp. For shop repairs, epoxy usually wins. For on-site touch-ups where the clock is running, UV resin wins on speed.
Major suppliers include Tenax, Akemi, and Integra Adhesives. All three sell stone-specific tinted adhesives, and Integra's color-match system includes over 200 pre-tinted cartridges for common stone colors [3]. If you're doing this regularly, buy a tint kit and learn to mix. Relying on a pre-tinted cartridge for every slab gets expensive and still won't match everything.
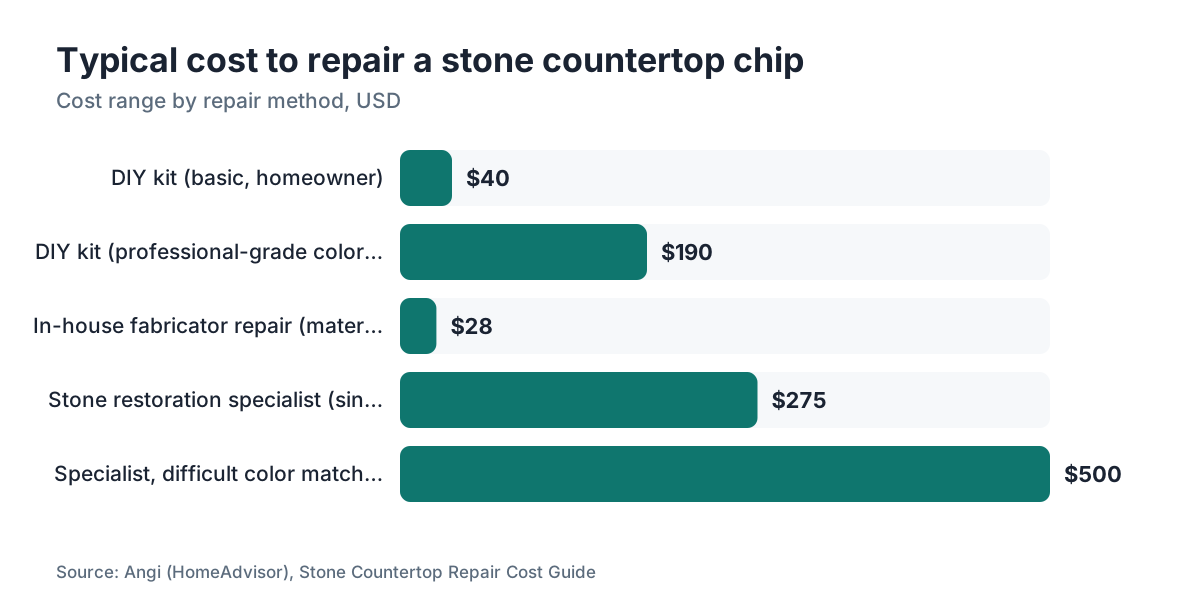
A basic homeowner DIY kit from a stone restoration supplier runs $20 to $60 depending on resin type and pigment count. Professional kits with a full color-matching system and multiple pigment tubes run $80 to $300. The price gap is pigment variety and resin volume, not the underlying chemistry.
How do you actually repair a chip in stone, step by step?
Step 1: Clean the chip completely. Wipe it with acetone on a clean rag to pull off dust, oil, or silicone residue. Stone is porous, and any contamination under the fill causes adhesion failure. Let it dry five full minutes. People in a hurry skip this, and it's the number-one reason repairs fail.
Step 2: Mask around the chip. Run painter's tape to within about 1/8 inch of the chip edge on all sides. That keeps stray resin off the surrounding surface and gives you a clean line to scrape to.
Step 3: Mix and tint your filler. With two-part epoxy, mix the A and B components at the manufacturer's ratio (usually 1:1 or 2:1 by volume). Add pigment in tiny amounts. Start with a mid-tone base that matches the stone's dominant background, then layer in vein colors after the base cures. Never try to force the full pattern into one pour. You're building layers, not painting a picture in one stroke.
Step 4: Fill slightly proud. Apply the tinted resin and deliberately overfill by 1/16 to 1/8 inch above the surface. That covers shrinkage during cure and leaves material to remove when you level.
Step 5: Cure. For epoxy, wait the full manufacturer cure time, usually 30 to 60 minutes at 70 degrees F (21 C). Cold slows it hard. At 50 degrees F (10 C), many two-part epoxies need 90 minutes or more to reach working hardness [4]. On a cold winter job site, warm the stone gently with a heat gun before applying.
Step 6: Scrape flush. Hold a razor blade flat to the surface and scrape the cured filler down level. Multiple light passes beat one heavy one. You're reducing it progressively, not shaving it flat in a single swipe.
Step 7: Sand up the grits. Start at 400-grit wet, move to 800, then 1500. Keep the paper wet. This clears the razor scratches and starts bringing back the sheen. For a honed finish, stop at 1500 and hand-rub with a clean cloth. For high polish, follow with polishing compound and a buffing wheel.
Step 8: Re-seal the repair zone. Once it's leveled and polished, hit the area with your standard impregnating sealer. Cured epoxy doesn't absorb sealer, but the stone right around the repair does, and sealing that ring keeps the repaired spot from standing out as an unsealed island later.
Step 9: Photograph it. Shoot a close-up under direct light. That protects you if the homeowner later claims the chip was never reported, and it's clean documentation for your records. Shops running job management software like SlabWise attach these repair photos straight to the job record, so the paperwork follows the order through the whole workflow.
How do you color-match filler to the stone?
Color matching is the skill that separates a mediocre repair from an invisible one. There's no shortcut. It takes practice, and your first few will show under direct light. That's normal.
The basic approach: look at the stone under the lighting it will actually live in (daylight if you can get it, not shop fluorescents). Pick out three to five tones, from the lightest background to the darkest vein. Mix the epoxy base to the mid-tone and apply that first. After it cures, use a fine artist's brush to lay in the secondary colors, each pigment mixed into a small dab of fresh resin. Those thin painted layers fake the veining or the crystal fleck.
For granite, you're matching a granular texture, not a linear vein. Stipple the second-color tints on with a toothpick or the tip of a brush to build a speckle that reads like grain.
For marble and quartzite, you're chasing veins. Study the vein width, the vein color (it's almost never pure gray or white; there are blue or gold undertones in there), and whether the edge is hard or soft and feathered. Soft edges need a diluted tint dragged through the wet resin before it cures.
For engineered quartz, the chip's interior color is often way off from the surface. Lay down an opaque white or cream base coat first to bury the exposed interior, then color-match to the surface on top. This is exactly why quartz repairs run harder than natural stone, despite what people assume.
Working on a very light or near-solid stone with the chip in plain view? Be honest with the homeowner before you start. Show them what the repair looks like on a sample piece. Setting the expectation up front beats a fight afterward.
What's different about repairing chips in granite vs. marble vs. quartz?
Each material behaves differently, and that changes the repair.
| Stone Type | Chip Character | Best Fill Material | Biggest Challenge |
|---|---|---|---|
| Granite | Small, jagged divots | Two-part epoxy, pigment-tinted | Matching granular texture, not flat color |
| Marble | Cleaner, deeper chips | Epoxy or polyester adhesive | Matching translucent, layered vein structure |
| Quartzite | Brittle, irregular edges | Two-part epoxy | Distinguishing from marble; texture varies widely |
| Engineered Quartz | Chip exposes lighter interior | Epoxy with opaque base layer first | Interior color mismatch; warranty considerations |
| Travertine | Porous, chips at void edges | Polyester filler or cement-based fill | Pre-existing fill may already be present |
Granite is the most forgiving because the natural speckle hides minor color variation. A repair that's 80 percent right on granite reads as invisible at two feet. The same 80 percent match on a solid Calacatta marble reads as wrong the second you walk in.
Marble has one extra thing going for it: it's soft (typically 3 to 4 on the Mohs scale, against 6 to 7 for granite) [5], so you can sand and polish the repair more aggressively without gouging the surrounding stone. That gives you room to level with finer paper and land a true high-polish match.
Travertine is a case of its own. It comes full of natural voids filled with cement or grout at the factory. A chip at a void edge is common and easy: you're just refilling what was already filled. Use a travertine-matched color filler (most suppliers stock these) and run the same level-and-polish process.
Should the fabricator or the installer repair chips found at install?
This is where jobs go sideways. The answer rides on your contract language and shop policy, but a fair industry standard is simple: whoever caused the chip fixes it, and when the cause is unclear, the fabricator handles it.
Shops with clear written policies dodge most of these fights. A standard framework:
- Chip found during templating or in the shop before delivery: fabricator's problem, repaired before install or the piece gets remade.
- Chip found on arrival at the job site before the slab leaves the truck: document it right then with photos, call the shop, get direction before you proceed.
- Chip that happens during the install itself: installer's problem, but the fabricator's crew should carry repair materials on every truck.
What lives on every install truck? At a minimum: a small color-matched epoxy kit for the common stone colors on that day's jobs, a razor blade, 400/800/1500 sandpaper, acetone, and a polishing pad. Good crews treat this like a first-aid kit. You hope you never open it, but it's always there.
Homeowners who spot a chip after install: photograph it right away and contact your fabricator. Most reputable shops will come back and fix a chip, especially one their crew caused. If the chip was pre-existing and disclosed before install, that documentation should already be in writing.
What does a professional chip repair cost?
When a fabricator handles the repair in-house during install, the cost to the homeowner is usually nothing. It's part of delivering the job right.
When a chip turns up later and a stone restoration specialist gets called in, expect $150 to $400 for a single chip repair, depending on size, stone type, and how hard the color match is [6]. Tough repairs on near-solid light stones, or chips over an inch, can run $400 to $600 if the specialist has to make multiple visits to layer and polish.
DIY kits run $20 to $80 for a basic setup. The materials are cheap. The skill is the cost. A botched DIY repair on a visible edge makes the chip look worse and makes the eventual professional repair harder, because now there's cured epoxy in the void that won't bond cleanly to fresh filler. If the chip sits in a highly visible spot on a stone with a difficult match, pay a professional.
For fabricators, the internal cost of an in-house repair is typically $15 to $40 in materials plus 30 to 90 minutes of labor. Stack that against the alternative: a fresh piece of stone, new fabrication time, and a second install trip. The math makes repair the obvious move for anything in the repairable range.
What's the best way to prevent chips at install in the first place?
Prevention pays because even a clean repair is still an extra step that slows the job.
At the saw: run sharp blades. Dull blades cause far more edge blowout. The Natural Stone Institute recommends inspecting saw blades for wear before cutting tight profiles or sink openings [1]. Ease off the feed rate on exits from radii.
In transit: slabs ride on edge, never flat. Riding on edge kills the flex that starts micro-cracks. Keep finished edges away from anything metal or abrasive with foam padding. Every finished piece gets wrapped or padded before it goes in the truck, not after.
At the install: throw moving blankets over the cabinet edges before you set the slab. The most common install chip happens when the back edge catches the top of a cabinet rail on the way down. A blanket on those rails takes five seconds and prevents a chip that costs 60 minutes to fix.
Corner protection caps (soft foam caps that slip over finished corners) cost almost nothing and stop the most common transit chip. If your shop doesn't use them, start. NSI installation guidelines list this as standard practice [7].
One quartz-specific rule: never drag slabs across any surface, including other slabs. The polymer surface scratches easier than natural stone, and the edges chip when they catch an obstacle at an angle.
When does a chip cross the line from a repair into a warranty or replacement conversation?
No universal industry standard names an exact chip size that forces replacement, but there are reference points worth knowing.
The Natural Stone Institute's "Dimension Stone Design Manual" describes acceptable finish tolerances for stone work but doesn't set a specific chip-size threshold for countertop replacement [7]. In practice, most fabricators judge on a blend of size, location, and visibility.
For engineered quartz, the manufacturer's warranty is the controlling document. Cambria's warranty, for example, covers manufacturing defects in material and workmanship but requires notification within a set window after install [2]. A chip caused during delivery or install may fall under the installer's liability rather than the product warranty. Read the actual warranty before you talk to the homeowner. That's not optional.
For natural stone, there is no product warranty from a quarry. Your recourse for a chip on delivery runs against your supplier or your own crew, depending on when and how it happened. This is where documentation at every stage (quarry, shop, truck, install) protects you.
A chip at a seam is a different animal. If a chip lands exactly on a seam line and the two pieces no longer meet cleanly, that's a structural and aesthetic problem a fill repair can't solve. The seam gets remade. That's a replacement conversation.
Fabricators who keep these talks clean build chip inspection into the delivery checklist. When the homeowner or GC signs off that the stone arrived undamaged, that signature carries real weight in a dispute. If you run a shop without a written delivery acceptance form, adding one is one of the highest-value changes you can make. Tools like SlabWise let shops track job status and attach documentation at each stage, so delivery sign-offs live in the digital record instead of on a paper scrap that disappears.
What should a homeowner do if they find a chip after install is complete?
Take clear photos first, ideally within 24 hours of install completing. Note the lighting. A chip that looks dramatic under a direct overhead light can nearly vanish under under-cabinet lighting, and the reverse happens too. Knowing both helps the conversation with your fabricator.
Next, contact your fabricator in writing (email or text, anything with a timestamp). Most reputable shops will return to repair a chip if the photos show a legitimate chip and not a pre-existing, already-disclosed condition. Don't sit on it for weeks. Reach out fast.
Third, don't try a DIY repair before the fabricator has seen it. A good-faith attempt with the wrong product can close the void and make a professional repair harder. Show them the chip first and take their recommendation.
If you want to understand what repair options fit your specific material, our guides on granite countertops, marble countertops, and how to clean stone countertops cover the material properties that drive repairs and maintenance.
For engineered quartz like Cambria countertops, call the manufacturer's customer service line on top of your fabricator. If the chip traces to a manufacturing defect (a subsurface void that caused a brittle failure at the edge), it may fall under the product warranty and the manufacturer may direct the repair.
If your fabricator goes quiet or disputes responsibility, get an independent estimate from a stone restoration specialist. That written estimate gives you a dollar figure for any small-claims or dispute process, and it documents the scope of damage at a fixed point in time.
Frequently asked questions
Can I use regular super glue to fix a chip in my granite countertop?
Super glue (cyanoacrylate) bonds stone temporarily and works as a quick stabilizer to hold a loose fragment in place before a real repair. It's not a finished repair material. It yellows over time, it won't take pigment tinting, and it cures rigid and brittle, so it eventually pops out under normal kitchen thermal cycling. Use it only to re-seat a fragment that's still in your hands, then follow with a proper epoxy repair.
How long does a stone chip repair last?
A properly done two-part epoxy repair holds for many years under normal kitchen use. The bond between cured epoxy and stone is very strong, often stronger than the stone itself in tension. Repairs fail when surface prep was inadequate (contamination under the filler) or when the chip sat at a stress point like an unsupported overhang. Repairs in high-traffic spots like sink cutout corners may need a touch-up in five to ten years.
Will the repaired chip be completely invisible?
Under normal viewing and typical kitchen lighting, a well-done repair on speckled or veined stone is effectively invisible. On solid or near-solid stones (pure white, solid black, uniform beige), even a skilled repair can show under direct raking light. Your fabricator should tell you honestly what visibility to expect before the repair, not after. Setting that expectation up front is part of doing the job right.
Does repairing a chip affect the sealer on my countertop?
The sanding and polishing that levels a repair strips the sealer from the immediate area. Re-seal the repair zone and several inches around it once you finish polishing. Cured epoxy doesn't absorb impregnating sealer, but the stone around the repair does. Skip this and you leave a dry ring that soaks up stains faster than the sealed stone next to it.
Can a chip in engineered quartz like Silestone or Cambria be repaired?
Yes, but it needs an opaque base layer first to bury the lighter interior color that quartz exposes when it chips. The repair runs harder than natural stone because the interior and surface colors differ so much. Check your warranty before you start: Cambria and some other manufacturers run certified repair programs, and an unauthorized repair may affect coverage. Call the manufacturer's customer service line before opening your kit.
What grit sandpaper do I use to finish a stone chip repair?
Start at 400-grit wet to level the cured filler after scraping with a razor blade. Move to 800 to clear the 400 scratches, then 1500 to bring back sheen. For a honed finish, stop at 1500 and buff with a clean cloth. For high polish, follow with a 3000-grit pad and a polishing compound matched to your stone. Keep the paper wet the whole time to prevent heat buildup and carry away abraded particles.
Is it safe to repair a stone chip myself if I'm a homeowner?
Yes, with realistic expectations. DIY kits from stone restoration suppliers run $20 to $60. The risk isn't safety, it's looks: a poor color match or an uneven level can look worse than the original chip. Practice on a scrap piece first if you have one. For chips in highly visible spots, a professional repair ($150 to $400) is likely worth it over a visible DIY attempt.
Can a large chunk that broke off a stone countertop edge be reattached?
If you kept the broken piece and it fits cleanly, yes. Clean both surfaces with acetone, apply a thin layer of two-part epoxy to each mating face, press firmly, and tape or clamp while it cures. This works best on a clean break where the surfaces fit tight. A gap or missing material needs fill after bonding. The structural result is strong; the cosmetic result depends on how clean the break was and how well you hide the seam line.
How do fabricators document chip repairs for their records?
Good practice: photograph the chip before and after under direct light, note the materials used and the date, and attach both photos and note to the job record. That documentation protects you if a homeowner later claims the chip went unreported, and it flags patterns (a blade that's causing blowout, a stone that keeps chipping at the sink cutout). Digital job management tools make attaching photos to orders straightforward.
Does a chip repair void the warranty on my natural stone countertop?
Natural stone slabs from a quarry carry no warranty in the consumer product sense. Your warranty, if any, comes from your fabricator or installer and covers their workmanship. Repairing a chip yourself is unlikely to affect a fabricator workmanship warranty, but check your contract language. Engineered quartz is different: manufacturer warranties may require authorized technicians, so read your warranty document before you start.
What's the difference between a chip and a crack in a stone countertop, and does it change the repair approach?
A chip is missing material, usually at an edge or corner. A crack is a fracture running through the slab with little or no missing material. Cracks need a different fix: inject low-viscosity epoxy under pressure or by capillary action, let it fully penetrate, then cure and surface-polish. A crack that runs more than a few inches, or shows any vertical displacement between the two sides, may signal a support problem under the slab and needs a professional look before repair.
How do I know if a chip I found at install was pre-existing or happened during my install?
Check your pre-install documentation. Reputable fabricators photograph slabs before they leave the shop and walk the homeowner or GC through a delivery inspection. If those photos don't show the chip, and it wasn't noted on the delivery acceptance form, it likely happened during install. This is exactly why pre-install photos and a signed delivery checklist matter. Without documentation, it becomes a word-against-word dispute, which is bad for everyone.
Can chips in marble countertops be polished out, or do they always need filler?
Small surface scratches on marble can sometimes polish out with progressively finer abrasive pads, since marble is relatively soft (Mohs 3 to 4). But a true chip, where material is gone from the surface or edge, can't be polished away. It needs filler. Grinding the surrounding stone down to the chip level would remove too much material and change the edge profile. Fill the void, cure, level, and polish to match.
Sources
- Natural Stone Institute, "Dimension Stone Design Manual": Edge damage is the leading cause of countertop rejection at delivery, ahead of veining mismatches and surface scratching, per Natural Stone Institute reference data.
- Cambria, Warranty Information: Cambria's warranty covers manufacturing defects and requires notification within a specific window after installation; unauthorized repairs may affect coverage.
- Integra Adhesives, Stone Repair Product Line: Integra's color-match system includes over 200 pre-tinted cartridges for common stone colors.
- Tenax USA, Stone Adhesives and Repair Product Guide: Two-part stone epoxies cure in roughly 30 to 60 minutes at 70 degrees F, and cold job-site temperatures near 50 degrees F extend cure time to 90 minutes or more.
- U.S. Geological Survey, National Minerals Information Center (Mohs hardness reference): Marble is typically 3 to 4 on the Mohs hardness scale; granite is typically 6 to 7.
- Angi (HomeAdvisor), Stone Countertop Repair Cost Guide: Professional stone chip repair by a restoration specialist costs $150 to $400 for a single chip, with difficult jobs reaching $400 to $600.
- Natural Stone Institute, Installation and Handling Guidelines: NSI installation guidelines include corner protection caps and padded edge transport as standard practice to prevent chip damage.
- Akemi, Stone Repair and Bonding Products: Tenax, Akemi, and Integra are major suppliers of stone-specific tinted adhesives for chip repair in the countertop fabrication industry.
- Occupational Safety and Health Administration (OSHA), Crystalline Silica: OSHA regulates silica dust exposure during stone fabrication and repair; wet methods are a recommended engineering control.
Last updated 2026-07-11