TL;DR
- Epoxy countertop installers apply resin coatings or cast solid epoxy surfaces over existing counters or new substrates.
- Installed cost runs $45 to $150 per square foot depending on pour depth, design complexity, and your region.
- DIY kits exist, but professional work is safer for kitchens: a bad pour is very hard to undo.
What does an epoxy countertop installer actually do?
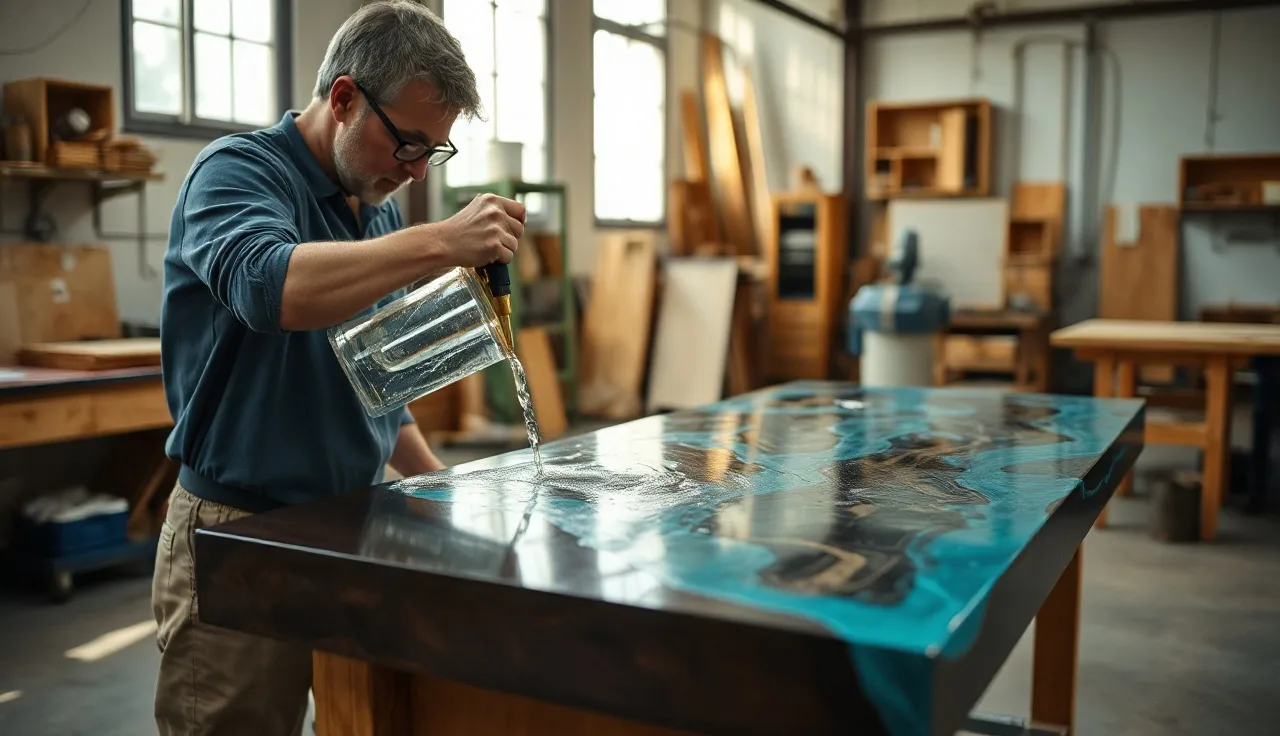
An epoxy countertop installer preps the substrate, mixes two-part epoxy resin to exact ratios, pours or rolls it on, and finishes the cured surface. That sounds simple. It isn't.
Prep is the biggest variable. For a countertop overlay on existing laminate or tile, the installer sands or grinds the surface to 80 to 120 grit so the epoxy bonds instead of peeling. For a full cast countertop, they build a form out of melamine-coated MDF, seal every joint, and level the whole rig before the pour. Any tilt shows in the finished slab because uncured epoxy self-levels by flowing downhill. [1]
Mixing is non-negotiable. Most countertop-grade two-part epoxies require a 1:1 or 2:1 ratio by volume. Measuring wrong by even 5 to 10% causes a soft cure that never fully hardens, stays tacky for weeks, and scratches under a coffee mug. A good installer uses digital scales or calibrated pumps rather than eyeballing.
The pour itself can be clear, pigmented, or decorative. Metallic pigments, acrylic inks, alcohol inks, and dry natural stone chips are all common design options. Each requires a different pour sequence: usually a base flood coat, the decorative manipulation while partially gelled, then a clear topcoat. Between each coat the installer sands lightly with 220 grit to help adhesion.
Curing takes 24 to 72 hours for a hard enough surface to use, and 7 to 30 days for full chemical cure depending on the product. [1] Some installers do the finish sanding and polishing on-site after the cure; others cut the slab loose from the mold, finish it in the shop, and transport it like stone.
Finally, seams. A multi-section epoxy counter can be joined with color-matched epoxy filler and sanded flush. Done well, seams are invisible. Done badly, they're a raised ridge forever.
How much do epoxy countertop installers charge?
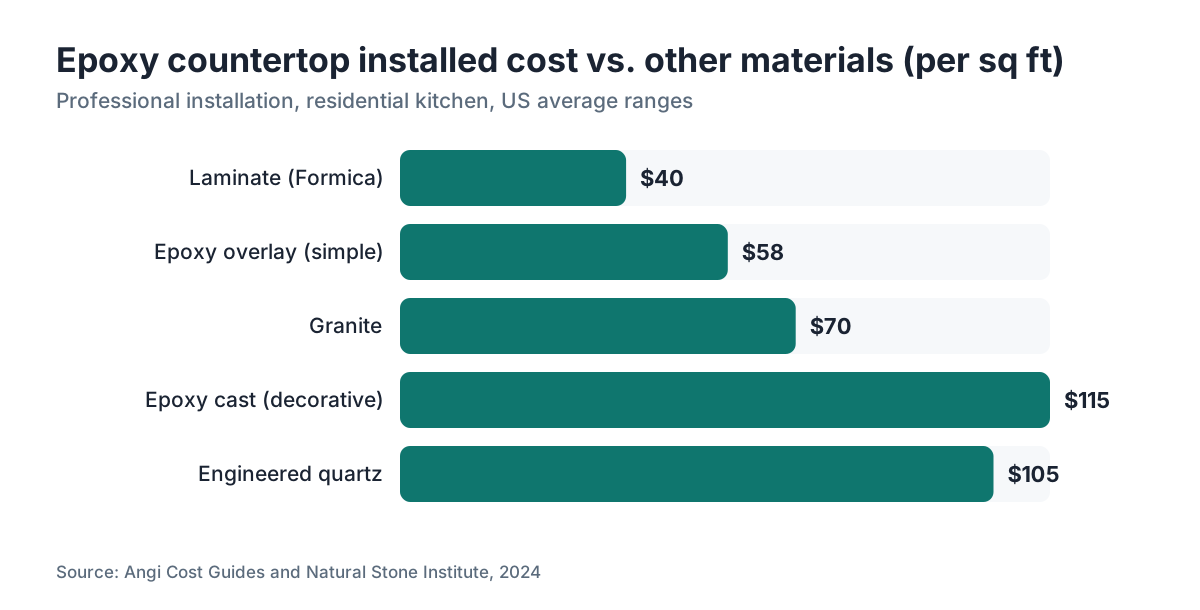
Professional epoxy countertop installation runs roughly $45 to $150 per square foot all-in, though the range can stretch beyond that in high-cost metros or for specialty river-table effects. The spread is wide because epoxy work is labor-intensive and design complexity multiplies hours fast. [2]
| Type of epoxy job | Typical installed cost per sq ft |
|---|---|
| Single-color overlay on laminate | $45, $70 |
| Metallic or painted base overlay | $65, $95 |
| Decorative cast slab (simple design) | $80, $120 |
| High-complexity cast (river, geode) | $100, $150+ |
| Skim-coat countertop refinishing only | $25, $45 |
Material accounts for roughly 30 to 40% of that cost. [2] High-end countertop epoxy like Stone Coat, UltraClear, or TotalBoat runs $90 to $180 per kit covering 40 to 60 square feet at two coats. Labor and overhead carry the rest.
A typical kitchen of 40 square feet comes to $1,800 to $6,000 professionally installed. Compare that to granite countertops, which average $40 to $100 per square foot installed [3], or laminate countertops at $20 to $60 per square foot installed. Epoxy is genuinely mid-tier on cost, not cheap.
A few things will push your quote up fast: edges (every linear foot of routed or domed edge adds 20 to 40 minutes of sanding), integrated sinks, color-matched backsplash, or tight turnaround that forces the installer to do multiple coats in a single day. Most installers also charge a shop minimum of $500 to $800 regardless of square footage, so a tiny bathroom vanity can cost nearly as much as a modest kitchen.
If you're on the fabricator side and juggle multiple epoxy quotes alongside stone jobs, tools like SlabWise handle mixed-material quoting so you're not switching between systems for one job type.
Is DIY epoxy countertop installation realistic, or should you always hire a pro?
DIY is genuinely doable for overlays and single-coat refinishing. It's much harder for cast slabs.
For overlays, consumer kits from brands like Rust-Oleum Countertop Transformations or Giani sell for $80 to $250 and cover 35 to 50 square feet. The application is a roller-and-brush job, and the main risk is bubbles from outgassing or rolling too fast. A heat gun passes over the wet surface to pop bubbles. Most people can do a decent job following the manufacturer's instructions carefully. [4]
For cast countertops, the risks compound. You're managing mold construction, absolute level, mixing accuracy, pour timing, heat from the exothermic cure reaction, and multiple coats with exact timing windows. If you mix wrong or wait too long between coats, the second coat may not bond to the first and will delaminate. The epoxy can also yellow from UV if it doesn't include UV stabilizers. Correcting a bad pour almost always means grinding the whole thing back down and starting over.
The honest take: if you have 30 square feet of bathroom countertop and a $300 budget, a DIY overlay kit is a reasonable weekend project. If you have a kitchen island you want to turn into a showpiece and you're pouring $4,000 into materials plus labor either way, hire the pro. Mistakes are expensive and irreversible.
One practical middle ground: some installers offer a hybrid service where you pay for materials and the first flood coat, they supervise, and you do the decorative manipulation yourself. This cuts labor by 30 to 40% and you end up with something personal.
How do you find and vet a qualified epoxy countertop installer?
There's no licensing specifically for epoxy countertop work in any US state as of 2025. That's both the problem and the opportunity: the barrier to entry is low, and plenty of people calling themselves installers have done a dozen countertops max. [5]
Here's how to vet someone seriously.
Ask for photos of completed countertops, more than process shots. You want to see finished edges, seams if any, and close-ups of the surface in raking light. Bubbles, fish-eyes, uneven pigment distribution, and orange-peel texture all show up in raking light even in photos taken with a phone.
Ask specifically which products they use. A professional will name a brand and explain why. Vague answers like "commercial-grade epoxy" are a yellow flag. Good installers tend to have strong opinions about their preferred resins.
Ask how they handle a bad pour. The answer tells you whether they've done this enough to have faced one. The right answer involves grinding, sanding back to the substrate, and repouring. A blanket "I've never had one go bad" from someone with two years of experience is not reassuring.
Ask about ventilation and PPE. Two-part epoxy resins contain reactive amine hardeners and in some products, bisphenol A (BPA). The EPA classifies certain epoxy components as potential sensitizers with repeated skin or respiratory exposure. [6] A professional installer shows up with an air-purifying respirator rated for organic vapors, nitrile gloves, and eye protection. They also ask about your ventilation before they start. If someone shows up in a t-shirt and latex gloves, pay attention.
Get a written contract that specifies: the product brand and line, number of coats, edge treatment, cure time before use, warranty terms (if any), and what happens if a coat fails adhesion. No reputable installer objects to this.
Check whether the installer carries general liability insurance. It doesn't exist for epoxy specifically, but a contractor's GL policy covers property damage during installation. Ask for the certificate. A one-person shop may not carry it, and that's your risk to weigh.
What surfaces can epoxy be installed over?
Epoxy bonds to almost any solid, non-porous substrate that has been properly abraded. Common substrates include plywood and MDF (for cast slabs), existing laminate like Formica countertops, ceramic tile, concrete, wood (with caveats), and even existing stone counters you want to refinish. [1]
Wood is complicated. Wood expands and contracts seasonally with humidity changes. Epoxy doesn't move with wood, so over time micro-cracks can form along grain lines, especially in wide-plank surfaces. Installers who epoxy over butcher block countertops typically seal the wood with a thin penetrating coat first, then add mass coats. Even then, movement cracks are a real long-term risk in climates with large seasonal humidity swings.
Tile with grout lines is the trickiest overlay substrate. The installer needs to level the grout lines with a skim coat before pouring, otherwise the epoxy follows the contours and grout lines telegraph through the finished surface. Two or three thin skim coats and sanding flatten the texture adequately for most lines under 1/8-inch deep.
Materials that don't work: flexible or semi-rigid surfaces (think vinyl sheet flooring or rubber-backed tiles), surfaces with wax or silicone contamination, and surfaces where moisture is coming through from below. Epoxy does not tolerate moisture vapor transmission. A basement countertop over a concrete substrate needs a moisture test before the pour; ASTM F2170 (relative humidity probe testing) is the standard. [7]
How does epoxy compare to stone, quartz, and other countertop materials?
Epoxy countertops occupy a genuinely different niche than stone, and the comparison only makes sense when you're honest about what each material is good at.
| Factor | Epoxy | Granite | Quartz (engineered) | Laminate |
|---|---|---|---|---|
| Installed cost (per sq ft) | $45, $150 | $40, $100 [3] | $55, $155 [8] | $20, $60 |
| Heat resistance | Poor (yellows/warps at 150°F) | Excellent | Moderate (avoid direct heat) | Poor |
| Scratch resistance | Moderate (softer than stone) | Excellent | Excellent | Poor, moderate |
| Repairability | Good (sand and recoat) | Difficult | Difficult | Easy (replacement) |
| Seam visibility | Low on large pours | Depends on slab size | Factory seams exist | Visible seams |
| UV yellowing risk | High (non-UV-stabilized epoxy) | None | None | Fades over time |
| Food safety (cured) | Yes, when fully cured [1] | Yes | Yes | Yes |
Epoxy's real advantages are design freedom and the ability to refinish or change the look without demolition. If you want a galaxy swirl or a river effect, no one can match epoxy for cost. Its real weaknesses are heat resistance and long-term durability compared to stone. Setting a hot pan on an epoxy counter at 300°F will leave a white haze or a dent. Nobody argues this; it's physics.
For a kitchen that sees heavy daily cooking, honest advice is: stone or engineered quartz (see kitchen countertops) is a better long-term choice. For a bathroom vanity, a laundry room, a garage workshop bench, or a decorative island that mostly holds a fruit bowl and a wine glass, epoxy is a legitimate option that costs less than premium stone and looks nothing like anything else.
If you're coming from Cambria countertops or marble countertops and want to understand the full material landscape, the cost per square foot comparison above is a reasonable starting point.
How long do epoxy countertops last and what maintenance do they need?
A professionally installed epoxy countertop with proper UV protection should last 10 to 20 years in normal residential use before it needs resurfacing. That estimate comes from manufacturer documentation and field reports from professional installers; there's no long-term controlled study because the residential epoxy countertop trend only really gained steam around 2015. [2]
The main enemies are UV light, heat, and abrasion. UV causes yellowing in epoxies without UV stabilizers. Full sun through a window hitting a countertop for 4 to 6 hours a day can cause noticeable yellowing in 2 to 3 years even in UV-stabilized products, though at a much slower rate. If your kitchen gets a lot of direct sun, factor this in.
Heat causes soft spots and discoloration. Always use trivets. This is not a negotiable habit; it's a material constraint.
Abrasion from daily use will dull the surface gloss over years. The good news: you can recoat. Light sanding with 220 to 400 grit, a wipe-down with acetone, and a fresh topcoat brings the gloss back. This is the main maintenance advantage epoxy has over stone.
Cleaning is simple: mild dish soap and warm water, the same as cleaning stone countertops. Avoid abrasive scrubbers, bleach at full concentration, and acetone-based cleaners on the finished surface (acetone dissolves epoxy). A soft cloth is enough for daily use.
For fabricators who also handle stone and need to explain maintenance differences to customers, the maintenance story for epoxy is honestly simpler than quartzite or soapstone, which need periodic sealing or oiling.
Is cured epoxy countertop safe for food contact?
Fully cured two-part epoxy is generally recognized as food-safe by the FDA when formulated for that use and fully cured per the manufacturer's specifications. [9] The key word is fully. Uncured or partially cured epoxy contains unreacted amine hardener, which is a sensitizer and a skin/mucous membrane irritant.
Most countertop epoxies reach full cure in 7 to 30 days at room temperature depending on the product, ambient humidity, and pour thickness. [1] At the 24 to 48 hour mark the surface may be hard enough to use for light contact, but cutting directly on it before full cure will leave marks and potentially expose you to residual reactive components.
The FDA's food contact rules under 21 CFR Part 175 cover surface coatings and adhesives, and some epoxy manufacturers explicitly state compliance with these regulations for their cured products. [9] If you're buying or specifying a product for food prep, ask for documentation. Reputable brands have it.
A practical note: epoxy countertops are not cutting-board surfaces regardless of cure status. The surface scratches under knife blades, and those scratches harbor bacteria just like scratched plastic cutting boards. Use a separate cutting board, which you'd do on any countertop material anyway.
For fabricators quoting epoxy jobs for commercial kitchens or rental properties, food-safety documentation from the epoxy manufacturer is worth collecting upfront. Some health department inspectors ask for it during restaurant inspections.
What are the most common epoxy installation mistakes and how do professionals avoid them?
Bubbles are the most frequent complaint on DIY jobs. Epoxy releases trapped air from the substrate and from agitation during mixing. Professionals heat-gun the surface within 5 to 10 minutes of pouring, holding the gun 4 to 6 inches away and moving continuously. They also warm the resin slightly (to 75 to 80°F) before mixing, which improves flow and reduces outgassing. [1]
Fish-eyes are circular craters where the epoxy recedes from a point. They're almost always caused by silicone contamination from a previous sealant or cleaner. The fix is to degrease aggressively with isopropyl alcohol after sanding, then wipe down again with acetone before the pour.
Soft cure from incorrect mixing ratio is the most expensive mistake. The fix is grinding the whole pour off and starting over. There's no chemical cure for an undercatalyzed pour that's already set.
Edge drips happen when too much epoxy runs over the edge during pouring. Experienced installers tape a plastic drip edge below the counter that catches excess and can be pulled off cleanly after the pour gels. Some build a temporary dam from hot-glued craft sticks for the same purpose.
Yellowing in the first year usually means the product lacked UV stabilizers or the installer used a general-purpose industrial epoxy instead of a formulation designed for countertop use. Not all two-part epoxies are equal. A 100% solids casting epoxy designed for river tables and bar tops has UV inhibitors in the formulation; a structural adhesive epoxy does not.
Temperature below 60°F slows or prevents cure and causes cloudiness. Installers in cold climates heat the workspace to 70 to 75°F before, during, and for 24 hours after the pour. A space heater pointed away from the surface (not at it, to avoid uneven temperature that causes ripples) handles this.
What questions should you ask before signing a contract with an epoxy installer?
A focused pre-hire checklist makes the difference between a good result and an expensive argument.
Start with the product. Ask the exact brand and product line they plan to use, the number of coats, and the cure time before normal use. Get this in writing because substitutions happen.
Ask about the warranty. Most independent epoxy installers offer a 1-year workmanship warranty covering adhesion failure and pour defects. Some offer 2 years. Manufacturer product warranties run separately (typically 1 to 5 years on the material itself). Understand what's covered: most warranties exclude heat damage, because putting a hot pan on an epoxy counter is operator error, not a product failure.
Ask about ventilation requirements. You may need to vacate the space for 24 to 48 hours during the pour and initial cure. Epoxy vapors are not trivial; the Occupational Safety and Health Administration sets permissible exposure limits for amine hardeners under its General Industry standards. [10] A professional installer who doesn't bring this up is a concern.
Ask about prep work responsibilities. Who moves the appliances? Who removes the existing countertop if there is one? Some installers include this; many don't. Clearing the space and having the substrate ready for the installer's arrival is typically the homeowner's job.
Ask what happens if they can't complete the job in a single visit. Partial pours that cure before completion create a visible seam even after the topcoat. The installer should have a specific plan for scheduling to avoid mid-job interruptions.
Fabrication shops that run epoxy alongside stone can use SlabWise's quoting system to build consistent estimates for jobs like this, tracking material cost against labor and flagging when complexity pushes the job out of range for a flat-rate price.
Finally, ask for references from the past 12 months and actually call them. Ask one question specifically: "Did the installer come back after the job was done, and did they respond promptly?" Post-job responsiveness tells you everything about someone's professional standards.
How does a countertop installer price an epoxy job vs. stone?
Stone fabricators price by the square foot based on material cost, saw time, edge work, and CNC programming. Epoxy installers price differently: material cost is lower per square foot, but labor hours per square foot are higher, especially for decorative pours.
A typical professional breakdown on a $100/sq ft epoxy job at 40 square feet ($4,000 total):
- Material (resin, pigment, substrate prep, supplies): $600, $900
- Labor (prep, pour, coats, finish, install): $1,800, $2,200
- Overhead, insurance, travel, waste: $400, $700
- Profit margin: $300, $600
This is a rough structure, not a formula. It varies by installer business model and region. The point is that epoxy is labor-heavy relative to material, unlike stone where the slab is often 50 to 60% of the job cost. [3]
For fabricators deciding whether to add epoxy to their service mix, the margin picture is actually reasonable. The consumable cost is predictable, jobs move fast (one or two visits), and there's no large capital equipment requirement beyond good scales, a heat gun, and orbital sanders. The training curve is the real investment. A fabricator with stone experience already understands substrate prep and finish work; the learning curve is mostly in epoxy chemistry and pour technique.
The challenge for stone shops is scheduling: epoxy requires specific temperature and humidity windows, and the 24 to 48 hour cure period before the next coat means either staging jobs carefully or dedicating a full day to a single pour.
For homeowners, the key number to take away is this: the installed price per square foot for professional epoxy overlaps heavily with engineered stone on the mid-to-high end. If you're comparing Corian countertops or engineered quartz to an epoxy pour, the cost difference may not be as large as you'd expect, and the choice comes down to aesthetics and heat tolerance rather than budget alone.
Frequently asked questions
How long does epoxy countertop installation take from start to finish?
From substrate prep through final topcoat, most professional epoxy countertop jobs take 2 to 4 days on-site spread across 2 to 3 visits. The first visit covers prep and the base coat. The second (24 to 48 hours later) covers the decorative coat and topcoat. Full chemical cure before the counter is safe for daily use takes another 7 to 30 days depending on the product and temperature.
Can you put epoxy over existing granite or quartz countertops?
Technically yes. Epoxy will bond to granite or quartz if the surface is sanded to 80 to 120 grit and degreased thoroughly. In practice, it's rarely worth it: you're covering an expensive, durable material with one that has lower heat resistance. The main use case is repairing a chip or crack with color-matched epoxy filler, not coating the whole surface.
Does epoxy countertop installation smell bad and how long does the odor last?
Yes, noticeably. Amine hardeners in two-part epoxy have a strong ammonia-like smell during mixing and the first few hours of cure. The worst of it clears within 24 hours with good ventilation. Trace odor can persist for 2 to 5 days in enclosed spaces. Plan to ventilate aggressively with open windows and fans, and vacate the kitchen for at least the first 24 hours after the pour.
What is the difference between an epoxy overlay and a cast epoxy countertop?
An epoxy overlay is a thin coating (1/8 to 1/4 inch) poured directly over an existing countertop surface to refinish it. A cast epoxy countertop is poured into a mold at 1/2 to 1.5 inches thick, cured, removed from the mold, and installed like a stone slab. Overlays are cheaper and faster. Cast countertops are heavier, more durable, and offer more design options, especially for edge profiles.
Will epoxy countertops yellow over time?
They can, yes. UV exposure is the main cause. Epoxy without UV stabilizers will yellow measurably within 1 to 3 years in kitchens with significant natural light. UV-stabilized formulations slow this substantially but don't eliminate it. If your kitchen faces south or west and gets direct afternoon sun, ask your installer specifically about UV performance and request a UV-stabilized product.
How do you repair a damaged epoxy countertop?
Small scratches and dull areas can be wet-sanded starting at 400 grit, working up to 1500 grit, then polished with a buffing compound. Deeper gouges or cracks get filled with a thin color-matched epoxy pour, allowed to cure, then sanded flush. A full resurface (skim coat and topcoat) restores a badly scratched or discolored surface. This repairability is the main durability advantage epoxy has over stone.
Is epoxy countertop installation regulated or licensed in any state?
No state licenses epoxy countertop installation specifically as of 2025. Installers may hold a general contractor's license, a home improvement contractor license (required in states like New York and Connecticut for work above certain dollar thresholds), or no license at all. Always check your state's home improvement contractor registration requirements and ask for proof of general liability insurance regardless.
Can epoxy countertops be used outdoors?
Rarely with good results. Standard countertop epoxies are not designed for outdoor temperature extremes, freeze-thaw cycling, or continuous UV exposure. The surface will yellow, craze, or delaminate within 1 to 3 years outdoors. Polyurethane or polyurea coatings are better options for outdoor counters. Some installers apply a UV-protective polyurethane topcoat over epoxy in covered outdoor kitchens, which extends outdoor life modestly.
How do epoxy countertops hold up in bathrooms compared to kitchens?
Better. Bathrooms avoid the biggest threat to epoxy: direct heat from cooking. Bathroom vanities don't see hot pans. The main bathroom risks are toiletry spills (some nail polish removers and acne cleansers contain acetone or glycolic acid, which can etch or dull epoxy) and prolonged water pooling around the sink if the install didn't seal the sink cutout properly. A well-installed bathroom epoxy countertop is a more durable long-term choice than the same product in a kitchen.
What thickness should an epoxy countertop be?
Overlays run 1/8 to 3/16 inch thick, which adds negligible weight to existing cabinets. Cast countertops range from 1/2 inch (for a lightweight installation) to 1.5 inches for a stone-like look and feel. Most residential cast countertops land at 3/4 to 1 inch. Thicker pours generate more heat during cure (exothermic reaction) and require more attention to avoid crazing or cracking from thermal stress.
How do I get an accurate quote from an epoxy countertop installer?
Measure your countertop square footage accurately (length times width, including any overhang), count your linear feet of edge, and note the substrate type. Bring photos of any decorative style you want. Get at least three quotes and make sure each one specifies the same scope: prep method, product brand, number of coats, edge treatment, and what happens after a failed coat. Apples-to-apples comparison is hard otherwise.
Is a DIY epoxy countertop kit actually worth it?
For a simple single-color overlay on a bathroom vanity or laundry room, yes. Consumer kits from Rust-Oleum and similar brands cost $80 to $250 and can produce acceptable results with careful prep. For a kitchen or for any decorative pour with metallic effects, the margin for error is much smaller and the cost of failure (grinding everything off and starting over) approaches what you'd pay a pro. DIY makes the most sense when you're comfortable with the outcome being imperfect.
Sources
- HomeAdvisor (now Angi), Cost to Install Epoxy Countertops: Professional epoxy countertop installation costs approximately $45 to $150 per square foot; material accounts for roughly 30 to 40 percent of installed cost
- National Kitchen and Bath Association (NKBA), Kitchen and Bath Market Index: Granite countertop installed costs average $40 to $100 per square foot depending on grade and region
- Rust-Oleum, Countertop Transformations Product Instructions: Consumer epoxy overlay kits cover 35 to 50 square feet and are designed for DIY application over existing laminate and tile surfaces
- National Conference of State Legislatures (NCSL), Contractor Licensing State Requirements: No state specifically licenses epoxy countertop installation; general contractor or home improvement contractor licensing varies by state and dollar threshold
- U.S. Environmental Protection Agency (EPA), Epoxy Resins - Health and Environmental Effects: Certain epoxy hardener components are classified as potential sensitizers with repeated dermal or respiratory exposure
- ASTM International, Standard F2170: Determining Relative Humidity in Concrete Floor Slabs: ASTM F2170 is the standard test method for measuring relative humidity in concrete slabs before applying moisture-sensitive coatings including epoxy
- Marble Institute of America (now Natural Stone Institute), Quartz Surfacing Cost Data: Engineered quartz countertop installed costs range from approximately $55 to $155 per square foot depending on brand and complexity
- U.S. Food and Drug Administration (FDA), 21 CFR Part 175 - Indirect Food Additives: Adhesives and Components of Coatings: Fully cured surface coatings including epoxy formulations can qualify as food-safe under FDA 21 CFR Part 175 when formulated and cured per specification
- Occupational Safety and Health Administration (OSHA), General Industry Standards 29 CFR 1910 - Air Contaminants: OSHA sets permissible exposure limits for amine hardener vapors under 29 CFR 1910.1000 General Industry Air Contaminants table
Last updated 2026-07-09