TL;DR
- Countertop seams crack because the cabinet or substrate underneath flexes, the epoxy wasn't mixed or cured right, thermal expansion pulls the joint apart, or the stone was cut with too little glue surface at the seam.
- Heavy point loads, water getting into the joint, and settling foundations pile onto every one of those problems over the years.
Why do countertop seams crack in the first place?
A countertop seam is only as strong as everything beneath it. The stone, quartz, or laminate on top gets all the attention, but the seam lives or dies based on the substrate, the cabinet framing, the adhesive, and how well the installer controlled those variables on the day of installation.
Stone and engineered quartz are rigid. Wood cabinets, plywood subtops, and residential floors are not. Every time someone leans on the counter, opens a heavy drawer, or the house settles a few millimeters, the substrate moves a little. Rigid material bonded across a joint can't absorb that movement the way a solid slab can. The joint is always the thinnest cross-section, so stress lands there first.
There is rarely one cause. Most cracked seams are two or three factors ganging up. A marginal epoxy cure plus a slightly flexing cabinet plus one hard thermal shock is often what finally opens a seam that held fine for four years. Pull those factors apart and diagnosis gets much easier in your specific kitchen.
How does substrate flex cause seam failure?
Substrate flex is the most common cause, and it's the one homeowners almost never suspect. Cabinet boxes are usually built from 3/4-inch plywood or particleboard. Particleboard deflects under load far more than solid plywood, and neither is anywhere close to as stiff as the stone sitting on top of it.
When a span of cabinet runs more than roughly 24 to 30 inches with no vertical support beneath it, the substrate can flex measurably under moving loads. The Architectural Woodwork Standards from the Architectural Woodwork Institute set maximum deflection limits for casework, but residential kitchen cabinets aren't always built to those limits. [1] A particleboard shelf rated for 50 pounds per linear foot static will bend noticeably when someone sits on the counter or drops a heavy stand mixer onto it.
That flex goes straight into the seam above it. If the seam falls over a span instead of over a cabinet wall or a cross-support, the risk is highest. Good fabricators put seams over cabinet walls whenever the slab layout allows. When the job forces a seam over an open span, a plywood or steel subtop should bridge that span and stiffen it before the stone ever goes down.
Diagnosing an existing crack is simple. Press gently on the counter on each side of the seam and feel whether one side drops relative to the other. Any relative movement means the substrate is your problem.
What role does epoxy quality and application play?
Stone fabricators join seams with two-part color-tinted epoxy, and how that epoxy cures matters enormously. Most shop-grade stone epoxies reach full cure strength in 24 to 72 hours at room temperature. If the substrate or stone was cold (below about 60 degrees F) at install, cure times stretch out and peak strength drops. Installers working in an unheated garage in January, or setting counters in a kitchen with no heat, routinely get under-cured seams that feel solid but hold far less tension than the spec sheet promises. [2]
Application errors are just as common as material errors. The epoxy has to fill the joint completely, no voids. Air pockets become stress risers: under load, stress concentrates at the void and the epoxy cracks from the inside out. Gaps wider than about 1/16 inch get hard to fill cleanly. Gaps over 1/8 inch are nearly impossible to fill without voids and usually mean the cut wasn't precise enough to start with.
Mix ratio matters too. Two-part epoxies need a specific resin-to-hardener ratio. Off-ratio mixes cure soft, stay tacky, or cure weak. Cartridge epoxies with static mixing nozzles beat hand-mixed systems here because they hold the ratio automatically. Some shops still hand-mix color epoxy from a kit, which works fine with a disciplined tech, but it adds human error that cartridges mostly remove.
One more thing: surface prep. Both stone faces at the seam need to be dry and clean of saw coolant, dust, and sealer residue before bonding. A seam bonded over a film of silicone sealer will delaminate. Period.
Can thermal expansion crack a countertop seam?
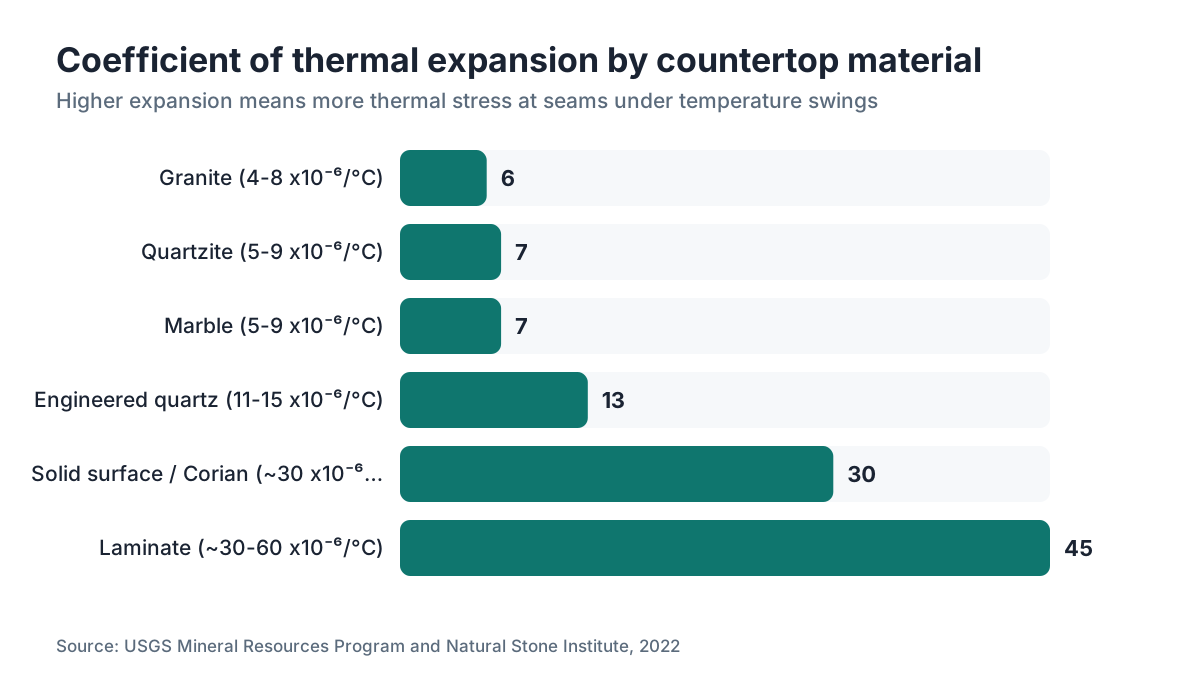
Yes, and it catches people off guard because stone feels like it should ignore temperature. Natural granite has a coefficient of thermal expansion around 4 to 8 x 10^-6 per degree Celsius (roughly 7 to 9 millionths of strain per degree Fahrenheit). [3] For a 10-foot run of granite going from 65 to 95 degrees F on a summer day near a south-facing window, that's about 0.02 to 0.025 inches of expansion across the length. Small number. But it concentrates entirely at the seam if the stone has nowhere else to move.
Engineered quartz expands at a similar or slightly higher rate. Laminate expands far more, which is why laminate seams should always leave a small gap for the adhesive to bridge instead of a fully filled butt joint.
The risk peaks near heat: next to a range, under a skylight, on a counter that catches direct sun for hours. Dishwasher heat venting up through a gap in the cabinet below a seam is a specific failure fabricators see over and over. The heat-cool cycle fatigues the adhesive bond over years even when the first install was clean.
The fix is room for movement. For stone over 8 to 10 linear feet, many fabricators leave a hairline gap at the seam instead of a zero-gap butt joint, then fill it with a color-matched flexible sealant rather than rigid epoxy. Sounds backward. It's mechanically correct: a slightly flexible joint survives thermal cycling far longer than a rigid one.
Does poor seam placement by the fabricator cause cracking?
Yes, and no amount of good epoxy fixes bad placement. Seam location is set partly by slab size and partly by the fabricator's judgment, and bad judgment here bakes in a failure from day one.
The rule is straightforward: seams land over solid support, never over an unsupported span, never in front of a sink opening, and ideally out of high-traffic zones where the same point loads hit again and again. A seam directly in front of the sink is the worst spot on the whole counter. That's where people lean hardest, where water gets in easiest, and where the substrate is weakest because of the sink cutout.
Glue surface matters too. A 45-degree mitered seam has more bonding area than a square butt joint, so it holds more in tension. Most kitchen seams are butt joints because they're easier to cut and hide better when filled. But a fabricator choosing between a butt joint over a weak span and a miter over a cabinet wall should take the miter and the better placement every time.
Slab thickness ties in. Standard residential granite and quartz is 3 cm (about 1-3/16 inches) thick. Budget jobs sometimes run 2 cm. Thinner stone has less glue surface at the seam and flexes more between supports, so it stacks the adhesive-area problem right on top of the substrate-flex problem. [4]
For kitchen countertops, the layout talk with your fabricator before the template visit is the moment to ask where the seams land and why. If the answer is vague, push harder.
How does water infiltration damage seams over time?
Water is the slow killer. A seam that isn't sealed tight at the top surface takes on water every time the counter gets wet. That water sits in the joint, wicks into any micro-void in the epoxy, and does two kinds of damage.
For natural stone like granite countertops and marble countertops, water carries minerals that deposit in the joint and expand slightly as they dry, widening the gap over years. Worse, water that reaches the substrate makes the plywood or particleboard swell and shrink on a cycle. That movement pushes force into the stone above and works the seam open from below.
For laminate countertops and Formica countertops, water at the seam is a disaster. The particleboard swells immediately and permanently, the laminate peels off the edge, and the seam opens where you can see it within weeks. Laminate seams near sinks that aren't sealed with a penetrating waterproof adhesive almost always fail.
For Corian countertops and solid surface, the story is different. The material itself is non-porous, but the joint filler can still shrink or delaminate over time, especially if it wasn't sanded flush.
Prevention is easy. After installation, run a bead of color-matched silicone along the top of the seam and tool it flush. Redo it every two to three years, or any time you spot a gap opening. Sealing the stone surface on schedule cuts how much water reaches the seam at all. For that, see our guide on how to clean stone countertops.
Can foundation settling or structural movement crack a seam?
Yes. Residential foundations settle unevenly, most in the first few years after construction and after big weather swings. When one end of a cabinet run settles relative to the other, the countertop spanning it bends. A seam in that span cracks before the stone does, because the seam is the thinnest cross-section.
This crack has a signature. It runs the full depth of the seam, and often one side sits slightly higher than the other (fabricators call that lippage at the seam). If the seam crack shows up alongside cracks in the drywall above the cabinets or in the tile backsplash, structural movement is almost certainly the cause.
Seismic activity does the same thing on a much faster clock. In earthquake country, stone counters are sometimes installed with a slightly flexible seam joint for exactly this reason.
A seam cracked by foundation settling can't be permanently fixed until the foundation is addressed. Repair the seam while the movement continues and the repair cracks again within months. The order is: diagnose and stabilize the structure first, repair the seam second.
If you suspect movement, a structural engineer or a qualified home inspector can assess it. The American Society of Home Inspectors publishes standards of practice that cover foundation inspection as part of a general home inspection. [5]
Does the countertop material type affect how likely seams are to crack?
Material matters a lot. Here's a realistic comparison based on material properties and the failure patterns fabricators actually see:
| Material | Typical seam method | Main failure mode | Relative seam durability |
|---|---|---|---|
| Granite (3 cm) | Two-part epoxy, butt or miter | Thermal stress, substrate flex | High |
| Engineered quartz | Two-part epoxy, butt | Thermal stress (higher expansion) | High |
| Marble (3 cm) | Two-part epoxy | Water infiltration, substrate flex | Moderate |
| Quartzite | Two-part epoxy | Same as granite | High |
| Laminate / Formica | Contact cement + seam filler | Water infiltration, swelling | Low near moisture |
| Solid surface (Corian) | Color-matched adhesive, sanded flush | Adhesive shrinkage | Moderate-High |
| Butcher block | Glue + mechanical fasteners | Moisture cycling, wood movement | Low without sealing |
Engineered quartz like Cambria countertops has a higher coefficient of thermal expansion than natural granite, roughly 11 to 15 x 10^-6 per degree C against granite's 4 to 8, so thermal movement is a bigger concern even though the material is very durable otherwise. [6]
Butcher block countertops sit in their own category. Wood moves seasonally with humidity, so seams in butcher block fight wood movement rather than thermal expansion. They need flexible, waterproof adhesive and should never be bonded rigidly end-grain to end-grain across a seam without an expansion gap.
Quartzite countertops behave like granite at the seam, though some quartzite runs more porous and gains even more from consistent sealing.
How can you tell if a seam is failing before it fully cracks?
Catch it early and you're looking at a few hundred dollars instead of a several-thousand-dollar slab replacement. Five warning signs are worth watching.
First, a visible hairline gap at the top of the seam where the filler shrank or the joint opened slightly. Run your fingernail across it. If you feel a step or a catch, that's lippage, and the joint is moving.
Second, discoloration along the seam. A darkening or staining pattern that follows the seam line means water is getting in. On light quartz it shows up as a gray or yellowish line.
Third, a hollow sound when you tap near the seam. A properly bonded seam sounds like the middle of the slab. A delaminated or void-filled seam rings duller.
Fourth, a height difference between the two sides. Lay a straightedge across the seam. Any gap under it on one side means the slabs have moved relative to each other.
Fifth, cracked grout or caulk at the backsplash directly above the seam line. The backsplash is bonded rigidly to the wall while the counter moves on its own. If the counter seam is shifting, that junction cracks first.
Any of these signs means a fabricator should look at it. Many will do a repair visit for $150 to $400 depending on scope. A full reset of a failed seam with recutting runs $300 to $800 or more. [7]
What is the right way to repair a cracked countertop seam?
The repair depends entirely on why the seam failed. Treat the symptom without fixing the cause and you've wasted the money.
If the cause is substrate flex, sister a piece of 3/4-inch plywood across the span under the seam before re-bonding. Access is usually through the cabinet interior. If the layout blocks that, a steel angle bracket screwed to the inside faces of the adjacent cabinet walls can bridge the gap.
If the cause is bad original epoxy, all the old epoxy has to come out. That means carefully cutting and routing the joint clean, which risks chipping the edges. A skilled fabricator can do it in place, but it takes a steady hand and the right tooling. Then the joint gets re-bonded with fresh two-part epoxy at the correct mix ratio, both faces clean and dry, at ambient temperatures above 60 degrees F.
If the cause is thermal expansion, the repair should use a flexible color-matched sealant, not rigid epoxy. Products made for stone seams, like StoneTech Stone Caulk or an equivalent, stay flexible after cure and take the expansion cycling. [8] This is a maintenance repair, and you'll likely redo it every five to ten years, but it's the right long-term move for a thermally stressed seam.
If the cause is water and substrate damage, assess the substrate before anything else. Swollen particleboard under a seam can't be repaired. It has to be replaced, and that's a cabinet-disassembly job. If the substrate is plywood and the swelling is minor, dry it completely (a fan for several days), confirm it went back to level, then re-bond.
If you're considering countertop installation from scratch after a total seam failure, the single best thing you can do before signing is get multiple quotes and ask each fabricator, in plain terms, how they handle seam placement and which epoxy system they run.
Fabricators tracking seam callbacks as a quality metric can use tools like SlabWise to tag jobs by seam type and substrate condition, which makes patterns in which install variables drive the most callbacks much easier to see.
How should seams be handled differently for kitchen vs. bathroom countertops?
Kitchen counters run longer, carry more load, and live next to heat. Bathroom counters run shorter, sit in steadier humidity, and vanity tops are often thinner (2 cm material is more common in bathrooms). Those differences move the risk profile in real ways.
In bathrooms, water infiltration at the seam is the dominant risk. A seam anywhere near the sink bowl cutout is especially exposed. Many vanity tops are made as one-piece units specifically to kill seams near the sink, but in a custom stone install, a seam near the basin is sometimes unavoidable. When it is, a quality silicone perimeter seal on install day, refreshed every two years, is non-negotiable.
In kitchens, the range area creates a thermal stress zone that doesn't exist in a bathroom. A seam within 12 to 18 inches of a range or cooktop should get a flexible sealant system rather than rigid epoxy. That goes double for marble countertops and other softer stones more prone to thermal shock.
The substrate picture differs too. Vanity cabinets usually run shorter, so long unsupported spans show up less. But bathroom floors move more with humidity than kitchen floors in a lot of houses, which makes settling-related seam issues a bit more frequent in bathrooms than most people expect.
How do fabricators build seams to resist cracking from the start?
Prevention is the right end of this conversation. The practices that reliably produce seams holding 15 to 20 years without cracking are well understood, and they come down to four steps.
Cut precision is step one. A CNC-cut seam holds tolerance around plus or minus 0.005 inches per face. A hand-cut seam with an angle grinder rides entirely on the operator. Most professional shops CNC their seam cuts because you can't hit that gap width and flatness by hand at any reasonable speed. A tight, flat seam is the base everything else builds on.
Substrate prep is step two. Installers should check the cabinet run for level before any stone goes in. A run out of level by more than 1/8 inch across its length needs shimming first. Shimming after the stone is set is much harder and much less reliable.
Adhesive selection and temperature control are step three. Many fabricators specify their epoxy by name and lot because performance varies between products. The Marble Institute of America (now part of the Natural Stone Institute) has published installation standards covering epoxy cure temperature. Their standard MIA+BSI 7.6 states that stone adhesives should be applied and cured between 40 and 95 degrees F, with 65 to 80 degrees F being optimal. [9]
Post-cure finishing is step four. Once the epoxy cures, the seam is planed flush, polished to match the surrounding surface, and sealed at the top with color-matched flexible caulk. That final bead isn't cosmetic. It's the water barrier protecting everything under it.
A fabricator who nails all four produces seams that outlast the epoxy's rated service life, which runs 10 to 20 years for quality formulations under residential conditions. [10]
Frequently asked questions
How long should a countertop seam last before it needs repair?
A well-installed stone seam with quality two-part epoxy and a properly supported substrate should last 10 to 20 years before needing attention. Seams near sinks or heat sources usually need their surface sealant refreshed every 2 to 5 years even when the structural bond is fine. Laminate seams near moisture often show failure within 5 to 10 years if they weren't perfectly sealed at installation.
Is a visible gap in a countertop seam always a structural problem?
Not always. A gap at the very top surface is often just the flexible caulk shrinking or peeling, which is maintenance, not structural failure. A true structural failure shows as a height difference between the two sides or a gap running through the full thickness of the material. The surface gap is easy to fix. A full-depth gap needs a fabricator's assessment before any repair.
Can I repair a cracked countertop seam myself?
Surface-level gap filling with color-matched stone caulk is a reasonable DIY repair. Structural re-bonding is not. Re-bonding means removing the old epoxy cleanly without chipping the stone faces, which takes specialized tooling. Do it wrong and you leave voids in the joint that crack again faster than the original failure did. Get a fabricator quote before you attempt it yourself.
Does sealing granite or stone countertops prevent seam cracks?
Sealing the surface cuts water infiltration, which removes one factor that damages seams over time. It does nothing for substrate flex, thermal stress, or adhesive quality. Sealing is necessary maintenance, not a substitute for correct installation. Reseal natural stone every 1 to 3 years depending on the stone's porosity and how hard you use the counter.
Why does my quartz countertop seam look worse than my old granite seam did?
Engineered quartz has a higher coefficient of thermal expansion than granite, roughly 11 to 15 x 10^-6 per degree C versus granite's 4 to 8. Quartz moves more with temperature swings, which stresses the joint more. Quartz is also usually light and consistent in pattern, so any gap or color mismatch reads obvious in a way a busy granite hides.
What is the minimum thickness for a stone countertop to have a strong seam?
3 cm (about 1-3/16 inches) is the standard residential thickness and gives enough glue surface for a reliable seam. 2 cm material has roughly 33% less glue surface at the seam and flexes more between supports. Most fabricators won't warranty a 2 cm seam in a high-stress spot like in front of a sink. If you're buying 2 cm to save money, ask how the fabricator reinforces the seam.
How much does it cost to repair a cracked countertop seam?
Surface caulk repair runs $0 to $50 as a DIY job. A fabricator doing an in-place re-bond without recutting typically charges $150 to $400 depending on access and epoxy cost. A full recut and re-bond with substrate repair runs $300 to $800 or more. If the substrate needs replacement, add cabinet labor on top. These are general ranges; actual costs vary by region and shop.
Should seams in stone countertops be placed over cabinet walls or over open spans?
Over cabinet walls, always, when the slab layout allows it. A seam over an open span has no rigid support beneath it and deflects under any concentrated load. Most fabricators know this and honor it. If yours proposes a seam over a span without adding a subtop or cross-support, ask them to revise the layout or explain the reinforcement plan. Settle this before the template gets cut.
Does the dishwasher cause countertop seam damage?
Yes, in two ways. Heat exhaust venting up through the gap between the dishwasher and the counter creates repeated thermal cycling right at or near the surface. And if the door seal leaks, it puts moisture inside the cabinet that wicks into the substrate. Both effects are worse if a seam falls directly above the dishwasher, which is a placement any good fabricator avoids when possible.
How do I know if my countertop seam crack is from the house settling or from bad installation?
Settlement cracks usually show a height difference between the two sides (lippage) plus other movement signs: cracks in drywall above the cabinets, sticking doors nearby, or grout cracks in the backsplash above the seam line. A bad-installation crack typically runs flush, both sides at the same height, and appears within the first one to three years with no other structural signs. When in doubt, have a home inspector check the foundation before spending on a seam repair.
Are some colors or finishes of countertop more likely to show seam cracks?
Light solid colors (whites, pale grays) show seam gaps and color mismatch far more than dark or heavily patterned surfaces. A 1/32-inch gap in a white quartz seam is instantly visible; the same gap in a dark speckled granite nearly disappears. This is a visual issue, not a structural one, but it changes how fast homeowners notice and report a failing seam. Finish (polished vs. honed) doesn't meaningfully change structural seam durability.
Can you prevent countertop seams from cracking by using more epoxy?
No. More epoxy doesn't mean a stronger seam if the application has voids, the joint gap is too wide, or the real problem is substrate movement. Overfilling a seam actually makes a clean flush finish harder and adds no structural value beyond a properly filled joint. Precision of application and joint fit matter far more than volume of adhesive.
Do countertop seams need to be re-sealed periodically even if they are not cracked?
Yes. The flexible caulk over the top of the structural epoxy shrinks and can debond over time even while the epoxy underneath stays solid. Inspect the seam surface once a year. If you see a gap or the caulk has pulled away from one side, clean it out and run a fresh bead of color-matched stone caulk. It takes 20 minutes and heads off the water infiltration that causes the next level of damage.
Sources
- Architectural Woodwork Institute, Architectural Woodwork Standards (AWS) Edition 2: Maximum deflection limits for residential casework and cabinet construction standards
- U.S. Department of Energy, Building Technologies Office, Building America Solution Center: Temperature effects on adhesive and sealant cure performance in residential construction
- U.S. Geological Survey, Mineral Resources Program: Coefficient of thermal expansion for granite: approximately 4 to 8 x 10^-6 per degree Celsius
- Natural Stone Institute (formerly Marble Institute of America), Dimension Stone Design Manual Version VIII: Standard residential stone countertop thickness is 3 cm; 2 cm material has reduced structural performance at seams
- American Society of Home Inspectors, Standards of Practice for Home Inspectors: Foundation inspection is a required component of a standard home inspection under ASHI standards of practice
- Cambria, Technical Data Sheet: Physical Properties of Cambria Quartz Surfaces: Engineered quartz coefficient of thermal expansion approximately 11 to 15 x 10^-6 per degree Celsius
- Angi (formerly HomeAdvisor), Countertop Repair Cost Guide: Countertop seam repair costs range from approximately $150 to $400 for in-place re-bonding; full recut and re-bond $300 to $800
- StoneTech (DuPont), Professional Stone Care Product Data Sheets: StoneTech Stone Caulk and equivalent flexible sealants formulated for stone seam joints to accommodate thermal expansion
- Natural Stone Institute, MIA+BSI Installation Standard 7.6: Adhesives for Dimension Stone: Stone adhesives should be applied and cured at temperatures between 40 and 95 degrees F, with 65 to 80 degrees F optimal per MIA+BSI standard 7.6
- U.S. Army Corps of Engineers, Adhesive Bonding for Structural Applications (EM 1110-2-1104): Rated service life for quality two-part epoxy adhesives in structural bonding applications is typically 10 to 20 years under residential conditions
- National Association of Home Builders, Study of Life Expectancy of Home Components: Published service life expectations for countertop materials and installation components including seam adhesives
Last updated 2026-07-10