TL;DR
- Quartz countertop seams are joined with a two-part epoxy or polyester adhesive, often called a seam setter or color-matched filler.
- Epoxy is the industry standard because it cures hard, sands flush, and resists heat better than polyester.
- The adhesive gets tinted to match the slab so the seam nearly vanishes.
- A skilled fabricator can close a seam to under 1/16 inch.
What adhesive do fabricators actually use for quartz seams?
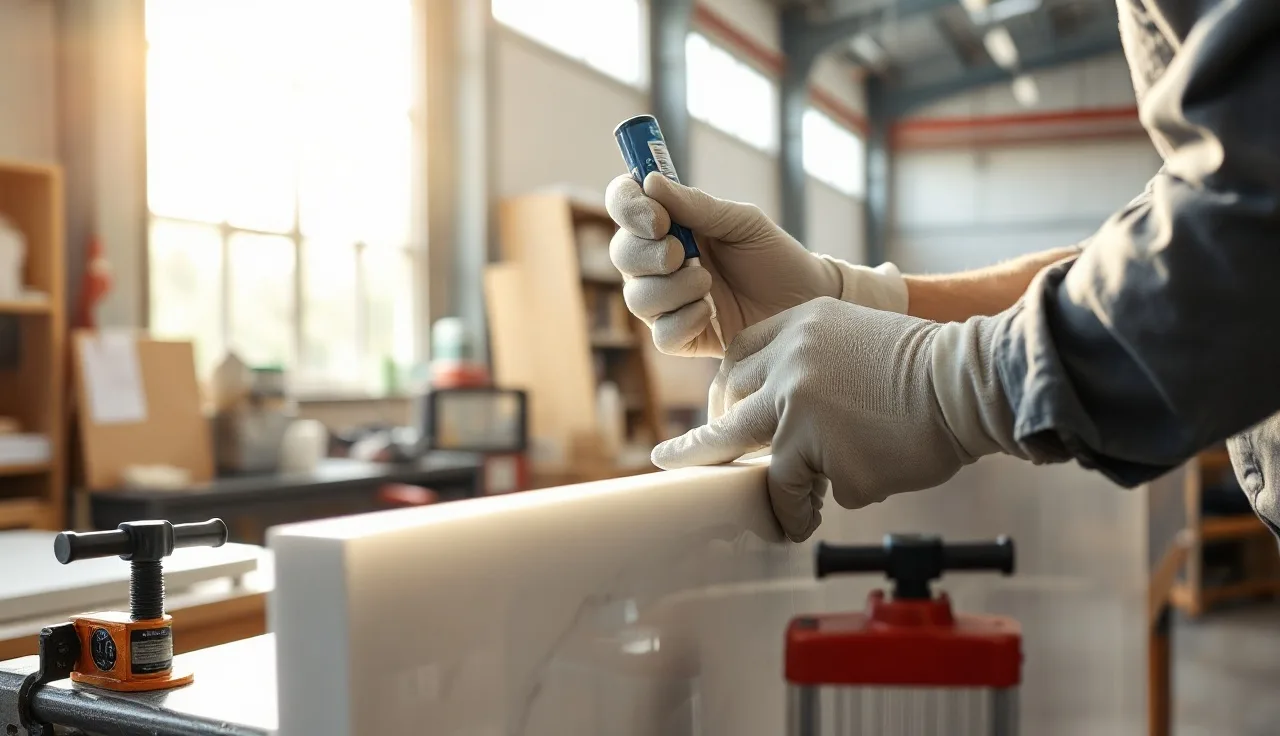
The go-to adhesive for quartz countertop seams is a two-part epoxy, mixed from a resin and a hardener right at the seam. The two parts are dispensed through a static-mixing nozzle, which blends them in the right ratio automatically, so there's no guesswork. Most fabrication shops stock brand-name seam setters like Integra Adhesives' Colorfast, Akemi's Akepox series, or Tenax products, all formulated for engineered stone and natural stone work [1].
Polyester adhesive is the older alternative. It's cheaper and sets faster, but it yellows over time, doesn't sand as cleanly, and is a little more brittle. You'll still see polyester in some shops, especially on lower-price projects, but most fabricators doing quality work have moved to epoxy for quartz specifically.
A third category exists: UV-curing adhesives. These stay liquid until you hit them with an ultraviolet lamp, which gives you unlimited working time to position pieces before locking them in place. They're popular in high-end fabrication for exactly that reason, but they need specialized equipment and the adhesives themselves cost more. For a standard residential seam, two-part epoxy does the job without the overhead.
The adhesive is always color-matched. Manufacturers sell tint kits, and fabricators mix pigment into the epoxy base until it visually matches the slab. On a speckled or veined quartz like a Calacatta-look engineered stone, that matching takes real skill. A poorly matched seam on a light background is painfully obvious.
How is quartz seam adhesive applied, step by step?
The application matters as much as the adhesive choice. A rushed or sloppy seam will fail or look bad regardless of what adhesive you use.
First, both slab edges are polished or ground flat and square so they meet with no gap or rock. Fabricators call this the seam profile. The standard finish is a 90-degree flat edge. Any deviation here means the adhesive has to fill an uneven gap, which makes the seam weaker and more visible.
Second, both surfaces are cleaned with acetone or a similar solvent to remove stone dust, oils from handling, and any sealer residue. Epoxy bonds to clean stone. It does not bond well to contaminated surfaces, and a seam that pops open six months later almost always traces back to a dirty bond line.
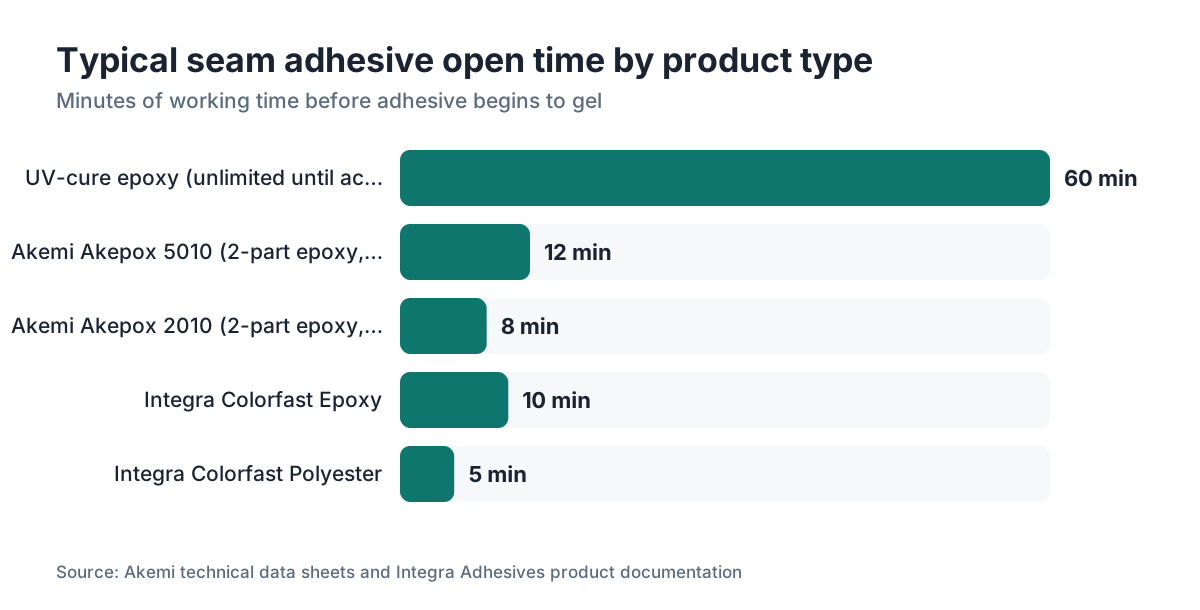
Third, the fabricator mixes and applies the adhesive. On a CNC-cut or hand-finished straight seam, they run a thin bead along one edge, press the pieces together, and use seam clamps or spring clamps to hold them tight while the epoxy sets. Most two-part epoxies used in fabrication have an open time of 5 to 15 minutes and reach handling strength in 20 to 40 minutes at room temperature [2].
Fourth, after the epoxy gels but before it goes fully hard, they scrape off the squeeze-out with a razor blade. Once fully cured, typically 60 to 90 minutes depending on the product, the seam is hand-sanded or belt-sanded flush, then polished to match the surrounding surface.
The steps sound straightforward, and they are. The difficulty is in the detail: matching color perfectly, holding the pieces at exactly the same height so there's no lippage, and keeping the seam line tight enough that it reads as a line, not a gap.
What makes a quartz seam different from a granite or marble seam?
Quartz is an engineered product, which changes the adhesive calculus compared to natural stone. Engineered quartz slabs (brands like Silestone, Caesarstone, or Cambria) are roughly 90 to 94 percent crushed quartz bound with polymer resins, usually polyester or epoxy resins, plus pigments [3]. That polymer matrix means the surface is slightly less porous than most granite, which is actually good for bonding: the adhesive sits on the surface rather than wicking in unevenly.
Granite seams are often done with the same two-part epoxy products, so there's overlap. But granite's natural variation in porosity means some slabs absorb adhesive differently. Marble and quartzite are softer and more porous, requiring extra care about adhesive migration into the stone face. With quartz, you don't have that problem.
The bigger difference is color matching. Granite countertops have natural movement that can actually help hide a seam because the eye follows the pattern. A uniform solid-colored quartz or a white quartz with subtle veining has nowhere to hide a bad seam. Every fraction of a millimeter of color mismatch or lippage is visible. That's why fabricators working primarily on quartz often invest in better adhesive systems and take more time color-matching than they would on a heavily figured granite.
For other countertop materials like laminate countertops or Corian countertops, the approach is entirely different: laminate uses contact cement at substrate joints, and solid surface like Corian is typically solvent-welded or uses manufacturer-specific adhesive kits. The epoxy seam-setter world is mostly a stone and engineered stone thing.
What are the main brand-name seam adhesives fabricators use?
A few brands dominate the professional fabrication market in North America.
Integra Adhesives (Colorfast series) is probably the most widely used seam setter in U.S. shops. Their Colorfast line comes in multiple formulations, including versions tuned for quartz, and their tinting system is well-regarded. They sell both polyester and epoxy versions [1].
Akemi (Akepox series) is a German brand with a long history in stone fabrication. Akepox 2010 is their flagship two-part epoxy for transparent or lightly tinted seams. Akepox 5010 is more opaque and used when you need strong color coverage. Both cure to a hard, sandable finish [2].
Tenax is an Italian brand also popular in North American shops. Their Proseal and TE-TX lines include both polyester and epoxy options, and they have tinting systems compatible with most slab colors.
Mapei makes stone installation products including epoxy grouts and adhesives, though their products show up more in tile setting than in slab fabrication seams.
For homeowners trying to do a small repair rather than a full seam, consumer-grade two-part epoxy from a hardware store can work in a pinch, but the color matching is genuinely hard without the fabricator's tint system. Clear epoxy on a light quartz is often less visible than a poorly tinted one.
| Product | Type | Typical open time | Best for |
|---|---|---|---|
| Integra Colorfast Epoxy | 2-part epoxy | 8-12 min | Quartz, granite seams |
| Akemi Akepox 2010 | 2-part epoxy | 5-10 min | Transparent/light quartz |
| Akemi Akepox 5010 | 2-part epoxy | 8-15 min | Opaque/heavily tinted seams |
| Integra Colorfast Polyester | 2-part polyester | 3-6 min | Budget installs, fast turnaround |
| UV-cure adhesives (various) | UV-activated resin | Unlimited (until UV) | Complex positioning jobs |
How visible should a quartz seam be, and where should it go?
No seam disappears completely. Even a perfect seam on the best-matched quartz is still a line. The realistic goal is a seam you notice only when you're looking for it, not one that jumps out from across the room.
The industry rule of thumb for acceptable seam width is 1/16 inch or less. On a CNC-cut edge, a tight fabricator can get seams below 1/32 inch. Anything wider than 1/8 inch looks sloppy and is harder to fill convincingly with adhesive.
Seam placement is a decision made before fabrication starts, not during installation. The fabricator or salesperson reviews your kitchen layout and decides where seams must fall based on slab dimensions, your overhangs, and the support situation. On a standard 26-inch-deep kitchen countertop, a full slab might be 55 to 65 inches long, so an L-shaped kitchen almost always needs at least one seam. The Marble Institute of America (now the Natural Stone Institute) notes that slab layout and seam placement should be reviewed with the homeowner before templating [4].
Good placement guidelines: seams should avoid the sink cutout area if possible (water constantly runs there), they should fall over a cabinet or support, not in mid-air over an opening, and they should be perpendicular to the countertop front edge so they're less visible from a standing position.
On a simpler countertop material like butcher block countertops, the seam question doesn't arise the same way, since end-grain and long-grain pieces are often glued up in the shop. But with quartz, the seam location is a real design and structural decision.
Can a homeowner repair a quartz seam, or does it need a fabricator?
Small cosmetic repairs are within homeowner territory. That means the seam adhesive has shrunk slightly or discolored but the pieces haven't actually separated. You'd clean the seam thoroughly with acetone, let it dry completely, then work a thin bead of color-matched two-part epoxy into the gap with a toothpick or very fine spatula. The hard part is color matching. Without the original fabricator's tint kit, you're guessing.
If the pieces have actually separated or shifted, that's a fabricator job. The slab has to come off (or at minimum be unloaded from the cabinet), the old adhesive ground out, surfaces re-cleaned, and the seam re-done with proper clamping pressure. Trying to re-glue a separated seam in place, with the countertop still on the cabinets, almost never works well because you can't clamp it and you can't control lippage.
For ongoing care around seams, the main rule is to keep standing water away from the seam area. The cured adhesive is waterproof, but water can migrate under the slab if there's any gap, and the substrate (plywood or MDF underlayment) will swell and crack the seam from below. This is especially true near a sink. See our guide on countertop installation for more on substrate prep and support requirements.
If you have a light-colored quartz and the seam has yellowed, that's often from the adhesive oxidizing or from cleaning chemicals reaching the bond line. A fabricator can sometimes re-fill a yellowed seam without removing the slab. If it's polyester adhesive that yellowed, replacing it with epoxy is the right long-term fix.
Does the type of quartz brand affect which adhesive to use?
The short answer is no, with a small caveat. The engineering chemistry of major quartz brands (Silestone, Caesarstone, Cambria, MSI, and others) is similar enough that professional stone epoxies work across all of them [3]. The adhesive bonds to the surface, not to anything specific to one manufacturer's formula.
The caveat is color. Different brands have very different aesthetics, and some are harder to match than others. Brands with matte finishes need a slightly different post-cure polish approach. Very dark quartz colors (near-black) are actually easier to seam invisibly than bright white or concrete-gray, because small color variations in the filler are less visible. Heavily veined quartz that mimics marble movement is the hardest to seam well, because you're matching both color and the path of the vein across the seam line.
Some quartz manufacturers publish installation guidelines that mention adhesive type. Cambria's installation guide, for example, recommends using a two-part epoxy adhesive for seams and specifies that seams should align with cabinet supports [5]. Silestone's technical documentation similarly recommends epoxy-based adhesives over polyester for long-term performance [10]. Following the manufacturer's recommendation matters if you're in a warranty situation, though in practice the adhesive brand is rarely the source of warranty claims.
If you're curious about how a specific brand installs and where seams typically fall, that manufacturer's published technical guide is the most reliable source. Brands post these in the professional or fabricator sections of their websites.
What does quartz seam adhesive actually cost?
The adhesive itself is a small line item in any quartz job. A 250ml cartridge of professional two-part epoxy seam setter runs roughly $15 to $35 depending on brand and formulation [1]. One cartridge is usually enough for two to four seams. The tinting pigments and static-mixing nozzles cost extra, but they're minor.
For homeowners, the adhesive cost buried in your countertop installation price is essentially invisible. Fabricators don't line-item it separately. What they charge for is seam work as a labor component, and complexity of seaming (especially on detailed layouts or mitered edges) can add to the overall job quote.
The bigger cost question is this: how does seam location and count affect total project price? More seams mean more labor and more adhesive, but they also mean smaller slab pieces, which can reduce material waste. A fabricator running a tight nesting layout on a CAD or quoting platform (tools like SlabWise let shops model seam placement against slab dimensions during the quote stage) can sometimes cut seam count by optimizing the layout before a single piece is cut.
The realistic total for a quartz countertop installation including seam work is $50 to $100 per linear foot for the whole installed project, varying by region, stone grade, and edge profile. That range comes from aggregated installer pricing data, and local markets vary a lot [6].
For comparison, here's what seaming adds to installed cost across different countertop types:
| Material | Seam adhesive type | Typical seam labor add | Visibility challenge |
|---|---|---|---|
| Engineered quartz | 2-part epoxy | $50-$150 per seam | High (uniform colors) |
| Granite | 2-part epoxy | $50-$150 per seam | Lower (natural variation) |
| Marble | 2-part epoxy | $75-$200 per seam | High (veining must align) |
| Laminate | Contact cement | Minimal | Very high |
| Solid surface (Corian) | Manufacturer adhesive | $75-$150 per seam | Low (can be sanded invisible) |
Are there any safety or ventilation concerns with epoxy seam adhesives?
Yes, and this is worth taking seriously if you're doing any repair work yourself. Two-part epoxy adhesives contain reactive chemicals, including bisphenol A (BPA) based resins in many formulations and amine-based hardeners. Before curing, both components are skin and respiratory irritants. The hardener in particular can cause sensitization with repeated exposure, meaning you can develop an allergic reaction that gets worse over time [7].
The U.S. Occupational Safety and Health Administration (OSHA) treats uncured epoxy resins as potential sensitizers and skin and respiratory irritants. OSHA's air contaminant limits under 29 CFR 1910.1000 set permissible exposure limits for some components found in epoxy systems [8]. Professional fabricators should work in ventilated shops and wear nitrile gloves and eye protection when dispensing and mixing.
For a homeowner doing a small repair: work in a ventilated space (open windows, use a fan), wear gloves, and avoid skin contact with the unmixed components. Once fully cured, the epoxy is inert and poses no health concern. The finished seam you set your groceries on is not a hazard.
Polyester adhesives carry their own concerns. They contain styrene monomer, a volatile organic compound (VOC) with a stronger smell and more respiratory irritation than most epoxies [9]. OSHA also regulates styrene exposure. This is one more reason epoxy has pushed out polyester in many shops. It's about more than performance. It's a better working environment.
Always read the Safety Data Sheet (SDS) for any adhesive product before use. Manufacturers are required to provide SDS documents under OSHA's Hazard Communication Standard (29 CFR 1910.1200) [8].
How long does quartz seam adhesive last, and what makes seams fail?
A well-executed epoxy seam should last as long as the countertop itself, which in a residential kitchen is decades. There's no meaningful published longevity data specific to countertop seam adhesives (nobody has run a 30-year countertop seam study), but epoxy adhesives in construction applications routinely outlast the structures they're used in.
Seams fail for identifiable reasons, almost never because the adhesive gave out on its own. The most common causes:
Thermal shock. Setting a hot pot directly on the seam line repeatedly can stress the bond. Quartz manufacturers universally warn against this, and it's relevant regardless of adhesive type [5].
Substrate movement. If the cabinet base isn't level or shifts over time, the slab rocks and eventually cracks the seam from below. This is a support problem, not an adhesive problem.
Water infiltration near the sink. Water reaching the substrate makes the wood swell and push the slab up unevenly. The seam cracks. Proper silicone caulking at the backsplash and around the sink prevents most of this.
Impact. A heavy dropped object directly on or near the seam can crack it. Quartz is hard but not elastic.
Poor original bond. If the surfaces weren't clean or weren't clamped at the same height, the seam was never strong to begin with. It may hold for a while and then fail under minor stress.
For anyone managing a countertop project, understanding how to clean and care for quartz surfaces helps preserve seam integrity over time. The same aggressive cleaning chemicals that damage quartz finishes can also degrade seam adhesive if they reach the bond line regularly. See also how to clean stone countertops for safe product guidance.
What should homeowners ask their fabricator about seams before signing a contract?
Most homeowners don't think to ask about seams until the countertop is installed and the seam is not what they expected. Asking these questions upfront takes five minutes and prevents most surprises.
First: where will the seams be? Ask the fabricator to show you on a drawing. A good fabricator will have a layout sketch or a digital template showing seam locations. If they can't tell you where the seams go before fabrication, that's a red flag.
Second: what adhesive will you use? The honest answer is some form of two-part epoxy. If they say polyester and it's a light-colored premium quartz, it's worth asking why.
Third: how do you match the color? Ask if they use a tinting system or a pre-tinted cartridge. A tinting system with individual pigment drops gives finer control. Pre-tinted cartridges from adhesive manufacturers are matched to common slab colors and are perfectly acceptable, but they have less flexibility on unusual colors.
Fourth: can I see a sample seam on scrap pieces before installation? Not every shop will do this, but some will on request, especially for high-visibility areas.
Fifth: what's your process if the seam doesn't look right after installation? Get a clear answer on the warranty or re-work policy. Most reputable fabricators stand behind seam work. A vague or hostile answer to this question tells you something.
For homeowners comparing multiple materials, looking at options like marble countertops alongside quartz makes clear that seaming challenges aren't unique to any one material. Each stone type just has different variables. SlabWise's instant quote tool can help you compare installed costs across materials before you commit to anything.
A good kitchen countertops installation comes down to preparation and communication. Seams are the place where both matter most.
Frequently asked questions
Can I use regular super glue or Gorilla Glue on a quartz seam?
Super glue (cyanoacrylate) and polyurethane glues like Gorilla Glue aren't appropriate for quartz seams. Super glue has almost no gap-filling ability and is brittle under shear stress. Polyurethane foams as it cures, which is the last thing you want in a tight seam. Two-part epoxy is the right tool: it fills small gaps, sands flush, and is rigid enough to hold under normal countertop loads.
What color should quartz seam adhesive be?
The adhesive should be tinted to match the dominant background color of the quartz as closely as possible. Fabricators use pigment kits to adjust the base color of the epoxy before applying it. On veined quartz meant to mimic marble, matching the white or gray background is the goal. The vein pattern across the seam is a separate hand-painting step that skilled fabricators sometimes do on high-end work.
How do I remove old quartz seam adhesive for a repair?
Cured epoxy is hard to remove without damaging the surrounding stone. A razor blade or oscillating multi-tool with a narrow blade can score and pry out old adhesive from an open seam. Acetone softens some epoxies slightly and helps clean residue from the bond surfaces after mechanical removal. Don't use a heat gun aggressively on quartz; sustained heat above roughly 300°F can damage the polymer resin in the slab.
Why does my quartz seam look white or hazy?
A white or hazy seam usually means the adhesive wasn't tinted to match, or it was applied too thick and the surface wasn't sanded flush. It can also come from cleaning products leaving residue in a slightly open seam. For a new installation, this is a workmanship issue you should take back to the fabricator. For an older seam, cleaning with acetone on a cotton swab sometimes removes surface haze.
How long after seam adhesive is applied can I use my countertop?
Most professional two-part epoxy seam setters reach handling strength in 20 to 40 minutes and full cure in 24 hours. Fabricators typically allow the full cure period before the countertop goes into normal service. In practice, homeowners can use the surface lightly after a few hours, but putting heavy stress directly on the seam line before 24 hours is not a good idea.
Is the adhesive used for outdoor quartz countertops different?
Outdoor installations need an adhesive with better UV resistance. Standard epoxies can yellow with prolonged UV exposure. For outdoor quartz, fabricators often use UV-stabilized epoxy formulations or polyurea-based adhesives rated for exterior use. The brand-name seam setter manufacturers offer outdoor-specific versions. If your fabricator is quoting an outdoor kitchen in quartz, confirm they're using an exterior-rated adhesive.
Can you seam quartz at a corner or miter joint?
Yes. Miter joints on quartz edges (where two pieces meet at 45 degrees to form a thick waterfall edge or a 90-degree corner profile) use the same two-part epoxy, but with more adhesive surface area and more clamping complexity. Seam clamps with adjustable angles hold the miter tight during cure. These joints are structurally solid when done correctly but take more time to execute than a standard top-surface seam.
Does quartz always need a seam, or can you get one-piece countertops?
Most residential kitchens need at least one seam if the countertop runs more than about 55 to 65 inches, which is the usable length of a standard quartz slab after accounting for saw kerf and edge finishing. Small bathrooms or short kitchen runs can often be cut from a single piece with no seam at all. Your fabricator's layout drawing will show whether a seam is structurally required for your specific kitchen dimensions.
How do fabricators keep both pieces at the same height during seam glue-up?
Fabricators use seam clamps, also called Z-clamps or countertop alignment clamps, that grab both slab edges at once and draw them together while holding them flush at the surface. The clamps have set screws that adjust the height relationship between the two pieces. Getting zero lippage (no step at the seam surface) is the main technical challenge, and good clamps plus a flat substrate are how it's achieved.
Will quartz seam adhesive stain if exposed to wine, coffee, or cleaning chemicals?
Cured two-part epoxy generally resists common household stains and most cleaning products. Prolonged contact with strong acids (bleach-heavy cleaners, oven cleaners) can degrade the adhesive surface over time. Epoxy handles wine and coffee fine. The bigger risk is if the seam is slightly open: liquid can wick into the gap and stain both the adhesive and the substrate below, which is why a tight, well-filled seam matters.
What's the difference between a seam and a crack in quartz, and how are each fixed?
A seam is intentional: two separate pieces of quartz joined with adhesive during fabrication. A crack is unintentional damage to a single piece, usually from impact or thermal stress. Seam repairs involve re-doing the adhesive bond between the two pieces. Crack repairs are more complex: the crack is routed slightly, filled with color-matched epoxy, and polished. Neither repair is truly invisible on close inspection, but both can be made unobtrusive by a skilled fabricator.
Should I seal the top of a quartz seam after installation?
Quartz doesn't need sealing, and neither does the epoxy seam. Sealers are for porous natural stones like granite and marble. Applying a stone sealer to quartz does nothing useful and can leave a hazy film on the surface. The seam is protected by the epoxy itself. If there's a visible gap at the surface of the seam, the right fix is filling it with fresh epoxy, not covering it with sealer.
How do I find a fabricator who does good seam work?
Ask to see photos of completed seam work, preferably on a color similar to your quartz. Ask specifically how they color-match adhesive. Check online reviews for mentions of seam quality; it's a detail that unhappy customers reliably mention. A fabricator who installs quartz daily and uses a proper tinting system will produce better seams than one who occasionally installs it between tile and other work.
Sources
- Integra Adhesives, Colorfast product line documentation: Integra Adhesives produces the Colorfast two-part epoxy and polyester seam setter lines widely used in North American stone fabrication shops
- Akemi, Akepox 2010 and 5010 technical data sheets: Akepox 2010 has an open time of approximately 5-10 minutes and reaches handling strength in 20-40 minutes at room temperature; Akepox 5010 is designed for opaque, heavily pigmented seams
- U.S. Geological Survey, National Minerals Information Center: Engineered quartz slabs contain approximately 90-94 percent crushed quartz bound with polymer resins, plus pigments
- Natural Stone Institute, Countertop Installation Guidelines: Slab layout and seam placement should be reviewed with the homeowner before templating, per Natural Stone Institute installation standards
- Cambria, Cambria Care and Maintenance Guide: Cambria recommends using two-part epoxy adhesive for seams, that seams align with cabinet supports, and that hot items not be placed directly on the surface
- Angi, Countertop Installation Cost Guide: Installed quartz countertop costs range from approximately $50 to $100 per linear foot depending on region, stone grade, and edge profile
- National Institute for Occupational Safety and Health (NIOSH): Uncured epoxy resins and amine hardeners are skin and respiratory sensitizers; repeated exposure can cause allergic reactions that worsen over time
- U.S. Occupational Safety and Health Administration (OSHA), Hazard Communication Standard: OSHA requires manufacturers to provide Safety Data Sheets (SDS) for hazardous chemical products including epoxy adhesives under 29 CFR 1910.1200; permissible exposure limits for epoxy components are set under 29 CFR 1910.1000
- U.S. Occupational Safety and Health Administration (OSHA), Styrene Health Standard: Styrene monomer, found in polyester adhesives, is a volatile organic compound and respiratory irritant that OSHA regulates for occupational exposure
- Silestone by Cosentino, Technical Installation Guide: Silestone's technical documentation recommends epoxy-based adhesives over polyester for long-term seam performance in engineered quartz installations
Last updated 2026-07-10