TL;DR
- A countertop fabrication drawing is a scaled, dimensioned plan showing exactly how a shop will cut your stone.
- It maps piece outlines, seam locations, edge profiles, cutouts, overhangs, and special notes.
- Reading it before you sign is the cheapest insurance you'll ever buy, because a wrong cut in stone means buying a new slab.
What is a countertop fabrication drawing and why does it matter?
A fabrication drawing (also called a shop drawing, cut sheet, or layout drawing) is the document that travels from the templating stage to the saw. It tells the waterjet or bridge saw operator exactly where to cut, where to leave material for a sink or cooktop, where to join pieces, and what edge to run on every exposed face.
Think of it as the architectural plan for your countertops. A kitchen blueprint shows walls. A fabrication drawing shows stone. Both have the same trap: if nobody catches the error on paper, you live with it in the physical world. Stone is not forgiving. A seam in the wrong place or a sink cutout that lands two inches off cannot be patched. You order a new slab.
For homeowners, reading the drawing is not optional if you care about your money. Your fabricator may be excellent, but templating mistakes happen, and you are the last check before the saw runs. For fabricators and shop owners, the drawing is a liability document as much as a production document. If a customer signed off on a drawing that shows a seam they later hate, that signature is your protection.
The drawing also governs material yield. Fabricators plan piece placement across the slab to cut waste and match veining. Reading the drawing lets you see those decisions and ask sharp questions about them.
How is a fabrication drawing created, and what does it start from?
Almost every modern fabrication drawing starts with a digital template. A technician visits the kitchen or bath and uses either a laser templating system or a manual contact method to capture the exact shape of the cabinet tops, walls, and any obstructions. That data feeds into CAD or dedicated countertop software, which outputs the drawing.
The common digital templating tools produce a DXF or DWG file, which is a standard CAD format [1]. That file gives the fabricator a dimensionally accurate outline of every piece. Older shops still cut paper templates from cardboard strips or rosin paper, and a draftsperson then draws the layout by hand or traces it into software.
The drawing usually shows a top-down (plan) view at a stated scale, commonly 1:10 or 1:20 for a kitchen, meaning one unit on paper equals ten or twenty of the same units in real life. Check the scale block before you trust any printed length. Some drawings add a detail view zoomed in on complicated areas like a five-sided peninsula or an inside corner.
Software platforms that handle quoting and nesting (SlabWise is one) can generate a fabrication drawing straight from the quote data. That cuts the risk of a dimension quietly changing between the estimate and the cut file without anyone catching it.
What do the different lines and symbols on the drawing mean?
Every drawing uses a set of graphic conventions. They are not fully standardized across the industry the way architectural drawings are, so the key below covers the most common ones. If your fabricator's drawing uses different symbols, ask for a legend.
Solid bold lines outline the outer edge of each countertop piece. This is the cut line.
Dashed or dotted lines inside a piece usually mark something below the surface: a cabinet edge, a wall line, or an overhang boundary. They show context without meaning the stone gets cut there.
Centerlines (a line of alternating long and short dashes, sometimes labeled CL) mark the center of a sink, cooktop, or faucet hole. These are reference points for positioning the cutout.
Cutout rectangles or ovals inside the piece outline show sink, cooktop, or drainboard cutouts. They get dimensioned from at least two edges so you can verify the position independently.
Seam lines are usually a heavier or differently styled line across a piece boundary, often labeled with an S or the word SEAM. They show where two pieces of stone meet and get joined with adhesive.
Edge profile callouts are short leader lines pointing to an exposed edge with a label like "Eased," "Ogee," "Bullnose," or a profile number from the shop's catalog. Edges that butt against a wall or appliance are typically labeled "Unpolished" or "Against Wall" and get no decorative profile.
Hatch patterns or shading sometimes mark the backsplash area, which may be a separate piece or a raised section of the same slab.
Arrows with measurements are the dimension strings. They run parallel to the edge being measured, with tick marks or arrowheads at each end.
A note block or legend in the corner lists material, thickness, finish, and any special instructions like "mitered waterfall edge on left side" or "book-matched seam." Read that block first.
How do you read the dimensions on a countertop drawing?
Dimensions are where most errors hide. Read them slowly and cross-check everything.
U.S. shops dimension in inches and fractions. Metric shops use millimeters. A U.S. drawing might show 96 3/8" for a run of base cabinets. That fraction matters. Digital templating is accurate to 1/16 inch or better [1], so the drawing should carry the actual measurement, not a rounded number.
Overall dimensions run the full length or width of a piece. These are the first numbers to check against your cabinet measurements or the room plan from your designer.
Partial dimensions (also called string dimensions) break the overall into segments. An L-shaped counter might show 48" along one leg and 36" along the other, with a separate 25" depth on each. The partial dimensions have to add up to the overall. If they don't, flag it right away.
Cutout dimensions tell you where a sink sits. A typical drawing shows the cutout width and length, plus two locating dimensions: distance from the front edge and distance from one end. Cross-check these against your sink's installation template or spec sheet. Undermount sink reveals, the gap between the stone edge and the bowl rim, usually run 1/8" to 3/16", but confirm with your fabricator because it changes the cutout size.
Overhang dimensions show how far the stone extends past the cabinet face. The standard base-cabinet overhang is 1 1/2" per Marble Institute of America guidelines, though designer preferences vary [2]. Island overhangs for seating commonly run 12" to 15" for a standard stool height [9].
Thickness usually lives in the note block, not on the plan view, because the plan is a top-down drawing. Common thicknesses are 3/4" (2 cm) and 1 1/4" (3 cm). If your countertop has a laminated edge to fake a thicker look, that should be noted too.
Have a tape measure nearby while you read. Measure your actual cabinets at the spots the drawing claims to match, then compare. A 1/8" gap is usually fine. A 1/2" gap needs to be resolved before anyone cuts.
Where are seams shown, and how do you evaluate their placement?
Seam placement is one of the heaviest decisions in a countertop project. A seam in the wrong spot is visible, it may open over time if the substrate shifts, and it can look worse with certain materials. Book-matched marble, for one, reveals every seam aggressively.
On the drawing, seams usually appear as a distinct line across a piece, perpendicular or angled to the run. They may carry a seam number (S1, S2) or just the word SEAM. Some drawings shade one side of the seam differently to show which piece is which.
Seams go where the slab material runs out, where the weight of a single piece would be structurally risky, or where transport limits force the top into manageable sections. A good fabricator also keeps seams off dishwashers (heat and humidity stress the joint) and away from sink cutouts.
The Marble Institute of America advises that seams not sit in the field of a sink cutout and that any seam within a cutout corner be evaluated for structural risk [2]. Ask your fabricator directly if any seam on your drawing lands near a sink or cooktop.
For natural stone with strong veining, ask to see how the pieces will lay on the slab before cutting. Many shops can show you a digital rendering of the slab with the piece outlines overlaid, so you can see where the veins cross the seam. If the veins run at an angle to the seam, the mismatch may be obvious from standing height. Whether that bothers you is a personal call. Just make it on purpose.
What do edge profile labels mean on a fabrication drawing?
Edge labels tell the fabricator which edge shape to machine on each exposed side of the stone. The label is usually a short code or a name, pointed at a specific edge with a leader line.
Common edge profiles:
- Eased or flat-polish: a square edge with slightly softened corners. Minimal material removal, lowest cost.
- Beveled: a 45-degree cut along the top corner, usually 1/8" to 1/4" wide.
- Bullnose (full or half): a rounded edge. Full bullnose curves from the top face all the way to the underside. Half-bullnose stops midway.
- Ogee: an S-curved profile, more decorative, usually seen on thicker 3 cm stone.
- Waterfall or mitered: the stone continues vertically down the side of the cabinet and meets a horizontal piece at a 45-degree miter. This is expensive and should be flagged clearly on the drawing.
- Laminated edge: two layers of stone glued together for a thicker look. Common on 2 cm stone to mimic 3 cm.
If an edge goes against a wall or gets covered by a range or refrigerator, it should read "unpolished" or "against wall" on the drawing. You don't pay for profile work on those edges, and the stone shouldn't be profiled there. Unnecessary profiling costs time and can weaken an edge where it isn't supported.
A drawing that labels every edge explicitly, including the ones against walls, is a sign of a careful shop. A drawing that labels only the fancy edges and leaves the rest ambiguous is asking for a miscommunication.
How do you check a fabrication drawing for errors before approving it?
This is the practical heart of the guide. Here is a check you can run in about 20 minutes.
Step 1: Verify scale. Find the scale block and confirm it is readable. On a printout, use a ruler to spot-check one known dimension.
Step 2: Match piece count. Count the pieces on the drawing. Count the runs of countertop in your kitchen. They should line up. A missing filler piece or bar top is a common omission.
Step 3: Check overall dimensions. Measure each counter run yourself and compare to the overall dimensions on the drawing. Give a 1/8" tolerance for minor wall irregularities. Anything larger than 1/4" needs an explanation.
Step 4: Verify all cutouts. For each cutout, pull the sink or cooktop manufacturer's installation spec (it ships with the appliance or downloads from the maker's site). Compare the cutout dimensions on the drawing to the spec. Confirm the locating dimensions put the cutout where you expect it.
Step 5: Check overhangs. Confirm the front overhang on base cabinets matches what you agreed to. Check island or peninsula overhangs for seating clearance.
Step 6: Evaluate seam locations. Ask three things. Will I see that seam daily? Does it fall over a dishwasher or near a sink? Can it be moved?
Step 7: Confirm edge profiles. Make sure every exposed edge has an explicit profile label that matches your contract. Watch for any edge showing a profile you never ordered.
Step 8: Read the note block. Check material name, color or slab number, thickness, and finish (polished, honed, leathered). If you're doing a kitchen countertop in a stone that needs special sealing or handling, that may show up as a fabrication note.
Step 9: Look for the backsplash. If you ordered a backsplash, confirm it appears as a separate piece with its own dimensions.
Step 10: Sign nothing yet. If you found discrepancies, write them down and send them back in writing. Verbal corrections get forgotten.
What are the most common errors found on countertop fabrication drawings?
The errors cluster in predictable places, and homeowners and fabricators run into the same short list.
Wrong sink cutout size or position is the error most likely to trigger a call-back. Undermount sinks have tight reveal tolerances, and even a 1/4" shift looks wrong. Always verify against the sink manufacturer's template.
Missing pieces happen when a small section of counter gets overlooked at template, often a narrow filler beside a range or a short return at the end of an island.
Incorrect overhang slips through because overhangs are often assumed rather than measured at template. The drawing may show a standard 1 1/2" overhang on an island where you actually want 15" for seating.
Seams in bad locations (directly over a dishwasher, in the corner of a sink cutout, in an obvious sightline from the entry) are a judgment call the templater made without you. The drawing is your chance to override it.
Wrong edge profile on one or more pieces, either a profile you never ordered or a fancy profile on an edge that should be unpolished.
Dimension errors from wall irregularities show up when the templater averaged an out-of-square wall instead of noting the variance. If a wall is off 90 degrees, the drawing should show the actual angle, not an assumed right angle.
Missing faucet holes on sink pieces. If you're drilling faucet holes in the stone (rather than a sink-mounted faucet), those should appear as small circles with a dimension.
The good news: all of these are easy to catch on paper and brutal to fix in stone.
What is slab nesting and how does it appear on the drawing?
Slab nesting is the process of arranging all the cut pieces on the available slab area to cut waste and get the most out of the material. On a drawing set, the nesting layout is sometimes a separate sheet showing the full slab outline with the piece outlines placed inside it.
For homeowners, the nesting sheet matters for one reason above the rest: veining orientation. On natural stone like marble, quartzite, or granite, the direction the pieces come off the slab decides whether the grain runs lengthwise or crosswise on your countertop. If veining direction matters to you, check the nesting layout and ask whether any pieces are rotated in a way that runs the vein against your preference.
For fabricators, nesting is a yield problem. A typical residential granite slab runs roughly 55" by 110" to 65" by 120", though dimensions vary by supplier and origin [3]. A kitchen with 60 square feet of countertop might need one slab or two depending on piece geometry. Efficient nesting can save one slab purchase per project. Over a year, that adds up fast.
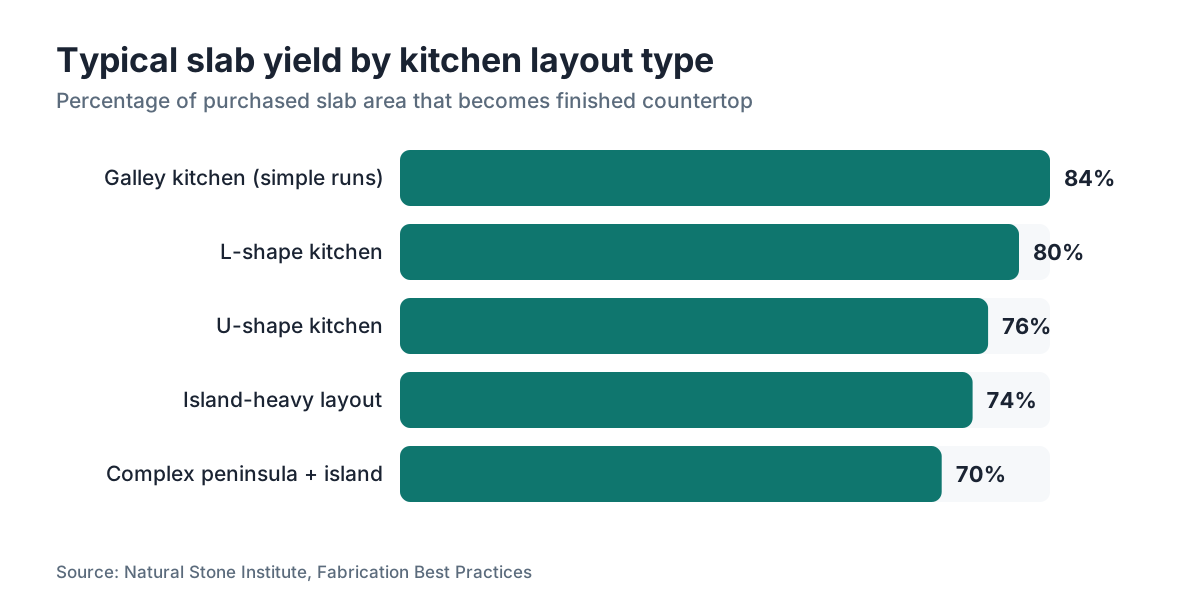
Modern fabrication software (including tools built specifically for stone shops) generates nesting layouts automatically and reports yield percentages. A well-nested kitchen typically targets 75% to 85% yield from the slab [4]. Below 70% and you're leaving a real chunk of paid material on the floor as offcuts.
Comparing bids from more than one shop? Ask whether the price is based on actual measured square footage or on a full slab purchase. On small projects, the difference is real money.
How do digital templates and CNC files relate to the fabrication drawing?
The fabrication drawing is the human-readable document. The CNC file is the machine-readable version of the same information. They should match exactly, and in a well-run shop they come from the same source data.
A CNC (computer numerically controlled) bridge saw or waterjet cutter reads a file (typically DXF or a proprietary machine format) that tells it where to move the cutting head. The operator often overlays this file on a photo of the actual slab to position the cuts relative to the stone's surface features before committing.
Digital templating systems, like those from Prodim or Laser Products Industries, capture the cabinet outline as a digital point cloud or spline that exports straight into the CAD environment [1]. That removes one transcription step compared to paper templating, which cuts error. It does not remove human judgment about seam placement, edge selection, or piece orientation.
As a homeowner, you'll probably never see the CNC file. But you should know it exists, and that the fabrication drawing you signed is the human document that's supposed to agree with it. If a mistake shows up on the drawing you approved, and that same mistake shows up in the cut, your signature is the fabricator's defense. Read it carefully for that reason alone.
For fabricators, keeping the drawing and the CNC file in sync is a workflow discipline problem. If anyone edits the CNC file after the customer signs the drawing, that change needs to be documented, and depending on its scope, may need a second customer sign-off.
Are there different drawing conventions for different countertop materials?
The drawing format is largely the same regardless of material. A few things change.
For granite countertops and other natural stone, the drawing may carry a slab number or lot number, since every slab is unique and the shop needs to track exactly which one it bought for your project. The nesting layout matters more with natural stone because veining and color variation are one-way decisions.
For marble countertops, seam notation is especially important because marble's strong veining makes seams more visible. Some shops add a note about seam treatment (color-matched epoxy, for one) right on the drawing.
For engineered quartz like Cambria countertops, slabs are more consistent, so veining orientation matters less. The conventions are identical, but the note block should list the exact product name and color, since engineered stone is made to spec and a replacement slab will match the original.
For laminate countertops and products like Formica countertops, the fabrication drawing is often simpler because cuts happen with a router or circular saw rather than a CNC waterjet. Seams are rarer because laminate sheets are wider than most countertop runs.
Butcher block countertops and Corian countertops each have their own joining and cutout conventions, and shops that specialize in those materials may run a modified drawing format. The principles hold. Reading dimensions, verifying cutouts, and checking edge labels stay the same.
The countertop installation process depends on the fabrication drawing being right. Installers use it to know which piece goes where, especially in a kitchen with multiple separate runs.
What should you do after reviewing the fabrication drawing?
Once you've checked the drawing and cleared any questions, close the loop cleanly.
If everything looks correct, sign the drawing (or the digital approval) and keep a copy. Photograph it with your phone as a backup. Note the date.
If you found issues, do not approve verbally. Send your corrections in writing (email is fine) and ask for a revised drawing before signing. Most disputes come from verbal corrections that each party remembers differently.
Once approved, ask how long before cutting begins and whether you can see a nesting layout with the actual slab photo before the first cut. Many shops run a pre-cut slab walk where the customer (or a representative) approves the piece placement on the physical slab, especially for high-cost natural stone. Ask for it even if the shop doesn't offer it by default.
After installation, compare the as-built countertop to the drawing one more time. Check that overhangs match, that the sink cutout landed where it was drawn, and that edge profiles are correct on every piece. If something is wrong, raise it before final payment. Most fabrication contracts set an inspection period (often 24 to 72 hours after installation) during which defects should be reported.
For fabricators who want to shrink the cycle of corrections and re-approvals, drawing tools that let customers mark up a PDF or a shared digital drawing can cut revision rounds a lot. SlabWise, for one, generates customer-facing layout previews straight from the quote and cut data, so the drawing and the job order stay in sync through approval.
Frequently asked questions
What scale are most countertop fabrication drawings printed at?
Most U.S. shop drawings print at 1:10 or 1:20 scale, meaning one inch on paper equals ten or twenty inches in the real world. Always find the scale block before assuming any printed distance. Digital drawings viewed on a screen may not be to scale at all unless the software displays a dimension overlay.
What does a seam line look like on a countertop drawing?
A seam line runs across a piece as a distinct, heavier, or differently styled line compared to dimension lines, and is often labeled S1, S2, or simply SEAM. Some drawings shade or color the adjacent pieces differently to make the boundary obvious. If you can't identify the seam lines clearly, ask the fabricator to point them out before you sign off.
How accurate should a digital template be compared to my actual cabinets?
Digital laser templating systems are generally accurate to 1/16 inch or better for cabinet runs under 12 feet. Manual templating runs slightly less precise. Any dimension on the drawing that differs from your field measurement by more than 1/4 inch should be flagged and explained. Small gaps from wall irregularities are normal. Large ones suggest a measurement error.
Can I move a seam after I approve the fabrication drawing?
Not reliably. Once you approve the drawing and cutting begins, moving a seam means cutting new pieces, which may require more slab material. If the existing slab has no room, you may need a second slab. Seam relocation before cutting is easy and free. After cutting it can cost hundreds to thousands of dollars in material and labor.
What does 'unpolished' or 'against wall' mean on an edge label?
Those labels tell the fabricator to leave that edge rough or unfinished because it will hide against a wall, backsplash, or appliance. No decorative profile gets machined, no polishing happens. This saves time and money. Make sure every edge that should be finished carries an explicit profile label, and every hidden edge reads unpolished.
Why does the countertop drawing show dashed lines inside the piece outline?
Dashed lines inside a piece outline usually mark something below the stone's surface, most often the cabinet edge, wall line, or overhang boundary. They give spatial context without meaning the stone gets cut there. A dashed rectangle inside a piece might also flag a cooktop or sink cutout if the shop uses that convention, though cutouts are more commonly shown as solid lines.
How do I verify that a sink cutout is in the right place on the drawing?
Get the installation template that ships with your sink, or download the spec sheet from the manufacturer's website. Compare the cutout dimensions (length and width) to the drawing. Then check the two locating dimensions, which give the cutout's distance from the front edge and from one end of the piece. Measure your actual cabinet to confirm those positions make sense.
What is the standard countertop overhang on base cabinets, and where is it shown on the drawing?
The standard front overhang on base cabinets is 1 1/2 inches per Marble Institute of America guidelines, though it varies by designer preference. On the drawing, overhangs appear as a dimension between the cabinet edge line (usually dashed) and the outer cut line of the stone. Island seating overhangs commonly run 12 to 15 inches and should be dimensioned explicitly.
Do I need to review the fabrication drawing if I trust my fabricator?
Yes. Even experienced fabricators make templating errors, and the drawing is the only stage where errors are free to fix. Once stone is cut, you're paying for new material. Reviewing the drawing is not a sign of distrust. It's the industry norm. Most professional fabricators expect and encourage customer sign-off precisely because it protects both parties.
What is slab yield and why does it affect my project cost?
Slab yield is the percentage of the purchased slab that ends up as finished countertop pieces. A well-nested project hits 75 to 85 percent yield. Low yield means more waste, which may mean an extra slab at added cost. If a fabricator's bid seems high, ask whether it includes more than one slab and what the projected yield is for your layout.
Can I request a nesting layout showing my pieces on the actual slab?
Yes, and it's worth asking for on natural stone projects. Many shops can overlay the digital cut file on a photo of your specific slab so you see exactly where veins and color variations land on each piece. This helps most with marble or highly veined quartzite, where the nesting decision changes the final look.
How long do I usually have to review and approve a fabrication drawing?
Most shops give customers 24 to 48 hours to review and return a signed drawing before the job queues for cutting. If you need more time to measure cabinets or check appliance specs, say so immediately. Holding the drawing without a word can delay your project, since most shops schedule cutting based on when approval comes back.
What happens if I find an error after the stone is already cut?
The outcome depends on your contract and whether you approved the drawing that contained the error. If the drawing you signed showed the correct dimension and the fabricator cut it wrong, they typically eat the replacement cost. If the error was on the approved drawing, you're usually on the hook for the material cost of remaking the piece. This is why the review matters.
Are fabrication drawing conventions the same for all shops?
No. There is no single industry-wide standard for countertop fabrication drawing symbols, though conventions are broadly similar. Some shops use color coding, others use hatching, and edge profile codes vary by shop. If a drawing isn't self-explanatory, ask for a legend or a quick walkthrough. A shop that can't explain its own drawing is a warning sign.
Sources
- Laser Products Industries, Digital Templating Overview: Digital laser templating systems capture cabinet outlines accurate to 1/16 inch and export DXF files directly into CAD environments.
- Marble Institute of America, Dimension Stone Design Manual: MIA recommends a standard 1 1/2-inch overhang on base cabinets and advises against placing seams in the field of a sink cutout.
- USGS, National Minerals Information Center: Granite slab dimensions typically range from approximately 55 by 110 inches to 65 by 120 inches depending on quarry origin.
- Natural Stone Institute, Fabrication Best Practices: Well-nested countertop projects typically achieve 75 to 85 percent material yield from the purchased slab.
- OSHA, Silica in the Stone Fabrication Industry: Stone fabrication involves cutting and grinding operations governed by federal silica exposure standards; shop drawings must specify material type to support compliance.
- American National Standards Institute, ANSI A108 Tile Installation Standards: ANSI standards for stone and tile installation specify dimensional tolerances that inform fabrication drawing dimension conventions.
- National Kitchen and Bath Association, NKBA Planning Guidelines: NKBA planning guidelines specify countertop overhang dimensions for seating, commonly 12 to 15 inches for standard stool height.
- U.S. Census Bureau, Characteristics of New Housing: Data on kitchen size and countertop square footage in new residential construction informs typical slab quantity requirements per project.
Last updated 2026-07-10