TL;DR
- Installing a countertop means removing the old surface, leveling the cabinets, making a precise template, cutting and fitting the new material, securing it with adhesive or fasteners, then sealing the edges and sink cutout.
- Stone slabs like granite almost always need a professional fabricator.
- Laminate and butcher block are real DIY projects.
- Budget $40 to $200 per square foot installed.
What does countertop installation actually involve?
Installing a countertop means transferring the exact geometry of your cabinet run onto a new surface, getting that surface level and flush, and locking it down so it won't move. Sounds simple. It isn't.
Cabinets are almost never perfectly level or square. Walls bow. Corner angles drift off 90 degrees. A countertop that looked great in the showroom will show every one of those flaws once it sits on your cabinets, because your eye picks up the gap between a straight slab edge and a crooked wall instantly.
The sequence is the same for every material: demo the old top, level the cabinets, template the space, fabricate or cut the new material, dry-fit it, adjust, install for good, then seal and finish. Each step leans on the one before it. Skip the dry-fit and you end up with a granite slab that's a quarter inch short on the back wall.
Material choice changes almost everything about which of those steps you can do yourself. See the full breakdown in our countertop installation guide, and if you're still picking a material, our kitchen countertops overview compares the real tradeoffs.
Which countertop materials can you install yourself?
Here's the honest answer most articles skip: the material decides whether DIY is realistic, not your skill level.
Laminate countertops and Formica countertops are the most forgiving. Post-form laminate (the kind with a rounded front edge already formed) comes in standard 25-inch-deep sections you cut to length with a circular saw and a fine-tooth blade. Sheet laminate needs a substrate and contact cement, which adds steps but buys you more design freedom. A moderately handy homeowner can pull off either.
Butcher block countertops are also friendly to DIY. They're heavy but workable with basic woodworking tools. You cut them with a circular saw, sand the edges, and finish with food-safe mineral oil or a hardening oil. The main risk is moisture. Seal the sink cutout edges thoroughly or the wood swells and cracks over time.
Granite countertops and other natural stone are a different animal. A full slab of 3cm granite runs 18 to 20 pounds per square foot [1]. A 10-foot run of 25-inch-deep countertop weighs roughly 375 pounds before you add the backsplash. Moving it without breaking it, cutting a sink hole without a wet saw and diamond blade, and hitting a seam that doesn't show a step or a gap all take specialized gear. Most fabricators won't warrant a job if the homeowner supplies the slab and asks for labor only, because they can't control how it was stored or handled.
Engineered quartz (Cambria countertops is one brand) has the same weight and cutting limits as granite. Corian countertops and other solid surface materials land in the middle. You can cut them with woodworking tools, but seams need a special adhesive and a router, and invisible seams take practice.
| Material | DIY realistic? | Key constraint |
|---|---|---|
| Post-form laminate | Yes | Cutting precision |
| Sheet laminate | Yes, with care | Contact cement application |
| Butcher block | Yes | Moisture sealing |
| Solid surface (Corian) | Possible | Seam technique |
| Granite / quartz slab | Usually no | Weight, wet saw, seam quality |
| Marble | Usually no | Same as granite plus fragility |
What tools and materials do you need before you start?
Get everything on the jobsite before you touch the old top. Running to the hardware store with cabinets half-stripped is how a small job turns into a lost day.
Every countertop install needs a 4-foot level (a 2-footer won't catch a cabinet run that dips in the middle), a tape measure, a pencil, construction adhesive (PL Premium or equivalent), painter's tape, safety glasses, and gloves. A cordless drill with bits is non-negotiable.
Laminate adds a circular saw with a fine-tooth blade (60 teeth or more), a jigsaw for the sink cutout, a router with a flush-trim bit for scribing to walls, contact cement and a short-nap roller if you're applying sheet laminate, and a J-roller to bond it down.
Butcher block uses the same cutting tools, plus a belt sander or random orbital sander, a food-safe finish (pure mineral oil, pure tung oil, or a hardening oil like Rubio Monocoat), and 100% silicone caulk for the sink perimeter.
Granite or quartz (if you're a fabricator or helping one) calls for an angle grinder with a diamond cup wheel for scribing, a wet saw with a diamond blade, suction cups rated for at least 400 pounds per pair, a seam setter, color-matched epoxy, and a polishing pad kit. These are professional tools that cost real money. A wet saw alone runs $500 to $2,000 new [2].
Shims are underrated. Buy a bag of composite shims. Cabinets are almost never level out of the box, and shims let you bring high spots down or build low spots up before the top goes on.
How do you remove old countertops without damaging your cabinets?
Turn off the water supply valves under the sink. Disconnect the supply lines and the drain trap. If you have a garbage disposal, unplug it and release it from the sink flange by twisting counterclockwise. A disposal still attached to the sink will fall and drag the drain gasket with it if you're not paying attention.
Cut the caulk line where the countertop meets the wall with a utility knife. Make several passes. Trying to muscle through old silicone in one cut tears the drywall paper.
Look underneath for screws coming up through corner brackets into the countertop substrate. Most post-form laminate tops are held by those screws plus a bead of construction adhesive. Pull the screws first. Then use a pry bar or a stiff putty knife to break the adhesive bond. Work slowly down the whole length instead of levering hard at one end, or you'll crack the top and make it harder to pull out in one piece.
Tile countertops are more work. The tile is usually set in thinset on cement backer board, and the whole assembly is often stuck to the cabinet top with more thinset or adhesive. You'll likely destroy the tile getting it off. A floor scraper on a pole helps, but expect to chisel and chip.
Once the top is out, scrape the cabinet rails clean. Any adhesive lumps left on the top rail will hold the new countertop up off the cabinet and give you a rocking surface. Take the time to scrape them flat.
How do you level cabinets and template before installation?
Lay your 4-foot level across the tops of the cabinets in every direction: front to back, left to right, and diagonally across corners. Mark high and low spots with a pencil on the cabinet face.
High spots get planed or sanded down. Low spots get shimmed. The goal is the whole run within 1/8 inch of level across its full length. On a stone job, fabricators often tolerate up to 3/16 inch but prefer tighter. On laminate, tighter is always better, because the substrate conforms to whatever surface you give it and then that shape is permanent.
Templating is where precision actually lives. Fabricators use either a physical cardboard or luan template or a digital tool (laser or photogrammetry systems like Prodigi or Laser Products Industries). For a DIY laminate job, template with 1/4-inch luan strips hot-glued together in place. The template captures the real wall angles, the depth of the run, and the location of the sink and cooktop cutouts.
Measure the sink twice. The sink cutout is the single most common source of expensive mistakes. With an undermount sink, the cutout has to be dead-on because the edge of the stone shows from above. Cut the hole too big and there's no fixing it short of buying new material.
Fabricators who run quoting and nesting software (SlabWise is one shops use) can import digital templates straight into their layout to cut slab waste, which matters a lot when the stone is expensive.
How do you cut and fit laminate countertops?
Post-form laminate comes in 8-foot, 10-foot, and 12-foot lengths, and most home centers stock them. Measure your run, add an inch on each exposed end that will be capped, and cut to length with a circular saw. Cut from the underside up if your saw blade exits from below, or from the top down if it exits from above. That keeps the finished face from chipping. A blade-direction mismatch is the most common beginner mistake with laminate.
For mitered corners, a coping saw and a lot of patience work, but a table saw or a sliding miter saw with the right blade gives a much cleaner joint. Pre-mitered corner kits cost about $15 to $30 at big-box stores, and they're worth using if your math is right.
Dry-fit the top on the cabinets before any adhesive touches anything. Check the back edge against the wall with a scribe or a compass. If the gap varies front to back (and it usually does), scribe the back edge to match the wall. A router with a flush-trim bit, or a block plane, lets you shave material a little at a time. Take off a little, check again.
Once the fit is right, run a bead of construction adhesive along the top of each cabinet rail. Set the top, press it down, and drive the screws up through the corner brackets. Wipe any squeeze-out right away with a damp rag.
Seal all seams and the backsplash-to-wall joint with 100% silicone. Tape the seam, apply the silicone, tool it with a wet finger, then peel the tape while the silicone is still wet. Caulk labeled "paintable" often isn't 100% silicone and won't survive around a sink. Read the tube.
How do you put granite on a countertop? (The real process)
Granite countertop installation starts at the stone yard or fabricator's shop, not at your house. The order goes: choose and buy the slab, have the fabricator template your space (usually a separate trip), fabricate the pieces including edge profiles and sink cutout at the shop, then deliver and install.
Templating for granite is not optional, and you can't do it with a tape measure. Fabricators use physical templates or digital laser systems to capture exact wall geometry. The template goes back to the shop, where the slab is cut on a CNC bridge saw with a diamond blade and the edges are finished by hand. This takes one to four days depending on shop workload.
On delivery day, the installer brings the pieces in with suction cups, often on a slab cart or an A-frame. They dry-fit each piece, then scribe the back edge to the wall with an angle grinder. The target is under a 1/8-inch gap at the wall, tight enough to caulk cleanly. Seams between pieces get color-matched epoxy mixed on-site and spread with a seam setter that clamps and aligns the two pieces at exactly the same height.
The slab sets on silicone dots (usually five to seven per 6-foot run) rather than a full bead of adhesive. Full contact traps moisture and makes future removal nearly impossible without wrecking the cabinets. The silicone dots cure overnight and hold the stone firm while allowing minor movement [3].
Undermount sinks clip to the underside of the stone with clips and silicone, not from above. The clips pull the sink rim tight to the stone. Most fabricators drill the sink holes at the shop and deliver the pieces with the clips and hardware ready.
Once it's set, the installer caulks the wall seam with color-matched silicone, usually custom-mixed to the stone rather than white or clear. Then the stone gets sealed before it goes into service. More on that below.
For more on material-specific properties, see our granite countertops guide.
Can you put hot pans on granite countertops?
Granite handles heat that would ruin laminate or solid surface. The stone itself won't scorch or melt. Granite forms at temperatures above 1,300 degrees Fahrenheit in the earth's crust [4], and a cast-iron skillet off a burner is only 400 to 500 degrees. The stone is fine.
The practical worry is the sealer, not the granite. Most granite countertops are sealed with an impregnating sealer, a resin that sits just below the surface. Sustained direct heat can break that sealer down over time, leaving the stone more porous in that spot and quicker to stain [5]. You can't see the sealer, so you won't notice the damage until the stone starts grabbing stains where you keep setting hot pans.
There's also a thermal shock risk with repaired slabs. If a slab has epoxy at a seam or a filled inclusion, sudden extreme heat can make the epoxy expand at a different rate than the stone and open a crack or pop a fill. This is uncommon with modern repairs but not unheard of.
The Natural Stone Institute recommendation: use a trivet or a silicone mat for anything over 300 degrees Fahrenheit, especially cast iron or ceramic bakeware that holds heat a long time [6]. A $3 trivet against sealer damage. Not a hard call.
If you're reading this because you already set something hot on your granite and see a white or dull ring, that's almost certainly sealer damage. A stone restoration pro can rebuff and reseal that area. The stone itself is not hurt.
How do you seal and finish countertops after installation?
Sealing depends on the material. Get it wrong and you either let moisture in or waste money on a sealer that does nothing.
Granite, quartzite, and marble all need an impregnating (penetrating) sealer. It soaks into the stone's pores and blocks liquid without leaving a surface film. Apply it after the adhesive and caulk cure (usually 24 hours), wipe it on, let it sit for the dwell time on the label (typically 10 to 20 minutes), then buff off the excess before it hazes. A second coat usually goes on 30 minutes after the first. The Natural Stone Institute recommends a water test: pour a tablespoon of water on the stone and wait 15 minutes. If it beads up, the sealer is working. If it soaks in and darkens the stone, reapply [6].
Quartz (engineered stone) needs no sealer. It's non-porous by manufacturing. Sealing quartz wastes money and can leave a film.
Butcher block gets a saturating oil finish, not a sealer. Pure food-grade mineral oil is the cheapest and most forgiving option. Flood it on, let it soak 20 minutes, wipe off the excess. Repeat three to four times in the first week. The wood stops drinking once it's saturated. After that, oil monthly for the first year, then a few times a year as needed.
Laminate and solid surface need nothing. They're non-porous. Just caulk the seams and the wall joint with silicone.
For ongoing care of stone, our how to clean stone countertops guide covers what to avoid (anything acidic etches marble and quartzite) and how to handle stains. For quartzite specifically, see how to clean quartzite countertops.
How much does countertop installation cost?
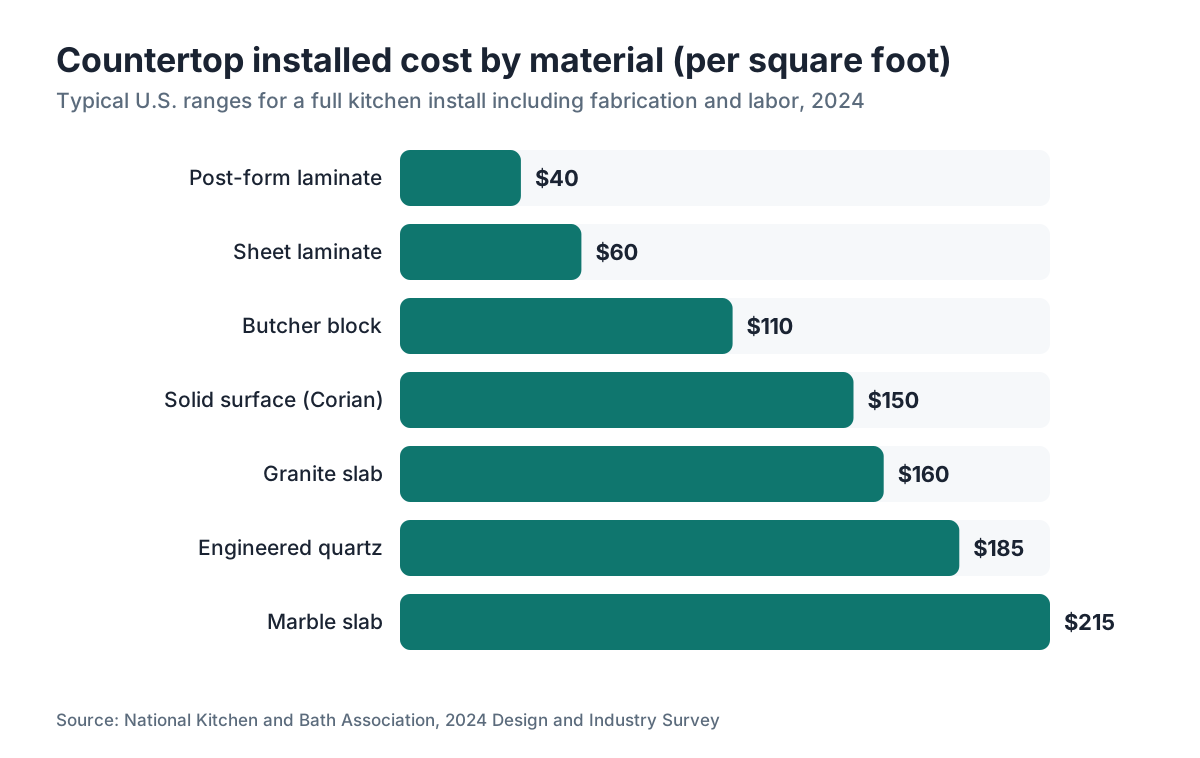
Cost swings hard by material, region, and whether you DIY or hire a fabricator. These ranges reflect 2024 U.S. market data. Prices in coastal metro areas run 20 to 30 percent above the national midpoint [7].
For a typical kitchen with 40 square feet of countertop surface:
| Material | Material cost (per sq ft) | Installed cost (per sq ft) | Typical 40 sq ft job |
|---|---|---|---|
| Post-form laminate | $15 to 25 | $30 to 50 | $1,200 to 2,000 |
| Sheet laminate (custom) | $25 to 45 | $45 to 75 | $1,800 to 3,000 |
| Butcher block | $40 to 100 | $70 to 150 | $2,800 to 6,000 |
| Solid surface (Corian) | $60 to 120 | $100 to 200 | $4,000 to 8,000 |
| Granite slab | $60 to 140 | $100 to 220 | $4,000 to 8,800 |
| Engineered quartz | $80 to 160 | $120 to 250 | $4,800 to 10,000 |
| Marble slab | $100 to 200 | $150 to 280 | $6,000 to 11,200 |
Stone labor alone (no material) typically runs $35 to $85 per square foot, based on industry surveys [7]. That number bundles template, fabrication, and install, because most shops price it as a package.
DIY savings are real on laminate and butcher block. You're mostly saving the labor markup, which on a $2,000 laminate job might be $400 to $600. On stone, DIY without the right gear rarely saves money once you count tool rental or purchase, wasted material from bad cuts, and possible damage to your cabinets.
If you're a fabricator sharpening your own pricing, SlabWise's quoting tool helps you build accurate quotes that account for slab yield, edge profiles, and sink cutouts without leaving money on the table.
What are the most common installation mistakes to avoid?
Skipping the dry-fit. Every experienced installer dry-fits first. Always. You find out about the crooked wall before the adhesive is down.
Not checking level before the top goes on. A countertop set on unlevel cabinets rocks, and you feel it every time you press down. The fix after the fact is shims or pulling the top and resetting it. Neither is fun.
Using the wrong caulk. Paintable caulk shrinks and cracks within a year at a sink joint. Use 100% silicone for anything that touches water.
Over-tightening the sink clips on granite. Granite is strong in compression but weak in tension. Crank a sink clip too tight and you can crack the stone at the cutout corner, which is already a stress point. Tight enough to hold the sink firm. No more.
Not sealing the sink cutout on butcher block. The end grain exposed at a sink cutout drinks water faster than any other part of the surface. Seal it with several coats of oil or with epoxy before the sink goes in. This is the number one reason butcher block countertops rot early.
Buying the wrong amount of material. Stone slabs get bought to cover the whole job from one or two slabs for grain match, and you want at least 10 to 15 percent overage for cuts and waste. Short-buy a granite slab and then discover the next slab from the lot has completely different veining, and you've got an expensive problem [8].
Putting the seam in a high-stress spot. On stone, seams should never run through a sink or cooktop cutout corner. Those are the weakest points. A seam there cracks under normal use. Good fabricators avoid it automatically. Less experienced ones may not.
Frequently asked questions
How long does countertop installation take from start to finish?
Laminate and butcher block installs usually take one day for demo and install combined, assuming the cabinets are ready. Stone jobs run longer: templating is a separate visit, fabrication takes one to four shop days, and the install visit itself takes two to six hours depending on kitchen complexity. From template to finished stone install, plan on one to two weeks total [3].
Do I need a permit to replace countertops?
In most places, replacing countertops like-for-like is maintenance that needs no building permit. But if you're moving or adding a sink, or the work is part of a larger remodel that changes the electrical or plumbing layout, a permit may be required. Check with your local building department before you start. Requirements vary a lot by city and county [9].
Can you put hot pans on granite countertops?
Granite itself won't burn or crack from a hot pan because it forms at over 1,300 degrees Fahrenheit. The risk is to the sealer, which can degrade under sustained direct heat and leave the stone more open to staining. The Natural Stone Institute recommends a trivet for anything over 300 degrees. Cast iron and ceramic bakeware hold heat longer and pose more risk than stainless pans [6].
How do you attach a countertop to cabinets without screws?
Construction adhesive alone can hold lightweight countertops like laminate. Run PL Premium or a similar adhesive in beads along the top of each cabinet rail, set the top, and weight it overnight. For stone, installers use silicone adhesive dots instead of full coverage or screws, which allows slight movement and makes future removal easier. Screws through corner brackets remain the most secure method for laminate.
How do you cut granite countertops in place?
You generally don't. Cutting granite in place is possible with an angle grinder and a diamond blade, but it throws off a huge amount of slurry and dust and risks cracking the stone. Fabricators almost always cut on a wet saw with water cooling at the shop. If an in-place adjustment is truly necessary, a professional uses a grinder with water control plus eye and lung protection. This is not a homeowner task.
What is the best adhesive for installing granite countertops?
Most fabricators use 100% silicone in dots (five to seven per 6-foot section) to set granite on cabinets. Silicone flexes enough to handle slight movement and allows future removal without destroying the cabinets. Seams between granite pieces get filled with a two-part polyester or epoxy adhesive, color-matched to the stone. Construction adhesive like PL Premium is used on some stone installs but is harder to remove [3].
Can you install granite countertops yourself?
Technically yes, but it's rarely worth it. A 10-foot granite run weighs roughly 375 pounds, cutting a sink hole needs a wet saw with a diamond blade, and an invisible seam needs a seam setter and color-matched epoxy. Tool costs easily hit $1,000 or more. Most fabricators also won't warranty a job where the homeowner provides labor. The DIY savings rarely justify the risk of cracking an expensive slab.
How do you seal granite after installation?
Apply an impregnating (penetrating) stone sealer once the install caulk has cured, usually 24 hours after install. Wipe the sealer on, let it dwell 10 to 20 minutes, then buff off the excess before it hazes. Apply a second coat 30 minutes later. Test with water: drop a tablespoon on the stone and wait 15 minutes. If it beads, the sealer is working. If it soaks in and darkens the stone, reapply [6].
How do you measure countertops for replacement?
Measure the depth from wall to cabinet front edge (typically 25 inches with overhang for kitchens, 22 inches for baths). Measure the linear length of each run. For L-shaped kitchens, measure each leg separately and add them. Multiply depth by length for each section, add them together, then add 10 to 15 percent for waste and cuts. For stone, a professional digital or physical template captures actual wall angles that tape measurements miss [8].
What countertop material is easiest to install?
Post-form laminate is the easiest countertop to install yourself. It comes pre-finished with a rounded front edge, cuts with a circular saw, and attaches with screws through cabinet corner brackets. Big-box stores stock standard depths and lengths, and end caps finish the exposed edges. A careful DIYer with basic tools can finish a laminate install in a single day, including demo of the old surface.
How do you install an undermount sink with a new countertop?
With stone, the sink cutout is made at the fabricator's shop. The sink clips to the underside of the stone with threaded clips and silicone on install day. With laminate or butcher block, you cut the sink hole yourself using the template that comes with the sink and a jigsaw, and the sink drops in from above and is held with clips from below. Always seal the wood at the cutout edges before installing the sink.
How long do I have to wait before using countertops after installation?
For stone set with silicone, wait 24 hours before putting weight on the countertop or using the sink. The silicone needs time to cure. Sealer on granite needs 24 to 72 hours before you expose it to water or oil. Butcher block needs three to four oiling sessions before regular use, with 20-minute soak times between coats. Laminate can be used almost right away once the adhesive cures, usually 2 to 4 hours.
Can you put new countertops over old ones?
Sometimes. Tile countertops can be covered with a thin laminate overlay if the tile is stable and the added height won't clash with appliances or windows above. Most installers don't recommend it for stone because the weight doubles and the height change causes trouble at the sink and dishwasher. The better practice is to demo the old top first and start from a clean, level substrate.
How do you fill gaps between countertops and walls?
Caulk, not grout. Use 100% silicone in a color that matches your countertop or grout. Tape both sides of the joint, apply the silicone, smooth with a wet finger or a caulk tool, and pull the tape while the silicone is still wet. Grout cracks at the wall joint because walls and countertops move independently. Silicone flexes enough to stay sealed for years. Reapply every three to five years as needed.
Sources
- Natural Stone Institute, Stone Tech Reference Manual: 3cm granite slab weighs approximately 18 to 20 pounds per square foot
- U.S. Bureau of Labor Statistics, Consumer Price Index for tools and hardware: Professional wet saws with diamond blades retail for $500 to $2,000 new
- Natural Stone Institute, Installation and Fabrication Guidelines: Silicone dot placement and undermount sink clip installation methods for granite countertops
- U.S. Geological Survey, National Minerals Information Center: Granite forms at temperatures exceeding 1,300 degrees Fahrenheit in the earth's crust
- Natural Stone Institute, Care and Maintenance of Stone Surfaces: Sustained direct heat can degrade impregnating stone sealer and increase stone porosity at the affected area
- Natural Stone Institute, Homeowner Care Guide: Recommends using a trivet for items over 300 degrees Fahrenheit on sealed stone; describes the water bead test for sealer effectiveness
- National Kitchen and Bath Association, 2024 Design and Industry Survey: Stone countertop labor (template, fabrication, install) typically runs $35 to $85 per square foot; coastal markets run 20 to 30 percent above national midpoint
- Natural Stone Institute, Slab Selection and Purchasing Guidelines: Recommends 10 to 15 percent overage when purchasing stone slabs to account for cuts and waste, and purchasing full lot for grain match
- International Code Council, International Residential Code: Like-for-like countertop replacement is generally exempt from permit requirements; plumbing or electrical changes may trigger permit requirements
- U.S. Department of Housing and Urban Development: Kitchen countertop installation included in standard residential rehabilitation scope; describes substrate and fastening requirements
Last updated 2026-07-10