TL;DR
- A tight radius corner, usually 1/8 inch to 1/2 inch, needs a template-routed or CNC-cut arc, a diamond core bit or radius router bit, and patient wet grinding to blend the curve.
- Shops charge roughly $20 to $60 extra per corner.
- Get it right the first time, because a cracked arc in natural stone rarely comes back.
What is a tight radius corner on a countertop?
A tight radius corner is any inside or outside corner that curves instead of meeting at a sharp 90-degree point, with the curve measuring roughly 1/8 inch to 1/2 inch. Anything larger than about 1 inch is usually called a "radius corner" or "bullnose corner" in shop language. Once you drop below 1/2 inch, fabricators start calling it tight.
The label matters because tight radii are much harder to cut cleanly. A 2-inch radius gives a router bit or CNC head room to arc smoothly. A 3/16-inch radius at a peninsula corner means the tool is basically pivoting on itself, and any wobble in the template or machine chatter shows up as a flat spot or, worse, a micro-crack that turns into a break under installation stress.
Outside corners point toward the room. Inside corners point into a wall. They behave differently. Outside corners on natural stone like granite or quartzite are where chips and breaks happen most often, especially when the radius is tight. Inside corners concentrate stress, and with no radius at all, they are the number one crack starting point in the slab [1]. That is why most fabricators will not cut a true zero-radius inside corner in natural stone.
Why do tight radius corners crack, and which materials are most at risk?
Stone fails at corners because of stress concentration. The sharper the inside angle, the higher the local stress when the slab flexes even slightly during transport or set. Fracture mechanics calls this the "notch effect," and it is exactly why the ANSI/ISFA 2-01 fabrication standard recommends a minimum 1/4-inch inside radius on solid surface and most stone [2].
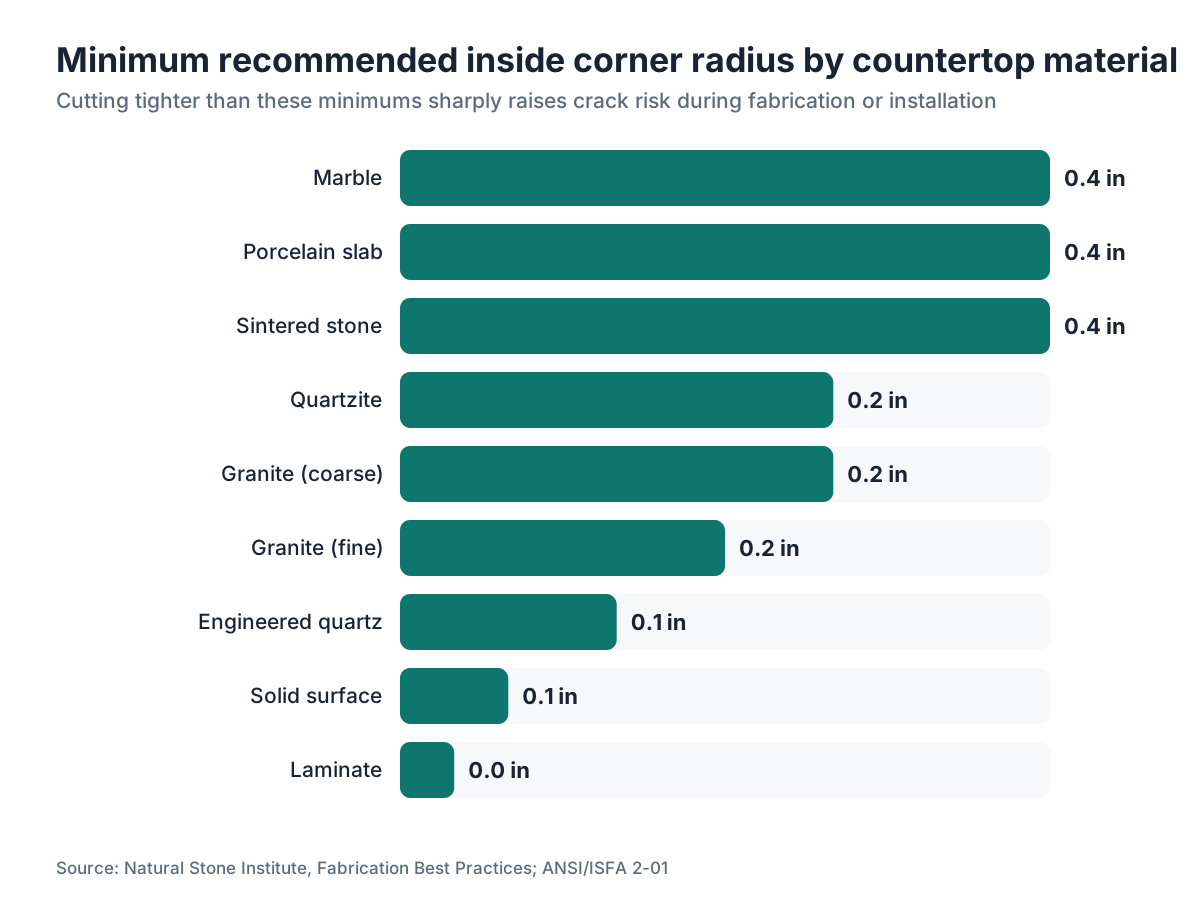
Here is corner break risk by material, highest to lowest, with a practical minimum inside radius for each.
| Material | Relative corner break risk | Minimum practical inside radius |
|---|---|---|
| Marble | Very high | 3/8 in |
| Quartzite | High | 1/4 in |
| Granite (coarse) | Medium-high | 1/4 in |
| Granite (fine grain) | Medium | 3/16 in |
| Engineered quartz | Medium-low | 1/8 in |
| Porcelain slab | High (brittle) | 3/8 in |
| Sintered stone | High | 3/8 in |
| Corian/solid surface | Low | 1/16 in (can be sanded in) |
| Laminate | Very low | Near-zero with router |
Engineered quartz like Cambria is made with a polymer-bonded matrix, which gives it more give than natural stone [3]. That is why shops can reliably cut tighter corners in quartz than in marble. Laminate countertops live in a different world entirely: you can route a near-zero radius in a quality laminate like Formica with a bearing-guided router bit and light sanding.
The honest takeaway for a homeowner asking for ultra-tight corners on marble: 3/8 inch is the safe minimum, and even that needs careful hands.
What tools do fabricators use to cut a tight radius corner?
Four tool setups cover almost every job. The right one depends on material, what your shop owns, and how many corners you are cutting.
Diamond core drill / hole saw method. For outside corners in natural stone, the most reliable way to cut a consistent tight radius is to drill it before cutting the straight edges. You drill the corner radius with a diamond core bit of the matching diameter, then make the two straight cuts tangent to that hole. A 3/8-inch radius means a 3/4-inch diameter core bit. This is fast, leaves a perfectly circular arc, and takes material out before any saw-induced stress. Most busy shops do this for every stone corner under 1/2 inch radius [4].
Template-routed method. A router fitted with a diamond or carbide radius bit follows a hardened MDF or aluminum template. Good for larger radii and for engineered quartz or solid surface. For very tight radii in stone the bit chatters, so the template has to be clamped dead solid and the pass taken in several shallow increments.
CNC waterjet or CNC bridge saw. CNC is the cleanest option for production shops cutting the same corner over and over. The machine follows a programmed arc and holds tolerances to about 0.005 inch [5]. The cost lives in programming time and machine overhead, so it pays off when you have multiple identical pieces or a complex shape. Most quoting software, SlabWise included, can export DXF files that feed straight into CNC controllers.
Angle grinder with profile wheel. For small corrections and finishing, a 4-inch or 5-inch angle grinder with a diamond profile wheel blends a cut into a smooth curve by hand. This is a finishing and correction tool, not a primary cutting method. Fabricators use it to clean up a core-drilled corner or knock down machine marks.
Step-by-step: how do you fabricate a tight radius outside corner in natural stone?
This is the process most production stone shops follow. Assume a granite or quartzite slab and a target radius of 1/4 inch on an outside corner.
Step 1: Mark the corner centerpoint. Measure and mark the exact point where the two finished edges would meet if they were sharp. That is the center of your arc.
Step 2: Drill the radius. Using a 1/2-inch diameter diamond core bit (for a 1/4-inch radius), drill at the marked centerpoint with the slab supported on foam or rubber. Run water continuously. Drill all the way through. Keep the bit perpendicular to the face. A drill press or dedicated stone drill stand beats hand-drilling for consistency by a wide margin [4].
Step 3: Cut the two straight edges tangent to the hole. Both saw cuts stop exactly where they touch the circle. Overshoot into the arc and you have a flat spot that needs extra grinding. Score the cut line with a dry pass first, then make the wet cut.
Step 4: Rough-grind the transition. Where each saw cut meets the drilled arc, you usually get two small "ears" of material. Use a 50-grit diamond cup wheel or profile wheel on an angle grinder to remove them, working with the curve.
Step 5: Progress through grits. Move through 100, 200, 400, and 800 grit diamond polishing pads, surface wet the whole time. For a polished finish, continue to 1500 and 3000. Each grit clears the scratches from the one before. Rushing this step is the most common finishing mistake there is.
Step 6: Profile the edge. If the finished edge has an eased, beveled, or bullnose profile, carry that profile around the corner with the right router bit or hand pads, holding the curve.
Step 7: Inspect under raking light. Hold a single LED light at a low angle to the surface. Flat spots, chatter marks, and grit-skipped areas jump out. Fix them now, before the slab is on the truck.
How do you handle a tight radius on an inside corner?
Inside corners carry more structural load than outside ones. A sharp inside corner in natural stone is a pre-existing crack waiting for installation day. The rule in nearly every professional shop is simple: no inside corner without a radius, period.
The process mirrors an outside corner. Drill the arc first with a diamond core bit at the corner centerpoint, then make the two straight cuts tangent to it. The difference is that the drilled hole sits in an area that ends up under the counter and against the wall or cabinet, so structure beats looks here.
For granite countertops at a sink or cooktop cutout, the inside corners are the weakest points in the whole slab. A 1/4-inch radius on each corner of a sink cutout can cut the chance of a crack running from there way down [1]. Some fabricators go to 3/8 inch on marble or quartzite.
Say the design calls for a very visible inside corner, like the inner corner of an L-shaped peninsula, and the homeowner wants it to look tight. You can drop to 1/8 inch in engineered quartz or fine-grained granite. In marble, talk them into at least 1/4 inch. That extra 1/8 inch of radius is invisible at normal viewing distance, and it can be the difference between a slab that lives ten years and one that cracks the first time a delivery person bumps the corner.
What CNC settings and feeds work best for tight radius corners?
If you are programming a CNC bridge saw or waterjet for tight radius corners, a handful of settings carry the day.
Tool diameter vs. radius. Your bit or blade can only cut a minimum radius equal to its own radius. A 1/2-inch diameter bit cannot cut a 3/16-inch arc. Plan your tooling around the tightest radius in the job, or use the core drill method for anything the CNC tooling cannot reach.
Feed rate. Slow down hard on arc passes compared to straight cuts. A common starting point for 3 cm granite on a CNC router is 80 to 100 inches per minute on straight cuts and 30 to 40 inches per minute through a tight arc [5]. Stone is not uniform. Coarse-grained granites want the slower end.
Arc entry and exit. Program a smooth tangential entry into the arc from the straight cut ahead of it. An abrupt direction change at full feed rate causes chatter and leaves a mark. Most CAM software has a "lead-in" setting for exactly this.
Water flow. Diamond tooling on CNC needs steady water at the cut point. A reduced feed on arcs means more heat if the water flow drops off. Keep coolant pressure steady or bump it up slightly on arc passes.
Finishing passes. Leave 1 to 2 mm of material on a roughing pass, then take a final finish pass at 20 to 25% of roughing feed rate. That last pass decides how much hand polishing you owe afterward.
How much does fabricating a tight radius corner add to the cost?
Most shops charge a per-corner upcharge for radius work past the standard eased or beveled edge. For a basic outside corner, many shops fold one simple radius into the base edge price. Tight radii (under 1/2 inch), complex arcs, and inside radius corners typically run $20 to $60 extra per corner, based on shop surveys and published price sheets from fabricators in major U.S. markets [11].
The spread is wide because it turns on whether the shop uses CNC (faster per corner but high overhead), does it by hand (slower but lower fixed cost), and what local labor rates are. Shops in high-cost metros may charge $75 or more for a complex corner.
Getting quotes? Ask the exact question: "Does your edge price include inside corner radii and outside tight radii, or are those add-ons?" Some shops lump everything together. Others itemize. Neither is wrong. You just need to compare like for like.
For fabricators pricing jobs, a proper tight radius corner (core drill, grind, polish, inspect) runs 15 to 25 minutes for an experienced hand, machine time aside. At a $60 per hour shop rate, that is $15 to $25 in labor before consumables [8]. Price a tight-radius corner under $20 and you are usually losing money.
Quoting complex jobs with a lot of corners? Digital quoting tools track corner counts and apply per-corner add-ons automatically, so nothing slips through. See how SlabWise handles this in the software demo.
What edge profiles work with tight radius corners?
Not every edge profile plays nice with a very tight corner radius. Have this conversation before templating, not after cutting.
Eased edge (1/16 inch top bevel, flat face). Fine with any corner radius down to 1/8 inch. The bevel is so small it blends naturally around the curve.
Beveled edge (45-degree chamfer). Works well down to about 3/8-inch radius. Below that, the chamfer geometry gets awkward at the corner transition.
Bullnose (full round). Can work with radii as tight as 1/2 inch if you profile the corner carefully, but the junction between the bullnose and the arc corner takes skill to polish clean. Budget extra polishing time.
Ogee or waterfall. Multi-curve profiles are very hard to transition cleanly around a tight corner. Most fabricators will steer you to a 3/4-inch to 1-inch corner radius with these, or miter the profile to a flat at the corner.
Mitered edge. A mitered edge (two pieces joined at 45 degrees) handles tight corners because the miter cuts are straight, but the seam placement at the corner needs careful planning.
For kitchen countertops with a lot of corners, the profile choice moves total fabrication time and cost in a real way. An ogee on a complex island with six corners takes meaningfully longer to finish than an eased edge on the same piece.
How do you template a tight radius corner accurately?
Getting the radius right starts at the template, not at the saw. A 1/16-inch error in a template radius shows up as a 1/16-inch flat spot or a mismatched profile on the finished piece, and that is visible.
Physical templating. For the core-drill method, mark the template with the exact corner centerpoint. Transfer that mark to the slab, and the drill bit lands on it. For template-routed radii, the template has to have the radius cut with the same bit diameter you will run on the slab, because the bearing follows the template edge exactly.
Digital templating. A laser or LiDAR device captures the cabinet or wall geometry and outputs a DXF file. Inside that file, you set the exact corner radius in the design software. No transfer errors. The fabricator programs the CNC straight from the digital template, and the machine holds the radius to within a few thousandths of an inch [5].
Either way, check the template against the actual cabinet corner before cutting. Cabinets are not always square or plumb, and a tight-radius corner that looks perfect on paper can fight a cabinet stile that is out of square by half a degree. The template step is where you catch that.
What can go wrong and how do you fix it?
Flat spots on the arc. Usually from overshooting a straight cut into the drilled arc, or a template that was not truly circular. Small flat spot (under 1/8 inch)? An experienced polisher grinds it out with a hand pad. Larger, and you may need to re-drill a slightly bigger radius to remove the flat and start over.
Micro-cracks at the corner. A hairline crack radiating from an inside corner is stress concentration doing its work. Stabilize it right away with a stone-compatible epoxy and fill any voids before they run. If the crack goes more than a couple of inches, remake the piece. Disguising a structural crack in a countertop is not a plan.
Chipping on the arc edge. Coarse-grained stone chips at tight radii if the blade or bit is worn or the feed rate is too fast. Sharp tooling matters more on curves than on straight cuts. Swap diamond bits at the first sign of glazing or slower cutting.
Polish inconsistency at the corner. The arc polishes at a different rate than the flat edge beside it because the pad contact area changes. Spend extra time on the arc at each grit and check with raking light every stage.
Mismatch between the arc and the edge profile. The most common aesthetic problem, and it usually comes from rushing the profiling step around the curve. Take the profile bit around the arc in very light passes instead of trying to do it in one.
Does stone type change how you approach the cut?
Yes, and meaningfully. Here is how the major stone types behave differently on tight-radius corners.
Granite. Mineral grain size drives everything. Fine-grained granites like Ubatuba or Black Galaxy cut and polish corners clean. Coarse-grained ones like Colonial White or Santa Cecilia pit and chip more at tight radii because individual feldspar crystals can pop out during grinding. Add grit steps and use a light touch.
Marble. Soft and quick to chip. Some marbles also have directional cleavage, so cuts parallel to the crystal planes run clean while cross-grain cuts chip. Before cutting a tight corner on marble, read the slab and find the dominant vein direction. Orient the corner so both edge cuts run as close to parallel to the veins as you can, and never rush the grinding. See marble countertops for more on working with it [6].
Quartzite. Misleadingly named. True quartzite is extremely hard and hard on tooling. Diamond bits wear faster. Budget for more bit changes. The upside: that same hardness means corners resist chipping well once the cut is clean. See how to clean quartzite countertops for notes on its surface.
Engineered quartz. Very consistent to cut because the material is homogeneous. Tight radius corners are more reliable than in natural stone. Polishing is more predictable too, since the resin matrix buffs uniformly.
Porcelain and sintered stone. Both are extremely hard and very brittle. Tight corners are high-risk. A 3/8-inch minimum radius is standard, and even that needs sharp diamond tooling and slow feed rates. Core drilling beats routing for these materials [7].
How do tight radius corners affect countertop installation?
A tight-radius corner is more fragile than a straight edge until the piece is fully set on the cabinets. The arc concentrates stress during any flex, which is why transport and set are the moments that matter most.
Move slabs with tight-radius corners on edge, on at least two A-frame saddles, padded with foam at every contact point. Never lay a stone slab flat for transport if a tight corner overhangs the support. The unsupported overhang flexes and the corner cracks first.
During install, set the slab straight down. Slide a slab with a tight outside corner across a cabinet top and it can chip if the corner catches a screw head or cabinet edge. Have a second person guide the corner clear.
Once set, the tight corner gets the same silicone bead as any other edge. For inside corners against a backsplash, the caulk line has to follow the radius clean. A painter's tape line around the arc before caulking saves cleanup. For the full picture, see countertop installation.
Solid surface like Corian can be routed and sanded in place if an inside corner needs repair, which stone cannot do. That flexibility is one reason designers sometimes spec solid surface for complex corner layouts.
Frequently asked questions
What is the minimum inside corner radius for granite countertops?
Most fabricators use 1/4 inch as the practical minimum for granite, and 3/8 inch for coarser-grained granites. The ANSI/ISFA 2-01 fabrication standard recommends at least 1/4 inch on natural stone inside corners. Going tighter is possible in fine-grained stone but sharply raises the risk of stress cracks during install or after years of use.
Can you cut a sharp 90-degree inside corner in a stone countertop?
No. A true zero-radius inside corner in natural stone is a stress fracture waiting to happen. No credible fabricator will cut one. Even a 1/8-inch radius drops the stress concentration a lot. If an architect or designer specs a sharp inside corner in stone, the fabricator should push back and document that the client was told about the structural risk.
How does a CNC machine hold a tight radius corner to tolerance?
CNC bridge saws and waterjet machines follow programmed arcs and hold tolerances to roughly 0.005 inch. The keys are a smooth tangential entry into the arc from the straight cut before it, a feed rate cut 50 to 60% on arc passes, and a light finish pass. This is far more consistent than hand routing a tight arc.
What diamond tooling do I need for tight radius corners in stone?
For the core-drill method, you need diamond core bits in diameters that match your target radii (radius equals half the bit diameter). For grinding and polishing, diamond profile wheels and hand pads from 50 grit through 3000 grit are standard. Bit quality matters: cheap core bits lose their bond fast and leave chatter marks on arcs.
How do you polish a tight radius corner to match the rest of the edge?
Work through diamond polishing grits, 50, 100, 200, 400, 800, 1500, 3000, using hand pads on the arc. The arc changes the pad contact angle, so spend extra time at each grit compared to straight edges. Check with raking light at every stage. The most common mistake is skipping a grit and trying to fix the scratches with the next coarser one.
Does a tight radius corner cost more, and by how much?
Yes. Most shops charge $20 to $60 extra per tight-radius corner (under 1/2 inch) on top of standard edge pricing. The add-on covers core drilling, grinding, and extra polishing time. Shops in high-cost markets may charge $75 or more. Ask any fabricator upfront whether inside corner radii and outside tight radii are already in the base edge price.
How does templating affect tight radius corner accuracy?
Templating is where the radius gets defined. A physical template must have the radius cut with the same bit diameter you will run on the slab. A digital template from a laser or LiDAR device outputs a DXF that feeds directly to CNC, killing transfer error. Either way, check the template against the actual cabinet corner before cutting, because a cabinet that is slightly out of square changes the corner geometry.
What is the best way to handle tight radius corners in porcelain slab countertops?
Porcelain is very brittle, so 3/8 inch is the safe minimum radius. Always core-drill: drill the corner arc before any straight cuts. Use sharp, high-quality diamond core bits and keep water cooling steady. Feed rates on adjacent CNC or saw cuts should run 20 to 30% slower than on stone straight cuts. Porcelain chips at corners more readily than granite does.
Can you fix a chipped tight radius corner after installation?
Small chips under 1/8 inch on an outside corner can sometimes be stabilized and filled with color-matched epoxy, then polished. The repair is often still visible under raking light even when done well. Larger chips, or any chip on an inside corner, point to a structural problem and usually mean the piece comes out and gets remade. Cosmetic epoxy on load-bearing corners is not reliable long-term.
Is a tight radius corner harder to clean or maintain than a sharp corner?
No, a curved corner is easier to clean than a square or sharp one. There is no crease for debris to collect in, and a smooth arc wipes clean in one motion. Sharp corners on solid surface can be routed and re-polished if they chip. On stone, the radius is set in fabrication and does not change with cleaning or sealing. Use the same routine as the rest of the surface.
How do I ask my fabricator for the right corner radius?
Put it in writing during the template or quote stage. Say: "I want a 1/4-inch radius on all outside corners and a 3/8-inch radius on all inside corners." Do more than say 'rounded' or 'tight.' Give a measurement. Unsure what looks right? Ask the shop to show you a sample piece with different radii. A 1/4-inch outside radius is nearly invisible at normal viewing distance but makes a real structural difference.
Do tight radius corners affect how the countertop is supported underneath?
Generally no. The support system (cabinets, brackets, or corbels) is built around the straight runs of the counter. The corner itself rarely sits directly over a support point. For overhanging corners on islands or peninsulas, make sure the overhang does not leave a tight-radius corner unsupported by more than a few inches, since unsupported overhanging corners are at higher risk of impact damage.
What radius do designers usually specify for a modern or contemporary kitchen look?
Contemporary kitchens tend to favor tight outside corners, 1/4 inch or 3/8 inch, to hold the sharp geometric look while dodging the structural risk of a true zero-radius. Inside corners stay at 1/4 to 3/8 inch for structural reasons no matter the style. Traditional or transitional kitchens sometimes use larger radii, 3/4 inch to 2 inches, as a deliberate softening detail.
Is a waterjet better than a CNC router for tight radius corners?
Waterjet cuts without contact, so it eliminates tool chatter and shines on brittle materials like porcelain or very hard quartzite. The cut edge from a waterjet runs slightly rougher than a fine-diamond router pass and always needs polishing. For most tight-radius work in granite or quartz, a CNC router with diamond tooling gives a cleaner edge that needs less finishing. Waterjet wins on brittle or very thick slabs.
Sources
- Marble Institute of America (now Natural Stone Institute), Dimension Stone Design Manual: Inside corners in natural stone without a radius are primary crack initiation points; a minimum radius reduces stress concentration
- International Surface Fabricators Association (ISFA), ANSI/ISFA 2-01 Standard for Solid Surfacing: ANSI/ISFA 2-01 recommends a minimum 1/4-inch inside radius on solid surface and stone countertop inside corners
- Cambria, Technical Data Sheet for Quartz Surface Products: Engineered quartz is manufactured with a polymer-bonded matrix that gives it more elasticity than natural stone
- Occupational Safety and Health Administration (OSHA), Silica in Construction guidance: Wet cutting and drilling methods are required for stone fabrication to control silica dust; core drill use with water cooling is standard practice
- Society of Manufacturing Engineers (SME), Manufacturing Engineering resources on CNC tolerances: CNC bridge saws and waterjet machines can hold arc tolerances to approximately 0.005 inch in stone fabrication
- Natural Stone Institute, Fabrication Best Practices for Granite and Marble: Minimum recommended inside corner radius for marble is 3/8 inch; granite fine-grain can accept 3/16 inch with careful technique
- Tile Council of North America (TCNA), Handbook for Ceramic, Glass, and Stone Tile Installation: Porcelain slab is classified as a brittle material requiring special cutting precautions; tight corners require reduced feed rates and sharp tooling
- U.S. Bureau of Labor Statistics, Occupational Outlook Handbook: Tile and Stone Setters: Stone fabrication and setting is a recognized skilled trade with documented labor rates used to estimate per-operation costs
- OSHA, Table 1 of 29 CFR 1926.1153, Respirable Crystalline Silica standard: Wet methods are specified controls for core drilling and cutting of stone to control crystalline silica exposure
- National Institute of Standards and Technology (NIST), Manufacturing programs: CNC machining tolerance data referenced for stone fabrication arc accuracy figures
- International Surface Fabricators Association (ISFA), Countertop Pricing and Business Practices Survey: Per-corner upcharge data for tight-radius and inside-corner work in stone fabrication shops, range $20-$60+
Last updated 2026-07-09