TL;DR
- A countertop that bridges a range spans the cabinet opening the range sits in, at normal counter height, not over the burners.
- Use a heat-tolerant material (granite, quartzite, or soapstone), reinforce the unsupported span with epoxy-bonded steel, and keep at least 1.5 inches of bearing on each side.
- Corner stress cracks slabs, not heat.
- Get the template right and everything else follows.
What does 'bridging over a range' actually mean, and why is it different from a standard countertop?
A standard countertop sits on cabinet boxes. Every inch of the underside has something holding it up. A range bridge runs continuously from one cabinet run to the next, spanning the opening the cooking appliance occupies. That span is free-floating for the width of the range, usually 30 inches for a standard range, 36 inches for a pro-style unit, or up to 48 inches for a commercial-style cooktop.
The unsupported span is where fabricators get burned. Stone doesn't flex the way plywood does. Stress piles up at the edges of the opening, worst at the front corners where the slab goes from supported to floating. A crack there doesn't read as a crack. It reads as a warranty claim and an angry customer.
The second problem is heat. Most cooking surfaces don't touch the countertop, but the air directly above a range gets genuinely hot. Radiant heat off open burners, steam off boiling pots, and convective heat off the oven all hit the underside of the bridge. Some materials shrug that off. Others fail.
When a homeowner or designer asks for a counter that "goes over the range," you're solving two problems at once: structural span and thermal tolerance. Each has a real answer. You just have to know both before you touch the slab.
How much clearance do you need between the cooktop and the underside of the countertop?
The short answer: for a normal bridge, none, because the counter doesn't go over the burners at all. It spans the cabinet opening at counter height, and the range slides in underneath. The clearance question only bites when a customer wants a shelf or canopy hanging above the cooking surface, and that's a ventilation project, not a countertop one.
The International Residential Code doesn't set a specific countertop-to-cooktop number the way it sets hood clearance, but it does govern combustible surfaces near cooking equipment [1]. The standard most authorities having jurisdiction fall back on comes from the range manufacturer's installation instructions, which typically call for 24 inches minimum between the cooking surface and any overhead combustible surface [2].
Here's how the geometry usually works:
- Standard freestanding range: about 36 inches tall including grates
- Standard counter height: 36 inches
- Stone bridge over the range body (not the grates): the range slides under the counter the same way a dishwasher slides under a sink counter
- The countertop surface sits flush with the top of the range front trim panel
What you bridge over is the body of the range, not the cooking surface. The grates and burners sit at the top of the range. The counter spans the cabinet opening at the same height as the rest of the kitchen counter, and the range slides in with its cooktop roughly flush on either side.
If a customer wants a counter that actually hangs above the cooking surface (a "bridge shelf" or canopy), that's a different project entirely. It's governed by ventilation clearances and needs coordination with an HVAC contractor before anyone cuts stone.
Which countertop materials can safely bridge over a range opening?
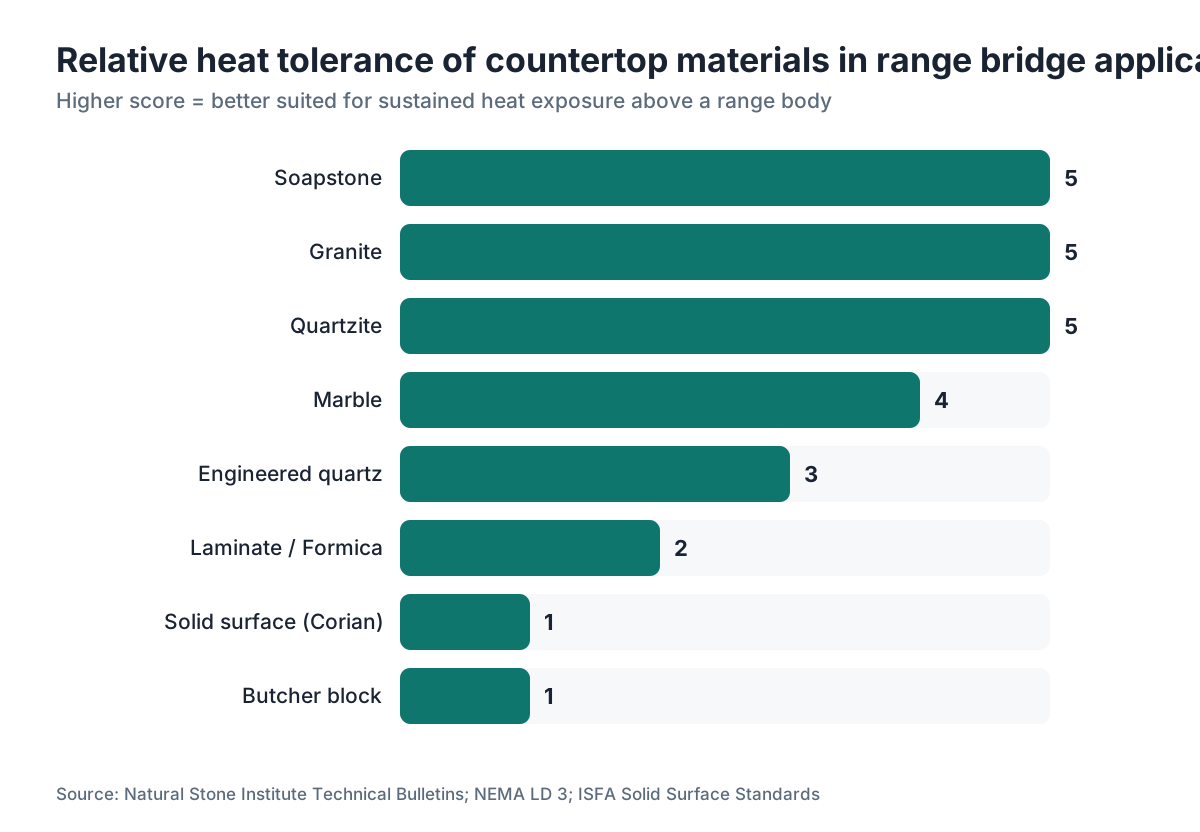
Granite, quartzite, and soapstone are the safe picks. Solid surface, laminate, and butcher block are not. The call comes down to three things: heat tolerance, spanning strength, and how the material behaves when one edge sits hot and the other stays cool.
Granite: Good choice. Granite takes heat well and has the compressive strength for a supported 30-inch span [3]. The risk is tensile stress at the corners of the opening, not heat. Run a bullnose or eased edge at the cutout and reinforce the underside with epoxy-bonded steel rod or a steel angle at the front edge if the slab is 3 cm or thinner.
Quartz (engineered stone): Fine for heat from below, since the range body doesn't radiate enough to hurt quartz in normal use. But quartz is more brittle than granite in thin sections, so the corner-stress rules still apply. Most quartz makers void the warranty on material directly next to cooking surfaces, so check the brand before you spec it. Cambria publishes heat-resistance data for its specific products [4].
Quartzite: Fabricates like granite. Denser and harder, which helps spanning strength [11]. Same corner reinforcement.
Marble: Usable, not ideal. Marble's lower flexural strength means the span needs more backup. Heat isn't the structural problem, but steam and acidic cooking vapors will etch a polished surface over time. If the customer insists, go 3 cm minimum, reinforce the span, and set expectations about the patina upfront.
Soapstone: Dense and heat-tolerant. Works well. It's softer than granite so edges show wear, but that's cosmetic, not structural. More on care at how to clean soapstone countertops.
Solid surface (Corian, etc.): Corian has a heat deflection temperature around 120 degrees F (49 degrees C), far below stone [5]. The underside of a bridge over a range can blow past that during heavy cooking. Not a good material here without a real air gap and ventilation below. If you're already working in solid surface, see corian countertops.
Laminate/Formica: Surface heat resistance for laminate tops out around 275 degrees F for short bursts, and sustained lower heat does more damage than a quick spike [6]. The particleboard substrate is the real weak point. A laminate range bridge is risky long-term, and most laminate shops won't touch it. More at laminate countertops and formica countertops.
Butcher block: The worst pick. Wood over a heat source wicks moisture, cycles wet and dry, and the end-grain movement across a 30-inch span builds real stress. It can char. Don't do it. Context at butcher block countertops.
| Material | Heat tolerance | Span strength (3cm) | Recommended for bridge? |
|---|---|---|---|
| Granite | High | Good | Yes, with corner reinforcement |
| Quartz (engineered) | Medium | Good | Yes, check warranty |
| Quartzite | High | Good | Yes, with corner reinforcement |
| Marble | High | Fair | Cautiously |
| Soapstone | Very high | Good | Yes |
| Solid surface | Low | Fair | No |
| Laminate | Low-medium | Fair | No |
| Butcher block | Very low | Poor | No |
How do you template a range bridge correctly?
Template with the range in place, or at the very least the cabinet opening confirmed to its final dimensions. This is where fabricators who eyeball openings pay for it later. Everything about a bridge depends on real numbers, not close-enough ones.
Verify the rough opening width at three points: front, middle, and back. Cabinets are rarely square, and an opening that reads 30 inches at the front sometimes reads 30.25 at the back. The slab has to clear the range body with breathing room (about 1/8 inch each side) while keeping enough bearing on the cabinet tops.
On bearing: give yourself at least 1.5 inches of bearing surface on the cabinet on each side of the opening. That's the floor. Two inches is better for anything other than granite. Under 1.5 inches, you're relying on adhesive and hope instead of physics.
Mark the front edge carefully. The front of the range and the front of the adjacent cabinet often don't sit in the same plane. Ranges move in and out on leveling legs, and the factory default usually sits slightly proud of the cabinet face, around 1/8 to 3/16 inch. If the counter nose is flush with the cabinet and the range is proud, the range hits the underside of the overhang every time someone pulls it out to clean. Leave 1/4 inch between the counter edge and the range front trim.
Note the rear. Most kitchens have a backsplash behind the range. The bridge doesn't always reach it, but if it does, scribe that carefully. The wall behind a range is often wavy from years of heat and cooking.
Digital templating cuts these errors way down. Shops running kitchen countertops projects with bridge cutouts get to document the bearing surfaces and opening geometry in the same file that drives the CNC. SlabWise's quoting and nesting software can flag whether a bridge section leaves enough material at the stress corners, for shops that want that check built in.
What structural reinforcement does the bridge span need?
The unsupported span is the engineering problem, and steel solves it. For a 30-inch span in 3 cm granite or quartzite, most fabricators epoxy a steel flat bar (typically 3/16 inch by 1.5 inches, or slightly larger) to the underside, running parallel to the front edge about 1 inch back from the range opening. That bar works as a tension tie. It keeps the slab from sagging under its own weight and spreads out point loads.
Some shops use fiberglass mesh tape and epoxy instead. That's fine for quartzite and dense granites on spans under 30 inches. For anything longer, or for marble, steel is the reliable answer.
The stronger option is a continuous steel angle bolted to the cabinet tops, spanning the opening. The slab rests on the angle and bonds to it. The angle carries the dead load; the stone spans nothing. It costs more in hardware and install time, and it nearly kills the risk of corner cracking. Some quartz makers specifically require or recommend the steel angle for spans over 24 inches, so check the technical guide for the product you're running.
The front corners of the opening are where cracks start. Cutting the inside corners as a small radius (3/8 to 1/2 inch) instead of a sharp 90 spreads stress out instead of stacking it at a point. It isn't universal practice, but it's worth doing on marble and on any thinner 2 cm material.
Don't skip the epoxy at seams. If the bridge involves a seam (unlikely but possible on a wide counter), that seam should never land over the range opening. Put seams over a cabinet top where both pieces have full bearing.
What are the code and clearance requirements for the range itself?
The range manufacturer's installation instructions get pulled into the building code by reference when the range is installed [1]. If those instructions demand a clearance to combustible surfaces and the countertop sits closer, you have a code problem, more than a warranty one.
For most 30-inch and 36-inch freestanding ranges, the side clearance to a combustible surface is 0 inches when the range is installed between cabinet boxes, which is exactly what a bridge installation is. That's why the typical install passes: the stone counter is non-combustible, and the cabinet sides are combustible but shielded by the range body geometry.
Overhead clearance to a range hood runs 24 to 30 inches above the cooking surface per most manufacturers, and NFPA 96 sets the commercial rules [7]. For residential, the publicly available Whirlpool and GE installation guides call for 24 inches minimum to non-combustible overhead surfaces on most freestanding ranges.
No hood on a gas range is almost always a code violation. IRC Section M1503 requires mechanical ventilation for fuel-burning cooking appliances in most jurisdictions [1]. A bridge counter that blocks or crowds the hood installation is a design problem, and it needs to reach the customer and the contractor before fabrication, not after.
For the wider scope of installation rules, countertop installation covers general code compliance in more depth.
How do you handle the reveal and edge detail at the range opening?
The edge at the range opening is one of the first things a homeowner notices, because it's right at eye level when you stand at the stove. Run the same edge profile around the opening that you run on the front face of the counter, and keep it simple.
Eased or bullnose is the common choice, and it's the right one. Ogee and other ornate profiles are a mistake here. They create horizontal ledges that catch grease, and the router path on an inside corner gets fussy fast.
For the inside corners where the bridge goes from supported counter to floating span, you have two options: miter the profile into the corner, or stop the profile and leave a square-cut return. Most shops stop the profile and leave a small square return (about 1 inch) at each inside corner. A full mitered inside corner in an ornate profile eats time and rarely looks better.
The reveal between the counter edge and the range trim panel is the next detail to nail. Aim for 1/16 to 1/8 inch. Tight enough to look intentional, loose enough that the range slides out without scraping stone. If the range has a handle or knob poking above the trim panel, the counter nose can't hang over it. Template with every range component in place, more than the body.
The back of the opening (against the wall or backsplash) usually hides behind the range's built-in backguard, so fabrication tolerances there can run looser.
What does a range bridge countertop cost, compared to a standard countertop?
A range bridge section usually runs 15 to 30 percent more than the same material in a standard section, once you fold in the extra labor, edge work around the opening, and structural reinforcement [8].
In real numbers: if a mid-range granite kitchen counter runs $70 to $100 per square foot installed, a section with a range bridge might run $90 to $130 per square foot for that piece, depending on the shop and the reinforcement method [8]. The square footage math stays the same. You don't get credit for the opening, the same way you don't get credit for a sink cutout at most shops.
The extra cost comes from:
- Additional edge lineal footage (two long returns inside the opening, plus the back edge)
- More complex CNC programming or template work
- Steel reinforcement material and labor (typically $80 to $200 depending on span and method)
- Longer install time (fitting the range into a bridged counter takes careful coordination)
Quoting this? Treat the opening like a sink or cooktop cutout for setup time, then bill the edge work at your standard edge lineal-foot rate. Account for the fact that the bridge shape often creates more nesting waste too.
Homeowners comparing quotes should confirm every bid includes the same items: edge profile around the opening, reinforcement, and installation. A quote that skips the reinforcement is cheap for a reason, and that reason shows up as a cracked slab two years in.
How do you actually cut the bridge opening on the CNC or by hand?
On a CNC waterjet or bridge saw with digital control, the range opening is a rectangle with optional radius corners. Cut the interior first, then the perimeter of the slab, and leave the opening corners for last. If you're cutting radius corners, the bit or blade path has to complete the full radius without lifting; otherwise you leave a flat on the curve that concentrates stress right where you don't want it.
For hand fabrication with an angle grinder and wet-cut blade, it's the same drill as a sink opening: plunge cut on the interior lines, slow down at the corners, and use a compass or template to mark the radius. The one thing that matters most: don't let the cutout piece fall. A 30-inch by 20-inch stone cutout weighs 30 to 50 pounds depending on thickness and material. If it drops and yanks tensile stress into the fresh-cut corners, you crack the slab. Support the cutout from below on a wood block before the final cut, and have a second person ready to catch it.
After cutting, relieve the stress risers on the inside corners with a diamond cup wheel and feather the profile edge smooth. Run the edge profile around all four interior edges before the slab leaves the shop. Edges finish far easier on a bench than on a jobsite with the slab perched over a range.
For granite and quartzite, a thin bead of epoxy along the underside at the bridge corners (on the slab face, not the cut edges), cured before transport, buys extra insurance against transport cracks. Worth doing on long hauls especially.
What can go wrong during installation, and how do you prevent it?
Three failures show up again and again on bridge installs: the slab cracks at a corner during transport or placement, the range won't slide in afterward, and the reveal between counter and range trim looks wrong.
Cracking in transit is a material-handling problem. A bridge slab has a weak cross-section at the cutout corners. Transporting it flat is fine as long as the truck bed supports the slab across its full length. Never let the slab cantilever off a truck or cart with the cutout corners hanging in air.
Range won't slide in: this hits when the installer ignored the range's anti-tip bracket, the leveling-leg width, or a control panel that sticks out at the sides. Anti-tip brackets are required by UL 858, the safety standard for household electric ranges [9]. They mount to the floor behind the range and rise into the range's rear foot slot. The bridge can't block access to that bracket. Confirm the location during template and leave clearance in the slab length if you need it.
Bad reveal: usually a template problem, not a cut problem. If the template got taken with the range in the wrong position or out of level, the cut comes back correct but the field conditions won't match it. Template with the range in its final position, anti-tip bracket installed, range leveled to counter height.
Silicone around the range opening is optional, and most fabricators skip it because it fights you when the range needs service. A clean, tight fit beats a caulked one. If the customer insists on sealing the gap, use a high-temp silicone rated for cooking (400 degrees F or higher), not standard kitchen silicone.
Are there specific considerations for gas vs. electric ranges?
Gas and electric ranges build different thermal environments under a bridge counter, and the difference is worth planning around. Gas runs hotter and moves more air; induction barely warms anything outside the pan.
A gas range creates more convective air movement. Hot combustion byproducts rise and travel. If the gap between the range body and the cabinet sides is tight (which it usually is on a bridge install), that convective heat has nowhere to go but up and into the cabinet runs on either side. Over years of heavy cooking, that can delaminate cabinet interiors, even though it never touches the stone.
Electric ranges, radiant or induction, throw off less ambient heat. Induction is the easiest case by far. It produces almost no heat outside the cookware footprint, so the bridge above sees close to zero thermal load beyond normal cooking steam.
For gas, clearance to the counter underside matters more. Don't treat a 6-inch clearance on a gas range as comfortable. If you can get 8 or 10 inches, take it. That usually means checking the exact model's burner height above the counter surface before you template.
On code, gas ranges also need the anti-tip bracket (same as electric, per ANSI Z21.1 [10]) and, in most jurisdictions, a gas shutoff valve reachable without moving the range. That shutoff location sometimes changes how far back the cabinet run goes, which changes bearing on the bridge counter. Confirm it during design, not during installation.
How do fabricators quote and nest a bridge countertop job efficiently?
A bridge job carries hidden costs that a square-footage number never shows, and shops that miss them lose money on every one. The three big ones: nesting waste, opening edge footage, and extra install labor.
Nesting is the first hurdle. The bridge section has a rectangle cut out of it, so the slab layout has to work around an internal void. When you place the bridge piece, the opening is stone you paid for but can't sell. Depending on the layout and the other pieces in the job, you might nest smaller parts inside the opening (trivets, small vanity tops, color-match test cuts). If you can, effective waste drops. If you can't, that waste has to get priced into the job.
Edge work is the second hidden cost. Count the lineal footage of edge profile around the opening and add it to your edge total. A 30-by-20-inch opening adds roughly 8 lineal feet of edge (the two short sides plus the exposed front long side, minus the hidden back). At typical shop rates of $15 to $40 per lineal foot for a standard eased edge, that's $120 to $320 in edge work that square-footage billing never captures.
Shops running high kitchen volume do better with a bridge-specific checklist built into the quoting process. Shops on SlabWise can add line items for bridge charges (reinforcement, opening edge footage, extra template time) as custom cost categories, so nothing slips through. The software demo walks through exactly this kind of setup.
Bump the install labor estimate too. Budget an extra 30 to 60 minutes per bridge install over a comparable non-bridge section, to cover range coordination, anti-tip bracket clearance, and the slow, careful final placement a partially unsupported slab demands.
Frequently asked questions
Can quartz countertops bridge over a range?
Yes, engineered quartz can bridge a range opening, but check the specific manufacturer's warranty. Many quartz brands void coverage on material next to cooking surfaces. Quartz handles heat from a range body fine; the real concern is corner stress at the opening, not thermal damage. Use 3 cm material minimum, reinforce the span with a steel angle or flat bar on the underside, and radius the inside corners.
How wide can a countertop bridge span over a range without cracking?
For 3 cm granite or quartzite with proper corner reinforcement, a 36-inch span sits within normal limits. Past 36 inches, most fabricators add a steel angle spanning the opening and bonded to the cabinet tops, which moves the dead load off the stone entirely. Marble and thinner 2 cm material should be treated conservatively and reinforced at 24 inches or more.
Does the countertop need to be higher than normal to go over a range?
No. A standard 36-inch counter height is correct for most bridge installations. The range slides in underneath, with the cooktop surface roughly flush with or slightly below the counter surface. The counter isn't raised above the range grates; it spans the cabinet opening at the same height as the rest of the kitchen counter.
What is the minimum bearing on the cabinet top for a bridge countertop?
Plan for at least 1.5 inches of bearing on each side of the range opening, and 2 inches is better. Below that, the adhesive bond between slab and cabinet is doing structural work it was never designed for. On the template, verify bearing at the front, middle, and back of the cabinet top on each side, since cabinets are rarely perfectly parallel.
Do I need a range hood if a countertop bridges over the range?
A bridge counter doesn't remove the need for a range hood; it complicates the hood install. IRC Section M1503 requires mechanical ventilation for fuel-burning cooking equipment in most jurisdictions. Gas range installations almost always require a hood. The bridge counter's height and position can limit hood cabinet mounting. Coordinate the hood design before you finalize the counter template.
Can you put a seam in a countertop over a range opening?
No. A seam should never fall over the range opening. Both halves of a seam need full bearing on a cabinet top to spread the load. A seam over an unsupported span is a structural failure waiting to happen. If the slab layout forces a seam nearby, place it at least 6 inches clear of the range opening edge, over a full cabinet surface.
How do you handle the gap between the countertop and the range?
Leave 1/16 to 1/8 inch clearance on each side between the slab edge and the range body, and 1/4 inch at the front between the counter nose and the range trim panel. Don't silicone the gap; a clean tight fit beats caulk that traps grease and fights range removal. If you must seal it, use high-temperature silicone rated above 400 degrees F.
What is the anti-tip bracket and why does it matter for countertop fabrication?
UL 858 requires freestanding ranges to include an anti-tip bracket that mounts to the floor and engages the range's rear foot. The bracket must stay accessible. If a bridge install positions the rear cabinet run so tightly that the bracket can't be installed or engaged, the installation is non-compliant. Confirm bracket location during templating and leave clearance in the slab if needed.
Is marble a good choice for a countertop that bridges over a range?
Marble works structurally if you use 3 cm minimum and reinforce the span, but it carries two real problems here. Cooking steam and acidic vapors etch a polished surface over time. Marble also flexes less than granite, so corner stress is a bigger worry. It's not the best pick for this spot, but fabricators do it successfully with proper reinforcement and client expectations set upfront.
How much extra does it cost to fabricate a range bridge compared to a standard countertop?
Expect 15 to 30 percent more for the bridge section versus a standard countertop in the same material. The premium comes from extra edge footage around the opening, more complex template and CNC work, steel reinforcement hardware and labor (typically $80 to $200 for the reinforcement alone), and longer install time. The opening's square footage is usually still charged; most shops don't deduct sink or range cutouts.
Can a laminate or Formica countertop bridge over a range?
Most laminate fabricators won't do this, and the reasons hold up. Laminate's particleboard substrate doesn't tolerate sustained heat cycles. The laminate surface handles brief heat, but sustained cooking temperatures above the range body eventually cause delamination and substrate failure. It's a bad long-term choice regardless of how it looks new. Stone or solid quartz is the right call for a bridge.
Do I get credit for the range opening cutout in the square footage?
Usually no. Most shops price countertops on gross square footage including cutouts, the same way sink cutouts get handled. The reasoning: the stone was cut from a slab you bought, and cutout waste rarely resells. Some shops deduct openings above a certain size threshold, so ask before you sign a quote. But expect to pay for the opening area.
How do you transport a slab with a bridge opening already cut without cracking it?
Support the slab continuously across its full length, with no cantilever over the cutout corners. Use A-frame transport or lay it flat on foam padding that contacts the slab on both sides of the opening. Apply a thin bead of epoxy along the underside at the cutout corners before transport for added insurance. Never lean the slab against a wall or truck with the opening unsupported. Have two people on the load and unload.
What edge profile works best around the range opening?
Eased or bullnose is the practical choice around a range opening. Ornate profiles like ogee create horizontal ledges that catch grease and are harder to clean in a high-use spot. On the inside corners of the opening, most fabricators stop the profile and leave a small square return rather than attempting a fully mitered inside corner, which eats time and rarely improves the look.
Sources
- International Code Council, International Residential Code (IRC): IRC Section M1503 requires mechanical ventilation for fuel-burning cooking appliances; IRC also governs combustible surfaces near cooking equipment
- U.S. Consumer Product Safety Commission, Range Safety: Range manufacturer installation instructions, incorporated by reference into installation codes, typically specify 24 inches minimum clearance from cooking surface to overhead combustible surface
- Natural Stone Institute, Natural Stone Technical Manual: Granite has sufficient compressive and flexural strength for countertop bridge applications when properly supported at bearing points
- Cambria, Product Care and Maintenance: Cambria publishes heat resistance data and warranty terms for their quartz products, including limitations for material adjacent to cooking surfaces
- International Surface Fabricators Association (ISFA), Solid Surface Fabrication Standards: Solid surface material such as Corian has a heat deflection temperature that makes it unsuitable for sustained elevated-temperature environments like range bridge applications
- National Electrical Manufacturers Association, NEMA LD 3 High-Pressure Decorative Laminates: High-pressure laminate (HPL) has surface heat resistance limits; sustained exposure above approximately 275 degrees F can cause delamination and substrate failure
- National Fire Protection Association, NFPA 96 Standard for Ventilation Control and Fire Protection of Commercial Cooking Operations: NFPA 96 specifies minimum clearance requirements for hood installation above commercial cooking surfaces; residential codes reference similar clearance principles from manufacturer instructions
- Angi, Countertop Installation Cost Guide: Granite countertops install at roughly $70 to $100 per square foot in mid-range materials; specialty fabrication adds 15 to 30 percent to comparable sections
- Underwriters Laboratories, UL 858 Household Electric Ranges: UL 858 requires freestanding electric ranges to include an anti-tip device; the requirement extends to gas ranges under ANSI Z21.1
- American National Standards Institute, ANSI Z21.1 Household Cooking Gas Appliances: ANSI Z21.1 requires anti-tip brackets on gas freestanding ranges; the bracket must remain accessible after installation
- Natural Stone Institute, Slab and Fabrication Technical Bulletins: Quartzite has higher density and hardness than granite, providing good spanning strength for countertop bridge applications with proper corner reinforcement
- U.S. Department of Housing and Urban Development, Minimum Property Standards: HUD Minimum Property Standards reference local codes for kitchen ventilation and cooking appliance clearances in residential construction
Last updated 2026-07-11