TL;DR
- Fabricating a curved countertop for a round island means templating the exact radius in cardboard or digital form, cutting the curve with an angle grinder or CNC router, then finishing the edge.
- Stone gets ground and polished; solid surface and laminate bend or seam more easily.
- Budget $800 to $4,500 depending on material and diameter.
- Shop work takes one to three days.
What makes a curved countertop different from a straight one?
A straight countertop is a rectangle at heart. You rip the slab to width, cut the length, profile the front edge, and you're done. A round island breaks every one of those assumptions.
The geometry goes from linear to radial. Instead of one front edge running parallel to a back wall, you have a continuous arc, and every point on that arc sits at a constant radius from a center point. The fabricator's whole job is to honor that radius from the first template line to the last polish pass.
Waste climbs fast. Cut a circle out of a rectangular slab and the corners become scrap. A 48-inch diameter circle uses about 12.6 square feet of stone, but the bounding rectangle is roughly 16 square feet, so you lose nearly 22 percent before the saw touches anything. On material that runs $60 to $120 per square foot installed, that scrap shows up on the invoice [1].
Joints get harder. Straight tops have butt or miter joints at corners. A full round island has no corners, so if the slab can't yield the whole circle in one piece, the seam has to follow the curve and grind flat with the surface. That takes real skill.
Edge profiling is the other tough part. A straight ogee or bullnose runs down a flat line. A curved edge forces the router bit or hand grinder to arc continuously, and any wobble reads in the finished profile. This is where most novice fabricators lose the job.
Which materials actually work for a curved countertop?
Not every material handles a curve the same way. The right pick depends on your radius, your shop equipment, and how much you can tolerate a visible seam.
Natural stone (granite, quartzite, marble). Stone does not bend. You grind the curve into it with a wet angle grinder, a bridge saw with a pivot jig, or a CNC waterjet. Any radius is possible, but tight curves under 6 inches of radius get fussy because the profiling tools need room to move. Granite countertops and marble countertops are the usual choices for high-end curved islands. Waste and labor both run higher than straight work.
Engineered quartz (Silestone, Cambria, etc.). Same handling as natural stone: sawed and ground, never bent. Cambria countertops show up on islands because the big slab sizes (up to 132 x 65 inches on some series) cut down on seams [2].
Solid surface (Corian, HI-MACS). This is the friendliest material for curves, full stop. Solid surface thermoforms: heat it to roughly 300 F (149 C), bend it over a mold, and let it cool in shape. It also cold-forms to gentle radii. Seams disappear because they're chemically bonded. Corian countertops have been the go-to for custom curved islands for decades. Corian's fabrication guide gives minimum bend radii by thickness; 1/2-inch sheet bends to a 6-inch radius when heated [3].
Laminate (Formica, Wilsonart). Post-form laminate over a curved substrate works at gentle radii. The laminate bends cold down to about 6 to 8 inches of radius before it stress-cracks, and thinner 0.028-inch material handles tighter curves than standard 0.039-inch [8]. Formica countertops and laminate countertops are the cheapest route for a curved island, though the look reads less premium. You build a curved substrate from MDF or plywood and laminate over it, rather than cut from a solid slab.
Butcher block. Butcher block countertops can be curved on a CNC or with a jigsaw, but end-grain and edge-grain construction means the cut face won't match the finished faces. You'd apply a separate solid-wood edge, steam-bent or built cooperage-style, to hide the substrate. That's a carpentry project as much as a countertop, and few shops offer it.
| Material | Curve method | Min. practical radius | Seam visibility | Relative cost |
|---|---|---|---|---|
| Natural stone | Saw/grind | ~3 in (tight polish gets hard) | High if needed | $$$$ |
| Engineered quartz | Saw/grind | ~3 in | High if needed | $$$ |
| Solid surface | Thermoform or cold-bend | 6 in (heated) | Near-zero | $$ |
| Laminate over substrate | Cold-bend | 6 to 8 in standard | Medium | $ |
| Butcher block | Saw + applied edge | ~6 in | Medium | $$ |
How do you template a round or curved island?
Templating wins or loses the job. A bad template means a stone piece that doesn't fit, and stone doesn't stretch.
Cardboard or luan strip method. The old-school approach. A fabricator builds a template from 1/8-inch luan strips or cardboard, tracing the exact perimeter of the island cabinet, marking the centerline, and noting overhangs. For a true circle, set a compass (a string pinned at center works) to the radius and scribe the arc straight onto the template. Mark every seam, sink, and cooktop cutout before the template leaves the site. Label the template with the direction of travel (which edge faces the room) and slab orientation.
Digital templating. A laser templater like the Proliner (Prodim) or a Slabsmith scan projects the top into a digital file that ships straight to the CNC saw or waterjet. For a tricky radius, or when the island isn't a perfect circle but a slight ellipse or flattened side, digital templating kills the translation error between a physical template and a programmed cut path. Shops running CNC almost always prefer it.
What to measure on site. Record the outside diameter of the cabinet at several axes (north-south, east-west, and at 45 degrees) because cabinets aren't always truly round, especially site-built ones. Note the thickness the client wants. Check ceiling height if you need to slide a big piece in. A 48-inch stone circle weighs roughly 300 pounds at 1.25-inch thickness [4], so getting it through the door matters.
Overhang. Standard island overhang for seating is 12 inches at counter height and 15 inches at bar height [5]. On a curved island you measure overhang radially, so the top's radius equals the cabinet radius plus the overhang. A 36-inch-radius cabinet with a 12-inch overhang yields a 48-inch-radius countertop circle.
What equipment do you need to cut a curved countertop in stone?
You can cut a curved stone countertop with hand tools if you must, but it's slow and the edge quality is harder to hold. Here's the real-world picture.
Bridge saw with pivot attachment. Some bridge saws take a pivot jig that locks the slab on a rotating table. You set the radius, spin the table, and the blade traces the arc. Great for consistent arcs, weak on ellipses and compound curves.
CNC waterjet or CNC router. For complex curves, a waterjet is the cleanest option because it cuts with no contact stress and won't chip a polished edge. A CNC router with a diamond profile bit handles the edge profiling in the same program. Most mid-size shops mix the two: waterjet or CNC saw for the shape, then hand-grind and polish the edge.
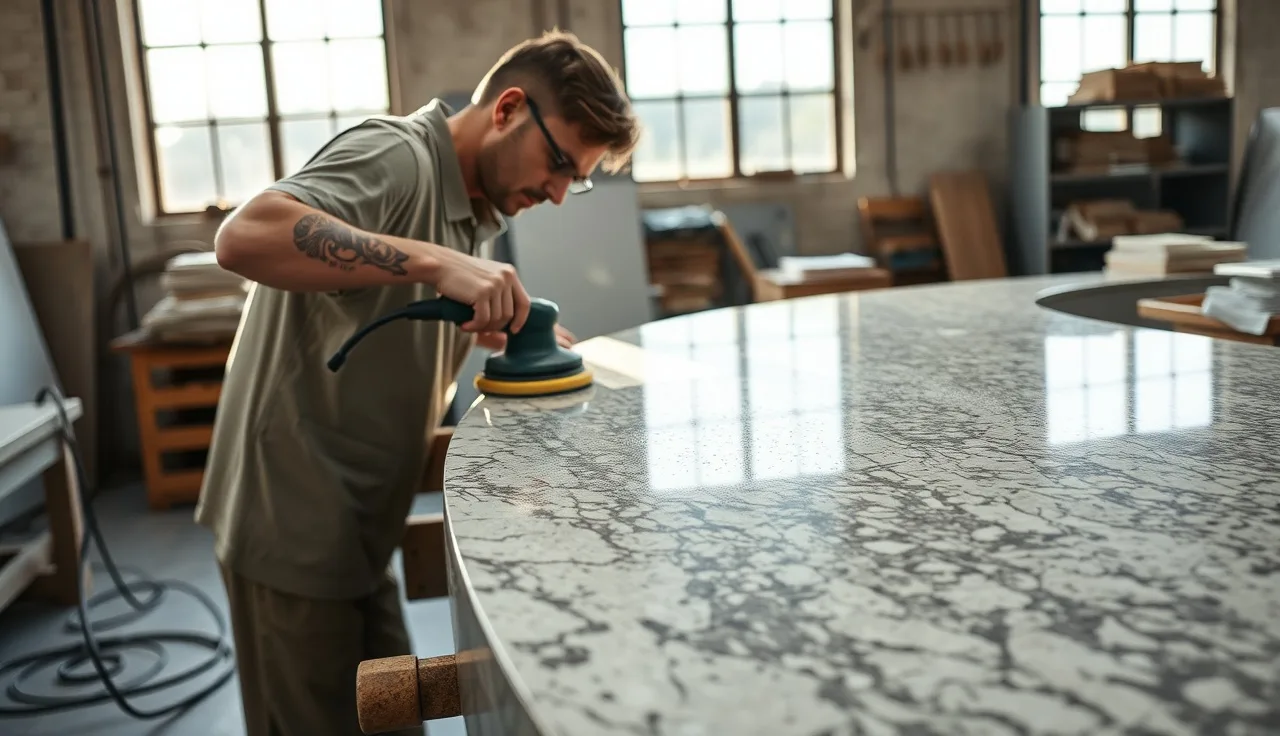
Angle grinder with diamond cup and profile wheels. For the edge profile on a curved front, an angle grinder with a radius shoe is the standard tool. You work through grits from 50 down to 400, 800, 1500, then a polishing pad. The curved path means constant pivoting, and holding even pressure is the whole skill.
Wet polisher. Final stone polishing needs water to cool the pad and flush swarf. A variable-speed wet polisher (typically 500 to 3,500 RPM) with hook-and-loop pads from 200 to 3,000 grit brings the edge to a true mirror if that's the spec.
Shops that run high volumes of curved work often buy a CNC edge profiling machine (a Comandulli, or a Park Industries Apex). These ride the template and cut the profile automatically, holding radius better than any hand grinder can [9].
How do you cut the curve in the slab, step by step?
Here's the actual sequence for a stone curved countertop, raw slab to ready-to-install.
1. Transfer the template. Lay the template on the slab with an eye on grain direction and any veining the client approved. Trace the perimeter with a china marker or soapstone pencil. Mark all cutouts.
2. Rough cut the perimeter. On a bridge saw, rough-cut the circle or arc to within about 3/16 inch of the line using straight tangential cuts (a series of short chords that approximate the curve). That clears the bulk of the waste fast. Do not try to swing the blade in a curve on a standard bridge saw without a pivot attachment.
3. Finish-cut to the line. With a CNC or pivot saw, take the finish cut to exactly the template line. If you're grinding, use the angle grinder with a cutting wheel to bring the material down to the line.
4. Profile the edge. Clamp the piece hard. Start with a coarse profile wheel (50 or 100 grit diamond) and establish the profile shape (bullnose, eased, ogee) as you arc around the curve. Keep the grinder moving. Stopping creates flat spots. Work through the grits.
5. Polish the edge. Wet-polish through the grit sequence up to 1,500 or 3,000 grit for a polished finish, or stop at 400 for a honed look.
6. Polish the top face. If the slab came pre-polished from the yard, you may only need to re-polish near the cut edge. If you're taking a honed slab to polished, run the wet polisher across the top face in an even pattern.
7. Cut any sink or cooktop openings. Use a grinder with a cutting wheel or a jigsaw with a diamond blade. Mark the cutout from the template, drill a starter hole at each corner for a rectangular sink, and cut.
8. Final inspection. Check the piece against the template. Any deviation over 1/16 inch fails; that's the accepted fabrication tolerance under the Natural Stone Institute's ANSI A108.19 standard [6]. Check the profile for consistency. Look for chips at the polished surface.
How do you handle seams on a curved countertop?
Seams on a round island are unavoidable when the circle is bigger than a single slab can yield, or when the shop has to work around a flaw or a vein.
The gold standard for a curved seam is to run it along a diameter of the circle, splitting the top into two semicircles. That gives you the longest possible seam line and keeps both pieces manageable in size and weight. A 48-inch circle split on the diameter makes two pieces, each about 150 pounds at 3 cm thickness.
Place the seam where it hides. The client should approve the location before any cutting. On a kitchen island the seam usually runs front-to-back, so it lands at the sides where it's least visible in normal use.
For stone, fill the seam with color-matched epoxy or polyester adhesive, pull it tight with seam-setter clamps, and let it cure at least 30 minutes before unclamping. Then grind it flush and polish. A well-done stone seam on a polished top is nearly invisible from standing height. It shows up in raking light at counter level, which is just physics.
For solid surface, bond the seam with the manufacturer's joint adhesive (Corian Joint Adhesive, for one) and it goes truly invisible in texture and color after sanding and polishing. Corian's fabrication guide calls for a finished seam gap of "0.005 inch or less" before you apply adhesive [3].
How do you install a curved countertop on a round island?
Installing a curved stone top follows the same rules as straight work, with a few extra checks.
Substrate check. The cabinet top must be level in every direction. Even a 1/8-inch drop across a 48-inch circle makes the stone rock and risk cracking. Shim the cabinet first. Check level radially at 12, 3, 6, and 9 o'clock at minimum.
Support. Stone needs continuous support, or support on 24-inch maximum centers across any unsupported span [4]. A round island cabinet usually gives full perimeter support, which is ideal. If the island is open (a waterfall design with no cabinet doors), add a plywood backer at least 3/4 inch thick across the top of the frame.
Setting. Run 100% silicone adhesive in quarter-sized blobs about 12 inches apart around the perimeter, or epoxy at stone-to-stone seams. Lower the stone in. Do not slide it once it's set, because silicone grabs fast and sliding fractures the blobs.
Caulk the perimeter. Where the top meets a wall or backsplash, use color-matched silicone caulk, never grout. Grout cracks as the building moves. Silicone flexes.
Seam assembly on site. If the top ships in two or more pieces, the final seam goes together on the installed cabinet. Dry-fit both pieces, check the gap, adjust if needed. Then apply adhesive, set both pieces at once, and clamp the seam. Easier with two people.
For the full walkthrough, see our guide on countertop installation.
How long does it take to fabricate a curved countertop?
Fabricating a curved top runs longer than straight work because of the extra cutting and edge profiling.
A realistic shop timeline:
- Template: 1 to 2 hours on site, plus 30 minutes back in the shop to finalize and program the CNC if you're going digital.
- Slab layout and cut: 2 to 4 hours, depending on whether the piece needs a CNC program or bridge saw work.
- Edge profiling and polishing: 1 to 3 hours for a single curved piece with a standard profile. Tight radii or complex profiles take longer.
- Seam fitting (if needed): add 1 to 2 hours.
- Installation: 2 to 4 hours, including dry-fit, seam assembly, and caulking.
Total shop-to-installed time runs 6 to 12 hours spread across one to three days, because adhesive cure times and scheduling break up the work. Most fabricators quote a lead time of 1 to 3 weeks from deposit to install, once you factor in material ordering and the shop queue.
Shops that handle a lot of custom curved work lean on quoting and nesting software to plan slab usage before cutting. SlabWise, for one, lets fabricators lay out curved pieces on a slab image to trim waste before the saw runs, which matters when curved work eats more material per piece than straight.
What does a curved countertop for a round island cost?
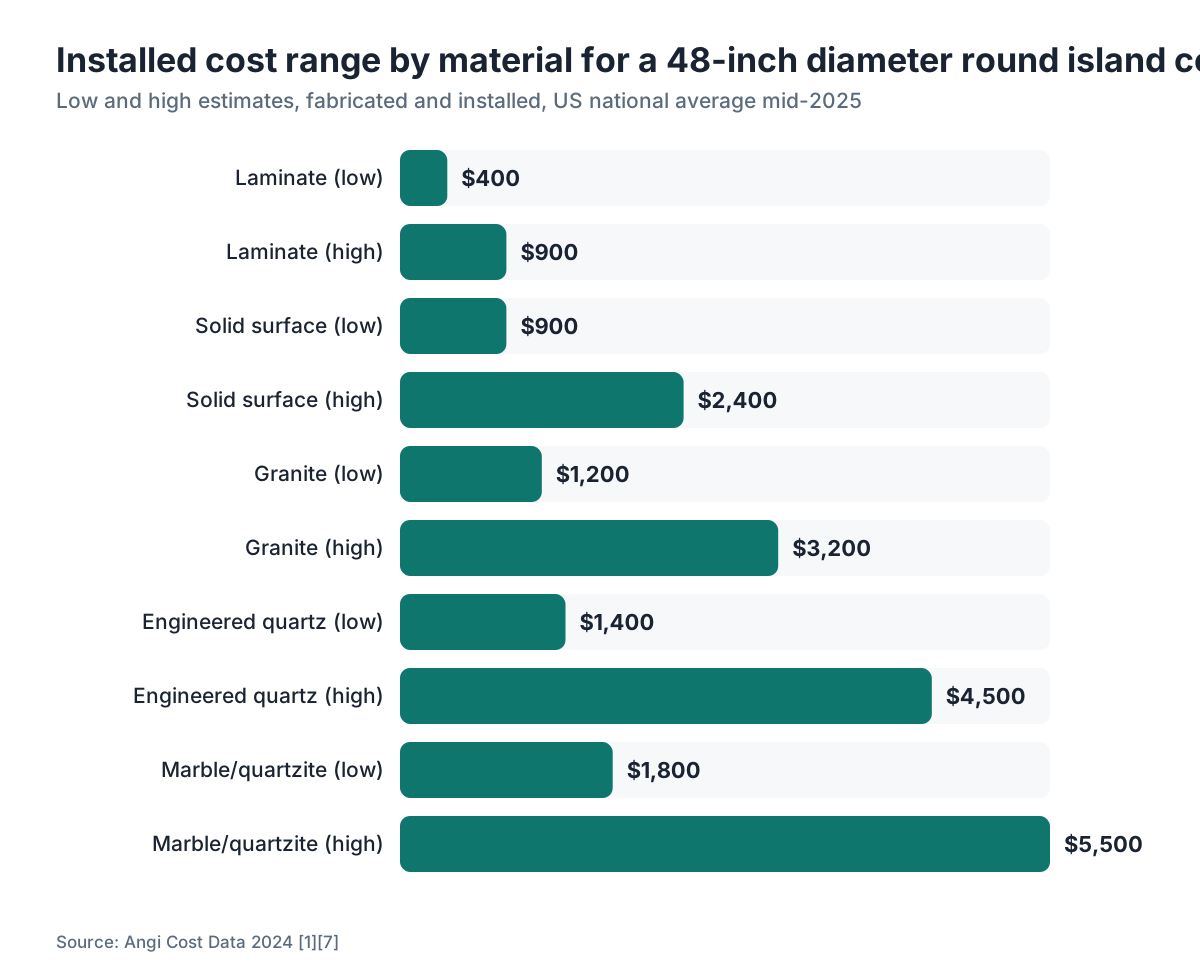
Cost turns on material, island diameter, edge profile complexity, and your region. These ranges reflect fabricated-and-installed pricing in the US as of mid-2025.
| Material | Typical installed price (48-inch diameter island) | Notes |
|---|---|---|
| Granite | $1,200 to $3,200 | Waste and edge work add 15 to 30% over straight [1] |
| Engineered quartz | $1,400 to $4,500 | Premium brands (Cambria) at the high end |
| Solid surface (Corian) | $900 to $2,400 | Thermoforming adds fabrication time |
| Laminate over substrate | $400 to $900 | Cheapest, least durable |
| Marble/quartzite | $1,800 to $5,500 | Material cost is the main driver |
The curved-work premium over a comparable straight top runs roughly 20 to 40 percent for stone, from the added labor and waste. A flat rectangular granite top of the same square footage might run $700 to $1,800 installed. The curved version of the same area costs more because you're paying for the irregular cut, the edge polish time, and the scrap [1].
For kitchen countertops broadly, Angi's 2024 cost data puts the national average installed cost at $2,700 to $4,200 for a typical kitchen, and round island work sits at the top of any material range [7].
Ask your fabricator to itemize the waste factor. A straight shop prices the actual slab square footage needed, more than the finished piece.
What are the most common mistakes when fabricating curved countertops?
Fabricators who don't do much curved work make the same handful of mistakes. Knowing them in advance saves money and time.
Measuring the cabinet, not the template. Cabinet dimensions and the actual top perimeter aren't the same thing. Cabinets have a reveal, overhangs vary, and site-built islands may not run perfectly round. Template the actual top, never the cabinet spec sheet.
Ordering too little slab. Sizing the order to the finished piece without adding for curve waste means running short. Add at least 25 percent to the net square footage of any curved piece for waste [1].
Underestimating edge polishing time. Curved edge polishing takes two to three times longer than straight polishing for the same linear footage. Quote a curved island at the straight edge rate and you lose money.
Moving the stone after silicone touches the cabinet. Silicone's open time is short (5 to 10 minutes depending on product and temperature). Slide a heavy curved piece to adjust and the blobs fracture, which weakens the bond and can crack the stone.
Skipping the dry-fit on multi-piece installs. Always dry-fit seamed pieces before you mix adhesive. Stone gets no second chance once the epoxy sets.
Can a homeowner DIY a curved countertop, or is it always a job for a pro?
Honest answer: it depends heavily on the material.
For stone (granite, quartz, marble), this is almost always a pro job. You need a wet saw that can cut curves or a CNC machine, diamond profile wheels, a wet polisher, and the muscle to move 200- to 400-pound pieces safely. Most homeowners don't have this gear, and renting it makes no economic sense once the rental plus consumables approaches the fabricator's labor charge. One chip on a polished edge can ruin a $600 slab section.
For laminate over a curved substrate, a skilled DIYer with woodworking chops can pull it off. You cut the substrate (MDF or plywood) with a jigsaw, sand the arc smooth, and apply laminate with contact cement. The limiter is getting a smooth, consistent arc on the substrate. A router with a circle-cutting jig (a straight bit following a trammel) is the right tool. Laminate countertops and Formica countertops in a curved application are genuinely DIY-friendly with the right setup.
For solid surface, thermoforming needs an oven big enough to heat the sheet evenly, which is specialized equipment. Cold-forming to gentle radii is more accessible but takes the correct sheet product and careful clamping. The manufacturer's fabricator certification program exists for a reason.
If you're a homeowner pricing a stone curved top, get three quotes from local fabricators who've done curved island work before, ask to see photos of their curved pieces, and study the edge quality in those photos.
Frequently asked questions
How much waste should I expect when cutting a curved countertop from a stone slab?
Plan for at least 20 to 30 percent waste over the net finished square footage. A perfect circle inscribed in a rectangle wastes about 21 percent of the bounding rectangle, and edge trimming plus flaw avoidance add more. Your fabricator should quote the gross slab footage needed, more than the finished piece size.
Can you make a curved countertop without a CNC machine?
Yes. Fabricators made curved stone countertops with bridge saws and angle grinders for decades before CNC became common. A bridge saw with a pivot jig handles arcs well. Hand grinding and polishing the edge is slower but produces excellent results in skilled hands. CNC mainly improves consistency and speed on high volumes of curved work.
What edge profiles work best on a curved countertop?
Eased edge and bullnose profiles are the most practical on tight curves because the profile wheel stays in steady contact with the stone. Complex profiles like ogee or stacked shapes get harder to hold evenly on tight radii. For a radius under 12 inches, stick to a simple eased or quarter-round edge unless your shop has CNC edge profiling equipment.
What is the minimum radius for a curved stone countertop?
The material imposes no hard minimum, but polishing gets very difficult under a 3-inch radius because profile wheels and polishing pads can't conform to the inside curve. For convex (outside) curves, any radius over 3 inches is manageable. For concave (inside) curves on an island, 6 inches is a reasonable practical floor for a polished stone edge.
How is a curved countertop template different from a standard template?
Standard templates are mostly straight lines with notches for corners. A curved template needs a scribed arc, usually drawn with a trammel or compass set to the radius, traced onto cardboard or luan. Digital laser templating captures the arc as coordinate data instead of a physical curve. The key addition is verifying the arc at multiple points, more than the endpoints.
Does a seam on a curved countertop ever become invisible?
In solid surface, yes. A properly made seam is effectively invisible. In stone, no seam is truly invisible, but a skilled fabricator can get one to near-invisible at standing height in normal light. In raking or low-angle light the seam shows as a faint line. Color-matched epoxy plus careful grinding and polishing bring it as close as it can get.
How much does edge polishing add to the cost of a curved countertop?
Expect curved edge polishing to add roughly 15 to 25 percent to total fabrication labor compared to the same linear footage of straight edge. Most fabricators charge a per-linear-foot edge rate. Ask whether they apply a curved-work surcharge, which is common and fair given the extra time.
Is quartz or granite better for a curved island countertop?
Both cut the same way in the shop, so the choice comes down to looks and budget. Engineered quartz slabs run slightly more consistent in hardness, which can mean more uniform edge polishing. Granite's natural variation can make seam color-matching harder. On budget they're comparable for curved work. See our guide to granite countertops for a full comparison.
Can laminate be bent around a curved island without cracking?
Standard 0.039-inch post-form laminate bends to a 6- to 8-inch radius before stress-cracking. Thinner 0.028-inch laminate handles tighter curves. For a typical round island with a radius of 24 inches or more, standard laminate works fine cold-formed with contact cement. The substrate has to be smooth and free of voids or the laminate telegraphs the imperfections.
How do you support a curved stone countertop on an island cabinet?
Stone needs continuous support or support on 24-inch maximum centers. A closed-base island cabinet with a solid perimeter frame satisfies this. Open-base islands need a 3/4-inch plywood backer added across the top of the frame. Silicone adhesive blobs placed 12 inches apart around the perimeter bond the stone to the substrate without rigid point-loading.
How long does a curved countertop take from template to installation?
Most shops complete a curved island top in 6 to 12 total shop hours spread across one to three days, with installation adding 2 to 4 hours on site. From deposit to installation, lead time is typically 1 to 3 weeks factoring in material ordering and the shop queue. Complex multi-piece curved tops take longer.
What questions should a homeowner ask a fabricator about a curved countertop?
Ask how many curved island tops they've fabricated in the last year, ask to see photos of finished curved edges, ask how they price the slab waste (you want gross slab footage quoted), ask where seams will land and whether you can approve placement, and ask what adhesive they use for installation. A fabricator who can't answer these clearly probably doesn't do much curved work.
Can you add a curved countertop to an existing square island cabinet?
Yes, but the cabinet top has to match the countertop shape for support. If the cabinet is square and the top is round, the corners of the top overhang open air. Stone needs support within 6 to 8 inches of any unsupported edge, so a round top on a square base only works if the cabinet is close in size to the countertop circle. Solid surface handles modest unsupported spans better than stone.
Sources
- Angi (formerly HomeAdvisor), Countertop Installation Cost Guide: Installed granite countertop cost ranges and waste factors for non-rectangular cuts
- Cambria, Slab Size Specifications: Cambria engineered quartz slabs available up to 132 x 65 inches on select series
- DuPont Corian, Fabrication and Installation Guide: Corian solid surface thermoforms at approximately 300 F; minimum bend radius 6 inches at 1/2-inch thickness; seam gap specification 0.005 inch or less
- Natural Stone Institute (formerly Marble Institute of America), Countertop Installation Guidelines: Stone countertop support on maximum 24-inch centers; weight estimate for 3 cm granite approximately 19 lb/sq ft
- National Kitchen and Bath Association, Kitchen Planning Guidelines and Access Standards: Recommended knee space and overhang for counter-height island seating 12 inches, bar-height 15 inches
- Natural Stone Institute, American National Standard for Natural Stone Installation (ANSI A108.19): Acceptable fabrication tolerance for stone countertop pieces is 1/16 inch from template
- U.S. Bureau of Labor Statistics, Occupational Outlook Handbook (Stonemasons and related trades): Labor cost context for stonemasonry and countertop fabrication trades in the United States
- Formica Group, Laminate Fabrication Technical Data Sheet: Standard 0.039-inch laminate minimum bend radius 6 to 8 inches; 0.028-inch laminate handles tighter radii
- Park Industries, CNC Stone Fabrication Equipment Specifications: CNC edge profiling machines maintain consistent profile radius on curved stone countertops
- International Surface Fabricators Association, Best Practices for Solid Surface Fabrication: Cold-forming and thermoforming procedures for solid surface curved countertop fabrication
- U.S. Occupational Safety and Health Administration, Respirable Crystalline Silica in Construction: Wet cutting and grinding of stone reduces respirable crystalline silica exposure during fabrication
Last updated 2026-07-11