TL;DR
- Use 100% silicone or siliconized latex rated for kitchens and baths.
- Clean and dry the joint fully, tape both edges, lay a steady bead, and tool it within a few minutes.
- Done right, the seal stays watertight 5 to 10 years before it needs replacing.
- Grout and paintable acrylic latex fail here fast.
Why does the countertop-to-wall joint need caulk at all?
Everything at that joint moves. Stone, wood, laminate, and quartz all expand and contract, and the wall behind them shifts too. Temperature swings, humidity cycles, and the slow settlement of a house mean the line where your countertop meets the wall is never truly still. Fill it with something rigid like grout, and it cracks. Water finds the crack. Behind that drywall is usually paper-faced gypsum, and once water gets in you get mold, swollen board, and eventually a rotted cabinet box.
Caulk flexes. A good silicone bead stretches and compresses with the joint without tearing loose. That elasticity is the whole point.
Fabricators specify caulk for backsplash-to-countertop and countertop-to-wall transitions almost without exception, because grout has essentially zero stretch before it splits [1]. The Tile Council of North America says movement joints have to be filled with sealant, not grout, precisely because grout "is not flexible" and rigid fills in a moving joint lead to tile or grout failure [1].
The joint also hides a gap. Very few walls are perfectly plumb and flat, and even a well-scribed countertop leaves small voids along its back edge. Caulk bridges those voids, keeps crumbs and grease out, and looks clean.
What type of caulk should you use for a countertop-to-wall joint?
This is where most DIY caulk jobs go wrong before they even start. Three choices are realistic, and one wins for most situations.
100% silicone is the best performer. It stays flexible for the life of the joint, bonds to stone, quartz, ceramic tile, and painted drywall, and resists mold better than any water-based product. It will not accept paint, which matters if your wall color runs right down to the countertop edge. It is also less forgiving to apply, because silicone cures by reacting with moisture in the air, so you get a shorter working window and a harder tooling job. Cleanup takes mineral spirits or denatured alcohol.
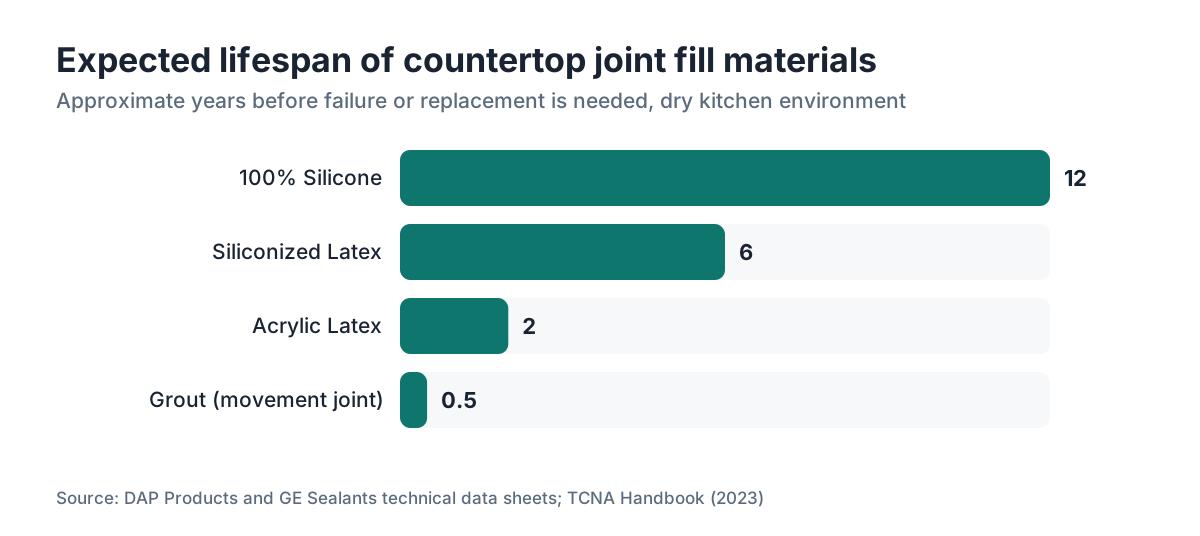
Siliconized latex (sold as a latex-silicone blend or plain "kitchen and bath" caulk) is the practical middle ground most homeowners pick. It paints, tools easily, cleans up with water while wet, and still flexes meaningfully. It will not last as long as pure silicone in a wet spot, but for a backsplash joint that stays mostly dry, a good one holds 5 to 8 years without complaint.
Paintable acrylic latex is fine for interior trim and gaps around windows. Do not use it here. It has too little stretch for a countertop joint and cracks or pulls away within a year in a kitchen or bath.
Both silicone and siliconized latex come in white, almond, biscuit, gray, and clear. Clear helps when you cannot match the wall exactly. If your countertop brand sells a matching caulk (Cambria, for example, sells color-matched caulk for their Cambria countertops), use it.
| Caulk type | Paintable | Flexibility | Mold resistance | Typical lifespan |
|---|---|---|---|---|
| 100% silicone | No | Excellent | Excellent | 10+ years |
| Siliconized latex | Yes | Good | Good | 5-8 years |
| Acrylic latex | Yes | Poor | Fair | 1-3 years |
| Grout | No | None | Poor | Cracks quickly |
GE Silicone II Kitchen & Bath and DAP Kwik Seal Plus both have long track records here. Neither is a paid recommendation. They are the products you will actually find at every hardware store.
What tools and supplies do you need before you start?
You can do this job for about $20 in supplies if you already own a caulk gun.
Here is the list: a standard caulk gun (a cheap ratchet-rod gun works, though a smooth-rod "dripless" gun gives you more control), the caulk itself, blue painter's tape, a utility knife or plastic caulk removal tool, isopropyl or denatured alcohol for silicone (or warm soapy water for latex), clean rags or paper towels, a gloved finger or a caulk finishing tool, and a spray bottle of water with a drop of dish soap in it if you are running silicone.
That soap-water spray is not optional for silicone. You mist the wet bead lightly before tooling, and it stops the silicone from sticking to your finger or tool so you can pull a clean concave line. Skip it and you smear silicone everywhere.
A 10-oz tube covers roughly 25 to 35 linear feet at a standard 3/16-inch bead [2]. Measure your backsplash run so you buy enough the first trip.
How do you prep the joint so the caulk actually sticks?
Prep is 80% of the job. Caulk fails because it went over old caulk, grease, or moisture, not because the product was bad.
First, remove all old caulk. A plastic removal tool (the hook-shaped ones sold next to the caulk) works without scratching stone. For stubborn silicone, soften it first with a product like Goo Gone Caulk Remover or with isopropyl alcohol. Get every bit out. Silicone will not bond to old silicone unless the surface is spotless and the cured bead is mechanically roughed up, which is more work than just removing it.
Second, clean the joint. Wipe the countertop edge and the wall with isopropyl alcohol for silicone, or soapy water and a clean rinse for latex. Any kitchen or bath in daily use carries a film of soap scum, cooking oil, or mineral deposits along that joint. That film wrecks adhesion.
Third, let the surface dry. This is where people rush and regret it. If you cleaned with water, wait at least 30 minutes in a warm room, longer if the air is humid. Silicone cures on moisture in the air, which is fine, but it will not bond to a surface that is actively wet.
Fourth, tape both sides. Run painter's tape along the countertop 1/8 to 3/16 inch back from the joint edge, and another strip on the wall the same distance up. The channel between the two tape lines is where your caulk goes. This makes cleanup nearly automatic and gives you a sharp edge without being a pro.
For natural stone like granite countertops or marble countertops, tape matters even more, because silicone staining on a porous edge is hard to lift. Even polished granite absorbs silicone oil if it sits there long enough.
How do you cut the caulk tube tip for a countertop joint?
Cut the tip at a 45-degree angle, opening it to about 3/16 inch across for a standard countertop-to-wall joint. Smaller and you drag the gun too slowly and get an uneven bead. Larger and you overfill the joint and make a mess to tool away.
Almost every tube tip has graduated rings marking cut points. For this joint you want the smallest ring, or a point just past the very tip. Err toward cutting less. You can always cut more. You cannot uncut.
Pierce the inner foil seal with the poker built into most caulk guns, or a long nail, or the tip of your utility blade. Skip this and nothing comes out, and you will stand there wondering what is wrong with the gun.
How do you apply the caulk bead correctly?
Hold the gun at roughly 45 degrees to the joint, tip angled in the direction you are moving. Pull the gun toward you instead of pushing it away. Pulling keeps the tip ahead of the bead and packs the joint from the bottom up. Pushing rides over the bead and leaves voids underneath.
Steady, even trigger pressure. Move at a pace that keeps the bead slightly overfilling the channel between your tape lines. You will tool it down next. The goal is no air pockets and consistent volume, not a perfect-looking bead straight off the tube.
Do the full joint in one continuous pass if you can. Stopping and restarting leaves lumps where the bead overlaps. If you have to stop, release the trigger a second or two before you lift the tip, because the gun keeps pushing after you let go.
On long runs like a full kitchen backsplash, work in 4 to 6 foot sections so you can tool each one before it skins over. Silicone skins fast, sometimes within 5 to 10 minutes in a warm, dry room [3]. Latex buys you a little more time.
How do you tool and smooth the caulk joint?
Tool the bead within 2 to 5 minutes of laying it. Do not wait.
For silicone: mist the bead very lightly with your soap-water spray, then run a gloved finger or a caulk tool along it in one smooth stroke. The soap keeps the silicone off your finger and pulls it into a clean concave line. Wipe your finger on a rag after each pass.
For siliconized latex: use a damp finger or a wet caulk tool. Some people dip in the soap-water spray anyway. It works just as well on latex.
Firm, consistent pressure. Press the caulk into the joint while you pull the excess up and out. One pass is the target. Multiple passes tear the bead apart or leave drag marks.
Pull the tape while the caulk is still wet. Peel each strip back at a 45-degree angle, away from the joint, not straight up. Wait until the caulk cures and you risk ripping the edge of the bead. Pull it within a minute or two of tooling.
Let the joint cure fully before it sees water. Silicone typically sets in 24 hours but reaches full adhesion closer to 72 hours [3]. Siliconized latex skins faster but can take 24 hours through the full depth of the bead. Run water over a half-cured joint and you wash the uncured material right out.
How do you caulk a countertop to wall joint in a wet area like a shower or bathtub surround?
Same process, higher stakes, and the product choice matters more. In a shower or tub surround, use 100% silicone, not siliconized latex. Constant water and humidity break down a latex-silicone blend faster than the package will ever admit.
Mold-resistant silicone, which carries a fungicide in the formula, is the right call for showers. GE and DAP both make bath-specific versions. The EPA regulates the antimicrobial additives in these products under FIFRA, the Federal Insecticide, Fungicide, and Rodenticide Act, so the mold-resistance claim on the label has actual regulatory footing behind it, unlike some of the vaguer marketing you see elsewhere [4].
Drying the joint first is even more important here. Run the exhaust fan for 30 minutes before you start, and wait at least an hour after the last shower. Better yet, wait a full day. If the substrate is even slightly damp, the silicone appears to bond and then peels off in sheets within a month.
On tiled surrounds, the line where tile meets the tub deck or shower floor is a "change-of-plane" movement joint in the TCNA handbook. The guidance leaves no room to argue: fill it with sealant, not grout [1].
What should you do if the gap between countertop and wall is very large?
A gap wider than about 3/8 inch is more than caulk alone can bridge well. Unsupported caulk across a wide span sags before it cures and can crack later as the joint moves.
The fix is a backer rod. That is a foam rope sold in various diameters at any hardware store, usually $3 to $6 for a 20-foot length [5]. Press it into the joint to fill most of the gap, leaving about 1/4 inch of depth for the caulk. Now the caulk bonds on two sides (countertop and wall) instead of three, which actually improves how the joint flexes. Sealant bonded on three sides, a condition called "three-point bonding," builds a stress concentration that tears the bead every time the joint moves [8].
For very uneven walls or big irregular gaps, you may need to scribe the countertop edge closer to the wall before installation, fill the remaining gap with a color-matched filler or solid-surface material, then caulk over the seam. That is a countertop installation fix, not a caulking fix.
If the gap comes from a warped wall, ask whether the wall needs furring out or repair before you spend on a countertop. No amount of caulk makes a crooked wall look straight.
How long does countertop caulk last, and how do you know when it needs replacing?
Silicone in a dry kitchen backsplash joint lasts 10 to 15 years without trouble. In a wet bath, 5 to 10 years is more honest. Siliconized latex in a kitchen runs 5 to 8 years. These ranges come from manufacturer technical data sheets and line up roughly with what experienced tile setters report. Nobody has run a controlled multi-decade study on residential caulk longevity specifically, so treat the top of each range as optimistic.
Signs the joint needs recaulking: the bead pulls away from either surface anywhere along its length, you see cracking or crazing on the surface, the caulk has turned brown or black (mold that penetrated the bead, not the surface mildew you can scrub off), or the bead has gone hard and you can chip pieces off with a fingernail.
Do not caulk over old failing caulk. It seems like a time-saver. It is not. The new bead bonds to the old caulk instead of to the countertop or wall, and it fails faster than the original did. Strip everything and start from prep.
For butcher block countertops and other wood surfaces, check the joint once a year. Wood moves more seasonally than stone and opens the joint faster than you expect.
What mistakes do most people make when caulking a countertop joint?
Not drying the surface. This is the top cause of early failure. Water under the caulk means no adhesion, full stop.
Using the wrong product. Grout fails. Acrylic latex fails in wet areas. The category matters as much as the brand.
Cutting the tip too big. An opening past 1/4 inch dumps too much material for a standard joint. You end up with a sloppy bead that is hard to tool and looks amateur.
Skipping the tape. Even experienced hands get a cleaner result with tape than without. Five minutes of taping saves fifteen minutes of cleanup and a result that looks twice as good.
Wetting the caulk before it cures. Running water over a silicone bead the same day, or even the next morning, washes out the uncured center.
Three-point bonding across wide gaps. Let caulk grab the back wall along with the countertop edge and the wall face, and the joint tears faster. Use backer rod.
If you run a shop, these are the same errors your installers make racing through an end-of-day punch list. A quality-control checklist built into your workflow, the kind you can track in shop management software like SlabWise, catches them before they turn into a callback.
For laminate countertops and formica countertops, there is one more trap: letting silicone touch the raw particleboard edge of the substrate. Silicone does not seal particleboard well. Prime or seal the substrate edge before you caulk, or use a latex-based product that soaks slightly into the surface.
Can you paint over countertop caulk, and what color options do you have?
You can paint over siliconized latex and plain acrylic latex once they are fully cured. You cannot paint over 100% silicone. Paint beads up and peels off, because silicone has an extremely low surface energy that rejects most coatings.
If your wall paint runs to the joint and you need the caulk to match after painting, use siliconized latex and wait at least 24 hours after application before you paint. Read the label. Some products want 48 hours first.
If you are using silicone (which you should in a wet area), buy the right color from the start. White and clear are the easiest to find. Almond, biscuit, and gray are common at home centers. For odd colors, specialty caulk makers carry broader palettes, and some fabricators order colored caulk to match specific stones.
For Corian countertops and other solid surface materials, the manufacturer usually specifies a color-matched silicone sealant. Check your warranty paperwork before you reach for a third-party product, because some solid-surface warranties are void if you use an unauthorized caulk or solvent near the seams.
Is there anything different about caulking stone countertops versus laminate or solid surface?
The process is mostly the same, but surface prep and product choice shift a little by material.
For natural stone (granite, marble, quartzite, soapstone), use 100% silicone everywhere, wet or dry. Many stones are porous enough that a water-based caulk wicks moisture in and causes discoloration or mineral deposits. Near a surface you care about, like honed marble or an untreated soapstone, test your cleaning solvent in a hidden spot first. Our guides on how to clean stone countertops and how to clean quartzite countertops list compatible cleaners by stone type.
For engineered quartz like Cambria countertops, the surface is non-porous, so silicone or siliconized latex both work. Use the manufacturer's color-matched caulk when you want the joint to disappear.
For laminate and Formica, the substrate edge is the weak point. The top is impermeable plastic, but the core is wood-based and swells when wet. Make sure the caulk fills the joint fully and bonds to the plastic laminate, more than to the core.
For butcher block and other wood tops, silicone is the right call. Wood moves hard with humidity, so you want maximum flexibility. Check the joint every season.
Frequently asked questions
How long should I wait after caulking before using the sink or getting the joint wet?
Wait at least 24 hours for 100% silicone before any water contact, and 72 hours for full strength. Siliconized latex is usually surface-dry in a few hours but still needs 24 hours before water exposure. Check the label, since drying time changes with temperature and humidity. Cold or humid rooms slow the cure a lot. Water on a half-cured bead washes out the uncured center.
Can I caulk over old caulk, or do I have to remove it first?
Remove it first. Caulk over old caulk bonds the new layer to the old surface, not to the countertop or wall. When the old caulk keeps failing, it drags your new bead down with it. Removal takes 20 to 30 minutes and is the single biggest factor in how long the fresh joint lasts. Plastic removal tools do the job without scratching stone.
What causes caulk to pull away from the countertop or wall so quickly?
Almost always one of three things: the surface was not clean and dry when the caulk went on, the wrong caulk type for the conditions, or a joint too wide without a backer rod so the bead had to span a gap it could not hold. Grease, soap film, and surface moisture are the most common adhesion killers. Clear all three before applying fresh caulk.
How do I get a smooth, professional-looking caulk line?
Tape both edges before you lay the bead. Tool it within 2 to 5 minutes using a gloved finger or caulk tool, with a light mist of soapy water on silicone to keep it from sticking. Peel the tape away at a 45-degree angle while the caulk is still wet. One slow, steady pass beats several short strokes. The tape does the heavy lifting on the finished edge.
Does the color of caulk matter, and how do I match it to my countertop or grout?
Color matters for looks. Use white for white or light grout and walls. Clear works when you cannot match a shade exactly. Almond and biscuit cover warm off-whites. For branded engineered quartz, check whether the maker sells a color-matched sealant, since several do. Once cured, silicone cannot be painted, so pick the right color before you apply it.
Is silicone or grout better for the joint between a tile backsplash and a countertop?
Silicone, always. The Tile Council of North America's handbook states plainly that change-of-plane joints and movement joints get filled with sealant, not grout. Grout has no flexibility and cracks as the two surfaces shift independently. Once it cracks in that joint, water runs behind the tile and into the wall. Replace any grout in that joint with silicone.
What is the best caulk for a kitchen countertop to wall joint specifically?
100% silicone or a good siliconized latex labeled for kitchen and bath. In a dry kitchen, siliconized latex is easier to apply and paintable. If the joint sits near the sink or takes regular splash, use 100% silicone. GE Silicone II Kitchen & Bath and DAP Kwik Seal Plus are widely stocked and have long track records in this exact spot.
How wide should the caulk bead be for a countertop-to-wall joint?
A bead 3/16 to 1/4 inch wide is right for most countertop-to-wall joints. Wider beads take longer to cure and are harder to tool smoothly. If the gap runs past 3/8 inch, press in foam backer rod to fill most of the depth first, then caulk over it. Cut your tube tip to match the bead width you want before you start.
Can I use white grout caulk instead of regular caulk to match my tile grout lines?
Grout-colored caulk exists for exactly this, and it is the right tool. It is siliconized latex or silicone tinted to match common grout colors. Do not substitute actual grout. The grout-colored caulk matches the look while keeping the joint flexible. Confirm the product is rated for wet areas if you are near a sink or in a bath.
How do I remove silicone caulk from a stone countertop without scratching it?
Use a plastic caulk removal tool or plastic scraper, not metal. Soften stubborn silicone with isopropyl alcohol or a remover like Goo Gone Caulk Remover, letting it soak 5 to 10 minutes before you scrape. On polished stone, work flat along the surface to avoid scratches. Finish with a clean wipe of isopropyl alcohol before you apply new caulk.
How much does it cost to have a professional re-caulk a kitchen countertop?
Most handypersons and tile contractors charge $50 to $150 for a standard kitchen caulk job, depending on the length of the run and the local labor market. Bath tub surrounds run similar rates. The materials cost $5 to $15 per tube. If the joint is failing because of a bigger problem, like an unlevel counter or a warped wall, the diagnostic and repair cost climbs well past that.
Do I need to seal the countertop before I caulk the joint?
For porous natural stone like granite or marble, yes. Seal the countertop first and let the sealer cure fully before caulking. Sealing after caulking risks getting sealer on the bead, which can affect adhesion or appearance. Non-porous surfaces like quartz or laminate do not need sealing. Check whether your stone requires sealing in the fabricator's care documentation.
Sources
- Tile Council of North America (TCNA), Handbook for Ceramic, Glass, and Stone Tile Installation: Movement joints and change-of-plane joints should be filled with sealant, not grout; grout is not flexible and fails in movement joints
- DAP Products, Kwik Seal Plus product technical data sheet: A 10-oz tube of caulk covers approximately 25 to 35 linear feet at a 3/16-inch bead width
- GE Sealants, Silicone II Kitchen & Bath product information: 100% silicone kitchen and bath caulk skins over in as little as 5 to 10 minutes and reaches full cure in approximately 24 to 72 hours
- U.S. Environmental Protection Agency, Pesticide Registration and FIFRA overview: Antimicrobial additives in products like mold-resistant caulk are regulated under FIFRA, providing regulatory backing for mold-resistance claims
- Home Depot product listings, foam backer rod: Foam backer rod for caulking joints is typically sold in 20-foot lengths for $3 to $6 at major home improvement retailers
- U.S. Consumer Product Safety Commission, indoor air quality guidance: Mold growth behind water-damaged drywall is a known indoor air quality hazard associated with water intrusion in kitchen and bath environments
- U.S. Centers for Disease Control and Prevention, mold and dampness guidance: Mold grows where moisture is present in building materials including paper-faced gypsum wallboard; preventing water intrusion is the primary control measure
- American National Standards Institute / TCNA, ANSI A108 specifications for installation of ceramic tile: Three-point bonding of sealant in a joint creates stress concentration and is discouraged; sealant should bond on two sides only, with backer rod preventing bottom bond
- National Kitchen and Bath Association (NKBA), Kitchen and Bathroom Planning Guidelines: Water-resistant and waterproof materials are specified for countertop and wall interfaces in kitchen and bathroom design standards
- International Code Council, International Residential Code (IRC) Section R702, interior wall and ceiling finish: Water-resistant gypsum board and water-resistant finishes are required in wet areas; water intrusion behind non-resistant materials is a code concern
Last updated 2026-07-10