TL;DR
- Removing old caulk from a countertop-to-wall joint takes 1 to 3 hours.
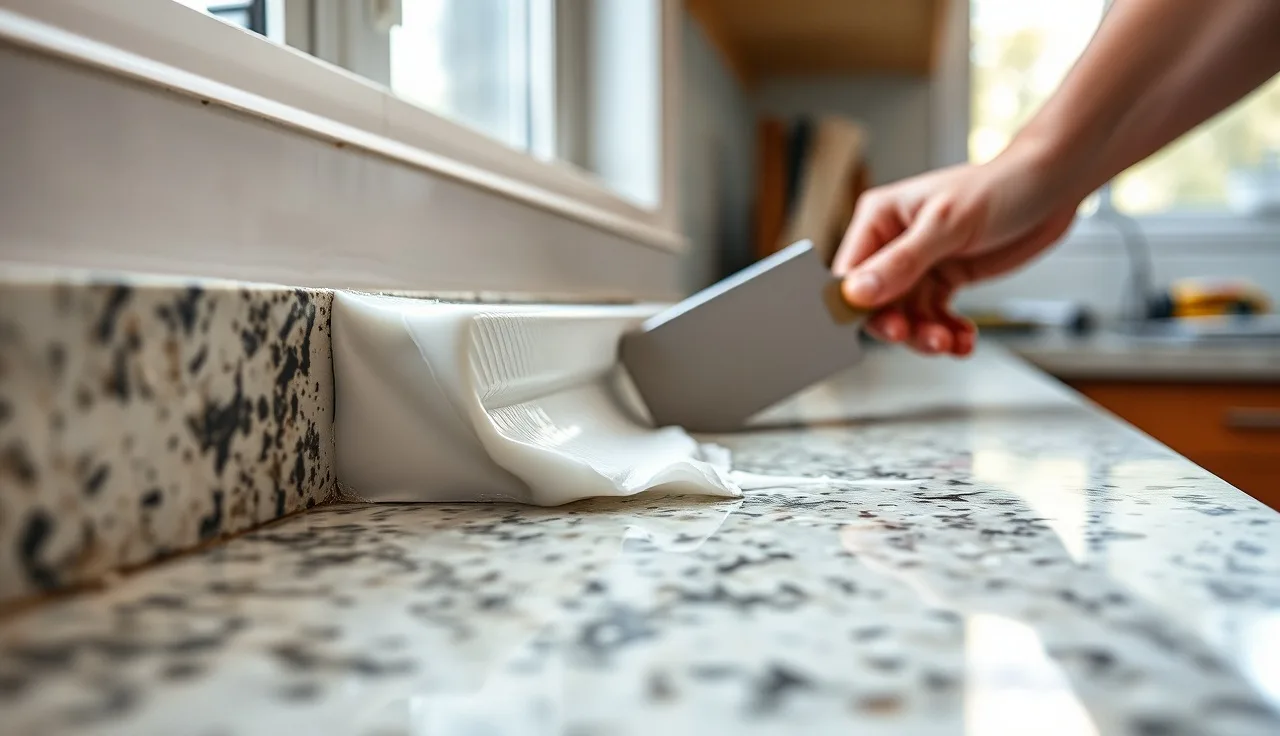
- Score the caulk with a utility knife, soften it with a silicone remover or isopropyl alcohol, then pull it off with a plastic scraper.
- Clean residue with mineral spirits or a citrus solvent.
- On natural stone, skip anything acidic.
- Let the joint dry 24 hours before recaulking.
Why does the caulk joint between a countertop and wall fail in the first place?
Countertops move. Not much, but enough to matter. Stone, solid surface, and laminate all expand and contract with temperature swings, and the slab settles slightly under the weight of appliances and daily use. The wall behind it does its own thing. That gap between the two surfaces is not a spot for structural bonding. It is a movement joint, and caulk is the one material designed to flex with it.
Silicone and latex caulks have a finite lifespan. Most siliconized latex products carry 5-year or 10-year warranties, and 100% silicone products from brands like GE and DAP are rated for up to 20 years. Real kitchen and bathroom conditions cut that down. Steam, grease, cleaning chemicals, and the constant wet-dry cycle around a sink break the bond faster than any test standard accounts for.
Failing caulk does not always announce itself. Sometimes it peels at the edge and lets water track behind the backsplash. Sometimes mold grows inside the bead because water got in and never dried. Sometimes it just hardens and cracks, losing the flex that was its whole reason for being there. Any of those is a signal to strip it out and start fresh.
Caulking over old caulk is almost always a mistake. The new bead bonds to the old material, which is already failing, so the assembly peels again within months. Fabricators see this constantly on remodel jobs. The right fix is a clean substrate.
What tools do you need to remove countertop caulk?
You do not need much. Most of this is already in your kitchen or garage.
For cutting and scraping: a utility knife or a dedicated caulk-cutting tool (the Allway CS1 style with a hook blade is the classic), a plastic scraper or an old credit card, and a stiff-bristle nylon brush. Metal scrapers work on tile and most solid surfaces, but they scratch polished stone edges, laminate, and Corian if you press too hard.
For chemical softening: a commercial silicone remover like Goo Gone Caulk Remover or 3M Caulk Remover, or plain isopropyl alcohol (70% or higher) for latex-based caulk. Acetone (nail polish remover) cuts silicone residue well, but it damages acrylic, some laminate surfaces, and painted walls. Use it only where you have confirmed it is safe.
For cleanup: paper towels or lint-free rags, mineral spirits for oily residue, and a spray bottle of denatured or rubbing alcohol for the final wipe. Solvents like acetone and mineral spirits need ventilation and skin protection, per CPSC safety guidance [4].
| Tool | Best for | Watch out for |
|---|---|---|
| Utility knife | Initial scoring | Scratching polished stone edges |
| Plastic scraper | Prying up bead | Basically safe on all surfaces |
| Oscillating tool with scraper blade | Thick, hardened silicone | Can chip tile grout or stone |
| Silicone remover spray | Softening 100% silicone | Needs 15-30 min dwell time |
| Isopropyl alcohol | Latex or latex-silicone blend | Less effective on pure silicone |
| Acetone | Silicone residue cleanup | Damages acrylic, laminate, paint |
One tool worth owning if you do this more than once: an oscillating multi-tool with a flat scraper blade. It chews through a long run of hardened silicone and saves your wrist. On stone, put a strip of painter's tape along the edge before you run the tool.
How do you actually remove old caulk step by step?
The process has five phases. Rushing any of them is what scratches stone or tears drywall.
Step 1: Identify the caulk type. Pure silicone is rubbery and almost translucent, stretches when you pull a tab, and shrugs off solvents. Latex or acrylic latex caulk is more paintlike, often white or almond, and crumbles when dry. Siliconized latex sits in between. The type decides your softener.
Step 2: Score both edges. Hold a utility knife at a low angle (nearly flat) and run it along the wall side of the bead, cutting the caulk's bond to the wall. Do the same on the countertop edge. You are cutting the adhesion, not digging into the surface. One clean pass per side is enough. On granite countertops or marble countertops, tape the surface first with blue painter's tape right up to the bead so a slip does not scratch the finish.
Step 3: Apply softener and wait. For silicone, spray or brush on a silicone remover and let it sit the full dwell time on the label, usually 15 to 30 minutes. Do not shortcut this. For latex, a generous soak of isopropyl alcohol works, or plain warm water on recently applied, still-soft latex. The softener does not dissolve the caulk. It breaks the adhesive bond at the substrate, so the bead peels rather than tears.
Step 4: Pull and scrape. Find a loose end, grip it with your fingers or needle-nose pliers, and pull slowly at a low angle. Long, slow pulls take off more material in one piece than short jerks do. Use the plastic scraper to pop up sections that will not pull free. On grout joints, a stiff nylon brush cleans residue out of the texture without hurting the grout.
Step 5: Final cleanup. This is the step most people skip, and it is why their new caulk fails in six months. Wipe the bare joint with mineral spirits on a rag to lift any greasy residue, then follow with a clean rag dampened with isopropyl alcohol. The surface has to be clean, dry, and free of old caulk crumbs before anything new goes on. Give the joint 24 hours to dry before recaulking, or at minimum until it shows no moisture when you dab it with a dry paper towel.
Are there safe chemical removers for natural stone countertops?
Yes, but the choice matters more on stone than on any other surface. One rule holds no matter what: nothing acidic, ever, on marble, travertine, limestone, or onyx. Acid etches calcium-based stone on contact and leaves dull patches that only professional polishing fixes. The Natural Stone Institute is blunt about it, warning that acidic cleaners cause etching on marble, limestone, and travertine [8]. That rules out vinegar, citrus solvents (most citrus degreasers run pH 3 to 4), and some lighter-duty hardware-store caulk removers built on organic acids.
For granite countertops, quartzite, and engineered quartz like Cambria, you have room to work. Silicone removers with an isopropyl or naphtha base are generally fine. Goo Gone's standard formula is citrus-based, so use their dedicated caulk remover (a different product) or go with a plain isopropyl alcohol soak. 3M's caulk remover uses an acetate base and is safer on stone than any acid product.
For marble countertops, soapstone, and any honed finish, the safest method is mechanical only: score, use plain warm water as the softener, and scrape slowly with a plastic scraper. It takes more passes. It is worth it.
On laminate countertops and Formica, acetone will fog or bubble the surface. Stay with isopropyl alcohol and a plastic scraper. On Corian and other solid surfaces, mineral spirits and isopropyl alcohol are safe. Avoid anything with methylene chloride, which is regulated under OSHA's Hazard Communication Standard and needs an SDS review before use [6].
When you are unsure about a solvent, test it in a hidden spot, inside a cabinet or behind the faucet, for five minutes before committing to the full run.
How long does caulk removal take, and is it a DIY job?
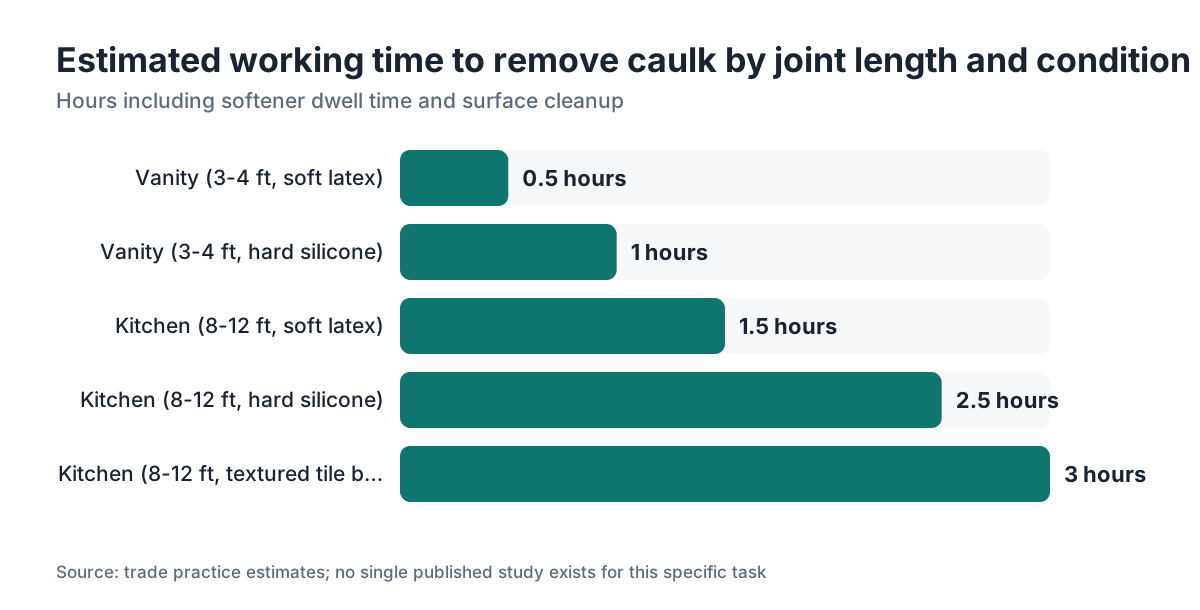
For a standard kitchen with a continuous backsplash run of 8 to 12 linear feet, plan on 1 to 3 hours start to finish. The spread comes from how well the caulk went on originally (thick, uneven beads take longer), how old and hard it is, and your surface type. A bathroom with a single vanity is often under an hour.
This is a real DIY job in most cases. What it takes is patience and a light touch, not trade knowledge. The biggest risk is scratching a polished surface or cutting into drywall paper while scoring, and you avoid both by going slow and keeping your blade flat.
Where a professional makes sense: if the joint has water damage behind it and the drywall is soft, that is a tile or drywall repair job that happens to start with caulk removal. If you have a long run on an expensive stone like a book-matched marble countertop or a thick engineered stone like Cambria where a scratch costs real money to refinish, the 30 minutes of labor a pro charges to do the removal is money well spent. Fabricators typically charge $1 to $3 per linear foot for recaulking service, with removal adding a similar amount.
Fabricators quoting a full countertop installation that includes joint work almost always underquote the cleanup phase. Budget it honestly in your labor hours.
What mistakes cause scratched or damaged countertops during caulk removal?
The most common damage is a metal scraper on a polished stone edge at a steep angle. The corner of the blade catches and leaves a bright scratch. Fix: use plastic scrapers on stone, or if you use metal, keep it nearly flat, under 15 degrees.
Second most common is dragging a sharp utility knife across the countertop surface instead of scoring only in the joint. It happens when people rush the softening step and the caulk is still bonded tight. The knife skips and gouges. Fix: wait the full dwell time on your softener.
Drywall damage comes from scoring too hard on the wall side. Drywall paper tears easily, and a torn face bubbles under new paint. Fix: score once, lightly, and let the softener release the bond.
On laminate countertops and Formica surfaces, acetone or lacquer thinner clouds or softens the laminate. That is irreversible. On butcher block countertops, any solvent that soaks into endgrain needs a longer dry time before re-oiling, so plan an extra day.
Applying new caulk before the joint is fully dry is how you guarantee mold under the bead within weeks. The joint has to be bone dry, more than surface dry.
How do you know if you have silicone, latex, or polyurethane caulk?
Pull a small tab of the caulk away from the surface. Silicone stretches a long way before tearing, sometimes to 200% of its length, and feels rubbery like a rubber band. Latex is stiffer, barely stretches, and crumbles when it is old and fully cured. Siliconized latex sits between the two, with moderate stretch. Polyurethane (less common in kitchens, more in exterior work or tub surrounds) is very firm, almost hard, and tends to skin over brown or tan.
You can also run a quick solvent test: dab a cotton swab of isopropyl alcohol on the caulk surface. If it softens or turns tacky, it has a latex component. If it stays rubbery and untouched, it is pure silicone.
This matters because silicone needs a dedicated silicone remover or acetone for cleanup, while latex breaks down with plain alcohol and water. Use alcohol on silicone and wait for it to release, and you will fight it for an hour before you figure out why nothing is happening.
Most kitchens built after 2000 use 100% silicone or siliconized latex at the countertop-to-backsplash joint. Builders switched to silicone for wet areas because it resists mold better than straight latex. Installation guides from most fabricators specify 100% silicone or a hybrid formula for the countertop-to-wall joint. See our kitchen countertop guides for how installers handle this joint.
Can you caulk over old caulk instead of removing it?
You can, in the sense that the product will go on. The result almost always fails within a season.
New caulk bonds to old caulk at the surface. Old caulk that is cracking, peeling, or moldy is already failing at its bond to the substrate underneath. So your new layer bonds to a failing layer. The whole assembly peels together, usually faster than the original bead did, because the joint is now overfilled and cannot flex.
There is one narrow case where caulk-over-caulk is acceptable: the existing bead is fully bonded, clean, and in good shape, and you only want to refresh the color or fill a surface crack. Even then, scuff the old bead with sandpaper for adhesion and wipe it with isopropyl alcohol first.
Every other time, the 1 to 3 hours of removal work pays for itself several times over in how long the new joint lasts. Surface prep is what separates a joint that holds for a decade from one you redo every two years.
How do you remove caulk from textured tile backsplash or grout lines?
Texture and grout joints trap caulk residue in ways flat stone and laminate do not. The basic process is the same, but the cleanup takes longer.
After pulling the main bead, use a stiff nylon brush (not a wire brush, which pulls grout out) with your solvent and scrub along the grout line and tile texture. Short, firm strokes perpendicular to the grout line beat long strokes running along it. A wooden skewer or bamboo chopstick sharpened to a point gets caulk out of a grout-joint corner with no risk to the tile glaze.
For stubborn silicone buried in grout, let the remover sit a full 30 minutes, cover it with plastic wrap so it does not evaporate, then scrub. Dwell time matters more in textured joints because the solvent has to work into the crevices.
One rule: do not recaulk with grout. The joint between the countertop and the wall should be flexible sealant, not grout. Grout is rigid and cracks there with any movement. The Tile Council of North America addresses this directly in its handbook, calling for flexible sealant at change-of-plane joints, not grout [1]. If a previous installer grouted that joint, clean it out and replace it with caulk.
What should you do after the old caulk is removed to prepare for recaulking?
The prep before the new bead is where most of the durability gets decided.
First, inspect the joint. Look for soft drywall, staining, or dark spots that point to moisture damage. If the paper face of the drywall is compromised, repair it before caulk goes back on. Water damage behind a countertop joint is more common than people expect, especially around kitchen sinks.
Wipe the whole joint with isopropyl alcohol and let it air dry. Then wipe it again. The surface has to be clean of old solvent residue, hand oils, and any caulk fragments. On stone, follow the alcohol wipe with a dry cloth right away, because alcohol can cloud some sealers if it sits.
Tape both sides of the joint with painter's tape before you apply new caulk. It gets a clean line and keeps the bead from smearing on the countertop or wall. Pull the tape while the caulk is still wet, before it skins over.
For the new caulk, 100% silicone is the professional choice for the countertop-to-wall joint in kitchens and bathrooms. It bonds to stone, tile, laminate, and painted drywall, stays flexible indefinitely, and resists mold better than latex. GE Advanced Silicone and DAP Dynaflex Ultra are the two products most commonly specified in the fabrication trade [2][3]. Elastomeric sealants for building joints are covered by ASTM C920, which sets the performance requirements these products test against [9]. On a full countertop installation, this joint is one of the last things done before the job gets signed off.
If you run a shop and use quoting software to price a job that includes removal and recaulk, SlabWise's estimating tools let you add line items for labor tasks like joint prep and caulking, so that work shows up in the quote instead of getting absorbed.
Apply the bead with the gun at a steady 45-degree angle, smooth it with a wet finger or a caulk tool, and pull the tape immediately. Let it hit the full cure time on the label before the joint gets wet. Most silicone products reach full cure in 24 to 48 hours at room temperature [3].
How do you remove caulk without damaging painted drywall?
Drywall is the most fragile surface in this job. The paper face holds it together, and once you tear it, you have a repair.
The wall-side score cut is the high-risk moment. Keep your blade nearly flat and use almost no downward pressure. You are cutting caulk adhesion, not the wall. One pass is enough. If the caulk is well bonded to the drywall, apply softener, wait the full dwell time, and try again rather than forcing the blade deeper.
When you pull the bead off the wall, pull at a very low angle, almost parallel to the surface. Pulling outward at a steep angle is what rips the drywall paper. If a strip pulls but you feel resistance at the wall, stop and cut that section free with the knife instead of yanking.
For residue on painted drywall, use isopropyl alcohol on a rag rather than mineral spirits or acetone, which dissolve latex paint. Dab and lift instead of rubbing, which abrades the paint. If the paint lifted with the caulk in spots, touch it up before the new caulk goes on. Raw drywall paper bonds poorly and lets water in.
When is a failing caulk joint a sign of a bigger problem?
Sometimes a joint fails again and again not because of bad product or bad installation but because of structural movement no caulk can absorb.
Caulk that cracks or pulls away within six months of application means the joint is moving too much. Common causes: a countertop that was not fully supported and flexes under load, seasonal wood movement in a butcher block countertop, a wall with heavy thermal cycling (an exterior wall with poor insulation), or, in rare cases, foundation settlement. Sealant joints have to be designed for the movement they will see, a point NIST building research makes about joint design in general [7]. Recaulking without fixing the movement just buys you another six months of the same result.
Mold that keeps coming back inside the joint even after a clean removal and fresh silicone usually means water is reaching it from another path, not through the joint face. Check the sink seal, check for plumbing drips under the cabinet, and look at the wall above the joint for moisture coming down from a window or roof.
For countertops that have visibly shifted, cracked at a seam, or where the gap to the wall has grown, the underlying issue needs a fabricator or contractor to assess, not fresh caulk. A countertop installation professional can tell you whether the stone has moved off its supports or whether an adhesive seam has let go.
Frequently asked questions
How long does it take to remove old caulk from a countertop?
For a typical kitchen with 8 to 12 linear feet of countertop-to-wall joint, plan 1 to 3 hours including cleanup. A single bathroom vanity is often under an hour. The biggest time variable is how hardened and thick the old bead is. Using a silicone remover and letting it dwell the full 15 to 30 minutes cuts total time compared to scraping without softener.
What is the best tool to remove silicone caulk from a countertop?
A plastic scraper after applying a dedicated silicone remover is the best combination for most surfaces. For a long run of very hard silicone, an oscillating multi-tool with a flat scraper blade is faster and easier on your wrist. On polished stone, tape the countertop edge first and use only plastic or wood tools against the stone surface to prevent scratches.
Can I use WD-40 to remove caulk from a countertop?
WD-40 softens latex-based caulk somewhat and can help with residue, but it leaves an oily film that wrecks new caulk adhesion. If you use it, clean the joint thoroughly afterward with isopropyl alcohol and let it dry completely before recaulking. Purpose-made silicone removers or isopropyl alcohol work better and leave no residue.
How do you remove caulk from granite without scratching it?
Score the bead edges carefully with a utility knife held at a very low angle, apply a non-acidic silicone remover or isopropyl alcohol, wait 20 to 30 minutes, then lift the bead with a plastic scraper. Tape the granite surface along the joint before scoring. Use no metal tools directly on the polished face. Clean residue with mineral spirits, then wipe with isopropyl alcohol.
Is it safe to use a razor blade to remove caulk from a quartz countertop?
A single-edge razor blade held flat, under 10 degrees, is used by fabricators on quartz for residue cleanup. The risk is the angle: tilt it up and the corner scratches the surface. On a quartz countertop with a polished finish, a plastic scraper is safer for most homeowners. Save the razor for the final pass on stubborn silicone film and keep it nearly parallel to the surface.
How do you prevent mold when recaulking a countertop joint?
Remove all old caulk and residue, clean the joint with isopropyl alcohol, and let it dry 24 hours before applying new product. Use 100% silicone or a mold-resistant formula; siliconized latex is acceptable but pure silicone holds up better in wet areas. Silicone caulks with antifungal additives are rated for kitchen and bath use and are available from GE, DAP, and similar brands.
How often should you replace caulk on a countertop?
Most silicone caulk is rated 20 years, but kitchen and bathroom conditions shorten that. Inspect the joint once a year. Replace it when you see cracking, peeling edges, discoloration that does not clean off, or soft spots where the bead has lost adhesion. In practice, heavily used kitchen sinks and bathroom vanities often need recaulking every 5 to 10 years under normal conditions.
Can you use Goo Gone to remove caulk from a countertop?
Goo Gone's original formula is citrus-based (acidic) and should not go on marble, travertine, or limestone, where it etches the surface. Goo Gone makes a specific caulk remover product that is formulated differently. For granite, quartz, tile, and solid surface countertops, their caulk remover works well. Read the label and test in a hidden spot first.
What type of caulk should I use after removing old caulk from a countertop-to-wall joint?
Use 100% silicone or a siliconized latex product rated for kitchen or bath use. Pure silicone stays flexible longest, bonds to stone and tile, and resists mold. GE Advanced Silicone and DAP Dynaflex Ultra are two widely used options in the fabrication trade. Match the color to your grout or countertop edge if appearance matters. Do not use unsanded grout in this joint; it cracks with movement.
Why does my new caulk keep peeling off the countertop?
The usual causes: old caulk residue left on the surface, moisture in the joint when you applied the new bead, or caulking over a failing old layer. New caulk needs a clean, dry, grease-free surface to bond. If the joint flexes more than normal, such as near a heavy appliance or on an unsupported section, the caulk formulation may also be too rigid for the movement.
How do you remove caulk from the countertop-to-backsplash joint on tile?
Score both edges with a utility knife, apply silicone remover, and let it dwell 20 to 30 minutes. Pull the main bead out slowly, then scrub residue from tile texture and grout lines with a stiff nylon brush soaked in your solvent. A wooden skewer works for grout-line corners without scratching tile glaze. Replace this joint with caulk, not grout, since the Tile Council of North America specifies flexible sealant at countertop change-of-plane joints.
Does removing caulk void a countertop warranty?
Generally no, but read your warranty document. Stone slab warranties typically cover material defects, not installation or maintenance. Engineered quartz brands like Cambria publish care guidelines that address caulk maintenance without voiding coverage. Warranties get complicated if water damage occurred behind a failed joint and the manufacturer argues the installation was not maintained. Keep records of your maintenance if you have a premium countertop.
How do professionals remove caulk from countertops?
Fabricators use the same basic method but faster: score with a utility knife or oscillating tool, apply silicone remover, pull the bead, then clean residue with mineral spirits and alcohol. The difference is mostly speed and surface awareness, knowing which solvents are safe for which materials. On high-end stone, some fabricators use a heat gun briefly to soften silicone before scraping, though this risks thermal shock on thin stone sections.
Sources
- Tile Council of North America, TCNA Handbook for Ceramic, Glass, and Stone Tile Installation: Movement joints at countertop-to-wall change-of-plane transitions should be filled with flexible sealant, not grout, per TCNA installation guidelines.
- GE Sealants, GE Advanced Silicone 2 Kitchen & Bath product data: GE Advanced Silicone 2 is rated for kitchen and bath use with documented elongation and flexibility for movement joints.
- DAP Products, DAP Dynaflex Ultra product technical data sheet: DAP Dynaflex Ultra requires 24 to 48 hours cure time at room temperature before water exposure and is rated for kitchen and bath countertop joints.
- U.S. Consumer Product Safety Commission, safety guidance on chemical products: Solvents including acetone and mineral spirits require adequate ventilation and skin protection per CPSC safety guidance.
- EPA, Safer Choice Program ingredient standards: EPA Safer Choice Program evaluates cleaning and solvent product ingredients for safety, relevant to selecting caulk removers in occupied homes.
- OSHA, Hazard Communication Standard (29 CFR 1910.1200): Methylene chloride and other chemical solvents in caulk removers are regulated under OSHA's Hazard Communication Standard, requiring SDS review before use.
- National Institute of Standards and Technology (NIST), building and fire research publications on sealant performance: NIST building research addresses sealant joint design and movement accommodation in construction joints.
- Natural Stone Institute, Natural Stone Care and Maintenance Guidelines: Acid-based cleaners and solvents should not be used on marble, limestone, or travertine surfaces as they cause etching.
- ASTM International, ASTM C920 Standard Specification for Elastomeric Joint Sealants: ASTM C920 covers performance requirements for elastomeric sealants used in building construction joints including countertop applications.
- U.S. Environmental Protection Agency, Indoor Air Quality: Volatile Organic Compounds: Solvents used in caulk removers including acetone and isopropyl alcohol are volatile organic compounds; EPA recommends ventilation when using these products indoors.
Last updated 2026-07-10