TL;DR
- Scribing a countertop to an uneven wall copies the wall's exact shape onto the slab so the back edge hugs every bump and bow.
- You set a compass to the widest gap, run it along the wall, cut the line, and the top sits tight.
- Plan on 20 to 90 minutes depending on the material and how far off the wall runs.
What does it mean to scribe a countertop?
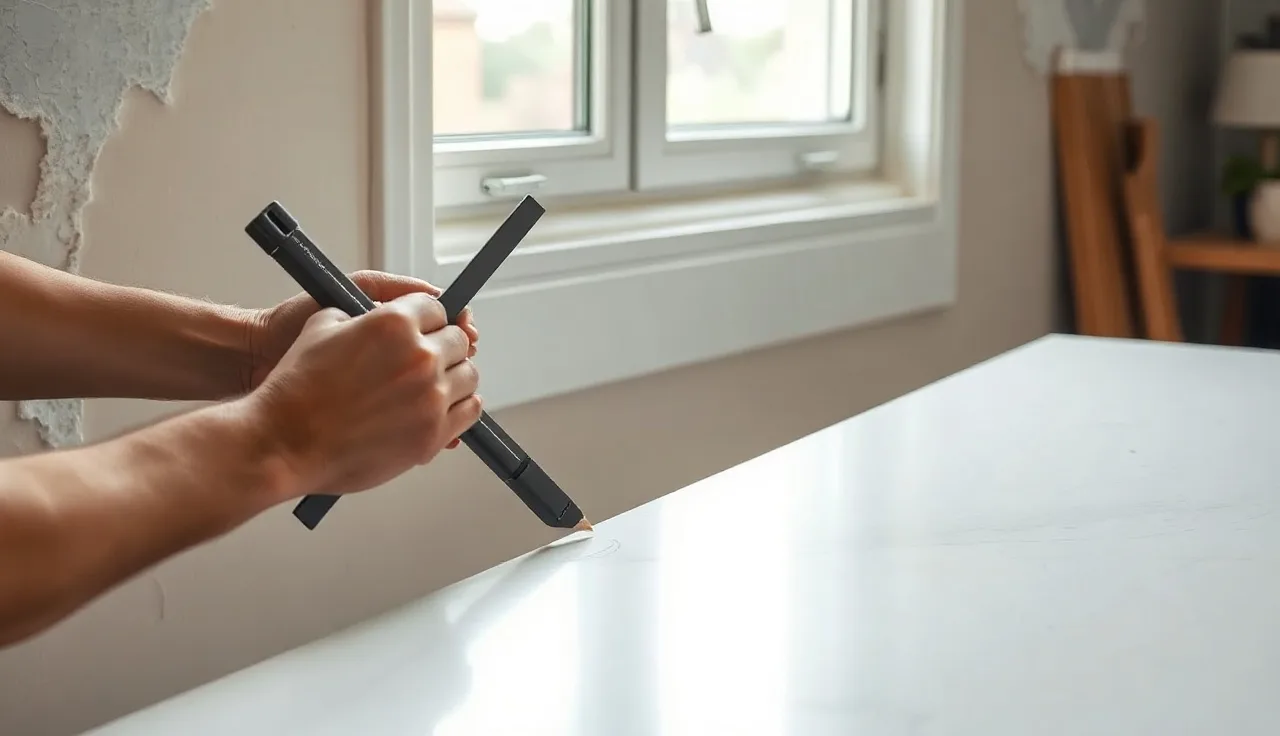
Scribing copies a surface's flaws onto a workpiece so you can trim away exactly enough to make the two meet. For a countertop, that surface is the wall behind it. And that wall is almost never straight or plumb.
Old plaster walls in homes built before 1950 routinely bow and wave by 3/4 inch or more over a 10-foot run [1]. Drywall does better, but perfect it is not. Taped seams add a slight crown, baseboard trim leaves a ledge, and the framing behind it has its own twist. Push a countertop flat against a wall like that and you get gaps, caulk that cracks inside a year, and water sneaking into the substrate.
A scribed back edge fixes all of that. It fits the countertop to the wall as it actually exists, not as the drawings say it should. The line comes out tight, takes almost no caulk, stays watertight, and looks like the stone grew out of the wall.
This matters most on natural stone and quartz. Both are rigid and unforgiving. Laminate and solid surface give a little because they flex, but you still want a clean scribe on anything thicker than 1/2 inch. On laminate countertops and Formica countertops, scribing shows up constantly because the postformed backsplash is molded into the slab and has to sit flush against the wall.
What tools do you need to scribe a countertop to a wall?
You do not need expensive gear. Here is what actually earns its place:
Compass or scribing tool. A basic woodworking compass with a pencil leg is plenty. For stone, some fabricators swap the pencil for a carbide-tipped scribing tool so the mark shows on a polished surface. A cheap hardware-store compass handles laminate and solid surface fine.
Straightedge or level. At least 4 feet long. This finds the high point of the wall, and the high point sets your scribing depth.
Pencil or china marker. Pencil reads on laminate and wood. A china marker (grease pencil) shows on dark stone. On light quartz or marble, a thin mechanical pencil line is usually enough.
Cutting tool matched to the material. Angle grinder with a turbo cup or diamond blade for stone. Jigsaw for laminate and solid surface. Belt sander for cleanup on both. Stone demands diamond tooling, full stop. Laminate cuts clean with a sharp jigsaw blade set to cut on the downstroke, which keeps chipping off the visible face. Solid surface takes a router or belt sander for fine tuning.
Shims. Skipped often, and that is a mistake. You have to level and support the countertop in its final installed position before you scribe. Scribe a top that sits cockeyed and your line is wrong before the blade ever touches it.
Clamps or a helper. The countertop cannot move while you run the tool. Heavy stone holds itself down. Lighter materials need a clamp or a brace against wandering.
How do you measure the gap between the countertop and the wall?
Push the countertop into position and level it. Shim under the cabinet or substrate until a 4-foot level reads flat front-to-back and side-to-side. The top has to sit in its true final position here, not a rough approximation, because everything downstream keys off this.
Now slide a straightedge along the back wall, touching it lightly. Watch where the daylight closes up. The spot where the wall pushes the straightedge away from the countertop's back edge is the high point. That high point decides how far you open your compass.
Measure the widest gap between the back of the countertop and the wall at that high point. If the biggest gap anywhere on the run is 5/8 inch, you set the compass to exactly 5/8 inch. That is your scribing depth.
The classic mistake is measuring at eye level or at one easy spot and assuming the rest matches. Run your hand along the whole length instead. Walls hump in one section, dish in another, and bulge near an outlet box. The maximum gap wins, always. Set the compass to anything less and you will not remove enough material, so the top still binds at the high point.
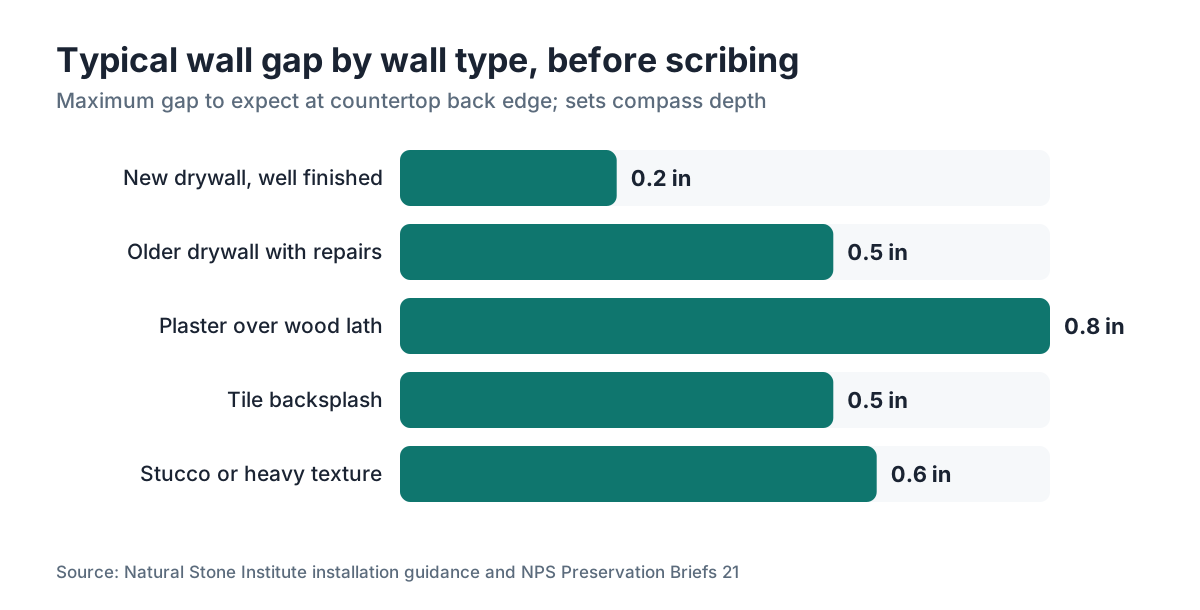
Practical ranges to expect:
| Wall type | Typical max gap |
|---|---|
| New drywall, well finished | 1/8 to 3/8 inch |
| Older drywall with many repairs | 3/8 to 5/8 inch |
| Plaster over wood lath | 1/2 to 1 inch |
| Tile backsplash or thick stone tile | 1/4 to 3/4 inch |
| Stucco or textured wall | 3/8 to 3/4 inch |
How do you set and run a scribing compass?
Open the compass to the exact gap you measured. Lock the screw if your compass has one. If it does not, guard against nudging it out of set.
Keep the metal leg pinned against the wall the whole way. The pencil leg traces onto the back edge of the countertop. Hold steady, even pressure on the wall leg so it follows every dip and rise. Move slow, maybe 2 to 3 inches a second. Rush it and the point skips out of the shallow recesses, and the line misses them.
Hold the compass perpendicular to the wall face, never tilted forward or back. Any tilt bakes error into the line. At corners and inside curves, stop, reset your grip, and keep going. The line you draw is the cut line.
On stone, that china marker line has to read clearly. A trick worth using: wrap low-tack tape along the back edge first and scribe onto the tape. You get a cleaner surface to mark and the line does not vanish into the texture of the stone.
Run longer than 8 feet? Step back and look at the line before you cut. It should mirror the wave of the wall. If it looks too uniform, or shows a flat stretch where you know the wall bows, run that section again. Trust the line only when it matches what you saw at the tape measure.
How do you cut the scribed line on different countertop materials?
The cut is where material choice changes everything.
Laminate and postformed countertops. A jigsaw with a fine-tooth blade (10 to 12 TPI) set to cut on the downstroke keeps chipping off the visible face. Clamp a straightedge as a guide for straight runs. On curves, freehand along the line slowly. A belt sander with 80-grit paper cleans the edge and lets you sneak up on the fit by testing and sanding in passes.
Solid surface (Corian and similar). A router with a straight bit gives the cleanest cut, guided along the scribe line. Solid surface belt-sands well too because it does not chip. This is a forgiving material: shave a little, test, shave more. Corian countertops scribe nicely because the material is homogeneous, so a sanded edge looks clean [8].
Quartz and natural stone (granite, quartzite, marble). Here the tooling matters. An angle grinder with a 4-inch turbo cup wheel takes material off fast. For a cleaner final edge, follow with a polishing pad sequence. Many fabricators rough the scribe with a 4-inch continuous rim blade, then polish the edge back to match the original finish. Remove material in small passes, test the fit often, and never try to hit the line in one aggressive grind. Granite countertops punish overshoot: you cannot glue stone back on.
Butcher block. A jigsaw or circular saw, then a hand plane for the final fit. Hand planing a butcher block scribe is a pleasure because you take off a hair at a time. Butcher block countertops also clean up well with a belt sander on the last pass.
How do you test the fit and make adjustments?
After the first cut, slide the countertop back into position and check the back edge against the wall. Look for light gaps. Run a stiff card, a business card works, along the joint. It should not slip in anywhere.
Mark any high spots on the countertop edge with a pencil while the top is in position. Pull it out and remove material only at those marks. Test again. Repeat.
This is slow, and slow is the only reliable way. Nailing it in one cut almost never happens on a real wall. Expect two or three test-fit cycles on a moderately wavy wall, four or five on a badly out-of-plumb plaster wall.
With stone, keep the top on a padded surface or rolling carts while you adjust so you do not chip an edge. Moving heavy stone over and over is the part that wears you out, and a second set of hands helps more than anything.
Once the fit is tight, dry-fit the whole countertop one last time. Check level. Check overhang at the front. Check that any seams line up. Only when all of that reads right do you move to adhesive or fasteners.
What about corners and inside angles?
Inside corners are the hardest part of any scribe. The wall meets itself near 90 degrees, and both faces of that corner can be wavy at the same time.
Scribe one wall at a time. Do the longer wall first. After you cut and fit it, push the countertop into final position against that wall, then scribe the adjacent one. Sequencing it this way matters because the two walls' irregularities compound each other. Try to solve both at once on the first scribe and you tend to land close but not quite right on either face.
For inside corner scribes on stone, some fabricators undercut the back face of the slab at roughly 15 degrees, a back bevel. Only the very front edge of the stone touches the wall, so the visible joint stays tight even where the wall has texture or a slight wave. On laminate and solid surface, a slight back bevel is standard for the same reason [8].
Pre-built corner blocks in a kitchen add a wrinkle because two walls may not sit square to each other. Measure the actual corner angle with a digital protractor or corner angle finder before you cut. A 1 or 2 degree deviation from square is common. It matters a lot for miter joints at countertop seams, but for scribing the back edge it mostly changes how much you relieve the corner of the top itself.
How much material can you actually scribe away?
There is a real limit here, and homeowners rarely think about it. Scribing takes material off the back edge of the countertop. How much you can safely remove depends on how much top is left to rest on the cabinet.
On a standard top with a 3/4-inch or thicker build-up at the back edge, removing up to 1 inch is generally safe across most materials. Go past that and you start eating into the structural back support and the build-up strip if there is one. Most installations carry 1.5 to 2 inches of back overhang onto the cabinet or substrate, and that is your working budget.
Natural stone adds a second limit: thin sections crack. If the scribe brings the back edge of a 3/4-inch slab down to less than about 3/8 inch of stone, the odds of cracking during install or under thermal stress climb fast [4][10]. The Natural Stone Institute flags thin cut edges as a fracture risk for exactly this reason. In that situation, shim or build out the wall instead of grinding more stone away.
For gaps over 1 inch, fix the wall first. Add a furring strip, skim-coat the low area, or sister a stud. Scribing handles the normal slop of construction. It is not a cure for a wall that runs badly out of plumb across a large section.
Shops that run a lot of countertop installation work know this threshold cold. Fabrication software like SlabWise lets shops flag templated pieces with large scribe requirements so the fabricator sees them before cutting, not after.
Do you need to caulk a scribed joint?
Yes, almost always. Even a perfect scribe is not a watertight seal by itself. The top moves a little over time with temperature and humidity, and any gap that opens lets moisture in.
For stone and quartz, run a color-matched silicone caulk in a narrow bead along the back joint after the top is set. Tool it flush with a wet finger or a caulk tool. Silicone is the right pick, not latex painter's caulk, because it stays flexible and does not crack when the top shifts. It also holds up to the wet zone around a kitchen sink. The National Kitchen and Bath Association recommends silicone over latex at countertop-to-wall joints for exactly that flexibility and moisture resistance [9].
For laminate with a postformed backsplash, a thin bead of silicone where the backsplash cap meets the wall is standard. Some installers also run a bead along the bottom of the backsplash where it meets the countertop surface.
For butcher block, use clear silicone and keep it minimal. Wood needs to breathe and move with the seasons, and an over-caulked joint can crack the board when it cannot expand [11].
A well-scribed joint takes maybe 1/16 inch of caulk or less. A sloppy scribe needs 3/8 inch of caulk that cracks within a year. The bead is a finish detail, not a gap filler.
When should a homeowner call a professional instead of scribing themselves?
Scribing laminate is a reasonable DIY job for anyone comfortable with a jigsaw and patient about test-fitting. The material is cheap enough that a mistake does not hurt much, and solid surface is even more forgiving.
Natural stone and quartz are another story. A $3,000 granite slab cracked during an amateur scribe is not a recoverable mistake. Tooling alone (angle grinder, diamond cup wheels, polishing pads) runs $150 to $400 for a single job, and the feel for how the material takes to the grinder comes from repetition. That is hard to pick up from a YouTube video. Wear eye and hearing protection any time you run a grinder or saw on stone; OSHA requires appropriate PPE for these tools under 29 CFR 1926.300 [7].
Call a pro for stone or quartz scribing, for any gap over 3/4 inch (the wall probably needs remediation first), for inside-corner scribes on stone, and for any run longer than 8 feet where error compounds.
For marble countertops, even pros go slow because marble is brittle and polished edges are hard to refinish in the field. Some fabricators will not scribe marble at all and prescribe wall correction instead.
If you are a homeowner collecting bids, ask each fabricator how they handle scribe allowances. Some fold it into their standard template and cut. Others charge $50 to $150 per linear foot of scribe as an add-on. The answer tells you a lot about how thorough the shop is before you sign anything.
How does wall correction compare to scribing as a solution?
Scribing and wall correction are not rivals. They handle different gap sizes.
For gaps up to about 3/4 inch, scribing is faster and cheaper. The fabricator templates the wall, builds the scribe into the cut file, and the slab fits. No drywall work, no extra trades, no waiting on compound to dry.
For gaps over 3/4 inch, or walls that run dramatically out of plumb over their full height, fixing the wall is usually the right call. A drywall skim coat over a 1-inch wave runs roughly $3 to $8 per square foot for a skilled drywaller [2]. A furring strip costs even less. Either one gets the wall flat enough that a standard scribe mops up the rest.
There is a third path that gets less airtime: build the scribe into the countertop template at the shop. The fabricator scribes the template on site, then embeds the scribe allowance in the digital cut file before the CNC ever touches the slab. This is how modern shops handle it when templating with a laser or digital templating device. The digital template captures the wall's exact shape, the cut file carries the scribe, and the slab shows up already cut to fit. SlabWise and similar tools support this, letting shops embed scribe lines right in the piece geometry instead of leaving it as a field adjustment.
Most kitchens want a mix: fix anything over 3/4 inch with drywall work, then scribe the leftover variation at installation.
What are the most common scribing mistakes and how do you avoid them?
The list is short. Each one is common enough to name out loud.
Not leveling before scribing. If the top is not shimmed level and in its final spot when you run the compass, the line is wrong. Every experienced installer has done this once. After that, leveling first becomes reflex.
Using the average gap instead of the maximum. Set the compass to the widest gap you find anywhere on the run. A smaller number leaves the top binding at the high point after you cut.
Moving the compass too fast. A fast stroke drags the point off the wall in shallow recesses, so the line skips those spots. The cut top then will not sit down in those areas.
Angling the compass. Tilt it forward or back and you add systematic error to the whole line. Keep it perpendicular to the wall face start to finish.
Cutting the full scribe in one pass. On stone especially, aggressive removal overshoots the line. Take 75 percent off on the first cut, test the fit, and creep up on the line from there.
Forgetting to back-bevel. A square-cut back edge snags on every wall irregularity. A slight back bevel (10 to 15 degrees away from the face) means only the front of the edge touches the wall, so the visible joint stays clean.
Not marking the final position. Before you pull the top for the final cut, mark its position on the cabinet with tape or pencil so it drops back into the exact same spot. Set it an inch off during test fits and you introduce error you cannot see.
Frequently asked questions
What is the easiest way to scribe a countertop for a beginner?
Use laminate or solid surface, not stone. Set a compass to the widest gap, run it slowly along the wall in one steady pass, and cut with a jigsaw. Follow up with a belt sander to sneak up on the fit, testing after each pass. Expect three or four cycles. The process is slow but not technically hard on those materials.
Can you scribe a granite or quartz countertop yourself?
Technically yes, but the tooling and skill make it risky for most homeowners. You need an angle grinder with diamond cup wheels, comfort working close to a polished edge, and patience for slow iterative passes. A mistake on a $2,000 to $5,000 slab is not recoverable. Most fabricators charge $50 to $150 per linear foot for in-shop or field scribing, which is money well spent on stone.
How much does professional countertop scribing cost?
Fabricators usually include minor scribing (under 3/8 inch) in the standard installation price. Larger scribes that need real material removal or field grinding get charged as an add-on, running $50 to $150 per linear foot depending on material and gap size. Always ask before signing whether scribe allowances are included or billed separately.
How do you scribe a countertop to a tile backsplash?
Same technique as drywall, but tile has sharper high points at grout lines and tile edges. Set the compass to the full gap including any grout-line protrusion. After cutting, the edge follows the tile face closely. Use a narrower silicone bead than usual since grout already provides some seal. Back-bevel the edge slightly so tile texture does not hang up the top during installation.
What is scribe allowance and how does it affect my countertop template?
Scribe allowance is extra material left on the back edge at the template stage so the fabricator has stock to remove when fitting to the wall. A typical allowance is 1/4 to 1/2 inch. Digital templating devices capture the wall's shape and embed the required scribe directly in the cut file, so the slab arrives already shaped to the wall's profile with no field grinding needed.
How do you know if your wall needs to be fixed before scribing?
Hold a 4-foot level or straightedge against the wall horizontally and measure the gap at the worst point. If it is over 3/4 inch anywhere, scribing alone risks removing too much from the back edge. In that case, skim-coat the low area or add a furring strip first to flatten the wall enough for a standard scribe. Gaps under 3/4 inch generally scribe without wall prep.
Can you use a router instead of a compass to scribe a countertop?
Yes, on solid surface and laminate. A router guided by a template or a flush-trim bit removes material precisely. Some installers use a router with a scribing jig that rides against the wall and cuts the edge in a single powered pass, like a compass but motorized. For stone, a router is not practical; an angle grinder with diamond tooling is the standard.
How do you scribe an L-shaped or U-shaped countertop run?
Handle each wall segment separately. Scribe and fit the longer run first, then the adjacent wall. Inside corners need care: scribe one wall face, test fit, then scribe the perpendicular wall. Use a digital angle finder to measure the actual corner angle, because it is rarely exactly 90 degrees. If you have seams at the corners, fit the scribes before cutting any corner miters.
What type of caulk should you use on a scribed countertop joint?
Use 100 percent silicone, color-matched to the countertop or wall. Silicone stays flexible as the top moves seasonally and does not crack the way latex caulk does. Apply a thin bead (1/16 to 1/8 inch is ideal on a well-scribed joint) and tool it flush. On butcher block, keep the bead minimal so the wood can move without cracking.
How is digital templating different from traditional scribing?
Traditional scribing is a field adjustment done after the top is cut to a nominal dimension. Digital templating (laser or photogrammetry devices) captures the wall's actual shape before cutting. The scribe gets built into the cut file at the shop, so the CNC cuts the slab to the wall's exact profile. The slab arrives on site already fit, with little or no field adjustment needed.
Does scribing affect the countertop warranty?
For manufactured materials like quartz and solid surface, scribing by a certified installer usually does not void the warranty, but field modifications by non-certified parties sometimes do. Check the manufacturer's installation guidelines before doing your own field scribing on a warranted material. Quartz brands like Cambria specify installer certification requirements in their warranty documentation [5].
How do you scribe a countertop to a brick or stone wall?
Brick and stone walls have extreme irregularity, with mortar joints cutting sharp recesses. Set the compass to the widest gap, often 1/2 to 1 inch on brick. The line comes out complex and wavy. Cut conservatively and test fit often. Many fabricators back-bevel the edge aggressively (20 to 25 degrees) so only the face contacts the brick, then seal the visible joint with a wider silicone bead.
Sources
- National Park Service Preservation Briefs 21: Repairing Historic Flat Plaster Walls and Ceilings: Old plaster walls in pre-1950 homes routinely deviate significantly from flat due to lath shrinkage and settling, with surface variations of 1/2 inch or more common over long runs.
- HomeAdvisor (Angi) Drywall Repair Cost Guide: Skim-coating a wall to flatten it typically costs $3 to $8 per square foot for professional drywall work.
- U.S. Department of Housing and Urban Development: Residential Construction Quality Standards: HUD residential construction guidelines acknowledge wall flatness tolerances that can allow up to 1/4 inch deviation over 8 feet in standard drywall construction.
- Natural Stone Institute: Dimension Stone Design Manual and Installation Guidelines: Natural Stone Institute installation guidance specifies minimum material thickness requirements at cut edges to prevent cracking, noting that sections thinner than 3/8 inch are at elevated fracture risk.
- Cambria Surfaces: Warranty and Installation Requirements: Cambria requires installer certification for warranty coverage, meaning field modifications by uncertified parties can affect warranty status.
- OSHA: Hand and Power Tool Safety, 29 CFR 1926.300: OSHA regulations require appropriate PPE including eye protection and hearing protection when operating angle grinders and power saws, applicable to stone scribing operations.
- DuPont Corian Installation Guide: DuPont's Corian installation documentation states that solid surface materials can be field-modified with routers, sanders, and jigsaws by certified installers, and that scribed back edges should be slightly back-beveled for best wall contact.
- National Kitchen and Bath Association: Installation Standards: NKBA installation standards recommend silicone sealant (not latex caulk) at countertop-to-wall joints due to silicone's flexibility and moisture resistance.
- U.S. Geological Survey: Properties of Granite and Natural Stone: USGS documentation on granite physical properties notes that granitic stones have low tensile strength relative to compressive strength, making thin sections at cut edges susceptible to fracture under installation stress.
- USDA Forest Products Laboratory: Wood Handbook, Chapter 4, Moisture Relations of Wood: USDA Forest Products Laboratory documents that hardwoods used in butcher block countertops expand and contract seasonally, requiring flexible sealing methods that allow movement.
- ASTM International: C920 Standard Specification for Elastomeric Joint Sealants: ASTM C920 is the standard specification that governs silicone and other elastomeric caulks, requiring minimum elongation and adhesion properties relevant to countertop joint sealing.
Last updated 2026-07-10