TL;DR
- A knee wall countertop is a slab of stone, quartz, or solid surface that caps a short half-wall (usually 36 to 42 inches tall) used as a room divider, bar ledge, or breakfast bar.
- It overhangs one or both sides with no cabinet support beneath, which makes templating and structural planning different from a standard countertop run.
What exactly is a knee wall countertop?
A knee wall is a short partition wall, usually somewhere between 36 and 48 inches tall, that divides two spaces without fully separating them. You see them most often between a kitchen and a dining area, at the edge of an open-plan living room, or along the back side of a peninsula where there are no base cabinets on the room-facing side. The countertop that sits on top of that wall is called a knee wall countertop.
The defining feature is what's underneath: nothing useful on at least one side. Standard countertops rest on a continuous run of cabinets. A knee wall countertop may rest on cabinets on the kitchen side and hang over open air on the seating side, or it may cap a wall that has no cabinets at all, sitting entirely on a framed partition. That overhang is where all the interesting engineering and templating problems live.
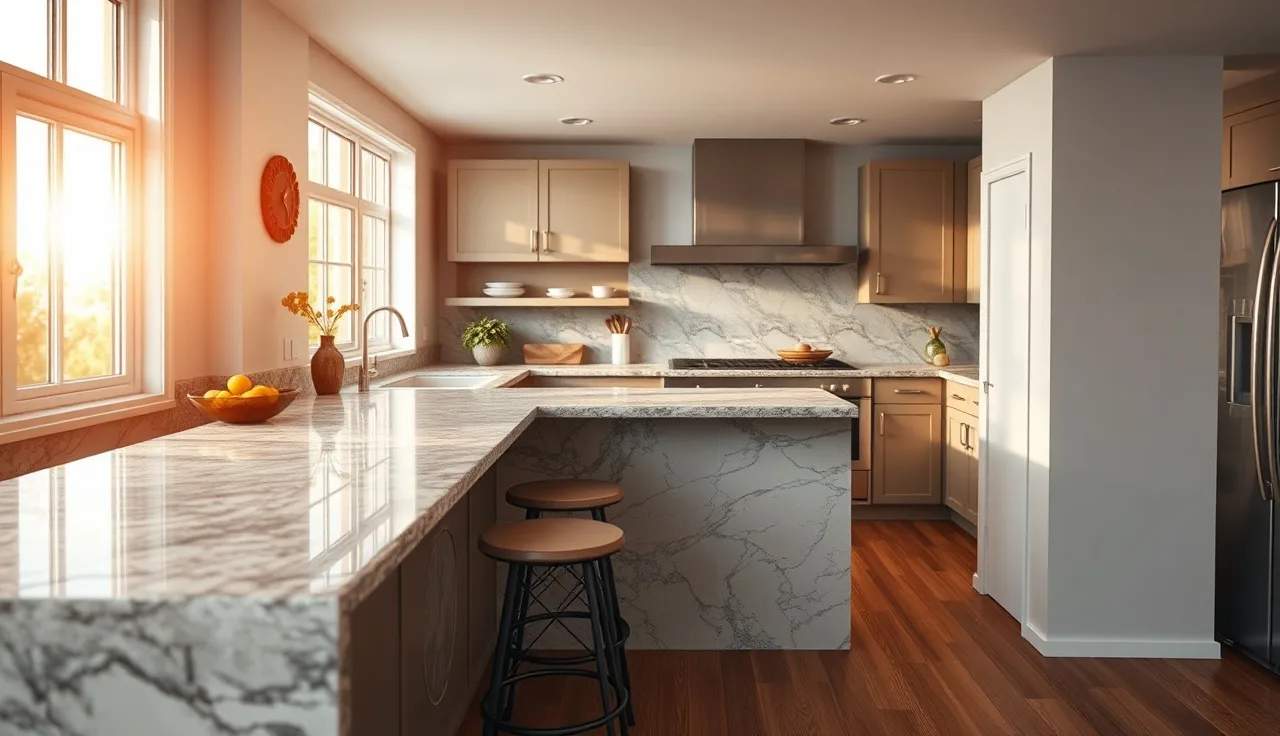
Knee wall countertops are popular because they create casual seating without closing off a kitchen. They also define traffic flow in open-plan homes. The countertop itself often does double duty as a visual anchor, which is why people frequently pick a material with presence, like a thick granite countertop or a dramatic marble countertop, even when the rest of the kitchen uses something plainer.
Don't confuse a knee wall countertop with a peninsula countertop. A peninsula attaches at one end to a full cabinet run and has base cabinets on at least the main working side. A knee wall countertop often has no cabinets at all, or cabinets on only one face, and the wall itself carries the load.
How is a knee wall countertop different from a regular countertop?
The structural difference is the one that matters most. A standard countertop has a cabinet box under nearly every inch of it. Cabinets give continuous support, so cantilevers stay short (usually the 1.5-inch overhang at the front of a base cabinet). A knee wall countertop often cantilevers 10, 12, or even 15 inches over open space where stools sit.
That changes how you spec the whole job. Natural stone, especially granite and marble, fails in tension. A slab hanging unsupported over a long span will eventually crack at the point of maximum bending stress, which sits right where the edge of the wall is below. The longer the overhang and the harder someone leans on the end, the higher the risk. The Marble Institute of America (now part of the Natural Stone Institute) published guidance [1] saying unsupported overhangs in natural stone should generally not exceed one-third of the total slab depth without added structural support.
The second difference is visual exposure. On a standard countertop, the front edge is the only finished edge most people ever look at. On a knee wall countertop, the room-facing long edge and both short ends may be fully visible from the seating side. So you're often pricing two, three, or even four finished edges, and the profile choice matters a lot.
Material choices shift too. Butcher block countertops and laminate countertops weigh less per square foot than stone and handle overhangs more forgivingly, because wood and laminate substrates have tensile strength stone lacks. Some fabricators steer customers toward engineered quartz for knee walls because the manufacturing process produces a slab with more consistent properties than natural stone, which cuts (though doesn't erase) the overhang risk.
How much overhang can a knee wall countertop have?
This is the question fabricators get wrong most often, and the answer depends on the material.
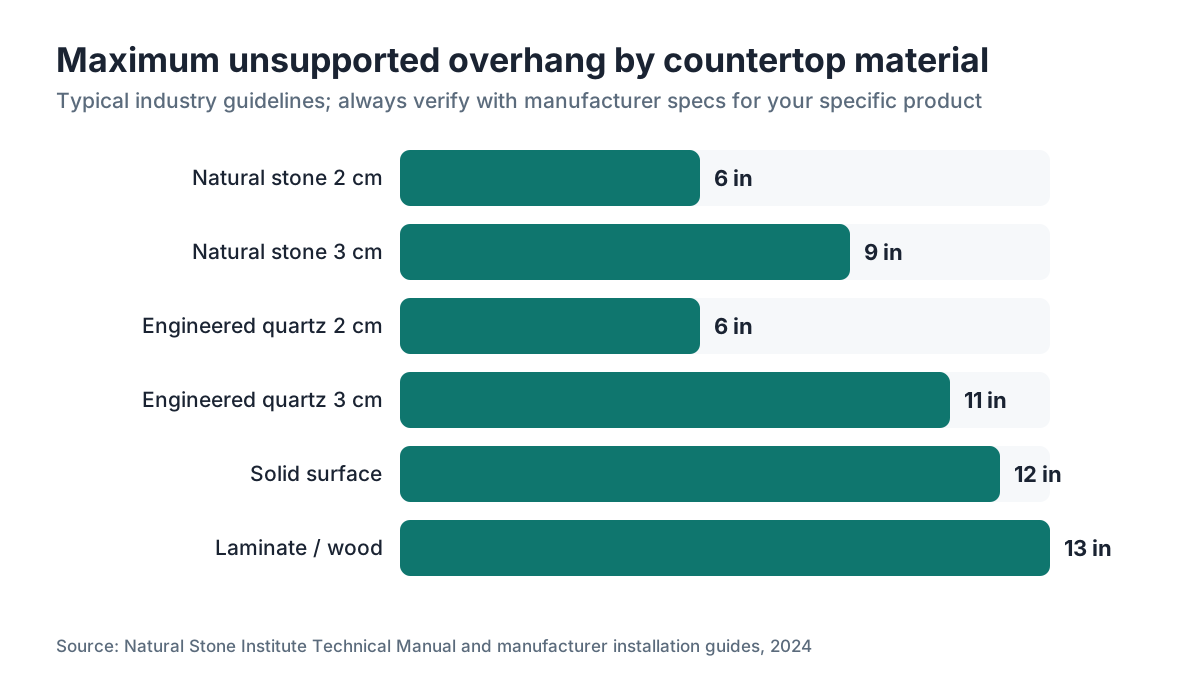
For natural stone (granite, marble, quartzite, soapstone), the widely cited rule is that the unsupported overhang should not exceed one-third of the total width of the countertop measured from the back wall to the front edge. So if your knee wall countertop is 24 inches deep, the maximum unsupported overhang is roughly 8 inches. Beyond that, you need steel support brackets, corbels, or a steel rod embedded in the slab. The Natural Stone Institute's fabrication guidelines [1] are the primary industry reference here, though individual fabricators use different thresholds depending on slab thickness, edge treatments, and material density.
For engineered quartz and solid surface materials like Corian countertops, manufacturers publish their own overhang tables. Cambria, for example, publishes installation guidance [2] that sets maximum unsupported overhangs by thickness; 3/4-inch (2 cm) slabs typically max out at 6 inches unsupported, while 1.25-inch (3 cm) slabs allow up to 10 or 11 inches in some configurations. Always pull the current spec sheet for the exact brand and thickness you're installing.
For wood and laminate products, grain direction and substrate construction matter more than any single number. A properly built butcher block or MDF-substrate laminate can handle 12-inch overhangs without brackets in many situations, but confirm it with the manufacturer.
When the design calls for a seating overhang of 12 to 15 inches (standard bar-stool depth), most fabricators add steel or iron support brackets anchored into the wall framing. Those brackets need to hit studs or mount to a properly sized ledger. If the knee wall is CMU (concrete block) or steel stud framing, the anchor strategy changes, and the GC or structural engineer should weigh in before the countertop goes in.
| Material | Max unsupported overhang (typical) | Notes |
|---|---|---|
| Natural stone 2 cm | 6 inches | Corbels or brackets beyond this |
| Natural stone 3 cm | 8-10 inches | Still check 1/3-of-depth rule |
| Engineered quartz 2 cm | 6 inches | Follow manufacturer's table |
| Engineered quartz 3 cm | 10-12 inches | Varies by brand |
| Laminate / solid surface | 10-12 inches | Substrate and edge banding matter |
| Butcher block | 12-15 inches | Grain direction, check with supplier |
What materials work best for a knee wall countertop?
There's no single right answer, but the constraints of the application do narrow the field.
Thick 3 cm natural stone is the most common choice in residential kitchens. It handles reasonable overhangs, looks substantial from the seating side (where you're staring at the edge), and holds up to daily contact without a protective finish. Granite is probably the most practical of the natural stones for a knee wall because it's harder than marble and less reactive than limestone. If the look calls for something softer, a quartzite with a leathered finish works well and hides contact marks better than a polished surface.
Engineered quartz is a strong runner-up. It's more dimensionally consistent than natural stone, which matters for long overhangs where subtle warping could stress the slab. Brands like Cambria countertops come with detailed installation specs and warranty support, which makes them easier to stand behind if a customer calls with a crack two years later.
Laminate and Formica countertops are genuinely underrated for knee walls in basement bars, mudrooms, and secondary spaces. They're light, easy to cut in the field, and a fraction of the cost of stone. The weak spot is edge durability: the exposed long edge on the seating side takes constant abuse from rings, keys, and bag straps. A post-formed or built-up edge with solid surface trim handles this better than a raw laminate edge.
For a real bar setup (wet, commercial, or semi-commercial), solid surface like Corian works well because you can make the sink bowl and the countertop a single piece, no seam to leak. Solid surface also allows truly custom edge profiles and shapes without the brittle failure risk of stone.
One material that struggles here is ultra-thin 1.2 cm stone or porcelain. The lower slab mass means the bending strength drops off hard. You can use it for knee walls, but it needs a full continuous substrate beneath it, which adds cost and complexity.
How do fabricators template a knee wall countertop?
Templating a knee wall countertop takes more work than a standard run because you have more exposed edges, overhang decisions to lock in, and no cabinet boxes to register against.
The two main approaches are digital templating with a laser device (brands like Prodim Proliner are common in fabrication shops) and physical templating with luan or hardboard strips. Most experienced fabricators use digital for accuracy, especially on curved or angled knee walls. Physical templating is still common in smaller shops and can be just as accurate when done carefully.
Here's how a physical template usually goes on a knee wall job:
-
Confirm the wall is plumb and the top is level. Almost no residential knee wall is perfectly level across its full length, so you need to find the high point and work from there. Use a 4-foot or 6-foot level, not a torpedo level, because short levels miss long-span sags.
-
Snap a reference line on the wall top at the finished depth you want. If the kitchen side needs to be flush with the cabinet face frame, measure out from the cabinet and mark it. If the wall has no cabinets, you're setting depth based on looks and the overhang spec.
-
Build the template in sections using 2-inch-wide luan strips taped and hot-glued together. Register the back edge of the template against the wall or whatever the countertop will sit against. Mark the overhang line clearly, labeled with the actual measurement.
-
Template every end condition on its own. A knee wall often has a butt joint at one end where it meets a full-height wall and an exposed return on the other. Both ends need exact measurements, and you need to mark which edges get finished profiles and which get a raw (hidden) edge.
-
Mark the face side on the template before you pull it off the wall. It sounds obvious, but flipping a template is a fast way to produce a mirror-image countertop that doesn't fit.
-
Note the support bracket locations on the template if steel corbels are going in. The fabricator needs to know where the brackets land, so they can rout relief pockets in the underside of the stone if needed, or at least confirm the stone clears the bracket hardware.
Digital templating collapses most of these steps into a single scanning session, but the judgment calls, especially around overhang depth, bracket placement, and end conditions, stay the same. The digital device just captures them faster and with fewer transcription errors.
Shops that handle a lot of knee wall work often build a knee-wall checklist into their templating workflow. If you're quoting and managing these jobs at volume, software like SlabWise can capture overhang dimensions, support conditions, and edge counts as structured job data rather than notes on a paper template bag, which cuts the chance of a fabrication error when the template gets handed off from the templater to the saw operator.
What measurements do you need before templating a knee wall?
Before the templater shows up, get these numbers confirmed:
Wall length (the full run the countertop will cover), wall width (how thick the wall is at the top, which sets the minimum countertop depth), finished countertop depth (wall width plus any overhang on either side), overhang depth on the seating side, overhang depth on the kitchen side if any, and finished height of the top of the wall.
Also confirm: is the wall framed and drywalled already, or is it still open? Stone should never be templated on a wall that hasn't been finished to its final state. Drywall adds about 5/8 inch to a wall face; if the templater measures before drywall goes on, the finished dimensions will be off.
Is there electrical in the knee wall? Outlets on the knee wall face are common (handy for charging phones at a breakfast bar). The electrician needs the boxes set before templating so the fabricator can note any required cutouts on the underside or face of the countertop.
Are the support brackets already installed? Ideally yes, so the templater can verify they're level, at the right height, and hitting solid framing. A bracket that's 1/4 inch too tall will force the stone up and open a gap at the wall side. Catch that before the slab is cut, not after.
How do you support a knee wall countertop overhang?
Steel corbels or brackets are the standard solution when the overhang exceeds what the stone can carry on its own. Most fabricators recommend them any time the seating overhang is 10 inches or more in stone, regardless of slab thickness.
Good brackets are made from 3/8-inch or 1/2-inch steel plate, either welded or bought from a specialty bracket company. The bracket mounts to the framing inside the knee wall through the finished drywall surface, so you need to hit studs (typically 16 inches on center in residential construction) [3] or install blocking between studs before drywalling. A bracket that's only screwed into drywall will pull out under the kind of repeated lateral load a barstool generates.
Bracket spacing depends on slab weight and overhang length, but a common rule of thumb is one bracket every 24 to 36 inches of run. Heavier stone (granite runs about 18 to 20 pounds per square foot at 3 cm thickness) [4] needs closer spacing than lighter materials.
Wood corbels are an option too, and they look great under a chunky wood or farmhouse aesthetic. The engineering is the same: the corbel has to transfer load to the wall framing, not to drywall. Decorative corbels that are only nailed to a wall face are a problem waiting to happen.
For very long overhangs (over 15 inches), some fabricators embed steel rods or flat bar into the underside of the slab during fabrication. This is a specialized technique and adds cost, but it can give enough tensile reinforcement to allow seating overhangs of 18 inches or more with no visible bracket hardware.
How much does a knee wall countertop cost?
A knee wall countertop costs more per square foot than a simple straight run of the same material, for a few predictable reasons: more finished edges, more complex templating, and often a need for support hardware.
For natural stone in a typical residential market as of 2025, you're looking at roughly $80 to $200 per square foot installed for granite or quartzite, with knee wall jobs trending toward the upper half of that range because of edge work. Marble countertops add another $20 to $50 per square foot on average. Engineered quartz falls in a similar range, $70 to $180 installed, depending on brand and market.
Laminate countertops and Formica countertops run $20 to $50 per square foot installed for a simple knee wall, though complex end treatments and multiple finished edges push that up.
Separate cost factors specific to knee wall jobs:
- Edge finishing: a standard 6-foot knee wall with an exposed seating edge and two exposed ends might have 10 or more linear feet of finished edge. At $10 to $30 per linear foot for a standard eased or beveled profile, that's $100 to $300 added to the job, just for edges.
- Support brackets: plan on $40 to $150 per bracket, installed, depending on material and complexity. A typical 6-foot run might need two or three brackets.
- Templating: some shops charge a flat templating fee ($150 to $350 is common), others fold it into the square footage price. Knee wall jobs sometimes carry an added charge because they take longer to template accurately.
The total for a 6-foot knee wall countertop in 3 cm granite, with a 12-inch seating overhang, two end caps, steel bracket support, and templating, often lands between $1,200 and $2,500 installed in mid-range markets. High-end stone and premium markets push well past that.
What edge profiles work best on a knee wall countertop?
Because the seating edge is front and center, edge choice matters more here than on most countertops. A few things to think about:
A bullnose or eased edge is the safe default. It's comfortable for someone sitting at the counter (no sharp corners at arm level), easy to fabricate, and looks clean. A simple eased edge is often the most practical choice because the 90-degree top corner is softened just enough to not be uncomfortable, but the profile doesn't add much machining time or cost.
A waterfall or stacked-stone edge, where the countertop wraps vertically down the end of the knee wall, is popular in contemporary kitchens. That vertical piece of stone is called a waterfall return or an end panel. It's expensive (you're adding another slab piece), needs a precise miter joint, and complicates templating a lot. If you want this look, budget for it early, because adding it after the countertop is templated is a headache.
A thick laminated edge (two pieces of stone stacked to create a 3-inch or 4-inch visual thickness) adds presence on the seating side without a full waterfall. It adds weight and cost, but less than a full end panel.
For softer-look kitchens, an ogee or dupont edge profile adds ornament. The tradeoff is that fancy profiles chip more easily in stone, and the seating side of a knee wall takes more contact than most countertop edges.
Round or beveled mitered corners on the exposed ends of the knee wall are worth doing. A sharp square corner at standing-bump height is a safety issue, especially with children in the home.
What are common mistakes when templating or installing a knee wall countertop?
Templating the wall before it's fully finished is probably the most common error. Drywall, tile, or casing that goes on after the template was pulled will shift the fit, sometimes by more than the tolerances the fabricator left.
Not checking level across the full run is a close second. Fabricators set a reveal height (how far the countertop sits above the finished wall) and they need the highest point of the wall to set it. Measure one end of a 10-foot knee wall, find it's the low spot, and the countertop will appear to float above the wall at the high end.
Forgetting to account for corner geometry is surprisingly common on angled or L-shaped knee walls. When a knee wall turns a corner, the inside miter angle is everything. If the wall isn't exactly 90 degrees (and it often isn't), a 45-degree miter won't fit. Digital templating catches this automatically; physical templating needs careful angle measurement with a bevel square or digital angle finder.
Underestimating edge work in the quote is a fabricator-side problem that homeowners feel in the final invoice. Count every finished linear foot before you price the job. A knee wall has at least three exposed edges (front long edge, two ends); a freestanding knee wall has four.
Skipping the structural bracket conversation until after installation is a bad outcome for everyone. The homeowner wonders why there are metal brackets visible under their beautiful stone, the fabricator didn't plan for relief pockets, and the brackets may not even be at the right height. Nail this down at the design and measurement stage.
Can you DIY template a knee wall countertop?
You can build a physical template yourself if you're handy, but there's a lot of margin for error, and most fabricators prefer to pull their own or at least verify a customer-supplied one before they cut expensive stone.
If you want to hand a rough template to your fabricator to communicate the shape and overhang intent, that's reasonable. Use 1/4-inch luan or door skin, cut it to the shape you want, and mark every dimension clearly in pencil, including which edge is the seating edge, the depth of the overhang, and any return ends. Label the face side.
What you probably can't do yourself is verify level across the full run with the precision a fabricator expects, manage the material-specific overhang limits, specify the bracket locations, and capture the subtle variations in a wall that isn't perfectly straight. Those judgment calls are what separates a template from a finished-size guess.
Some fabricators charge less for templating when the customer has done preliminary measurement work and can confirm the wall is fully finished and level. Ask before the templating appointment.
For countertop installation in general, the templating step is where fabricators protect their material investment. A bad template on a $2,000 slab is a very expensive mistake.
Frequently asked questions
What is the standard depth of a knee wall countertop?
Most knee wall countertops run 12 to 18 inches deep on the finished side. The wall itself is typically 4 to 6 inches thick (standard framed wall), and the countertop extends beyond that on one or both sides. A seating overhang of 12 to 15 inches fits a standard barstool comfortably. The kitchen side may have a small overhang or sit flush with the cabinet face frame.
What height should a knee wall countertop be?
The finished countertop height depends on its use. For a standard eating-height counter with regular chairs, 36 inches (same as kitchen counters) works. For bar-height seating with tall stools, 42 inches is the common target. The knee wall itself needs to be framed to the right height before drywall, accounting for the countertop thickness (usually 1.25 inches for 3 cm stone plus any adhesive or setting bed).
Does a knee wall countertop need corbels or brackets?
It depends on the overhang and material. Natural stone overhanging more than 8 to 10 inches unsupported generally needs steel corbels or brackets anchored to wall framing. Engineered quartz manufacturers publish specific overhang tables; most limit unsupported spans to 10 to 12 inches for 3 cm material. Lighter materials like laminate and solid surface can handle longer overhangs, but brackets add safety margin and prevent long-term stress cracks.
How do you attach a countertop to a knee wall with no cabinets?
Without cabinets, the countertop typically rests on a ledger board or angle iron attached to the inside face of the wall, plus corbels or brackets on the seating-side overhang. The ledger gives the slab a continuous bearing surface along the back. Silicone adhesive bonds the stone to the ledger and brackets; mechanical fasteners don't penetrate the stone. The wall framing must be solid enough to handle the combined dead load of the stone plus live loads from people leaning on the counter.
Can I use a quartz countertop on a knee wall?
Yes, and engineered quartz is a popular choice for knee wall applications. It handles reasonable overhangs well (up to 10 to 12 inches unsupported at 3 cm thickness for many brands), comes in consistent slabs without the natural variation that can create weak points, and most manufacturers publish clear installation specs. Follow the brand's installation guide for overhang limits; warranties may not cover cracks from overhangs that exceed their specifications.
How long does it take to template and install a knee wall countertop?
Templating a knee wall countertop typically takes 30 to 90 minutes on site, longer if the wall is angled or has multiple ends. Fabrication usually takes 3 to 7 business days after template, depending on shop volume and material availability. Installation takes 1 to 3 hours for most residential knee wall jobs. The total timeline from template appointment to installed countertop is commonly 1 to 2 weeks in a normal residential market.
What is the difference between a knee wall and a half wall?
The terms are used interchangeably in most residential contexts. Technically, a half wall usually refers to a wall that rises to roughly half the ceiling height (4 to 5 feet), while a knee wall is specifically a short wall, typically 36 to 48 inches tall, named because it reaches about knee height. In countertop and fabrication contexts, both phrases describe the same kind of short partition that gets a countertop cap.
What causes a knee wall countertop to crack?
Most cracks start at the edge of the wall below, where the unsupported overhang creates maximum bending stress. The causes: overhang too long for the material and thickness, no bracket support, someone sitting or standing on the overhang, uneven bearing surface (one point of the wall is high and concentrates load), or a pre-existing micro-fissure in natural stone that propagated under load. Poor templating that leaves an uneven base can also create stress points.
Can a knee wall countertop be curved or have an angle?
Yes, and both are common in traditional kitchen designs. Curved knee wall countertops require CNC fabrication and are significantly more expensive than straight runs because of the material waste and machining time. Angled ends (where the knee wall meets a room at something other than 90 degrees) require precise angle measurement during templating; digital templating devices capture this accurately. Always template after walls are fully finished for curved or angled applications.
What is the best material for a knee wall countertop in a bar area?
For a wet bar or a space with heavy drink traffic, solid surface (like Corian) or porcelain slab works well because both are non-porous and require minimal maintenance. Engineered quartz is also nearly non-porous and holds up well. Natural stone like granite can work but needs sealing and occasional maintenance. Avoid honed or leathered marble in bar areas; it stains easily from wine and acidic mixers unless you're committed to regular sealing and careful use.
How do I measure square footage of a knee wall countertop for pricing?
Measure the full length of the knee wall (including any overhang beyond the wall on the ends) and the full depth (front edge to back edge, including both overhangs). Multiply length by depth to get square footage. Most fabricators price to the nearest square foot and include a minimum job size. Remember to count finished linear feet of edge separately, since knee wall jobs often have three or four exposed edges that add to the total cost.
Do fabricators charge extra to template and install a knee wall countertop?
Many do, though how they charge it varies by shop. Some roll the complexity into a higher square foot price. Others charge separately for extra edge finishing (per linear foot), for support bracket installation, and for templating time on more complex layouts. If you're getting a quote, ask specifically whether the price includes all finished edges, bracket installation, and the templating appointment, so you can compare quotes accurately.
How do you keep a knee wall countertop clean?
Cleaning depends on the material. For natural stone, use a pH-neutral cleaner and avoid acidic or abrasive products; sealers help prevent staining on porous stones like marble. For engineered quartz, mild dish soap and water handle most spills. The seating-side edge takes more wear than a typical counter edge, so inspect the stone or finish annually for chips or seal degradation. General care guides for specific materials like our guide to cleaning stone countertops apply equally to knee wall surfaces.
Sources
- Natural Stone Institute, Technical Manual (formerly Marble Institute of America): Unsupported overhangs in natural stone should not exceed one-third of the total slab depth without additional structural support
- Cambria, Installation and Care Guide: Cambria publishes overhang tables by thickness; 3 cm slabs allow up to approximately 10-11 inches unsupported in some configurations
- U.S. Department of Housing and Urban Development, Residential Structural Systems: Residential wall studs are typically spaced 16 inches on center, which governs bracket anchor placement in knee walls
- Natural Stone Institute, Stone Resource Guide: Granite at 3 cm (1.25 inch) thickness weighs approximately 18 to 20 pounds per square foot
- International Residential Code (IRC), Section R602, Wood Wall Framing: IRC Section R602 governs residential wood framing requirements including stud spacing, which affects bracket anchoring in knee wall construction
- OSHA, General Industry Standards, 29 CFR 1910 (reference for load-bearing surface safety in commercial settings): Structural adequacy of load-bearing surfaces is governed by applicable building codes; OSHA references load limits in commercial construction contexts
- U.S. Census Bureau, American Housing Survey, Kitchen and Bathroom Features: Open-plan kitchen layouts with peninsula or half-wall dividers are among the most common residential kitchen configurations reported in housing surveys
- Forest Products Laboratory, USDA, Wood Handbook: Wood as an Engineering Material: Wood has tensile strength perpendicular and parallel to grain; this is relevant to butcher block and wood countertop overhang capacity compared to stone
- National Kitchen and Bath Association (NKBA), Kitchen Planning Guidelines: NKBA guidelines specify counter heights for seated dining: 28-32 inches for table height, 36 inches for counter height, 42 inches for bar height
Last updated 2026-07-11