TL;DR
- Epoxy countertop installation runs $45 to $150 per square foot installed by a pro, or $5 to $15 per square foot in materials if you DIY.
- The job needs thorough surface prep, tight temperature control during the pour, and at least 72 hours of cure before use.
- DIY epoxy looks easy on video and isn't.
- Bubbles, fisheyes, and uneven color are normal on a first attempt.
What is an epoxy countertop and what are you actually buying?
Epoxy countertops fall into two camps that get lumped together constantly, and mixing them up causes real budget surprises.
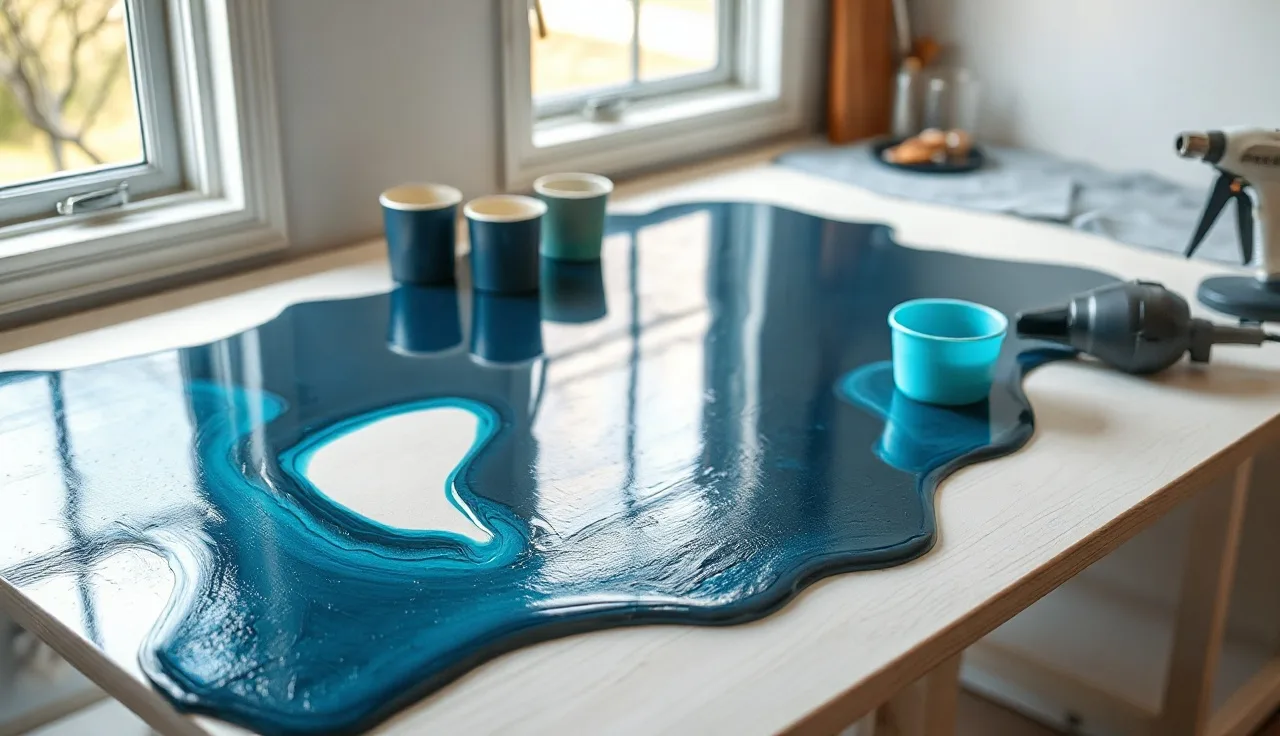
The first is a poured epoxy countertop, where two-part resin is mixed and cast directly on a substrate (usually MDF or plywood) or over an existing surface like tile or laminate. The top gets built up in layers, often with pigment, metallic powders, or embedded objects. You end up with a solid plastic slab anywhere from 1/8 inch to over 1/4 inch thick.
The second is an epoxy coating applied over an existing countertop to change its look. Kits like Rust-Oleum Countertop Transformations are this type. They cost $50 to $200 for a small kitchen and are mostly a paint job with a durable topcoat. They look nothing like a poured epoxy slab.
This guide is about poured and cast epoxy countertops, the kind that get photographed for kitchen renovation content and the kind fabricators increasingly get asked to produce. Coating kits show up briefly in the FAQs because homeowners ask about them, but they belong in a different category from real countertop fabrication.
Epoxy sits in an odd spot against the alternatives. It is not stone, so it does not have the resale cachet of granite countertops or the warmth of butcher block countertops. But it allows colors and patterns no natural stone will ever produce, and a skilled artist can make something genuinely one-of-a-kind. That artistic potential is why people choose it.
How much does epoxy countertop installation cost?
Epoxy countertop installation cost swings hard because the material is labor-heavy and the installer's skill matters more here than with almost any other surface.
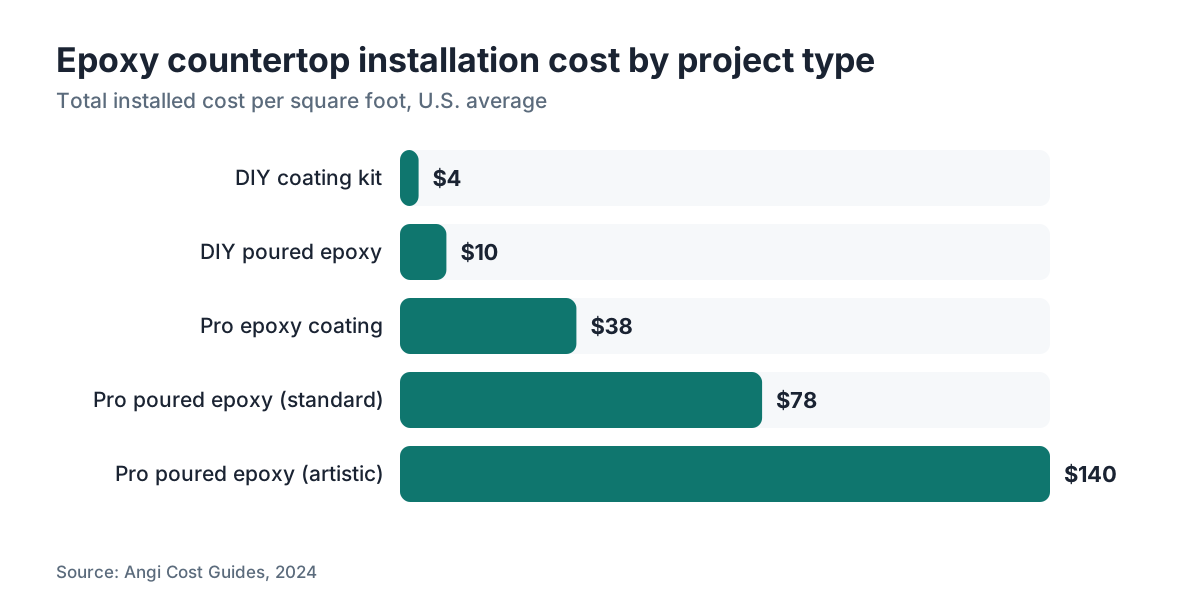
Professional installation runs $45 to $150 per square foot installed, with the midpoint around $75 to $85 for a standard kitchen in most U.S. markets [1]. A 40-square-foot kitchen (typical for a moderate renovation) lands at $1,800 to $6,000 total. High-end artistic pours with multiple colors, metallic pigments, and hand-detailing push toward $120 to $200 per square foot.
| Installation type | Material cost/sq ft | Labor cost/sq ft | Total installed |
|---|---|---|---|
| DIY coating kit | $2, $5 | $0 | $2, $5 |
| DIY poured epoxy | $5, $15 | $0 | $5, $15 |
| Pro epoxy coating | $5, $15 | $20, $35 | $25, $50 |
| Pro poured epoxy (standard) | $25, $45 | $30, $55 | $55, $100 |
| Pro poured epoxy (artistic) | $40, $70 | $50, $120 | $90, $190 |
Labor for epoxy specifically runs $30 to $55 per square foot at the midpoint, higher than most stone installs because the process takes multiple visits (surface prep, the pour, sanding, finishing) instead of one template-and-set day [1].
Compare that to stone. Professional granite installation averages $40 to $60 per square foot installed, and professional laminate countertops run $20 to $40 installed [2]. Epoxy costs more than laminate and lands right on top of mid-grade granite, while giving you looks neither can match.
The DIY route costs $5 to $15 per square foot in materials, but the time is real. Most first-timers spend 15 to 25 hours on a medium kitchen over three to four days. Value your own time, or watch a first pour go wrong, and those savings vanish fast.
What tools and materials do you need before you start?
Skipping this list causes most of the failed pours you see in forum post-mortems.
Materials: two-part countertop epoxy resin (not craft epoxy, not floor coating epoxy, read the spec sheet for Shore D hardness above 75 to 80 for a durable work surface), pigment or metallic powder, denatured alcohol for cleaning, 80- and 220-grit sandpaper, a sanding block or orbital sander, leveling shims, masking tape and plastic sheeting, disposable mixing cups, nitrile gloves, and a heat gun or propane torch for bubble removal.
Tools: a digital scale accurate to one gram (mixing by eye causes soft spots), a laser level or four-foot spirit level, a notched spreader, a chip brush for edges, and a foam roller for flat surfaces. A digital thermometer for the room and the resin is worth having. Most countertop epoxies specify a working temperature of 70 to 80°F (21 to 27°C) and ambient humidity below 80% [3].
Safety gear matters more than most tutorials admit. Uncured resin and hardener are both sensitizers. Repeated skin contact can cause permanent epoxy sensitization, an immune response that builds over repeated exposures and does not reverse [4]. The National Institute for Occupational Safety and Health recommends nitrile gloves, safety glasses, and adequate ventilation or a supplied-air respirator for mixed epoxy work [4]. A disposable P100 respirator is the practical minimum. A half-face respirator with organic vapor cartridges is better for enclosed kitchens.
The substrate needs to be flat to within 1/8 inch over 10 feet or the resin will pool and the finish will read uneven. Check this before you order resin. Shimming cabinets is far easier than fixing a cured slab.
How do you prepare the surface before pouring epoxy?
Surface prep is where the job is won or lost. No amount of skill during the pour fixes bad prep.
For new builds over MDF or plywood: seal the substrate with a thin epoxy base coat or wood sealer first. Raw MDF and plywood are porous and push air bubbles up through the pour as they off-gas. One sealed base coat, cured fully, kills most of that.
For overlays over existing countertops: the surface must be clean, dull, and structurally sound. Glossy surfaces need 80-grit sanding to give the epoxy something to grip. Any loose tiles, delaminating laminate, or soft spots in particleboard have to be fixed, or the overlay cracks and peels at those points later. Grease is the most common adhesion failure. Clean with a degreaser, wipe with denatured alcohol, and let it dry completely before you mix any resin.
The countertop must be level before you pour. Epoxy is self-leveling, which sounds handy but means it flows away from high spots toward low spots if the surface is not flat. Use a laser level or long spirit level and shim the cabinets until the surface reads level in every direction. Check again after the shims are set.
Mask the cabinet faces, walls, and floors with plastic sheeting taped down tight. Cured epoxy drips are almost impossible to get off floors and cabinet finishes. Spend 30 minutes on protection and skip a refinishing job.
Sink cutouts need support underneath so resin does not sag into the opening. Cut a piece of melamine or scrap MDF to cover the opening and tape it level with the surface. Pull it after the epoxy gels but before it fully cures.
What is the step-by-step process for a poured epoxy countertop?
Here is the sequence a professional uses. DIYers can follow the same order.
Step 1: Seal the substrate. Mix a small batch of epoxy (often 10 to 15% of the total project volume), roll a thin seal coat over the whole surface with a foam roller, and let it cure to tack-free but not full hardness. This usually takes 4 to 8 hours at 75°F. Lightly sand with 220-grit and vacuum all dust.
Step 2: Mix the flood coat. This is the main layer that gives the countertop its thickness and color. Measure resin and hardener by weight on your digital scale, following the manufacturer's exact ratio (often 1:1 or 2:1 by volume, but weight ratios differ). Add pigments to the resin before combining parts. Mix slowly for 3 to 5 minutes, scraping the sides and bottom of the cup. Pour into a second cup and mix again for one minute. Under-mixing causes soft, tacky spots that cannot be fixed after curing.
Step 3: Pour and spread. Pour the mixed epoxy across the surface and spread with a foam roller or notched spreader. Work edge to edge. Brush resin onto the edges with a chip brush. For decorative effects (swirls, cells, metallic pours), move fast. Most countertop epoxy has a working time of 20 to 40 minutes at room temperature [3].
Step 4: Remove bubbles. Pass a heat gun or propane torch briefly over the surface, keeping it moving, 6 to 8 inches above the resin. Heat lowers surface tension and pops bubbles. Never hold the flame in one spot. Repeat this at 30 and 60 minutes after pouring as new bubbles migrate up.
Step 5: Cover and let cure. Tent the surface with plastic sheeting suspended above it (not touching) to keep dust out. Hold the room at 70 to 80°F. Most countertop epoxies reach a hard surface in 24 hours and full chemical cure in 72 to 96 hours [3]. Set anything on the surface before 72 hours and you risk permanent indentations.
Step 6: Sand and finish. After full cure, sand with 220-grit to knock down high spots, drips, or texture. Work up through 400, 800, and 1500-grit wet sanding for high gloss, or stop at 400-grit for matte. Apply a finishing topcoat if the manufacturer calls for one.
Start to usable countertop takes 4 to 7 days in a real kitchen, not the 48 hours implied by most video tutorials.
What are the most common problems and how do you avoid them?
Bubbles are the most visible failure. The main causes are cold resin (below 70°F), under-mixing, a porous substrate, and a heavy torch pass that drives air in instead of pulling it out. Fix: warm resin to 75°F before mixing, mix thoroughly in two cups, seal the substrate, and use a light quick pass with the torch.
Fisheyes and craters come from silicone, wax, or oil on the substrate. Even fingerprints do it. Fix: wipe everything with denatured alcohol before pouring and do not touch the surface after cleaning.
Soft or tacky spots after cure are almost always a wrong mix ratio or under-mixing. There is no clean repair. You sand back to the tacky layer and pour again over it. This is the most expensive mistake because it eats more material and more hours.
Yellowing over time is a known limit of most epoxy resins. Standard aliphatic epoxies and amine-cured systems amber under UV exposure [5]. If the countertop will catch direct sun, specify a UV-stabilized or polyaspartic topcoat. Most spec sheets list UV resistance ratings. Read them before you buy.
Heat damage catches new owners off guard. Epoxy countertops are not heat-resistant the way stone is. Most countertop-grade epoxies have a heat deflection temperature of 120 to 150°F (49 to 65°C) [5]. A hot pan straight off the stove leaves a permanent white haze or soft spot. Always use trivets. This is the number-one ongoing complaint from epoxy countertop owners.
For fabricators tracking these jobs in a quoting workflow: epoxy pours carry far more labor-time variability than stone fabrication. A quoting tool that lets you build in material waste factors and multi-visit labor hours (instead of flat square-footage rates) gives you real job costs. SlabWise's quoting module handles this kind of multi-phase costing if you want to see how it maps to your shop.
Comparing epoxy to materials with their own quirks? How to clean stone countertops and how to clean quartzite countertops show what ongoing care looks like for natural materials.
DIY epoxy countertop vs. hiring a pro: which makes more sense?
DIY makes sense in a narrow case: a small, low-traffic surface (a laundry room, a bar top, a bathroom vanity), you are genuinely willing to practice on scrap first, and you enjoy the process. On a 15-square-foot bathroom vanity, material runs $75 to $225, the risk is low, and a slightly imperfect result is fine.
DIY on a kitchen countertop with a complex color pattern, multiple pours, and 40-plus square feet is a different animal. Professional epoxy artists spend hundreds of hours building technique. The gap between a polished pro pour and an amateur first attempt is visible and permanent unless you sand back and pour again.
Pros bring calibrated gear, commercial-grade resins with better UV stability and hardness, and the eye to read how a pour is behaving. They carry liability if something goes wrong. Most pro installers warrant their work for at least one year against delamination and surface defects.
The honest math. A pro at $75 per square foot on a 40-square-foot kitchen is $3,000. DIY materials might run $400 to $600. That difference is $2,400 to $2,600. Value your time at $30 an hour and spend 20 hours, and you have added $600 in time. You still net roughly $1,800 to $2,000 in savings, but only if the first pour works. A failed pour means more resin ($200 to $400) and a full restart, plus another 20 hours.
For where epoxy sits in the broader kitchen countertops market: formica countertops and corian countertops land in a similar installed price range but come factory-produced with predictable quality. Cambria countertops and natural stone cost more and carry better heat resistance and stronger resale value. Epoxy's edge is the artistic potential, full stop.
How long does epoxy countertop installation take from start to finish?
Hands-on time is 6 to 12 hours for a typical kitchen. Calendar time is 4 to 7 days because of the cure windows between steps.
Day 1: surface prep and seal coat (2 to 4 hours of work, then 6 to 8 hours of cure). Day 2: light sanding and the main flood coat with color (2 to 4 hours). Day 3: 24-hour surface cure. Days 4 to 5: sanding and any extra layers or topcoats (1 to 3 hours). Days 6 to 7: full chemical cure before use.
Pros on a simple job can sometimes compress this to three visits over four days when conditions cooperate. Complex multi-layer artistic pours take longer because each layer has to gel before the next goes down, or the colors mix uncontrollably.
This timeline is one reason some homeowners pick countertop installation with stone or solid surface instead. A granite or quartz install is usually one day for the crew, and the countertop is usable the same day (silicone needs 24 hours to cure, but the stone itself is hard immediately).
How do you maintain and clean an epoxy countertop?
Day-to-day cleaning is simple: warm water, mild dish soap, soft cloth. Epoxy is non-porous, so it does not harbor bacteria the way grout or raw wood does, and it never needs sealing.
Stay away from harsh chemicals. Acetone, full-strength bleach, and strong alkaline cleaners (oven cleaners, drain cleaners) dull or etch the surface. Abrasive scrubbers scratch the finish. If a cleaner says "do not use on painted surfaces," keep it off your epoxy.
Heat is the real enemy. Use trivets. Always. A cast iron skillet at 400°F will damage most countertop-grade epoxy. This is not a footnote to bury in an FAQ. It is the top reason people call a pro back for repairs.
Scratches and dull spots from normal use clean up with 1500-grit wet sanding followed by polishing compound. Deep scratches or heat damage usually need a topcoat re-application. Some fabricators sell maintenance topcoat kits for exactly this.
Long-term yellowing is manageable if you chose a UV-resistant formulation and the countertop is out of direct sun. If a top has already yellowed, light sanding and a UV-stable polyaspartic topcoat improve the look, but they will not fully reverse the color shift.
What do fabricators need to know before adding epoxy countertops to their shop's offerings?
The economics are different from stone. With granite or quartz, labor time gets predictable after a few jobs. Epoxy does not. Artistic pours vary wildly in time, and a job that goes wrong costs you both materials and hours.
Start with simple pours: single-color or two-color swirl patterns over a prepared substrate. Get 10 to 15 of those done before you touch complex metallic cells or multi-layer geode work. The technique takes real practice, and the best training comes from hands-on workshops, not YouTube.
Material markup matters. Countertop epoxy from quality suppliers (Entropy Resins, TotalBoat, MAS Epoxies) costs $60 to $120 per gallon of mixed resin [6]. A typical kitchen uses 1.5 to 3 gallons for a flood coat plus topcoat. Mark up materials 25 to 40% and bill labor separately instead of hiding it in a per-square-foot rate, because labor hours are too variable to average.
Warranty language needs updating. Your standard stone fabrication warranty almost certainly does not cover thermal damage, UV yellowing, or a customer using the countertop as a cutting board. Write a specific epoxy addendum that spells out what you warrant (delamination, structural cracks) and what you do not (heat damage, UV color shift, surface scratches from abuse).
SlabWise's quoting and job-cost tools let you build custom line items for multi-visit labor and variable material costs, which fits the epoxy workflow better than flat square-footage estimates. On a complex artistic pour, having the numbers organized before the customer conversation makes the price far easier to defend.
For fabricators who work only in stone right now, marble countertops gives useful context on how a premium material with maintenance caveats gets positioned and sold to homeowners who want something beautiful and will accept the trade-offs.
Is epoxy a good countertop material long-term, or does it wear out?
Honest answer: epoxy countertops have a shorter lifespan than stone and a longer one than laminate, and the range is wide depending on formulation, install quality, and how the surface gets used.
A well-installed epoxy countertop with a quality UV-stable topcoat, in a kitchen that uses trivets and mild cleaners, can look good for 10 to 15 years. A poorly installed surface in direct sun with regular hot-pan contact might need refinishing in 3 to 5 years [5]. Nobody has great longitudinal data on this. Epoxy as a residential countertop only got popular in the 2010s, so the long-term studies do not exist yet.
The ability to sand and recoat is underrated. Stone is essentially permanent, but an epoxy countertop can be refinished. A surface that has yellowed, scratched, or gone out of style can be renewed for $300 to $800 in materials and labor instead of ripped out and replaced. That is a real advantage over most natural stone.
For low-traffic surfaces (bathroom vanities, bar tops, laundry rooms), epoxy is a genuinely durable, practical choice. For a high-traffic main kitchen that sees hot pots, acidic foods, and heavy daily use, set expectations clearly before installing. Stone and engineered quartz handle daily kitchen abuse better. Epoxy handles artistic expression better. Those are just different jobs.
Frequently asked questions
Can you pour epoxy over existing laminate countertops?
Yes, and this is one of the most common uses. The laminate must be clean, dulled with 80-grit sandpaper for adhesion, and structurally sound (no swollen edges or delaminated sections). Glossy laminate that has not been sanded causes adhesion failures. Once properly prepped and sealed, epoxy bonds well to laminate and can completely change the look of dated laminate countertops for $5 to $15 per square foot in materials.
How much epoxy do I need for a countertop?
A standard flood coat of countertop epoxy uses about 12 to 16 ounces of mixed resin per square foot at 1/8-inch thickness. For a 40-square-foot kitchen, you need roughly 2 to 2.5 gallons of mixed resin (resin plus hardener combined). Add 15 to 20% for waste, edge coverage, and the seal coat. Most countertop epoxy sells by the kit in 1-gallon and 2-gallon sizes. Buy one size up from your calculated need.
How long before you can use an epoxy countertop after installation?
Most countertop-grade epoxies reach a hard, dust-free surface within 24 hours and allow light use (setting objects down gently) at 48 hours. Full chemical cure, meaning the surface hits its rated hardness and chemical resistance, takes 72 to 96 hours at 75°F [3]. Place hot items, cut heavily, or expose the surface to harsh cleaners before 72 hours and you risk permanent damage no amount of polishing will fix.
What causes epoxy countertops to yellow and how do you prevent it?
Yellowing comes from UV exposure reacting with the amine groups in standard hardeners. It happens even through window glass. Prevention means choosing a UV-stabilized aliphatic epoxy or applying a polyaspartic or polyurethane topcoat with UV inhibitors [5]. Darker pigmented countertops hide yellowing better than white or clear surfaces. Direct sunlight speeds the process up a lot.
Can epoxy countertops be repaired if they crack or chip?
Small chips and scratches fill with fresh mixed epoxy, cure, then sand level. Color matching is the hard part. If the original pigment mix was not recorded, an exact match is nearly impossible. Structural cracks (from substrate movement or thermal stress) need the cracked area sanded back and recoated. Major damage usually means refinishing the whole surface for an even look rather than spot-patching.
Is epoxy countertop installation safe for use around food?
Fully cured countertop epoxy is generally considered food-safe for incidental contact. FDA food contact regulations under 21 CFR Part 175 cover epoxy resin formulations used in food-contact applications [7]. The key word is 'fully cured.' Uncured or partially cured epoxy can leach reactive components. Most quality countertop epoxies spec full cure at 72 to 96 hours. Avoid cutting directly on the surface regardless, both to protect the finish and to keep epoxy particles out of food.
How does epoxy compare to quartz countertops in terms of durability?
Engineered quartz (like Cambria) has much better heat resistance (generally rated to 300°F and above), better scratch resistance (Mohs 7 vs. epoxy's rough Mohs 2 to 3 equivalent), and more predictable long-term appearance. Epoxy wins on creative flexibility and the ability to be refinished. For a working kitchen with daily heavy use, quartz is the more durable choice. For a statement piece where looks matter most and use is moderate, epoxy is a legitimate option.
Do you need a permit to install epoxy countertops?
In most jurisdictions, countertop replacement (including epoxy pours) does not require a building permit because it counts as a like-for-like surface replacement that does not touch structural, electrical, or plumbing systems. If the project involves moving or adding a sink, plumbing permits apply. Check with your local building department if you are unsure. Requirements vary a lot by municipality and state [8].
What is the difference between countertop epoxy and floor epoxy?
Floor epoxy is built for impact and abrasion resistance under foot traffic. Countertop epoxy is built for higher surface hardness (Shore D 75 to 85), better clarity, better color stability, and food-contact compliance. Use floor epoxy on a countertop and you typically get a softer, less clear surface that yellows faster and may not pass food-contact standards. Always use epoxy rated for countertop use and check the manufacturer's Shore D hardness spec.
What temperature and humidity conditions does epoxy need to cure properly?
Most countertop epoxies specify a working temperature of 70 to 80°F (21 to 27°C) and relative humidity below 75 to 80% [3]. Cold slows curing and can block full chemical cure, leaving a permanently soft surface. High humidity causes amine blush, a waxy film on the surface. If your shop or job site runs cold, warm the resin containers in warm water for 15 minutes before mixing. Never run an open-flame space heater near fresh epoxy vapors.
Can an epoxy countertop be poured outdoors or on a garage work surface?
Yes, and outdoor or garage settings are popular for practice pours and bar tops. The main risks are dust contamination (a bug landing in fresh epoxy is permanent), temperature swings, and direct sunlight driving UV yellowing from day one. Work under a canopy in still air, check humidity (dew point matters more than the outdoor humidity percentage), and cover the surface right after the bubble-removal pass. Cold concrete floors also pull heat from the substrate and slow the cure.
What are the pros and cons of epoxy countertops vs. concrete countertops?
Both are custom-cast with unique looks, but they behave differently. Concrete is heavier (up to 18 lbs per square foot), needs sealing against staining, and can crack from substrate movement. Epoxy is lighter, non-porous without sealing, and more forgiving of minor substrate flex. Concrete handles heat better. Epoxy costs less for DIY installs and repairs more easily via recoating. Both take real skill for professional results, and neither has strong resale value data next to stone.
How do fabricators price epoxy countertop jobs?
Most fabricators price epoxy by the square foot for materials plus an hourly rate for labor, rather than one installed square-footage number, because labor time varies too much between simple and complex pours. A realistic structure is material cost marked up 30 to 40%, plus $55 to $90 per hour for skilled labor, plus a mobilization fee for multi-visit jobs. Quoting software that supports variable labor phases and material waste factors beats flat-rate countertop pricing templates.
Sources
- HomeAdvisor (Angi), Epoxy Countertop Cost Guide: Professional epoxy countertop installation costs $45, $150 per square foot installed; labor runs $30, $55 per square foot
- HomeAdvisor (Angi), Countertop Installation Cost Guide: Granite countertops average $40, $60 per square foot installed; laminate countertops run $20, $40 installed
- TotalBoat, Countertop Epoxy Technical Data Sheet: Countertop epoxy working temperature 70 to 80°F, working time 20 to 40 minutes, surface cure 24 hours, full cure 72 to 96 hours
- NIOSH (CDC), Epoxy Resins Occupational Health Guidance: Uncured epoxy resin and hardener are sensitizers; NIOSH recommends nitrile gloves, safety glasses, and adequate ventilation or supplied-air respirator for mixed epoxy work
- Entropy Resins, Super Sap CCR Epoxy System Technical Bulletin: Standard amine-cured epoxy systems amber under UV exposure; heat deflection temperature of countertop-grade epoxies typically 120 to 150°F; well-installed epoxy surfaces last 10 to 15 years with proper care
- MAS Epoxies, Product Pricing and Technical Specifications: Commercial countertop epoxy from quality suppliers costs $60, $120 per gallon of mixed resin
- U.S. Food and Drug Administration, 21 CFR Part 175 Indirect Food Additives: Adhesives and Components of Coatings: FDA 21 CFR Part 175 covers epoxy resin formulations used in food-contact applications; fully cured epoxy is considered acceptable for incidental food contact
- U.S. Department of Housing and Urban Development, Permit Requirements for Home Improvement: Countertop replacement generally does not require a building permit in most jurisdictions; requirements vary by municipality
- U.S. Environmental Protection Agency, Volatile Organic Compounds' Impact on Indoor Air Quality: Epoxy resins release VOCs during mixing and curing; adequate ventilation is required to maintain safe indoor air quality during application
Last updated 2026-07-09