TL;DR
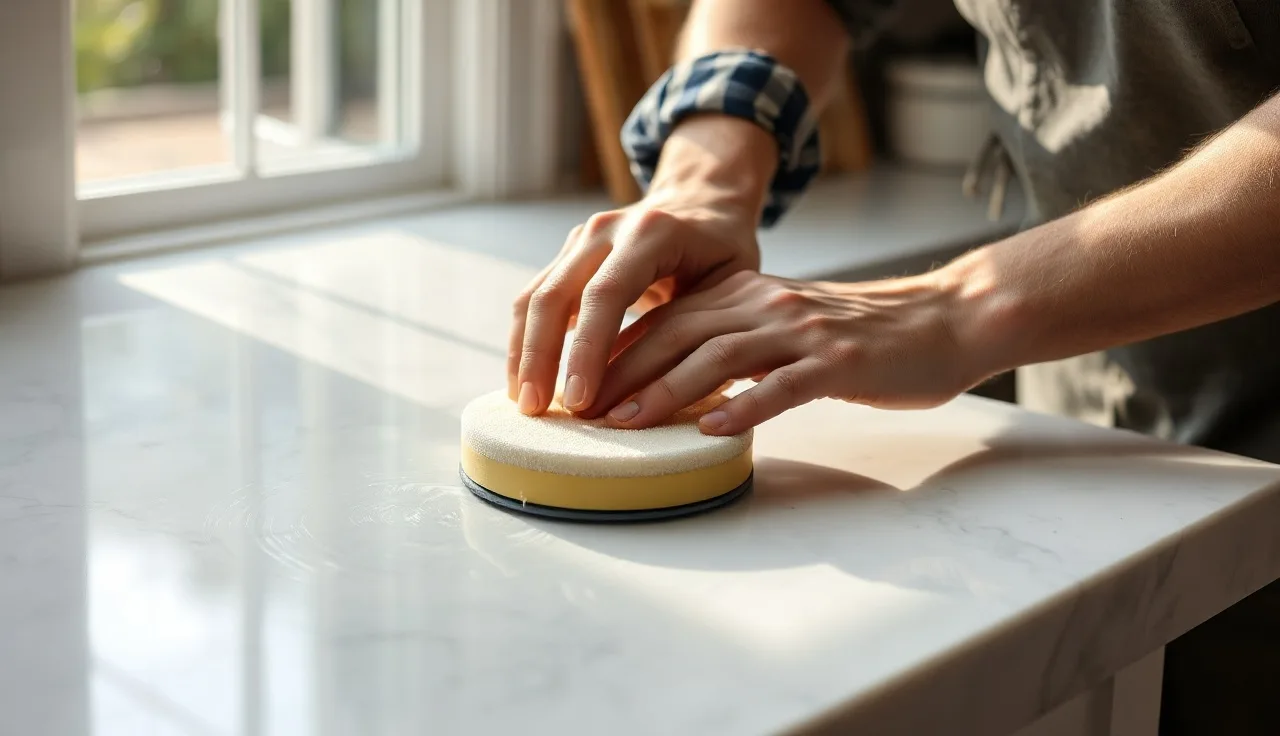
- Buffing marble means working through finer and finer abrasive grits (usually 200 to 3000), then finishing with tin oxide powder or a polishing cream.
- Light scratches and dull spots are real DIY territory.
- Deep etches, cracks, or lippage across seams need a stone restoration pro.
- Budget $30 to 80 in supplies for DIY, or $300 to 800 to have a pro polish a typical kitchen.
What does buffing marble actually do?
Marble is calcium carbonate. That makes it softer than granite and far more reactive to acids. Set a lemon on it and the acid dissolves a thin layer of the surface, leaving a dull, slightly pitted spot called an etch. Buffing removes that damaged microlayer by abrading the stone flat again, then polishing it back to a mirror finish.
The process is controlled grinding. You start with an abrasive coarse enough to cut into the etch, flatten it, and blend it with the stone around it. Then you step through finer and finer grits, each one erasing the scratches the last one left, until the surface reflects light evenly. The final step, whether you reach for tin oxide, cerium oxide, or a diamond paste, is what brings back the gloss.
None of this is magic, but the physics are unforgiving. Skip grits and the fine abrasive can't reach the deep scratches the coarse one carved, so you end up with a hazy surface that looks worse than the etch you started with. Respecting the progression is the whole job.
What supplies do you need to buff marble countertops at home?
For a small etch or dull patch, your hand and a set of diamond pads do the job. For anything larger than a dinner plate, a variable-speed angle grinder or a low-speed polisher (600 to 1800 RPM) with diamond pads saves your arms and gives a flatter result.
Here is what a full DIY kit looks like:
| Item | Approximate Cost | Notes |
|---|---|---|
| Wet/dry diamond hand pads (50, 100, 200, 400, 800, 1500, 3000 grit) | $25 to 50 for a set | Buy as a set; individual pads run $4 to 10 each |
| Polishing powder (tin oxide or cerium oxide) | $10 to 20 for 8 oz | 8 oz handles a full countertop easily |
| Marble polishing compound (cream) | $12 to 25 | Easier for beginners than loose powder |
| Low-speed angle grinder or random orbit polisher | $40 to 120 if you don't own one | Rental is $25 to 40/day |
| Wet/dry diamond polishing pads for grinder (same grit range) | $30 to 60 for a set | Keep pads wet during use |
| Water spray bottle | $2 | Water lubricates and carries swarf away |
| Soft microfiber cloths | $5 to 10 | Final buff and cleanup |
| Blue painter's tape | $5 | Protect adjacent surfaces |
Total DIY supply cost for a first project: $80 to 150 if you buy a grinder, $30 to 80 if you already own a suitable tool.
One thing plainly: the cheap "marble polishing kits" on Amazon with a single pad and a small tub of cream rarely handle a real etch. They can rescue a very light, fresh etch on high-polish Calacatta or Carrara, but if the dull spot has any depth, you'll burn through the cream and get nowhere without the full grit progression.
How do you buff marble step by step?
Clean the surface first. Dish soap and warm water, then rinse and dry. You need to see the etch clearly before you touch it.
Assess the damage. Run your fingernail across the dull spot. If you feel a slight depression or roughness, that's a real etch that needs the full grit progression. If it's smooth but just looks dull, you can probably start at 800 or 1500 grit.
Step 1: Start with the right grit. For a visible etch you can feel, start at 200 to 400 grit. Wet the pad and the stone, and work in small overlapping circles over the etch and about two inches past its edge. Keep moderate, consistent pressure. You're blending, not digging. Wipe the slurry away every 30 to 60 seconds to check progress.
Step 2: Work through the sequence. Move to 800, then 1500, then 3000. At each step the stone should look shinier and feel smoother. Jump straight from 400 to 3000 and the fine grit won't touch the scratches the 400 left, so you'll get haze. Don't skip steps.
Step 3: Apply polishing compound or tin oxide. Dampen the surface lightly. Put down a small amount of powder or cream and work it in with a felt pad, foam pad, or a damp cloth in small circles. The slurry turns milky gray as you go. This step runs 3 to 10 minutes of steady motion on a 6-inch area.
Step 4: Buff to finish. Wipe away the slurry with a damp cloth, then dry buff with a clean microfiber. The area should now match the sheen around it. Step back and look at it in raking light (a phone flashlight held at a low angle works well) to catch any haze.
Step 5: Seal if it makes sense. Buffing opens the surface slightly, which changes how your existing sealer behaves. If the stone was sealed before, reapply a penetrating impregnating sealer after polishing [1].
Total time for a dinner-plate etch: 45 minutes to 2 hours, depending on depth and your experience.
What grit sequence should you actually use on marble?
The right starting grit depends on how deep the damage runs. Here's the practical guide:
| Damage Type | Starting Grit | End Grit | Notes |
|---|---|---|---|
| Very light haze, fresh etch, no texture | 1500 | 3000 + compound | Quickest repair, 20 to 30 min |
| Moderate etch, slight texture | 400 to 800 | 3000 + compound | Most common DIY scenario |
| Deep etch, visible scratch | 200 to 400 | 3000 + compound | Full sequence required |
| Lippage (height difference at seam) or chip | 50 to 100 | 3000 + compound | Needs pro equipment usually |
| Full-surface restoration | 50 | 3000 + compound | Professional territory |
Marble's Mohs hardness sits around 3 to 4 [2], which is why it scratches so much more easily than granite (6 to 7) or quartzite (near 7). That softness makes the grit sequence fast, but it also means too coarse a grit with too much pressure can carve new damage quicker than you'd guess.
White marbles like Carrara or Calacatta make color matching during the polish easy. Darker marbles like Nero Marquina or Emperador trap polishing compound in the veining, so rinse hard and run a soft brush through the textured areas.
Can you buff out deep scratches in marble yourself?
Honest answer: sometimes yes, often no.
A scratch that lives only in the polish layer, where your fingernail doesn't catch, is a good DIY candidate. These are usually etches that read as scratches in certain light. Start at 800 grit, work up, done.
A scratch with real depth, where you feel a definite groove, means starting at 200 or even 100 grit to remove enough stone to get below the scratch floor. On a honed or polished 3/4-inch slab that's viable, but you're taking off real material. Near a seam, or in a thin tile section, you risk creating lippage or cracking the stone. That's a call for a professional stone restoration contractor.
Deep gouges, chips where stone has broken away, and cracks are past DIY buffing. Those need color-matched epoxy fills and professional refinishing. Buffing a chip smooth just digs a bigger crater.
For reference, marble countertops with a high-polish finish show etching the worst, because the contrast between polished and etched surfaces is stark. A honed or brushed finish hides etching and cuts how often you'll be buffing.
What is the difference between honed, polished, and buffed marble?
These terms get mixed up constantly, including by people selling the stone.
Polished marble has a mirror gloss, usually built at the factory with industrial diamond polishing out to 3000+ grit. It shows fingerprints and etches the most.
Honed marble has a smooth, matte to satin finish, usually stopped around 400 to 800 grit. It's softer to look at and less reflective. Etches are less obvious because there's no mirror for them to contrast against, but they still happen.
Buffed marble is a loose term. It usually means the surface got hand- or machine-polished to restore or improve its finish, typically with polishing compound after the grit sequence. Buffing can take a honed surface up to a polish, or just bring back the original gloss.
Brushed or leathered marble is a different animal, made with wire brushes or textured diamond pads that leave a rough, tactile surface. You can buff a leathered marble to gloss, but you'll destroy the texture, so don't do it unless you mean to change the finish.
Restoring a polished surface means matching the factory gloss. Factory polishing uses machinery with even pressure across the whole slab, so matching one small spot is genuinely tricky. Your fresh patch will often read slightly brighter than the stone around it. From five feet away that's usually fine, and it mellows as the polished area sees normal use.
When should you hire a professional stone restoration company?
A few situations make DIY buffing the wrong call.
One: if the damage covers more than two or three square feet, pro equipment gives a far more even result. Restoration crews run planetary grinders that hold flat contact across the whole surface at once, which kills the localized low spots and roller marks that hand tools and angle grinders leave.
Two: lippage at seams, where one slab sits higher than its neighbor, calls for grinding across the seam with a floor machine or slab grinder. Botch that and you tear up the surrounding stone and create a bigger problem.
Three: heavy scratching from abrasive cleaners or steel wool is often too widespread for spot work. A full-surface restoration, where the pro grinds and re-polishes the entire top, is the only path back to a uniform finish.
Four: some marbles are porous or carry thin veining that makes aggressive grinding risky. Stones with heavy gold or rust veining can hold iron pyrite inclusions that behave unpredictably under the pad. A pro who's worked your specific stone earns their fee here.
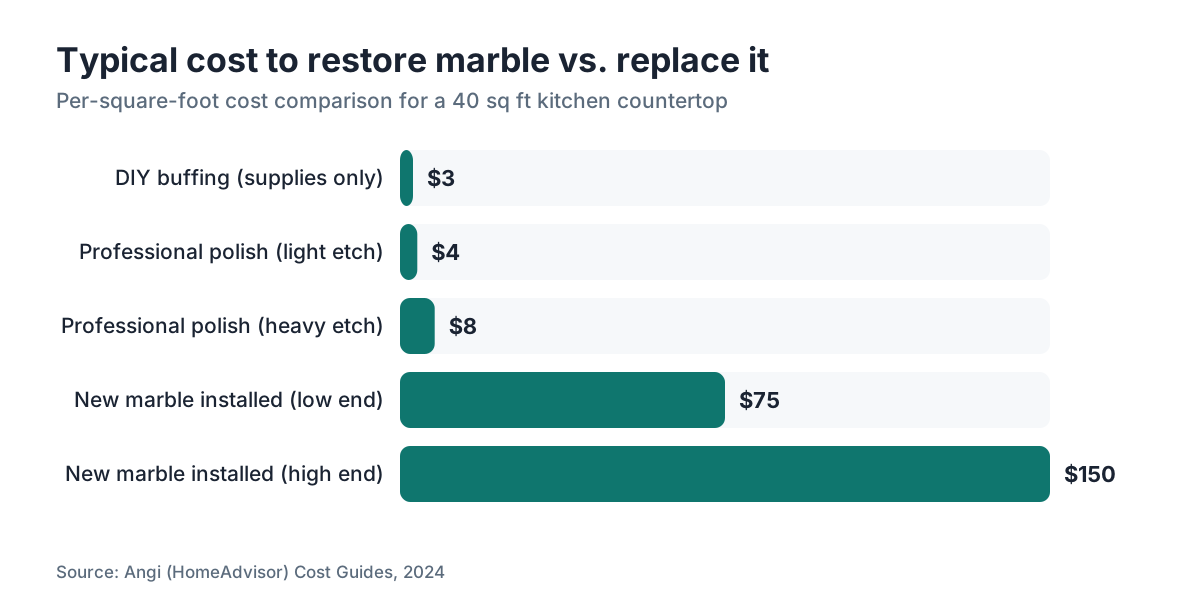
Professional marble polishing runs roughly $3 to 8 per square foot for in-home countertop work, based on contractor pricing surveys [3]. A 40-square-foot kitchen top lands at $120 to 320 on the low end, more if leveling or crack repair is in play. Not cheap, but well under a new slab and install, which runs $75 to 150 per square foot installed for marble [4].
How do you prevent marble from needing frequent buffing?
Acid contact causes most marble etching. Citrus juice, vinegar, wine, tomato sauce, coffee, and most cleaning sprays (including plenty sold as "natural" or "safe for stone") carry enough acid to etch polished marble on contact [5]. A pH-neutral cleaner made for stone is the single most effective thing you can do.
Sealing helps with staining but does nothing for etching. The sealer lives in the pores below the surface and blocks liquids from soaking in, but the surface itself is still bare calcium carbonate that reacts with acid. Plenty of homeowners are shocked their sealed marble still etches. It does.
Cutting boards, trivets, and wiping spills within a minute or two are the other real defenses. Marble in a busy kitchen will etch, full stop. The only question is how often and how badly.
For the kitchen countertops crowd who love the marble look but hate the upkeep, a honed finish beats polished as a starting point, because etches barely show. Some designers push further and spec leathered marble for hard-use kitchens, where the texture swallows minor damage.
Comparing marble's upkeep to other surfaces: granite countertops etch far less because granite is silicate-based, not carbonate-based. Quartzite countertops vary by stone, but true quartzite is also silicate and much more resistant to etching than marble.
Fabricators tracking which jobs drive warranty calls know the pattern: polished-marble kitchens in heavy-use homes top the list. If your shop runs quoting software (SlabWise keeps job-level notes, so you can flag marble polish jobs for follow-up), a check-in at six months catches etching complaints before they turn into bad reviews.
Does sealing marble before or after buffing change anything?
Always buff first, then seal. The logic is simple: buffing abrades the surface and takes off whatever sealer sat near the top. Seal before buffing and the sealer you applied comes right off, plus surface sealer can gum up polishing compounds by filling the pores you want the compound working in.
After you finish buffing and polishing, let the stone dry fully, usually 24 hours, before you apply a penetrating impregnating sealer [1]. Most sealers need a dry substrate to soak in and cure. Apply to damp stone and the sealer sits on top instead of penetrating, then hazes rather than protecting.
How often to reseal? The Natural Stone Institute (formerly the Marble Institute of America) recommends testing yearly with the water bead test: drop a tablespoon of water on the surface. If it beads, the sealer is still working. If it soaks in within a few minutes, reseal [6]. Most penetrating sealers on marble in normal use last 1 to 3 years.
Remember sealer does not restore gloss or buff out etches. A freshly sealed but unetched dull spot still looks dull. Gloss comes from physical smoothness, not from a coating.
What are the best products for buffing and polishing marble countertops?
A handful of products have long track records in stone care. This isn't an exhaustive list, and there are strong regional brands too.
Polishing powder: tin oxide and cerium oxide are the traditional professional picks. Both work on marble. Tin oxide is a touch finer and produces a bright, high gloss. Cerium oxide cuts a little faster. A single 4-ounce container covers multiple repairs.
Polishing cream/compound: StoneTech Stone Polish, Miracle Sealants Marble Polishing Powder, and Tenax Marble Polishing Powder are easy to find and well regarded by stone pros. Creams are easier to control than loose powder for beginners.
Diamond hand pads: Alpha Professional Tools and Stadea make wet/dry pads across the full grit range that wear evenly and stay consistent. Cheap no-name pads wear unevenly and leave swirl marks.
Sealers: penetrating impregnating sealers from StoneTech (Bulletproof or Pro), Miracle Sealants (511 Impregnator), and Aqua Mix are common and recommended by fabricators [7].
Cleaning before and after: any pH-neutral stone cleaner. Simple Green Stone Care, Method Daily Granite (pH-neutral, works on marble too), or diluted dish soap and water. Keep vinegar, bleach, ammonia, and citrus extracts away from it [10].
For how to clean stone countertops day to day, the routine you keep between buffing sessions matters as much as the buffing. Regular mild cleaning stretches the gap between restorations.
How does marble buffing compare across different stone countertop materials?
Marble is one of the more forgiving stones to buff, precisely because it's soft. That same softness means it needs buffing more often, but each session goes quickly.
Granite is much harder (Mohs 6 to 7) and rarely needs buffing. When it does, the process is the same but demands diamond pads with harder bond matrices and more time. Most homeowners never buff granite over the life of the countertop [2].
Quartzite ranges from marble-soft to near-granite-hard depending on the stone (and there's plenty of mislabeling in this trade). True quartzite buffs a lot like granite [8].
Engineered quartz (Cambria, Silestone, and the rest) can't be buffed the same way. The resin binder in Cambria countertops and similar products reacts to diamond abrasives differently than natural stone. Scratches in engineered quartz call for manufacturer repair kits or professional help. Light polishing with a non-abrasive quartz-specific polish is fine, but the diamond grit sequence you use on marble will damage engineered quartz.
Soapstone is soft (Mohs 1 to 2) and scratches easily, but its care runs on mineral oil rather than diamond buffing. Light scratches often disappear by hand with 400-grit sandpaper and oil [9]. More on that in how to clean soapstone countertops.
Laminate and Formica countertops take plastic/laminate-specific polishing compounds, but you can't restore a deep scratch or chip the way you can with stone. Once the laminate surface layer is through, the substrate is done.
For fabricators steering customers on material choice, laying out this upkeep reality upfront, including the cost and frequency of professional restoration if they pick marble for a busy kitchen, cuts down on complaints later. A simple maintenance-cost-by-material chart in your quoting flow is something SlabWise's job notes can track per customer if you're collecting the data.
| Material | Etch Resistance | DIY Buffable? | Pro Polish Freq. |
|---|---|---|---|
| Marble (polished) | Low | Yes, most cases | Every 3 to 5 years in heavy use |
| Marble (honed) | Low (less visible) | Yes | Every 5 to 10 years |
| Granite | High | Rarely needed | Rarely |
| Quartzite (true) | High | Sometimes | Rarely |
| Engineered quartz | High | No (resin surface) | N/A (manufacturer kits) |
| Soapstone | N/A (oil finish) | Yes (sandpaper+oil) | Ongoing but simple |
| Laminate | N/A | No | Replace if damaged |
How much does professional marble buffing and polishing cost?
Professional marble polishing for countertops runs $3 to 8 per square foot for standard work in most U.S. markets, based on contractor pricing data [3]. A typical 40-square-foot kitchen top comes to $120 to 320 before add-ons.
Add-ons that push the price up: lippage grinding ($1 to 3 extra per linear foot of seam), crack or chip repair ($50 to 200 per repair by size), travel fees in rural markets, and high-end specialty marbles where the contractor takes extra care against veining breaks.
Some restoration contractors set a flat minimum, often $150 to 250, regardless of square footage, because rolling a truck to a job carries fixed cost. For a small area with one or two etches, DIY almost always wins on price.
If the marble is beyond restoration and you're replacing the slab, installed marble runs $75 to 150 per square foot depending on type, edge profile, and region [4]. Replacement is rarely needed from etching alone. It becomes relevant with a major crack through the slab or severe staining that won't lift.
Shopping for a restoration contractor? Ask three things. Do they use planetary grinders (better for flat, even results on countertops)? Do they work wet or dry (wet is cleaner and keeps the stone cooler)? Do they carry liability insurance for stone damage? A reputable contractor answers all three without a pause.
Frequently asked questions
Can I use regular car polish or furniture polish to buff marble countertops?
No. Car polish is formulated for clear coat and paint, not calcium carbonate stone, and most brands carry silicones or petroleum distillates that leave a hazy residue on marble and interfere with future sealing. Furniture polish has the same problems. Use a compound or powder made for natural stone, such as tin oxide or a stone-specific polishing cream.
How long does it take to buff a small etch on a marble countertop?
A fresh, light etch the size of a coaster takes 20 to 45 minutes start to finish: cleaning, running the grit sequence, applying compound, and wiping down. A deeper etch or larger area takes longer, sometimes 1 to 3 hours. The grit progression can't be rushed without leaving haze, so patience is the main time cost.
Will buffing marble remove stains as well as etches?
Not reliably. Etches are surface damage to the stone itself, which buffing addresses directly. Stains are pigment or liquid that has soaked into the pores below the surface. Those need a poultice (a paste of absorbent material plus a cleaning agent, left on the stone for 24 to 48 hours), not abrasive buffing. You can have both an etch and a stain in one spot, which takes both treatments.
Is it possible to over-polish marble and damage it?
Yes. Too coarse a grit with too much pressure removes more material than needed, creating a low spot or flattening fine veining. Running abrasive pads dry instead of wet builds heat that can open micro-cracks. And buffing the same area repeatedly over years does gradually thin the slab, though that's rarely a practical worry for countertops unless the stone is already thin tile.
Can I buff marble countertops without a machine, just by hand?
Yes, for small areas. Diamond hand pads and polishing compound need nothing but your hand and a water spray bottle. Hand polishing is slower and a bit harder to keep flat over a large area, but for etches smaller than a dinner plate it works fine. For anything bigger, a low-speed angle grinder or random orbit polisher with diamond pad attachments gives more consistent results with less fatigue.
How do I know if my marble has a topical coating that would interfere with buffing?
Some older installations, especially from the 1990s and early 2000s, got treated with topical wax or polymer coatings. Signs: the surface looks glossy but feels slightly plastic rather than hard, water doesn't bead the way it does on sealed stone, and buffing reveals a cloudy layer instead of stone. Strip these with a topical coating remover before diamond buffing, or you'll just smear the coating around.
Does buffing marble make it more or less porous?
Buffing removes the very top surface layer, which slightly increases porosity right after polishing until you reseal. Polished marble is actually a little less porous at the surface than honed marble, because the dense, compacted top layer that produces the gloss is also less permeable. A penetrating impregnating sealer applied within 24 hours after buffing restores that protection.
What grit do I use to buff out a ring etch from a wet glass?
A water glass ring is usually a light acid etch from condensation carrying trace minerals or a slightly acidic drink. Start at 1500 grit, and if you feel any texture at the etch's edge, drop to 800. Run through 1500 and 3000, then finish with polishing compound. Work time is usually 20 to 40 minutes. These are among the easiest etches to fix.
Will professional polishing remove scratches from abrasive pads or steel wool?
Yes, in most cases. Steel wool and abrasive pads leave fine surface scratches that a professional planetary grinder starting at 200 to 400 grit removes efficiently. The question is whether the scratches are numerous and spread across the whole surface, which needs a full-surface pass, or confined to a small area. Either way, this is one of the clearest cases for a pro over hand tools.
How often do marble countertops need to be buffed professionally?
In a busy kitchen with regular cooking and cleaning, a polished marble top may benefit from professional polishing every 3 to 5 years. Light DIY touch-ups with polishing cream stretch that interval. In a low-use spot like a bathroom vanity or bar, professional polishing may not be needed for 10 years or more. A honed finish cuts the visibility of etching and lengthens the time between services.
Can I buff only part of a marble countertop and have it look consistent?
You can, and it often works fine for isolated etches. The risk is that freshly polished marble can read slightly brighter than the stone around it, especially if the surrounding stone has picked up a patina from use. That difference usually mellows over a few weeks to months. Polishing a very large section, say half a slab, is harder to blend invisibly at the transition line, which is another reason large-area work belongs with a pro who can treat the whole surface.
Is honed marble easier to buff than polished marble?
In some ways, yes. Honed marble's finish is already matte, so small inconsistencies in your buffing show less. You don't need mirror gloss to match the surface around it. If you're restoring a honed finish, stop at 800 or 1000 grit rather than pushing to 3000 grit and compound, or you'll end up with a shiny spot in a matte field, which looks worse than the original etch.
What is the water bead test and when should I use it on marble?
The water bead test checks whether your sealer is still working. Drop a tablespoon of water on the dry stone and wait 3 to 5 minutes. If it beads, the sealer is intact. If it soaks in and the stone darkens, the sealer has worn down and needs reapplying. The Natural Stone Institute recommends testing yearly. After buffing, always reseal and then test once the sealer cures (usually 24 to 72 hours) to confirm proper penetration.
Sources
- Natural Stone Institute, Care & Maintenance resources: Penetrating impregnating sealers should be applied to dry stone after polishing or restoration work to restore protection.
- U.S. Geological Survey, Minerals Information: Marble has a Mohs hardness of approximately 3 to 4, compared to granite at 6 to 7.
- Angi (formerly HomeAdvisor), Marble Polishing Cost Guide: Professional marble polishing runs approximately $3 to 8 per square foot for countertop restoration in most U.S. markets.
- Angi (formerly HomeAdvisor), Marble Countertop Cost Guide: Installed marble countertop costs run $75 to 150 per square foot depending on marble type, edge profiles, and region.
- Natural Stone Institute, technical guidance on acid etching of calcium-based stones: Acids in common kitchen items including citrus juice, vinegar, wine, and many cleaning products etch polished marble on contact by dissolving the calcium carbonate surface.
- Natural Stone Institute, sealer testing guidance: The water bead test is recommended annually to check whether a stone sealer is still providing effective protection.
- Tile Council of North America, TCNA Handbook for Ceramic, Glass, and Stone Tile Installation: Penetrating impregnating sealers are the recommended sealer type for natural stone countertops including marble.
- U.S. Geological Survey, Minerals Information: True quartzite, a metamorphic rock composed primarily of quartz, has a Mohs hardness near 7, significantly harder than marble.
- Natural Stone Institute, Care & Maintenance resources: Soapstone surface maintenance typically involves mineral oil application and light sanding rather than diamond polishing.
- NSF International: Certain cleaning agents including those with bleach and ammonia can damage natural stone surfaces and are not recommended for food-contact countertops.
Last updated 2026-07-09