TL;DR
- Buffing granite restores gloss and hides light scratches using diamond polishing pads (50 to 3,000 grit) or a stone polish cream on a felt pad.
- Most homeowners can handle light buffing in about an hour.
- Deep scratches or full repolishing need wet grinding and a variable-speed polisher, and that work belongs to a fabricator.
What does buffing granite actually do?
Buffing and polishing sound like the same job. They aren't. Polishing is abrasive work, grinding the stone through finer and finer grits until it reflects light like glass. Buffing is the last, lightest step of that ladder: a very fine abrasive or a chemical polish cream that brings back an existing finish without taking off real material.
Granite gets its shine at the quarry or the fabrication shop. Diamond-tipped heads run across the slab face in stages, often from 60 grit up to 3,000 grit, and that's where the glossy surface on a finished countertop comes from [1]. Years of food acids, harsh cleaners, and daily wear dull it. Buffing brings that surface back without starting over.
Here's what people get wrong. A dull granite counter is not always a polishing problem. Sometimes the sealer has gone cloudy. Sometimes it's hard water scale or wax buildup. Buff an unsealed, mineral-crusted surface and you'll be disappointed. Clean the stone hard first and rule those out before you touch a polishing pad.
For how granite is made and why the finish matters, see our guide to granite countertops.
What supplies do you need to buff granite countertops?
Your list depends on how far gone the finish is. Light haze needs almost nothing. Real scratches need a full grit kit.
For light buffing (everyday dullness or minor haziness), you need:
- A granite-specific polish cream or spray (Tenax Ager, MB Stone Care Polish, or a similar pH-neutral stone polish)
- A clean microfiber cloth or a soft felt buffing pad
- A variable-speed random-orbit polisher or a drill with a polishing pad, or just your hands for small areas
- A stone-safe cleaner to prep the surface
For scratch removal and deeper repolishing, the list grows:
- Diamond polishing hand pads or disc pads in 200, 400, 800, 1,500, and 3,000 grit (wet use)
- Water or a stone-safe lubricant
- A variable-speed angle grinder (4 or 5 inch) rated for wet work, or a dedicated wet polisher
- Masking tape and plastic sheeting to catch slurry
- Eye protection and a silica-rated dust mask if you do any dry work (more on that below)
Diamond hand pads cost roughly $5 to $20 each depending on grit and brand [2]. A homeowner-grade variable-speed wet polisher runs $80 to $200. Doing one countertop once? Rent the polisher instead of buying it.
Skip anything sold as a "granite cleaner" that lists bleach, vinegar, or ammonia. Those strip sealers and etch stone over time [3]. Neutral pH is the only safe choice on natural stone.
What grit sequence should you use for granite polishing?
Grit sequence is where most DIY jobs fall apart. People skip grits to save time, and the scratch pattern from the coarse pad shows straight through the finish. You can't hide it. You can only grind it out.
Here's how the stages work in practice:
| Stage | Grit | Purpose |
|---|---|---|
| Grinding | 50-100 | Removes deep scratches, lippage, old coatings. Almost never needed on home counters. |
| Shaping | 200-400 | Removes moderate scratches and levels the surface. |
| Honing | 800 | Produces a matte or satin finish. A fine stopping point if you want honed. |
| Polishing | 1,500-3,000 | Builds reflectivity. A true mirror finish starts here. |
| Buffing | 6,000+ or cream polish | Final gloss with almost no material removed. |
A typical home counter that's just a little dull might need only 1,500, then 3,000, then a cream buff. If there's a visible scratch, start two or three grits below what the scratch seems to need and work up.
Always run water as a lubricant under diamond pads. Dry grinding on granite throws off silica dust, and that's a serious inhalation hazard. OSHA's silica rule (29 CFR 1926.1153) caps worker exposure at 50 micrograms per cubic meter of respirable crystalline silica as an 8-hour time-weighted average, and dry cutting stone is one of the fastest ways past that limit [4]. Wet work knocks the dust down hard. Even a homeowner doing a small repair should wet-grind. Every time.
Spend equal time at each grit. A good rule with a power tool is two to three minutes per square foot per stage, pad always moving so you never cook one spot.
How do you buff granite countertops by hand, step by step?
Hand buffing works when the finish is mostly intact and you just want the shine back. Here's the whole process, start to finish.
-
Clean the countertop completely. Use a pH-neutral stone cleaner and a microfiber cloth. Lift off grease, food residue, hard water scale (plastic scraper for deposits, never metal), and old wax. Let it dry all the way.
-
Check the sealer. Drip a few drops of water on the stone. Beading means the sealer is fine. Soaking in within a few minutes means it's spent, and you should re-seal after buffing, not before [5].
-
Apply granite polish. A dab the size of a quarter, or a spray per the label. You do not need much.
-
Work small sections. Circular or back-and-forth motion with a clean, dry microfiber cloth or felt pad, moderate pressure, a 12-inch by 12-inch area at a time.
-
Buff to a haze, then wipe clean. As the product dries to a light haze, buff it off with a second clean cloth. That clears the excess and brings up the shine.
-
Repeat across the counter in overlapping sections.
-
Re-seal if the water test showed absorption. Apply a penetrating impregnating sealer, let it dwell per the label, wipe the excess. Most granite sealers need 24 to 48 hours to cure before heavy use [5].
Average kitchen counter: 30 to 60 minutes. It won't match a professional repolish, but for maintenance it's plenty.
Can you use a drill or angle grinder to buff granite at home?
Yes, with real caveats.
A variable-speed drill with a 4-inch diamond polishing pad handles the polishing stages fine on small areas. Keep the speed under 2,000 RPM for most stages and keep water running. The drawback is the chuck. It can wobble under sideways load, which puts uneven pressure across the pad. It works. It's just slower and needs more attention.
An angle grinder is faster, but only a variable-speed model. A fixed-speed grinder spinning at 10,000-plus RPM overheats the stone and can cause thermal cracking or burn marks. Purpose-built variable-speed wet polishers are the right tool for anything past small spot repairs.
Renting? Ask for a wet polisher (sometimes listed as a stone or granite polisher). Makita, Metabo, and Flex make popular professional versions in the $300 to $600 range, and rental shops often carry them for $40 to $80 a day [2].
One practical tip. Tape a dam of painter's tape around your work zone and keep a spray bottle handy. The slurry off wet polishing is gray, gritty, and it stains grout and discolors nearby surfaces if you let it sit. Keep rags close and wipe it up before it dries.
How do you remove scratches from granite countertops?
Start by finding out whether the scratch is in the stone or just in the sealer. Run a fingernail across it. If the nail catches, it's in the stone. If it glides over and the scratch only shows visually, it may be surface haze or a sealer scratch that polish cream alone can handle.
For real stone scratches:
Light scratches (nail barely catches): Start at 400 grit wet, then 800, 1,500, 3,000, then cream polish. This usually blends close enough to the surrounding finish to disappear in most light.
Moderate scratches (nail catches clearly): Start at 200, then 400, 800, 1,500, 3,000. Plan on 20 to 40 minutes of wet work per stage on a concentrated area.
Deep gouges or chips: Start at 50 to 100 grit to level the area, then climb the full sequence. Now you're removing real material across a wider zone to feather the repair in, and the risk of a visible dip or a finish mismatch is real. A fabricator with the right tools and experience on your granite color will usually get a cleaner result.
One honest note. Some colors and finishes just don't match well after a spot repair. Granite with heavy movement, big crystals, or unusual coloring can show the fix even when your grit work is perfect, because the stone's optical character in that spot shifts a little. Dark, uniform granites repair cleanly. Busy multi-color ones fight you.
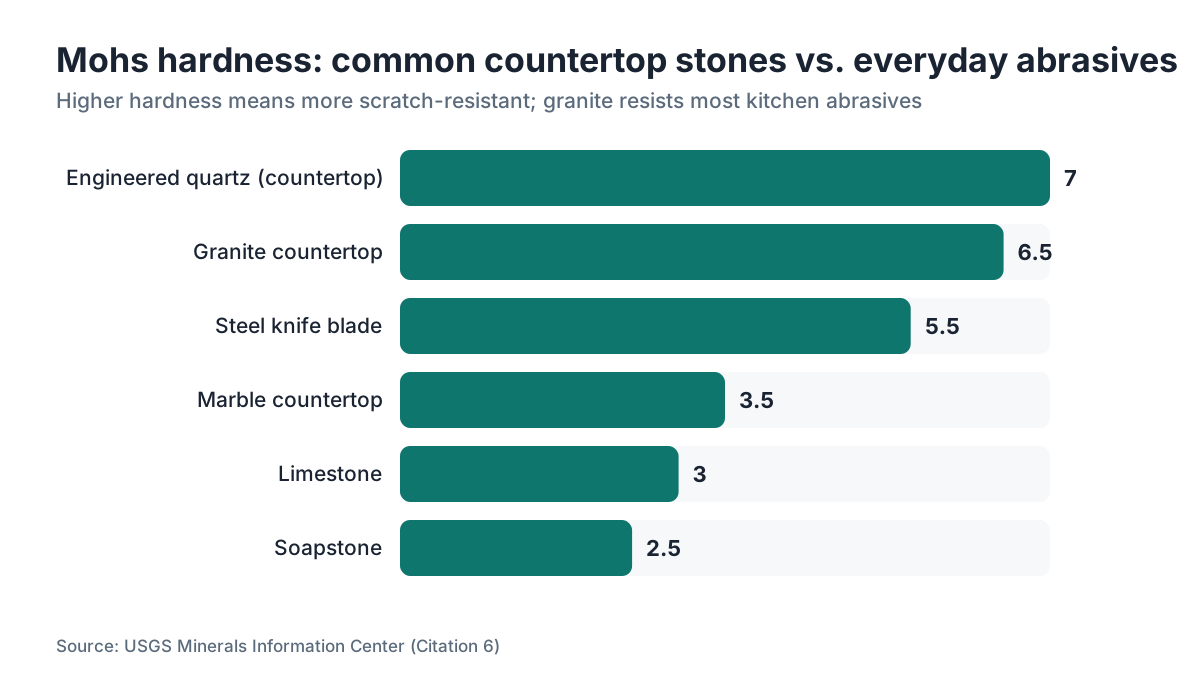
For other stone, the scratch approach for marble countertops is similar, but marble is much softer (Mohs 3-4 vs granite's 6-7 [6]) and easier to over-polish.
How often should you buff granite countertops?
Maintenance buffing with a polish cream: once or twice a year covers most kitchen counters. High-traffic zones near the sink or stove might want quarterly attention.
Resealing: most penetrating sealers last one to five years, depending on the stone's porosity, the sealer, and how you treat the surface daily [5]. The water-bead test beats any calendar. When water stops beading and soaks in within two to five minutes, reseal.
Full professional repolishing: most homeowners never need it. If the surface has dulled evenly over years and light buffing no longer brings the shine back, professional repolishing (usually $200 to $600 for an average kitchen, depending on condition and market [7]) is worth it. This is not routine maintenance.
What wrecks granite finishes faster than normal use: acidic foods left sitting (lemon juice, tomato sauce, vinegar), abrasive scrub pads, and cleaners with ammonia, bleach, or citrus [3]. National Park Service preservation guidance on masonry warns that harsh and improper cleaning methods rank among the leading causes of accelerated stone deterioration [8]. That lands directly on kitchen counters: the wrong cleaner does more damage than years of cooking.
When should you hire a professional instead of DIYing?
DIY buffing makes sense when the finish is just dull and not scratched, when you're doing routine maintenance on a sealed surface, and when the area is small (a spot or a section, not the whole kitchen).
Call a fabricator or stone restoration pro when:
- There are deep scratches, chips, or cracks
- The surface has been etched by acid (common on granite with calcite veins, and near-certain on marble or limestone)
- You tried light buffing and the dullness came right back, which suggests the surface texture itself has changed
- The countertop is a rare or unusual stone where a botched repair would be expensive to undo
- The area is large, like a full kitchen or island, where matching results across the whole surface is hard without professional gear
Stone restoration companies charge per square foot, typically $8 to $25 for repolishing depending on condition and region [7]. A 30-square-foot kitchen counter might run $240 to $750. Real money, but usually far below replacement.
Fabricators running their shop on software like SlabWise can quote restoration and repolishing work fast, right alongside new slab jobs. So if you're getting a new countertop installed and have an adjacent surface that needs repolishing, ask about bundling.
For a sense of what professional installation and surface work involves, see our countertop installation guide.
Is granite buffing the same as honing, and which finish is better?
No, and the terms get used loosely in the trade, so the mix-up is understandable.
Honing means grinding the stone to a set grit (usually 400 to 800) and stopping there on purpose. The result is a flat, matte or satin surface with no mirror reflection. Honed granite hides fingerprints better than polished, but it drinks liquids more readily and usually needs sealing more often.
Polishing means carrying the grit sequence past honing to 1,500, 3,000, sometimes higher, for a reflective, glossy surface. Most granite counters sold in the US are polished.
Buffing means applying a final polish compound or cream to an already-polished surface to hold or restore the gloss. It's maintenance, not a finish change.
You can turn polished granite into honed by grinding it back to 400-800 grit. You cannot bring a honed surface back to polished without running the full grit sequence again. That's why the honed-versus-polished call matters at purchase, not after install.
For kitchens, polished granite is easier to clean and shows stains before they set because the surface is tighter. Honed suits bathrooms and more contemporary styles. Neither is better in the abstract. It comes down to how much maintenance your household will tolerate.
Comparing stone options with different maintenance profiles? Our guide on how to clean stone countertops lays out the differences across stone types.
What about silica dust safety when buffing granite?
This section matters, and most DIY articles skip it.
Granite holds crystalline silica, typically 25 to 60 percent by weight depending on the variety [9]. Grind or cut it dry and fine silica particles go airborne. Breathe them in and you risk silicosis, a progressive, irreversible lung disease. CDC and NIOSH have documented silicosis in countertop fabricators, with engineered stone (quartz) carrying the highest risk, but grinding natural granite also produces hazardous exposures [10].
For a homeowner doing a small spot repair, the practical risk from a few minutes of wet polishing is low. The precautions are so simple there's no reason to skip them:
- Always wet-grind. Water suppresses airborne silica by roughly 85 to 90 percent [4].
- Work in a ventilated space, or outdoors if you can.
- If you do any dry work (you shouldn't, but just in case), wear an N95 respirator at minimum. A paper dust mask is useless against crystalline silica.
- Never sweep dry slurry. Mop it up wet.
For professional fabricators, OSHA's silica standards for construction (29 CFR 1926.1153) and general industry (29 CFR 1910.1053) both require engineering controls, exposure monitoring, and medical surveillance once exposures cross the action level [4]. Shops should have a written exposure control plan. OSHA publishes guidance aimed specifically at the stone countertop fabrication industry [11].
One homeowner buffing one counter faces a completely different risk than a shop worker grinding stone eight hours a day. Proportion matters. But wet work is non-negotiable, even for DIY.
Does buffing help if the granite surface is etched or stained?
Etching and staining are different problems, and they need different fixes. Buffing solves one and does nothing for the other.
Staining means a pigment or substance has soaked into the stone's pores. It reads as a darkened area, often with a defined edge. Buffing does nothing here. You need a poultice (a paste that pulls the staining substance back out) matched to the stain type. Oil-based stains respond to a poultice made with baking soda and acetone or hydrogen peroxide. Organic stains (coffee, tea, wine) respond to hydrogen peroxide poultices. Marble Institute care resources spell out the stain-matching protocols [12].
Etching means an acid reacted with calcium carbonate in the stone and left a dull, rough spot. Pure granite with no calcite veins shrugs off acid. But plenty of stones sold as granite (and essentially all marble, limestone, and travertine) carry calcium carbonate and will etch under lemon juice, vinegar, or acidic cleaners.
Buffing can improve a light etch on granite by re-polishing that spot. Heavier etching needs the full grit sequence, starting several grits below the visible damage. On marble, etching is both more common and more severe. See our guide on marble countertops for the specifics.
Heavy staining across a large area won't come out with buffing and repolishing. That's a job for professional stain removal, and possibly refinishing.
How do you maintain the shine after buffing?
The buffing you just did lasts longer if you treat the surface right afterward. Most of this is habit, not effort.
Re-seal promptly if the sealer was spent. A fresh impregnating sealer (not a topical coating, which peels) gives the stone a renewable layer of protection. Tenax, Aqua Mix, and StoneTech are widely used by fabricators and easy for homeowners to buy.
Clean with pH-neutral products daily. Dish soap diluted in water is fine for routine cleaning. Purpose-made stone cleaners are better because they leave no residue and don't strip the sealer over time.
Use cutting boards. Knives don't hurt granite (the stone is harder than most steel), but they dull your blades fast and can micro-abrade the finish over years.
Use trivets for hot pans. Granite handles brief heat fine (it formed at extreme temperatures, after all), but sudden thermal swings and prolonged heat from a screaming cast iron pan can stress the stone or hurt the sealer [13].
Wipe spills fast, especially acidic ones. The sealer buys you time. It's not a permanent barrier. Wine, tomato, citrus, and vinegar dressings should come up within a few minutes.
For how other countertop materials compare on care, our guide to kitchen countertops covers the full range.
Running a shop? SlabWise's quoting tools let you itemize stone restoration alongside slab and fabrication costs in one estimate, so bundled jobs stop leaking margin. A demo takes about five minutes.
Frequently asked questions
Can I buff granite countertops with a regular car polish or wax?
No. Car wax and paint polish are made for clear-coat finishes, not stone. They leave a greasy film on granite that grabs dirt and makes re-sealing harder later. Some car polishes carry silicones that fight stone sealers. Use a product formulated for natural stone. The price gap is small and the performance gap is not.
How long does buffing granite countertops take?
Light maintenance buffing with a polish cream runs 30 to 60 minutes on a typical kitchen counter. Scratch repair on a small area with wet diamond pads adds another 30 to 90 minutes depending on depth and how many grit stages you need. A full professional repolish of a complete kitchen counter takes a pro team two to four hours, cleanup of the slurry included.
Will buffing remove the sealer on my granite?
Light buffing with a polish cream rarely strips a good penetrating sealer, but heavy mechanical polishing with coarse diamond pads removes the sealer along with the surface layer it protects. After any repolishing above 200 grit, test with water drops. If absorption has increased, re-seal before the counter goes back into full use. Most impregnating sealers are rated for one to five years.
Can I buff granite to remove hard water stains?
Hard water deposits (calcium carbonate and mineral scale) have to be dissolved or scraped off before you buff. A plastic scraper or a product with a mild acid like citric acid can dissolve deposits, but use it carefully because even mild acids affect stone sealers. Buffing over dried scale just scratches the surface. Remove deposits first, then buff. Years of buildup may need a professional stone cleaner first.
What's the difference between granite polish and granite sealer?
Polish is abrasive or chemical and restores surface gloss. Sealer soaks into the stone and blocks liquid absorption from within. They do completely different jobs. Polish doesn't seal, and sealer doesn't polish. Many care kits sell both and tell you to polish first, then seal. In practice, sealing is the more important of the two for protecting the stone. Polishing is cosmetic. Do both, just don't confuse them.
Can you buff out a chip in granite?
A chip is lost material. Buffing can't put back what isn't there. Chips get repaired with color-matched epoxy or acrylic filler, cured, then ground flush and polished to match. The fix is often invisible on dark, uniform granite and more visible on light or heavily patterned stone. A fabricator who works with your slab type gets the best color match.
How much does professional granite buffing and polishing cost?
Professional granite repolishing typically costs $8 to $25 per square foot, with most full kitchen jobs landing at $200 to $600 depending on condition, stone type, and regional labor rates. Badly scratched or etched surfaces that need multiple grit stages cost more. Surface-only buffing and re-sealing (no deep scratch work) often runs $150 to $300 for a kitchen. Get at least two quotes. Pricing swings a lot by market.
Does buffing granite work on dark granite or only light-colored stone?
Buffing works on every granite color. Dark granites like Absolute Black or Black Galaxy often show the results more dramatically, because the jump between a dull and a polished black surface is easy to see. The technique doesn't change with color. The one difference is that repair blending is generally easier on dark, uniform stone than on light, busy, multi-color granite where matching across a repaired zone is harder.
Is it safe to buff granite near the sink area where there's constant water exposure?
Yes, but the sink area needs sealing more often than the rest of the counter because water and soap strip sealers faster. Buff and re-seal the sink surround separately if it's dulling ahead of everything else. Also check the caulk joint between sink and stone: a failing joint lets water wick under the stone and can cause staining, or in rare cases undermount sink failure. That's unrelated to polishing, but you often catch it at the same time.
Can buffing fix dull granite around the cooktop or stove area?
Dullness near the cooktop usually comes from heat stress on the sealer, grease baked onto the surface, or scrubbing with an abrasive pad. Clean the area hard first with a degreaser rated for stone. If dullness sticks around after cleaning and sealer restoration, mechanical buffing with fine pads (1,500 to 3,000 grit) and then polish cream should bring the shine back. Burned or heat-cracked stone needs a fabricator's eyes.
Do I need to empty the kitchen or cover appliances before buffing granite?
For hand buffing with cream polish, minimal prep: clear the counter and lay a towel over adjacent cabinets. For mechanical polishing with water, do more: cover appliances, the sink, and any open cabinet interiors with plastic sheeting, and put old towels on the floor. Slurry (fine stone particles in water) splatters several feet, stains grout, discolors paint, and clogs drains if it runs into the sink.
How do you know when granite needs buffing versus full replacement?
Granite is almost never worth replacing over surface finish alone. Even severe scratching and etching can be repolished by a pro for a fraction of replacement cost. Replacement makes sense only if the stone is cracked through (more than surface-scratched), if it broke at a seam, or if you want a different stone. A worn finish is a maintenance issue, not a material failure. Get a restoration quote before you decide to replace anything.
Can you buff granite countertops that have been painted or coated?
If someone painted or coated over granite (it happens), you have to strip that coating before you can buff the actual stone. A chemical stripper made for stone (confirm it's safe for the specific coating) or mechanical grinding at a coarse grit will pull the coating off, but it's a big job. After stripping, run the normal grit sequence. Don't try to buff over a peeling or damaged coating. You'll drive debris into the surface.
Sources
- Marble Institute of America (MIA+BSI), Dimensional Stone Design Manual: Granite receives its polished finish through progressive diamond abrasive stages in fabrication shops, typically from coarse grinding to 3,000-grit polishing.
- Natural Stone Institute, Technical Manuals: Diamond polishing hand pads cost roughly $5 to $20 each; professional wet polishers run $300 to $600 and tool rental typically costs $40 to $80 per day.
- Natural Stone Institute, Stone Care & Maintenance: Bleach, ammonia, vinegar, and citrus-based cleaners strip stone sealers and etch surfaces over time and should not be used on natural stone countertops.
- OSHA, Respirable Crystalline Silica Standard for Construction (29 CFR 1926.1153): OSHA limits worker exposure to 50 micrograms per cubic meter of respirable crystalline silica as an 8-hour time-weighted average; wet methods suppress airborne silica by approximately 85 to 90 percent.
- Marble Institute of America (MIA+BSI), Care & Maintenance of Natural Stone: Penetrating impregnating sealers for granite last one to five years depending on porosity and use; the water-bead test indicates when resealing is needed; sealers typically require 24 to 48 hours to cure fully.
- USGS Minerals Information: Industrial Minerals: Granite rates 6 to 7 on the Mohs hardness scale; marble rates 3 to 4, making granite significantly harder and more scratch-resistant.
- National Stone, Sand & Gravel Association, Industry Data: Professional granite repolishing costs approximately $8 to $25 per square foot in the US, with full kitchen jobs typically ranging $200 to $600.
- National Park Service, Preservation Briefs 1: Cleaning and Water-Repellent Treatments for Historic Masonry Buildings: NPS preservation guidance warns that harsh and improper cleaning methods are among the most common causes of accelerated stone deterioration.
- USGS, Mineral Resources Program: Silica Statistics and Information: Granite contains crystalline silica typically in the range of 25 to 60 percent by weight depending on granite variety.
- CDC/NIOSH, Silica page (silicosis among engineered stone fabrication workers): CDC and NIOSH have documented silicosis cases specifically among countertop fabricators; engineered stone presents the highest risk but natural granite grinding also produces hazardous silica exposures.
- OSHA, Silica page for stone fabrication (general industry guidance, 29 CFR 1910.1053): OSHA publishes silica guidance for the stone countertop fabrication industry; general industry rule 29 CFR 1910.1053 requires engineering controls, exposure monitoring, and medical surveillance above the action level.
- Marble Institute of America (MIA+BSI), Stain Removal Guide for Natural Stone: Oil-based stains on granite respond to acetone or hydrogen peroxide poultices; organic stains respond to hydrogen peroxide-based poultices; stain type must be matched to poultice chemistry.
- Natural Stone Institute, Stone in Residential Kitchens Technical Guide: Rapid thermal changes from very hot cookware can stress granite countertop surfaces and affect sealer performance; trivets are recommended as standard practice.
Last updated 2026-07-09