TL;DR
- Vinyl wrap countertops use adhesive-backed film applied over an existing surface.
- DIY kits run $3, $8 per square foot; professional installation adds $150, $400 in labor.
- It lasts 3 to 7 years with careful upkeep.
- It's a real short-term fix for renters or tight budgets, but it won't fool anyone up close and it can't repair damaged substrate.
What exactly is vinyl wrap for countertops?
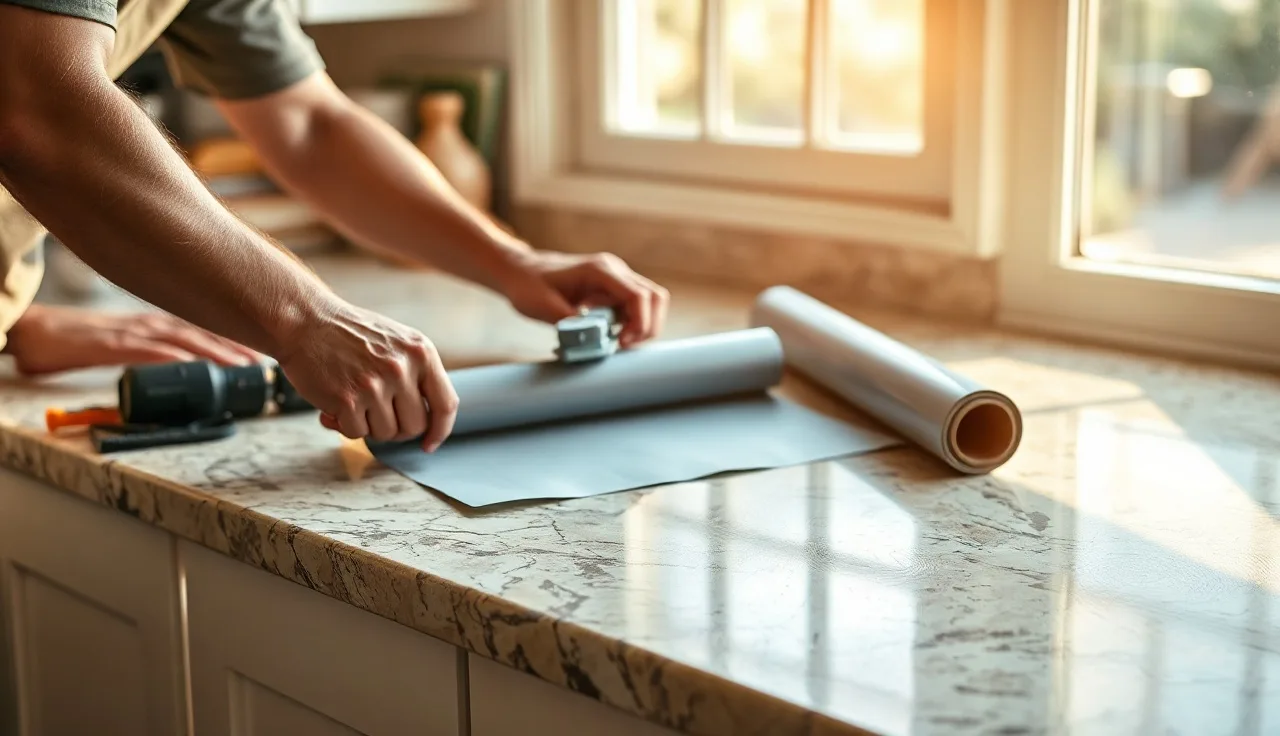
Vinyl wrap for countertops is an adhesive-backed film, usually 3 to 10 mil thick, that sticks directly over an existing surface. You apply it like a very large decal: peel the backing, smooth out air bubbles, trim the edges, done. The film is usually PVC-based, printed with stone, wood, concrete, or solid-color patterns, and coated with a thin laminate layer for scratch resistance.
This is not the same product as laminate countertops like Formica or Wilsonart, which are rigid sheets bonded with contact cement during fabrication. Vinyl wrap is thinner, more flexible, and fully removable (in theory). It's also different from Formica countertops, which a fabricator installs. Wrap is something a homeowner can do on a Saturday.
The market calls these products countertop contact paper, kitchen wrap film, or 3D countertop film. All describe roughly the same thing: a thin, flexible, peel-and-stick overlay. Brand names like d-c-fix, Artesive, and Con-Tact cover the mainstream DIY tier. Professional-grade films from 3M (Di-Noc series) and Avery Dennison are thicker, have better adhesive systems, and cost more.
Be clear about this upfront: it's cosmetic only. The wrap sits on top of whatever substrate you already have. If your countertop is cracked, delaminating, or structurally weak, vinyl wrap hides the problem for a while and fixes nothing.
How much does vinyl wrap for countertops cost?
Costs split into two buckets: materials and labor. For a typical kitchen with 40 to 60 square feet of countertop, here's the math.
| Tier | Product example | Material cost per sq ft | Typical total material (50 sq ft) |
|---|---|---|---|
| Budget DIY film | Con-Tact, generic Amazon brands | $0.50, $1.50 | $25, $75 |
| Mid DIY film | d-c-fix, Artesive | $2, $4 | $100, $200 |
| Pro-grade architectural film | 3M Di-Noc, Avery | $5, $12 | $250, $600 |
| Professional install (labor only) | Local wrap installer | $3, $8/sq ft labor | $150, $400 |
A homeowner doing it themselves with mid-range film usually spends $100, $250 in materials for a full kitchen. A professional install using pro-grade film on the same kitchen runs $600, $1,200 all in. The range is wide because wrap installers set their own rates and pro film prices swing with pattern complexity.
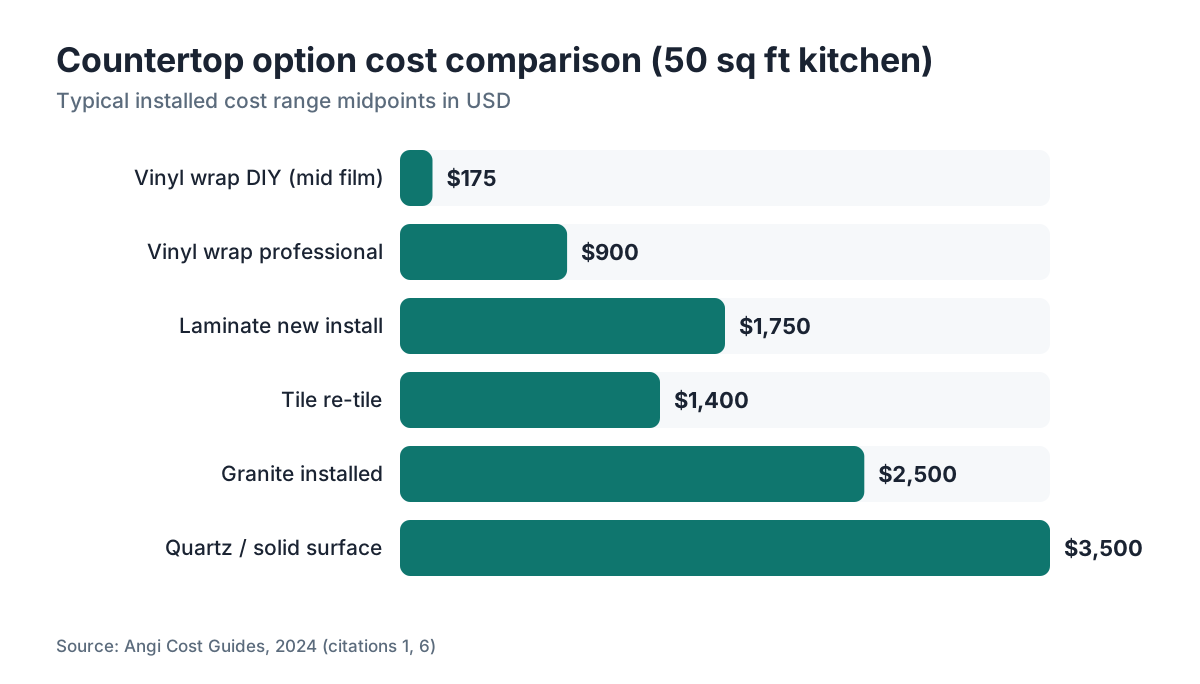
Compare that to new laminate countertops, which run roughly $20, $50 per square foot installed [1], so $1,000, $2,500 for a 50-square-foot kitchen. Granite countertops start around $40, $60 per square foot installed [6]. Vinyl wrap is dramatically cheaper. That's the whole point.
Budget film in the $0.50, $1.50 range is genuinely hard to apply without visible seams, and it tends to peel at edges within a year. Nobody who's done this project recommends the cheapest rolls. If you're going to do it, the $2, $4 per square foot tier is the practical floor.
How long does vinyl wrap last on a countertop?
Honest answer: 3 to 5 years for DIY mid-grade film applied correctly, and up to 7 years for professional-grade architectural film installed by someone experienced. Both figures assume normal kitchen use, which means heat from dishes, moisture near the sink, and daily cleaning.
Edges and seams fail first. Every seam is a spot where water can get under the film and lift the adhesive. Countertops near the sink and stove take the most abuse. If you apply wrap but skip sealing every edge with a compatible edge sealant (or don't trim to the edge properly), you'll see lifting within months.
Heat is the other enemy. PVC film softens around 140 to 160°F [2]. A hot pan set directly on vinyl wrap leaves a permanent mark or causes bubbling. A trivet habit is mandatory, not optional. That's a real behavior change, and some households don't stick to it.
UV exposure degrades the print layer too. Countertops near windows or under intense task lighting fade faster. Better films carry UV-inhibitor coatings [9]. Cheap ones don't. Wrapping a counter that gets hours of direct sun daily? Budget for replacement in 2 to 3 years.
There's no independent standardized lifespan testing for countertop applications that I'm aware of. The figures above come from manufacturer technical sheets and user-reported results in home improvement communities. Treat them as practical estimates, not guarantees.
What countertop surfaces can you vinyl wrap over?
This is where many DIY projects go sideways. The substrate matters enormously.
Good candidates for vinyl wrap:
- Laminate countertops in good condition (no swelling, delamination, or bubbling)
- Solid surface like Corian, if lightly sanded to knock down the gloss
- Solid wood or butcher block countertops with a clean, dry, smooth surface
- Tile with grout lines filled flush
Problematic or not recommended:
- Granite, marble, or quartzite. Not because the film won't stick initially, but because the stone is porous in texture even when sealed, and the adhesive bond runs inconsistent. More to the point, wrapping granite countertops or marble countertops is almost always a downgrade, both visually and financially.
- Heavily textured tile where you can't fill the grout lines flush
- Any surface with an active moisture problem (swollen laminate, wet wood)
- Concrete countertops with a rough, uneven surface
For tile specifically: the grout lines create valleys the film has to bridge. Thin film shows the pattern underneath. Thicker film handles it better. Some installers fill grout lines with a skim coat of patching compound first, let it cure, sand smooth, then wrap. That adds a half-day and makes a real difference.
Surface prep is 80% of the job. Clean the surface with isopropyl alcohol (70% or higher) to strip all oils and residue. Let it dry completely. Any contamination under the film shows up immediately and blocks proper adhesion.
How do you apply vinyl wrap to countertops, step by step?
This is a doable DIY project for a patient, detail-oriented person. It's not casual. Budget 3 to 5 hours for a typical kitchen, longer with complex cutouts or edge profiles.
Tools to have before you start:
- A squeegee or credit-card-style applicator (a felt-edged squeegee is better)
- A heat gun or hair dryer
- A sharp utility knife with fresh blades
- A ruler or straight edge
- Isopropyl alcohol (70%+) and clean lint-free cloths
- Masking tape for positioning
- Seam sealer compatible with PVC film (optional but recommended)
Step 1: Measure and cut. Add 2 to 3 inches to each dimension for overhang and trimming. If your counter is wider than your film roll (most rolls are 24 to 60 inches wide), you'll need a seam. Plan seam placement at the back edge or a corner, never in the middle of a field.
Step 2: Clean the surface. Isopropyl alcohol, then let it dry fully. Don't skip this.
Step 3: Wet application or dry? Some installers use a light mist of soapy water (a few drops of dish soap per quart) so the film repositions. Others go dry. Wet buys repositioning time but cures slower. Dry is faster and unforgiving. Wet works better for larger rolls and beginners.
Step 4: Apply from one edge, pushing bubbles out with the squeegee in overlapping strokes. Work methodically. Chasing a bubble with random pressure just makes more bubbles. Gentle heat (not hot) softens the film around curves and edges.
Step 5: Cutouts for sinks and faucets. Score and cut with the utility knife after the film is down. A sharp blade is essential. A dull blade tears the film.
Step 6: Trim edges and apply seam sealer. This is where rushed DIY jobs look amateur. Take your time on the trim.
Small bubbles that appear after application often disappear within 24 to 48 hours as the adhesive cures. Bigger ones come out with a pin prick and a squeegee. If a bubble has a visible wrinkle, that section has to come off and go back down.
For fabricators tracking material costs and waste on projects like these, SlabWise handles quoting and nesting for stone and other countertop materials, which helps when clients weigh full replacement against a wrap job.
Does vinyl wrap actually look good, or does it look cheap?
Honest answer: from a normal standing distance (4 to 6 feet), a well-applied professional-grade film looks surprisingly convincing. Up close, or the moment someone touches it, the illusion breaks.
The biggest tells:
- Seams. Any film wider than the roll has at least one seam. A good installer makes seams nearly invisible. A DIY seam usually shows.
- Edge profile. Real stone and quality laminate have built-up, shaped edges. Vinyl wrap on a square laminate edge still looks like wrapped laminate.
- Texture. High-end architectural films carry an embossed texture that approximates stone or wood. Budget films are flat and look flat.
- Thickness. Wrapping over an existing counter raises the surface slightly (1 to 5 mil). Where the film meets the wall, sink, or stove, there's a visible step.
For photography and social staging, wrapped countertops read as stone or wood convincingly. In person, most people who work with real stone every day (contractors, designers, fabricators) spot it instantly.
If looks are the goal and the budget clears $2,000, new laminate countertops installed properly look better and last longer. If the budget is $200 and the target is a rental or a low-end flip, wrap is entirely rational.
One design note: solid colors and concrete-look patterns forgive imperfect application better than marble or wood grain, where the repeat pattern has to line up across seams. First wrap project? Start with a simpler pattern.
Can you vinyl wrap a countertop with a sink or stove cutout?
Yes, and it's manageable with the right approach. A sink cutout is the most common challenge.
The method most installers use: apply the film across the full surface, including over the sink opening. Once the film is down and smoothed, score around the sink cutout from below with a utility knife guided by the existing edge, then fold the film down into the opening and adhere it to the side wall if depth allows, or trim it flush. A heat gun helps the film conform to the inside edge radius.
For undermount sinks, the film ends at the sink's top edge. That edge takes water directly, and it's the failure point. Seam sealant here is mandatory, not decorative. Some installers add a bead of clear waterproof silicone as insurance.
Drop-in sinks are slightly easier because the rim sits on top and covers the film edge. The edge still needs sealant, but the rim's mechanical protection cuts down on peeling.
Stove cutouts follow the same logic. The added concern is heat: film near a gas or electric burner ring gets hot. Keep a 2-inch clear zone around burner edges (trim the film back) to reduce heat exposure. Some installers run a high-temperature vinyl in that zone, though it creates a visible seam. NKBA design guidelines call for heat-resistant surfaces next to cooktops, which a wrapped counter isn't, so the trivet-zone approach is a workaround, not a fix [10].
The truth is, cutouts are where most wrap jobs show age first. Check these areas every 6 months and re-seal any lifted edges before water gets underneath.
What are the real downsides of vinyl wrap countertops?
Several, and they're worth knowing before you commit.
Heat damage is permanent. Set a hot pan on vinyl wrap once and you get a permanent divot or bubble. Period. It's the most common complaint in user reviews.
Moisture at seams is a slow disaster. Water working under the film doesn't just cause peeling. It can trap moisture against the substrate and grow mold if that substrate is wood or particleboard. That's more serious than it sounds in older kitchens with already-compromised substrates.
Removal can be messy. "Easily removable" is the manufacturer's line. Reality depends on how long the film's been down, which adhesive was used, and how warm the kitchen runs. Film left down 3+ years often leaves adhesive residue that needs solvents to clean fully. On laminate, aggressive removal can damage the substrate.
It doesn't add value to the home. Appraisers and buyers reading comps know the difference between a wrapped counter and a stone or quality laminate installation. Cosmetic surface overlays don't earn separate appraisal credit; only structural and material upgrades move appraised value [3]. Don't do this project expecting it to raise your home's worth. It won't.
Repairs show. Damage one section, patch it with new film, and the patch almost always reads. The only clean fix is usually replacing the whole surface.
For any project where you're seriously weighing resale value or longevity, countertop installation of a new surface serves you better. If the goal is purely cosmetic and temporary, vinyl wrap is reasonable. Know which situation you're in.
Vinyl wrap vs. other budget countertop options: which makes more sense?
This is the real question behind most vinyl wrap searches. Let's be direct about the trade-offs.
| Option | Typical installed cost (50 sq ft) | Lifespan | DIY-friendly? | Looks |
|---|---|---|---|---|
| Vinyl wrap (DIY, mid film) | $100, $250 | 3 to 5 years | Yes | Convincing at distance |
| Vinyl wrap (pro install) | $600, $1,200 | 5 to 7 years | No | Better seams and edges |
| Laminate (new install) | $1,000, $2,500 | 10 to 20 years | Difficult | Very good |
| Tile (re-tile) | $800, $2,000 | 15 to 25 years | Moderate | Good |
| Solid surface (Corian-style) | $2,000, $5,000 | 20+ years | No | Excellent |
| Granite or quartz | $2,000, $6,000+ | 25+ years | No | Excellent |
Renters who can't replace countertops and want a quick visual upgrade have exactly one legal option on this list: vinyl wrap. That's a genuine use case.
If you own the home and plan to stay 5+ years, the math usually favors new laminate over repeated wrap installations. Two wrap projects over 10 years cost about the same as one laminate install and look worse. The exception is selling within 2 years and wanting better listing photos without a big outlay.
In rental properties, the durability math shifts because tenants aren't always careful with heat. A pro film application in a rental might not survive one lease term. Tile or solid-surface options have better cost-per-year math over a landlord's time horizon.
What do fabricators think of vinyl wrap countertops?
Fabricators and stone shops see vinyl wrap as a separate market segment. They're not competing with it. A homeowner doing a $200 wrap job was never going to buy a $3,000 granite slab.
What fabricators do see is clients walking in after a wrap job failed, asking for a real replacement. The common scenario: someone wrapped over older laminate that already had minor delamination. The wrap hid the problem, moisture crept under both layers, and now the substrate needs replacement before any new surface can go down. That turns a $2,000 job into a $2,500+ job with substrate repair.
For fabricators quoting those replacement jobs, software that handles the full quote, including substrate repair line items, keeps you from underquoting. Tools like SlabWise are built around that quoting workflow, including tracking material waste on oddly-shaped counters.
The honest advice to give a homeowner asking about wrap: assess the substrate first. If the current countertop is structurally sound and you just want a different look for 3 to 4 years, wrap is fine. If there's any damage, skip the wrap and budget for a proper replacement.
How do you clean and maintain vinyl wrap countertops?
Vinyl wrap countertops aren't as durable as the surfaces they imitate, and cleaning habits have to match.
Safe cleaning methods:
- Mild dish soap and warm water, wiped with a soft cloth
- Isopropyl alcohol at 70% for disinfecting (use sparingly; repeated alcohol exposure degrades some adhesive systems over time)
- Diluted white vinegar for light stains
Things that wreck vinyl wrap fast:
- Abrasive scrubbers (Scotch-Brite style pads, steel wool)
- Bleach-based cleaners
- Acetone, nail polish remover, or paint thinners
- Ammonia-based glass cleaners
- Steam cleaning
The laminate topcoat on better vinyl films is the surface you're actually cleaning. Abrasives scratch it and dull it. Once the topcoat is scratched, the surface grabs stains more easily and can't be restored.
The principles for stone cleaning carry over partway: gentle cleaners, no abrasives, immediate cleanup of acidic spills. Acidic foods (citrus, tomato, vinegar) don't etch vinyl the way they etch natural stone, but they can lift edges if they get under the film at seams. See our guide on how to clean stone countertops for comparison.
Check edges and seams monthly. Catch a lifting edge early, press it back down with a heat gun and firm pressure, and you can often save it. Once the edge curls and picks up dirt, it won't re-adhere cleanly.
Is vinyl wrap countertop a good idea for renters?
This is the strongest use case for the product. Renters who want a better-looking kitchen without breaking their lease have few options, and vinyl wrap is the most practical one.
A few things to know before wrapping a rental:
Check your lease first. Most leases prohibit permanent modifications. Vinyl wrap is typically reversible, which is the argument for its legality, but some landlords treat any modification as a violation. Get written permission if you can. Even a text confirming the landlord is fine with it gives you documentation.
Document the substrate before you apply. Photograph the countertop condition before wrapping. If the landlord claims damage at move-out that was actually pre-existing, you want proof.
Plan for removal before you apply. The longer the film stays down, the harder removal gets. On a 12-month lease, plan to pull the wrap before the lease ends. Budget 1 to 2 hours and a bottle of Goo Gone.
Use a peel-friendly adhesive film for rentals. Some films market easy removal. Budget films are sometimes harder to remove than mid-grade ones because their adhesive has less engineering behind it. Counterintuitive, but consistently reported.
For renters with kitchen countertops that are dated or damaged, vinyl wrap delivers a real quality-of-life bump for the price of a few restaurant meals. For homeowners, the calculus is different.
Frequently asked questions
Can vinyl wrap go over laminate countertops?
Yes, and laminate is one of the best substrates for vinyl wrap. It's flat, non-porous, and holds adhesive well. The surface needs to be clean, dry, and free of delamination. Light sanding with 220-grit paper improves adhesion on high-gloss laminate. If the existing laminate is swollen or lifting anywhere, fix that before wrapping or you'll trap moisture underneath.
How do you remove vinyl wrap from countertops without damaging them?
Apply gentle heat from a hair dryer or heat gun to soften the adhesive, then peel slowly at a low angle. Adhesive residue responds to Goo Gone, WD-40, or isopropyl alcohol. Avoid metal scrapers on laminate; use a plastic one. Film left down 3+ years leaves more residue. Budget 1 to 2 hours and test your solvent in a hidden corner first.
Does vinyl wrap work on granite or stone countertops?
Technically yes, but it makes almost no sense. Stone countertops look better than any vinyl film that imitates them, and wrapping over granite permanently hides a material with real value. If the stone is damaged, the money is better spent on professional repair. The adhesive also bonds inconsistently to polished stone, so failure comes faster. Save wrap for laminate, wood, or tile substrates.
How long does it take to apply vinyl wrap to a kitchen?
A typical kitchen with 40 to 60 square feet and a standard sink cutout takes 3 to 5 hours for an experienced DIYer. First-timers doing careful work often take 6 to 8 hours, especially when filling grout lines or dealing with complex edge profiles. Professional installers move faster, averaging 2 to 3 hours on the same kitchen. Allow a full day for a first project if you want to avoid rushed mistakes.
Can you put hot pans on vinyl wrap countertops?
No. PVC film softens and permanently deforms starting around 140 to 160°F, and a hot pan off the stove easily reaches 300°F or more. Always use trivets or heat pads on vinyl wrap. This is the number one cause of premature damage reported by users. If your household routinely forgets trivets, vinyl wrap will look damaged within months.
What is the best vinyl wrap for kitchen countertops?
Professional-grade architectural films from 3M (Di-Noc series) and Avery Dennison have the best adhesive systems and topcoat durability, but cost $5, $12 per square foot in materials. For DIY use, d-c-fix and Artesive are consistently the best-reviewed mid-tier options at $2, $4 per square foot. Avoid the cheapest no-name films; the adhesive and seam quality are poor enough to cause failure within months.
Will vinyl wrap countertops increase home value?
No. Appraisers and buyers reading a home's condition recognize wrapped countertops for what they are. Vinyl wrap is a cosmetic cover, not a material upgrade. If anything, a visible wrap job signals that the countertops need replacement, which can be a slight negative in negotiations. If you're selling and want to improve the kitchen's value, new laminate or stone makes a stronger case to buyers.
Can you apply vinyl wrap over a sink or around faucet holes?
Yes. The standard method is to apply the film over the full surface, then score and cut the sink opening from below after the film is adhered. Faucet holes get the same treatment: cut an X pattern, fold the flaps down, and trim. Any exposed film edge near water needs seam sealant or silicone to block moisture. This is the most failure-prone area of any wrap job.
Is vinyl wrap safe for food contact on countertops?
Most PVC-based vinyl wrap products are not specifically certified for direct food contact. The FDA regulates food-contact materials; most decorative films are tested only for general surface safety, not repeated food contact. In practice, food sitting briefly on a wrapped counter carries minimal risk, but cutting food directly on the surface or leaving raw meat on it is not advisable. Use cutting boards, which you should be doing on any countertop anyway.
How do you deal with seams when vinyl wrapping a countertop?
Plan seams at back edges, inside corners, or under appliances, never in a visible work zone. For a clean seam, overlap two pieces by about half an inch, then cut through both layers at once with a straight edge and sharp utility knife. Remove both scrap pieces and press the seam down. A seam roller helps. Apply seam sealer as a final step. The cleaner your cut, the less the seam shows.
Can you wrap countertop edges, more than the flat surface?
Yes, and you should for a complete look. Film wraps around square or slightly rounded edges fairly easily with heat gun assistance. Bullnose or heavily shaped edges are harder; the film tends to wrinkle on tight radii. Some installers apply a separate strip to the edge face and the top surface as two pieces with a seam at the edge break. More seams, but cleaner execution than a single wrap that wrinkles on the radius.
Does vinyl wrap look different from new laminate countertops?
Up close, yes. New laminate has a consistent factory edge, thicker material, and a surface integral to the product rather than a film on top. Vinyl wrap shows seams on close inspection, has a slightly different sheen, and feels different to the touch. From a foot or more away, quality wrap and mid-grade laminate look similar. For photography or quick impressions, they're comparable. For daily lived-in quality, laminate is clearly better.
Can you wrap countertops around a stove without the film melting?
Keep film at least 2 inches back from direct burner edges, and don't let it run under a slide-in range that traps heat. The countertop surface between burners and behind the stove usually stays cool enough during normal cooking, but film directly next to a gas flame ring or electric coil will degrade. Some installers use a high-temperature vinyl rated for 200°F+ in those zones, though it creates a visible seam.
Sources
- HomeAdvisor / Angi, Laminate Countertop Cost Guide: Laminate countertops run roughly $20, $50 per square foot installed, depending on material and labor market
- 3M, Di-Noc Architectural Finishes Technical Bulletin: PVC-based architectural films begin to soften and deform at temperatures in the range of 140 to 160°F
- National Association of Realtors, Remodeling Impact Report: Cosmetic surface overlays do not receive separate appraisal credit; only structural and material upgrades affect appraised value
- U.S. Consumer Product Safety Commission, General Information on PVC Products: PVC-based decorative films are evaluated for general surface safety but are not classified as food-contact materials under CPSC or FDA guidelines
- U.S. FDA, Food Contact Materials Guidance: The FDA regulates materials intended for direct food contact; most decorative PVC films do not carry food-contact certification
- HomeAdvisor / Angi, Granite Countertop Cost Guide: Granite countertops cost roughly $40, $60 per square foot installed on average, varying by slab grade and market
- U.S. Environmental Protection Agency, Mold and Moisture Guidance: Moisture trapped against wood or paper-based building materials supports mold growth, which the EPA advises controlling by keeping surfaces dry
- U.S. Department of Housing and Urban Development, Tenant Rights and Lease Guidance: Lease terms govern what alterations a tenant may make to a rental unit; permanent modifications typically require landlord permission
- Avery Dennison, Architectural and Interior Films Product Overview: Professional-grade architectural vinyl films from Avery Dennison are available in 4 to 8 mil thicknesses and include UV-inhibitor coatings for extended print longevity
- National Kitchen and Bath Association (NKBA), Kitchen Design Guidelines: NKBA design guidelines recommend heat-resistant surfaces for countertops adjacent to cooktops; non-heat-resistant overlays require permanent trivet zones
Last updated 2026-07-09