TL;DR
- Laminate countertop installation costs $10 to $40 per linear foot for prefab postform slabs you install yourself, or $50 to $120 per linear foot hired out including labor.
- A standard kitchen takes 4 to 8 hours.
- You need a jigsaw, router, belt sander, and contact cement.
- Seams demand careful alignment, but the whole job stays inside DIY range for most homeowners.
What does laminate countertop installation actually involve?
Laminate countertops come in two forms, and that split shapes the entire job. Postform countertops are the prefab strips you buy at a home center: the laminate is already bonded to a particleboard substrate, the front edge rolls over and seals itself, and the backsplash is built in. Custom laminate countertops are flat particleboard or MDF sheets you cover with laminate yourself using contact cement, then trim and edge. Postform installs faster. Custom gives you real control over thickness, edge profile, and sheet pattern.
For most DIY homeowners, postform is where you start. You measure the cabinet run, buy the right length (usually sold in 6, 8, 10, or 12 foot sections), scribe it to the wall if needed, cut it to length, deal with any inside-corner miter, and fasten it from underneath. The one real skill is patience with the miter and keeping seams tight. That's the whole game.
Custom jobs add steps: cut the substrate, glue on laminate with contact cement, trim it flush with a router and flush-trim bit, then profile the edge with a router or file. You can also resurface an existing substrate by laying new laminate over old, as long as the old surface is flat, clean, and firmly stuck down. That's a legitimate way to save money on a remodel where the substrate is still solid.
For a wider look at your options beyond laminate, the kitchen countertops guide covers the full field.
What tools do you need for laminate countertop installation?
Laminate installation tools split into two groups: cutting and finishing. The toolkit isn't exotic, but the wrong tool wrecks the job. The most common mistake is a circular saw with a standard blade, which chips the laminate face into confetti.
Cutting tools
- Jigsaw with a fine-tooth laminate blade (10 to 12 TPI, down-cutting tooth orientation to hold down face chip-out). This handles sink and cooktop cutouts.
- Circular saw with a fine-tooth blade (60+ tooth carbide) or a laminate-specific blade. Cut with the finished face down when you can.
- A sharp utility knife and a straightedge for scoring sheet laminate before you snap it.
Finishing and fitting tools
- Router with a flush-trim bit and a bevel trim bit. The flush-trim bit is the most-used tool on the job after the jigsaw. It shaves laminate exactly flush to the substrate edge.
- Belt sander (or a file) for smoothing and beveling laminate edges after routing. A 100 to 120-grit belt does it.
- Orbital sander for scuffing old laminate before you relaminate.
- Scribing compass for fitting the backsplash to a crooked wall.
Fastening and seaming tools
- Miter saw or circular saw with a good fence guide for the 22.5-degree seam cuts at inside corners.
- Draw bolts (also called miter bolts or countertop connectors) for pulling two sections tight at a seam. They sit under the counter in routed slots.
- Contact cement and a short-nap roller or brush. Spray cans go faster for small jobs.
- J-roller (or a wood block and a hammer) to apply even pressure when bonding laminate to substrate.
- Silicone and a caulk gun for the wall and sink perimeter.
If you're weighing this against stone, the countertop installation guide shows how the tool list changes once you're handling granite or quartz. Stone work pulls in angle grinders, diamond blades, and suction cups instead of a router and a can of cement, as the granite countertops guide lays out.
For a roughly 10-foot kitchen run, buying everything you don't already own costs $150 to $300 at a home center, or you can rent a router and belt sander for about $25 to $40 a day [1].
How much does laminate countertop installation cost?
Laminate is the cheapest countertop category by a wide margin. Here's where the money goes.
Material costs (postform, prefabricated) Prefab postform strips run $10 to $40 per linear foot at retail, depending on pattern and thickness [2]. A standard 25.5-inch-deep postform with a 4-inch backsplash in a basic wood-grain or solid color sits at the low end. Textured patterns with finished end caps push toward the top.
Material costs (sheet laminate) High-pressure laminate (HPL) sheets cost roughly $1 to $4 per square foot for standard grades, and $4 to $8 per square foot for commercial or designer patterns [2]. That's before substrate (particleboard runs about $25 to $40 per 4x8 sheet) and adhesive.
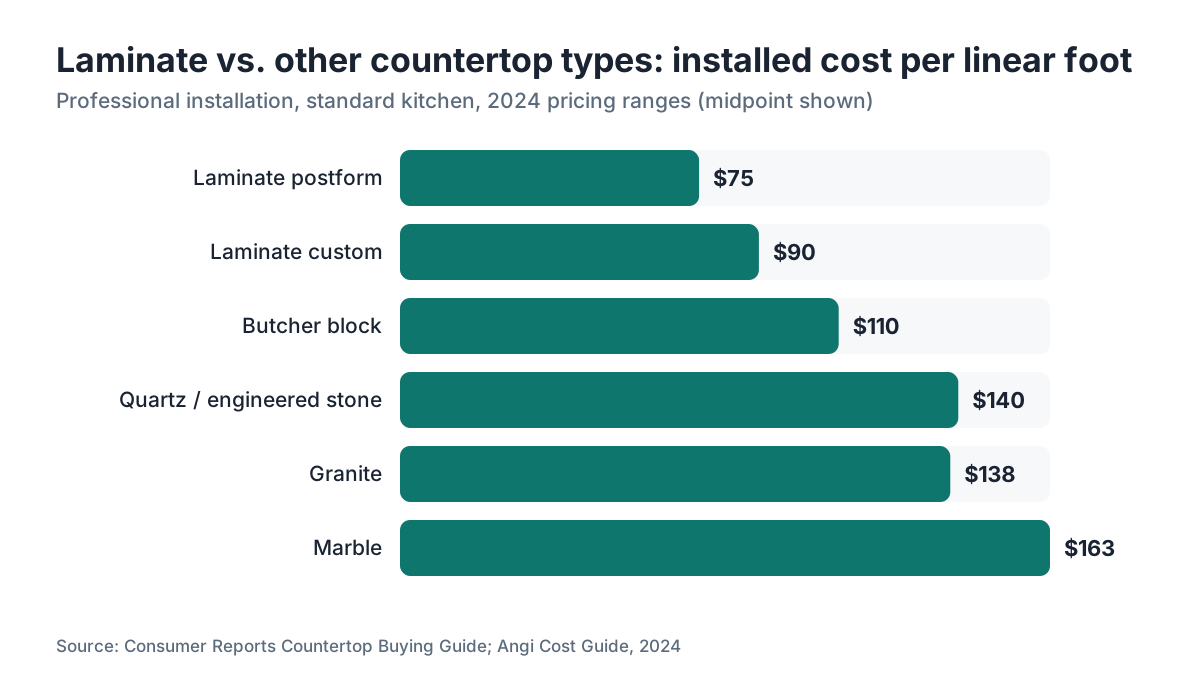
Labor costs Professional installation of prefab postform runs $30 to $60 per linear foot in labor, which brings total installed cost to roughly $50 to $100 per linear foot [11]. Custom laminate fabrication and install runs $60 to $120 per linear foot all in, still well under solid-surface, quartz, or stone.
DIY savings On a 20-linear-foot kitchen, doing it yourself saves roughly $600 to $1,200 in labor versus hiring out. Most of that is real money, because laminate installation doesn't require licensed trades in most places.
Stone costs a different universe. Marble countertops installed professionally can run $75 to $250 per square foot, and Cambria countertops typically land at $80 to $150 per square foot installed. Laminate is a fraction of either.
The Formica countertops guide breaks down pricing for one of the biggest HPL brands in more detail.
How long does laminate countertop installation take?
A standard L-shaped or galley kitchen with prefab postform takes most careful DIYers 4 to 8 hours across a day. That covers pulling the old countertop, making cuts, one inside-corner miter, the sink opening, and cleanup.
Custom laminate takes longer. Gluing sheet laminate to a built-up substrate, trimming, routing, and edging a comparable kitchen runs 8 to 16 hours over two days, because contact cement needs dry time (typically 15 to 30 minutes before the surfaces can join, per most manufacturer instructions) and routing is slower than dropping in a postform strip.
The inside-corner seam eats the most time, whatever the type. Getting a miter tight and flush takes patience and sometimes two or three test cuts. Don't rush it.
Cure time also shapes your schedule. Most contact cements reach full strength within 24 to 72 hours of bonding at room temperature [3]. Don't throw the kitchen back into heavy use the same day you finish.
Fabricators, take note: laminate installs are fast jobs. A two-person crew usually finishes a prefab postform kitchen in 2 to 3 hours on site. The clock runs during templating, shop cutting, and drive time, not the install. If you run a high-volume laminate shop and want to track time per job against margin, a quoting tool like SlabWise keeps you from underpricing the fast ones.
What are the step-by-step instructions for installing postform laminate countertops?
This is the process for a standard postform install. Adjust for custom laminate in the section below.
Step 1: Remove the old countertop Shut off the water, disconnect the sink, and disconnect any cooktop gas or electric. Countertops usually fasten from below with screws through corner brackets inside the upper cabinet rails. Back those out, then lift. Old tops glued to the wall backsplash sometimes need the caulk line scored with a utility knife and a little persuasion from a pry bar.
Step 2: Measure and buy material Measure the cabinet run at the back wall and at the front edge. Add 1 inch to length for final trim unless a finished end cap has to butt a wall or appliance exactly. Account for inside corners: you need two pieces each mitered at 22.5 degrees to make a 90-degree inside corner, not a single 45-degree cut.
Step 3: Cut to length Score the cut line with a utility knife and straightedge first. Then cut from the back face (laminate face down) with a circular saw to stop chip-out on the visible surface, or cut face-up with a jigsaw using a fine-tooth down-cut blade. Support the offcut so the laminate doesn't crack as it falls free.
Step 4: Cut the inside corner miter (if needed) Most home centers sell postform miter kits with a plastic alignment pin and draw bolts. Cut the 22.5-degree angles precisely. Dry-fit. The joint should close to a hairline under light hand pressure. If you see daylight, adjust.
Step 5: Scribe the backsplash Set the postform against the wall. Set a compass or scribing block to the widest gap between the backsplash top and the wall. Run the compass along the wall to transfer its wobble onto the backsplash. Belt-sand or plane to the line. Dry-fit again and again until the backsplash sits flush along its whole length.
Step 6: Cut the sink or cooktop opening Use the sink maker's template (it ships with nearly every undermount and drop-in sink) or trace the rim directly. Drill a starter hole just inside the line at each corner. Drop in the jigsaw blade and cut. Support the cutout piece from below with tape or a screw into a wood block so it doesn't fall and crack the laminate as it frees.
Step 7: Fasten Run a bead of silicone or construction adhesive along the top edges of the cabinet face frames and rails. Set the postform in place. Drive screws up through the corner brackets into the substrate, snug but not cranked (particleboard strips out). At the inside-corner miter, tighten the draw bolts evenly until the joint closes and both surfaces sit flush.
Step 8: Seal Run silicone caulk along the wall-to-backsplash joint and wherever the counter meets an appliance or wall. Tool it smooth with a wet finger. This is your moisture barrier. Skip it and the particleboard wicks water and swells.
Step 9: Reinstall the sink and fixtures Re-hang the sink, connect the supply lines, and turn the water back on. Check for leaks under load before you put anything away.
How do you install sheet laminate on a custom substrate?
Custom laminate work buys you more design control, and it's the method you use when you're building a countertop from scratch or resurfacing a substrate that still has solid bones.
Build the substrate Cut 3/4-inch particleboard or MDF to your plan dimensions. For the standard 1.5-inch-thick look, glue a second layer of 3/4-inch under the front edge (a build-up strip) before you apply laminate. Glue and screw the build-up strips from the top face before laminating.
Prepare surfaces Both the substrate face and the back of the laminate sheet have to be clean, flat, and dust-free. Resurfacing existing laminate? Scuff it hard with 80-grit so the contact cement has a mechanical key to grab.
Apply contact cement Brush or roll contact cement onto both surfaces. Let both flash off until they're just dry to the touch but tacky, typically 15 to 30 minutes depending on temperature and humidity [3]. Don't let it fully cure before joining. It has to be inside the open-time window.
Join the pieces This is the moment that matters: once the cemented surfaces touch, they bond instantly with zero repositioning. Lay wooden dowels or thin wood strips across the substrate, set the laminate on top of them without touching the substrate, line it up carefully (leave overhang on every side), then pull the dowels out one at a time from the center outward while you press the laminate down. Roll it with a J-roller from center to edges to chase out air pockets.
Trim flush Use a router with a flush-trim bit to cut the laminate exactly to the substrate edge. Take multiple light passes, not one heavy cut. The bearing rides the substrate edge and the bit cuts the laminate flush.
Profile the edge For a simple bevel, a router with a 15-degree bevel bit puts a clean chamfer on the laminate edge. For a thicker look, laminate the build-up strips before final trimming so the edge laminate and top laminate meet at the corner and you can router-trim them at once.
Edge laminate Cut edge strips slightly oversize, cement and bond them, then flush-trim and bevel. Always apply edge laminate before the top face so the top laminate overlaps and hides the edge joint when you look down at it.
How do you handle laminate countertop seams?
Seams decide whether a laminate job looks professional or looks like a mistake. The rules are simple and unforgiving.
First, keep seams away from sinks and wet areas. Water that gets into a seam eats particleboard over time. If a seam has to land near a sink, fill it with color-matched acrylic seam filler and caulk the seam top.
At inside corners, a miter is standard, because a square butt joint there leaves a line you can see from several angles while a miter hides it better. Some installers swear a tight square butt joint with seam fill looks just as good. On a busy counter, you'll spot the difference in 2 to 3 years, once the seam filler wears.
For straight field seams on long runs (anything past about 10 to 12 feet where a single slab isn't available), both cut edges have to be dead straight and square to each other. Clamp both pieces to a bench, run a router with a straightedge guide along both edges at the same time, and the two cuts mate perfectly because you made them with the same bit in one pass.
Seam filler is color-matched to the pattern. The major laminate brands sell fill kits keyed to their patterns. Apply with a small putty knife, let it set slightly, then scrape flush. It won't vanish, but it cuts visibility way down.
Draw bolts (the metal barrel connectors that thread together through routed slots on the underside of both pieces) should sit about 12 inches apart through the seam zone. Tighten evenly so neither side rides above the other.
Can you install laminate countertops over existing countertops?
Sometimes, yes. The old countertop has to be flat, firmly attached to the cabinets, and free of water damage or swelling. You cannot laminate over a bubbled, swollen, or loose substrate and get a good result.
Postform over postform is a bad idea. The finished thickness gets awkward and the built-in backsplash on the lower layer leaves a lip that makes scribing the new one a headache.
Sheet laminate over old laminate is legitimate and common. Scuff the old surface with 80-grit, clean it hard, and bond new laminate with contact cement. Edges are the catch: laminating over an existing postform with a rolled edge means you have to build up the front edge or accept that the new laminate bridges the curve and may not bond cleanly at the transition.
Sheet laminate over tile works, but it's fussy. Grout lines have to be filled completely flush with a skim coat of floor-leveling compound and cured before you laminate. Any bump in the substrate telegraphs through the laminate as a visible line, worst of all in raking light.
Corian and other solid surfaces use different bonding chemistry. The Corian countertops guide covers the solid-surface specifics.
What are common mistakes in laminate countertop installation and how do you avoid them?
A handful of things go wrong on laminate jobs over and over.
Chip-out on the visible face. Always cut laminate from the back face with a circular saw, or use a down-cut (reverse-tooth) jigsaw blade. Standard up-cut blades pull material up on the forward stroke and chip the face.
Blowing the open-time window with contact cement. Brush it on, wander off too long, and the cement cures dry instead of staying tacky. The bond comes out weak or nonexistent. When the surface looks glossy-dry but feels tacky on a light back-touch, you're in the window. Temperature swings it: in a cold garage below 50 degrees F, open time stretches; above 85 degrees F it shrinks [3].
Skipping the scribe. Walls aren't straight. A backsplash that isn't scribed to the wall leaves a gap no amount of caulk hides well. Spend the 20 to 30 minutes and scribe it right.
Over-tightening draw bolts. Particleboard tears out if you crank the bolts. Snug plus a quarter turn is usually plenty. Feel resistance, stop.
Not supporting the sink cutout. The piece drops and cracks the laminate as it breaks free. Tape it, or pre-drill and run a screw with a washer into a wood block across the underside before the final cut.
Putting a seam in a wet zone. Plan your seams before you buy. A little planning saves a lot of future substrate rot.
Skipping the silicone at the wall joint. The countertop-to-wall joint is the number one water entry point. Caulk it every time.
How does laminate installation compare to other countertop types?
The table below compares typical DIY and professional install parameters across four common countertop materials. All cost figures are for installed countertops in a standard kitchen (roughly 25 to 30 linear feet), based on 2024 retail and contractor pricing [2][4].
| Material | DIY cost/LF | Pro installed cost/LF | DIY difficulty | Typical install time (pro crew) |
|---|---|---|---|---|
| Laminate (postform) | $10 to $40 | $50 to $100 | Low | 2 to 4 hrs |
| Laminate (custom) | $15 to $50 | $60 to $120 | Medium | 4 to 8 hrs |
| Butcher block | $30 to $80 | $70 to $150 | Medium | 3 to 6 hrs |
| Quartz/engineered stone | Not recommended DIY | $80 to $200 | Very high | 3 to 5 hrs (2+ crew) |
| Granite | Not recommended DIY | $75 to $200 | Very high | 3 to 5 hrs (2+ crew) |
The gap between laminate and stone isn't a step up in difficulty. It's a different category. Stone needs precision diamond cutting, a wet saw or angle grinder, seaming epoxy, and often two or three people just to move slabs safely. Laminate is particleboard, a router, and a can of cement. Both can look excellent done right.
Want the look of stone with the install of laminate? Some makers now print convincing stone photography onto laminate sheets. Nobody's fooled at arm's length, but for a rental or a tight budget, it's a practical call.
Fabricators running high-volume shops who track material cost per job, waste, and labor margin across countertop types often find that software built for countertop quoting and nesting, like SlabWise, clarifies which job types actually make money at scale.
How do you maintain laminate countertops after installation?
Laminate is low-maintenance by design. The surface is a plastic resin. No sealing, no oiling, no special cleaners. Mild dish soap and water clears almost everything. For stubborn stains, a baking soda and water paste left on for 5 minutes lifts most organic marks without scratching.
What laminate can't take: heat and sharp edges. The resin scorches permanently at sustained contact above roughly 140 to 150 degrees F, well below a hot pan straight off the burner [5]. Use trivets. Knives scratch it permanently too. Use a cutting board.
Around seams and sinks, prevention is the whole strategy, because repair is hard. Once particleboard swells from water, the only real fix is replacement. Re-caulk the wall joint every year, and reseal any chip or crack right away with laminate repair paste or nail polish matched to the color.
Laminate isn't hard to clean, but it looks tired fast if the surface picks up fine scratches from abrasive cleaners. Skip anything gritty. Unlike solid-surface material, laminate doesn't respond to polishing compounds. Scratches in laminate are usually there for good.
For stone surfaces that do need special care, the how to clean stone countertops article makes a useful contrast.
Do you need a permit to install laminate countertops?
In most U.S. jurisdictions, replacing countertops needs no building permit, because it's a cosmetic swap of an existing surface, not a structural, electrical, or plumbing change [6]. The line matters: if you're also moving a sink drain or changing outlets for a new appliance, those trades usually do need permits and licensed contractors, depending on your local code.
Call your local building department before you start if the project touches any of these: relocating a sink, adding a garbage disposal where there wasn't one, extending a gas line, or adding under-counter lighting on a new circuit. Those are trade permits, not countertop permits, but the same remodel triggers them.
For rentals, some jurisdictions require landlord disclosure of materials used in habitability improvements. It varies a lot by state and is worth a 10-minute call to your city or county building department if you're unsure.
Insurance angles are minimal for a countertop swap. If the install causes water damage (say, a supply line hooked up wrong), that's usually covered under a standard homeowner's policy as sudden accidental water damage, not excluded as maintenance neglect. Read your own policy language.
Frequently asked questions
Can I install laminate countertops myself without professional help?
Yes. Postform laminate is one of the most DIY-friendly countertop installs there is. You need a jigsaw, circular saw, router, and contact cement for custom work. The main skill is patience with miter cuts at inside corners and careful scribing to the wall. Most homeowners with basic tool experience finish a standard kitchen in a day.
What kind of blade do I need to cut laminate countertops?
For a jigsaw, use a fine-tooth down-cutting blade, sometimes labeled a laminate or reverse-tooth blade, with 10 to 12 TPI. For a circular saw, use a 60-tooth or finer carbide blade. Both minimize chip-out on the visible face. With a circular saw, orient the finished face down so any chip-out lands on the back.
How do I cut a sink hole in a laminate countertop?
Use the template that ships with the sink, or trace the rim and subtract the overlap lip width. Drill a starter hole just inside the cut line at each corner, drop in a fine-tooth jigsaw blade, and cut. Before the last cut segment, tape across the cutout or screw a wood block to its underside so the piece doesn't drop and crack the laminate as it frees.
What adhesive is used to install laminate countertops?
Contact cement, either solvent-based or water-based. Solvent-based bonds faster and stronger but needs ventilation. Water-based is safer indoors but flashes off slower. Apply it to both surfaces, wait until both are dry to the touch but still tacky (roughly 15 to 30 minutes), then join. Dowels or wood strips let you align first, since the bond is instant once the surfaces touch.
Can laminate countertops be installed over tile?
Yes, but grout lines have to be filled completely flush with floor-leveling compound and cured flat before you laminate. Any leftover surface variation telegraphs through the laminate as a visible line, worst in side or raking light. If the tile isn't firmly bonded, pull it first rather than laminating over a possibly loose substrate.
How do I fix a gap between my laminate countertop and the wall?
Small gaps under about 1/4 inch: fill with color-matched silicone caulk, smooth with a wet finger, paint over if needed. Bigger gaps mean the backsplash wasn't scribed to the wall. The real fix is to pull the countertop, scribe the backsplash to the wall contour with a compass, belt-sand to the line, and reinstall. Caulk over a large gap looks bad within a year.
How long does contact cement take to dry before I can use the countertop?
Contact cement grabs an initial bond the instant the two surfaces meet. Most formulations reach handling strength within 1 to 2 hours. Full cure typically runs 24 to 72 hours at room temperature. Hold off on heavy loads, wet spills on seams, or reinstalling a heavy sink the same day. The open-time window before joining is usually 15 to 30 minutes after application.
What is the difference between postform and custom laminate countertops?
Postform is prefabricated: laminate already bonded to particleboard, with a rolled front edge and integral backsplash, sold in standard lengths at home centers. Custom laminate means you bond sheet laminate to a flat substrate yourself, picking edge profile, thickness, and pattern independently. Postform installs faster. Custom costs more time but gives you far more design freedom.
Can laminate countertops be repaired if they are chipped or burned?
Edge chips can be filled with color-matched laminate repair paste from any home center. Scorch marks from hot pans or scratches into the resin surface are usually permanent. Surface scratches can sometimes be softened with automotive polishing compound on high-gloss finishes, but matte finishes don't respond well. Major damage generally means replacing the affected section or the whole top.
How do I connect two pieces of laminate countertop at an inside corner?
Each piece gets a 22.5-degree miter cut so the two angles together form a tight 90-degree inside corner. Route slots on the underside of both pieces and install draw bolts (barrel connectors) about 12 inches apart through the seam zone. Apply seam fill or silicone to the joint face, then tighten the draw bolts evenly until both faces sit flush and the joint closes to a hairline.
Is laminate countertop installation different from Formica installation?
No. Formica is a brand of high-pressure laminate, and installing it follows the same process: contact cement on both surfaces, align with dowels, bond, J-roll, flush-trim with a router. In the field, laminate countertop and Formica countertop get used interchangeably, even though Formica is one manufacturer among several.
What is the R-value or heat resistance of laminate countertops?
Laminate surface resins start showing heat damage (blistering, discoloration) around 140 to 150 degrees F with sustained contact. A hot pan off the stove easily hits 400 to 500 degrees F. R-value isn't a standard metric for countertop surfaces. What matters in practice is that laminate needs trivets under anything hot. It tolerates heat far worse than granite, quartz, or stainless steel.
Do laminate countertops require any special support or underlayment?
No special underlayment beyond the particleboard or MDF substrate the laminate bonds to. That substrate rests on the upper rails and face frames of the base cabinets. Cabinet support across the span matters: particleboard spanning more than about 36 inches without support from below can deflect under heavy loads, which cracks laminate at seams over time.
How do I remove an old laminate countertop before installing a new one?
Shut off the water and disconnect the sink. Open the cabinet doors and look for screws driven up through corner brackets into the countertop substrate. Back those out. Score the wall caulk line with a utility knife. The top usually lifts free. If it's also glued to the top cabinet rails, work a pry bar along the front edge gradually rather than forcing one spot, so you don't wreck the cabinet boxes.
Sources
- HomeAdvisor (Angi), Tool Rental Cost Guide: Router and belt sander rental runs approximately $25, $40 per day at tool rental centers
- Consumer Reports, Kitchen Countertops Buying Guide: Laminate countertops cost $10, $40 per linear foot for postform material and $1, $8 per sq ft for sheet laminate depending on grade and pattern
- Formica Group, Contact Adhesive Application Instructions: Contact cement should be applied to both surfaces and allowed to flash dry 15 to 30 minutes before bonding; full adhesive strength develops within 24 to 72 hours
- National Kitchen and Bath Association (NKBA), 2024 Kitchen & Bath Market Outlook: Professional countertop installation labor rates and material costs by category for 2024
- Wilsonart, Laminate Care and Maintenance Guide: High-pressure laminate surfaces can be damaged by sustained heat contact above approximately 140°F; trivets are required under hot cookware
- International Code Council (ICC), International Residential Code (IRC): Cosmetic countertop replacement without plumbing or electrical alteration does not constitute a regulated alteration requiring a building permit under standard IRC provisions
- U.S. Environmental Protection Agency, Indoor Air Quality (IAQ): Formaldehyde: Particleboard substrates used in laminate countertops may off-gas formaldehyde; EPA guidance recommends ventilation during installation
- NEMA (National Electrical Manufacturers Association), High Pressure Decorative Laminates Standard LD 3: NEMA LD 3 is the standard governing performance properties of high-pressure decorative laminates including abrasion resistance, heat resistance, and dimensional stability
- Occupational Safety and Health Administration (OSHA), Controlling Chemical Hazards: Solvent-Based Adhesives: Solvent-based contact cements require adequate ventilation during application to prevent accumulation of flammable vapors and worker exposure to VOCs
- U.S. Consumer Product Safety Commission (CPSC), Formaldehyde in the Home: Pressed wood products including particleboard used as countertop substrate emit formaldehyde; the CPSC recommends air circulation during and after installation
- HomeAdvisor (Angi), Countertop Installation Cost Guide: Professional laminate countertop installation labor costs range from $30, $60 per linear foot; total installed cost for postform ranges $50, $100 per linear foot
Last updated 2026-07-09