
TL;DR
- Installing laminate countertops costs roughly $5, $15 per square foot for materials and $20, $50 per square foot fully installed by a pro.
- A confident DIYer can do the job in a weekend with basic tools.
- This guide covers every step: measuring, cutting, joining, edge-finishing, and sink cutouts, plus honest advice on where DIY makes sense and where it doesn't.
How much do new laminate countertops cost?
Laminate is the cheapest countertop surface you can buy. Material alone runs $5, $15 per square foot for post-form or custom sheet laminate, depending on brand, thickness, and edge profile [1]. A typical kitchen with 30 square feet of counter runs $150, $450 just in materials.
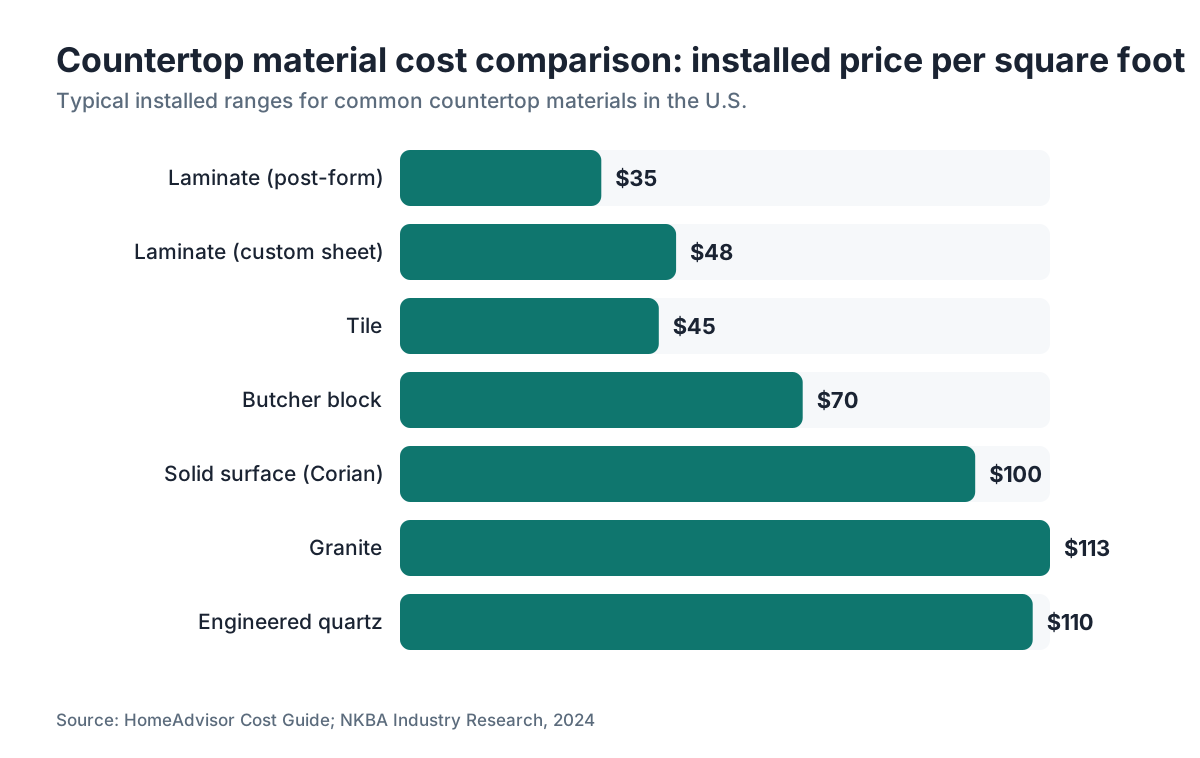
Professional installation adds $15, $35 per square foot in labor, putting total installed cost at $20, $50 per square foot [1]. For that same 30-square-foot kitchen, you're looking at $600, $1,500 all-in. That's a fraction of what granite or quartz runs. For comparison, granite countertops typically start around $75 per square foot installed, and engineered stone like cambria countertops often runs $90, $140 [2].
Post-form countertops (the curved-front, one-piece units you see at home centers) are the cheapest option, sometimes as low as $3, $8 per linear foot at big-box stores for standard lengths in common colors. Custom laminate fabricated from sheet goods costs more but gives you almost unlimited color and pattern choices, plus the ability to do nearly any length and edge style.
DIY labor savings are real. If you're comfortable with a circular saw and a router, you can save $300, $700 on an average kitchen [10]. That math is why laminate is so popular for rental units, budget remodels, and secondary kitchens.
What tools do you actually need to install laminate countertops?
You don't need a professional shop. But you do need the right tools or the cuts will look bad.
For cutting post-form or pre-laminated substrate: a circular saw with a fine-tooth blade (60-tooth or higher, carbide-tipped) cuts cleanly if you cut from the back side or run blue painter's tape along the cut line to limit chip-out. A jigsaw handles sink cutouts. A belt sander or router with a flush-trim bit cleans up edges.
For applying sheet laminate to a substrate (the more advanced method): you'll also need a laminate roller or J-roller (around $20, $40) to press the material down evenly, a file or router with flush-trim bit to trim edges, and a scoring tool if you're doing straight snaps on laminate sheets.
Other essentials:
- Contact cement (brush-grade or spray-grade)
- Dowel rods or wood strips as slip sheets while positioning
- Clamps and a straightedge
- Silicone caulk for the backsplash joint
- Miter bolt kit if you're joining two pieces at a corner
A level is non-negotiable. Cabinets are rarely perfectly level, and shimming before you set the top is far easier than dealing with a gap after the fact.
One tool people skip and regret: a router table, or at least a router with a good laminate trim bit. A file alone can smooth a laminate edge, but a router makes it look finished and takes a quarter of the time.
What are the main methods for installing laminate on countertops?
There are two main approaches, and which one you use depends on what you're starting with.
Post-form installation is the simpler path. Post-form countertops are pre-built units, typically 25 inches deep with a curved front edge and an integrated backsplash. You buy them in standard lengths (usually 4, 6, 8, or 10 feet), cut them to fit with a circular saw, and bolt them to the cabinet boxes with mounting screws from below. Corners use special miter bolts (draw bolts) that pull two mitered sections together tightly. This is the method most DIYers start with.
Sheet laminate application is more involved. You start with a substrate (usually 3/4-inch particleboard or MDF, though plywood is more water-resistant), cut it to your counter shape, then glue plastic laminate sheets to the face and edges using contact cement. This method lets you do any size, any edge style, and any laminate pattern. It's the method fabricators use for custom work.
A third option exists for partial projects: laminate overlays. These are thin laminate sheets you can glue directly over an existing countertop if the surface is flat, clean, and sound. The results vary. Edges are the hard part, and if the old surface has any flex or damage, it telegraphs through. Overlays work better in theory than in practice, and most experienced fabricators don't recommend them except for very flat, solid surfaces.
For a full kitchen remodel or new construction, post-form is the weekend-project choice. For an L-shape, custom depth, or a surface longer than standard stock lengths, sheet laminate is worth the extra effort.
How do you measure and cut laminate countertops correctly?
Measurement errors are the most common reason DIY laminate installations look amateur. Walls are not square. This is one of the few things in countertop work that is almost universally true [3].
Start by measuring the length of each run at both the front edge and the back (wall) edge. If they differ by more than 1/4 inch, you have an out-of-square wall and you'll need to scribe the top to fit. For post-form countertops, scribing means cutting a slight angle or curve along the back edge with a jigsaw so it sits flush against the wall. Most post-form tops come with a 1/2 to 3/4 inch scribe allowance along the backsplash for exactly this purpose.
For end cuts (where the counter meets a wall or appliance), cut about 1/8 inch short so the top slides in without forcing. The gap gets covered by an end-cap strip or a small bead of caulk.
Cutting laminate sheet goods (not pre-laminated countertops): score-and-snap works for straight cuts. Use a scoring tool and a straightedge, score firmly two or three times, then bend. For cuts near a sink or complex shapes, use a jigsaw with a fine blade. Cut with the good face down if using a circular saw, or face up with a jigsaw, because each tool cuts on a different stroke and you want the blade moving through the face on the up-stroke for a jigsaw and the down-stroke for a circular saw.
Sink cutouts: Mark the opening with a pencil using the sink template (most sinks come with one). Drill a starter hole just inside the line, then cut with a jigsaw. Support the cutout from below with a scrap piece of wood and a clamp before you finish the cut, so it doesn't drop and chip the laminate at the last moment. This single step prevents the most frustrating mistake in the whole job.
How do you glue laminate to a countertop substrate?
Contact cement is the adhesive. It bonds laminate to substrate with an aggressive, permanent hold the instant two coated surfaces touch. The critical rule: apply cement to both surfaces, let both get tacky (usually 15 to 30 minutes depending on temperature and humidity), then carefully position the laminate before the surfaces meet.
Because contact cement bonds on contact, you need a positioning system. The classic method is dowel rods or wood strips laid across the substrate every 8 to 12 inches. Lay the laminate on top of the rods, align it perfectly (including overhang on all edges, which you'll trim later), then pull the rods out one at a time from the center outward, pressing down as you go. A J-roller pressed firmly across the entire surface pushes out air bubbles and forces full contact [8].
Work sequence: do edges first, face second. Apply laminate strips to all four edges of the substrate, trim flush, then apply the face laminate. The face laminate covers and protects the edge laminate seams [8].
Trimming: use a router with a flush-trim or laminate bevel-trim bit. A bevel trim bit cuts at a slight angle (typically 7 to 15 degrees), which leaves a clean, safe edge that won't chip or cut fingers. Clean up with a fine file, stroking at an angle away from the face to avoid chipping.
Temperature matters. Contact cement doesn't bond reliably below about 50°F (10°C) [7]. In a cold garage in winter, warm the workspace or use a water-based contact cement rated for lower temperatures.
One thing to know about volatile organic compounds (VOCs): solvent-based contact cements release flammable fumes. Work with ventilation, keep ignition sources away, and read the safety data sheet for your specific product [4]. Many water-based contact cements run lower in VOCs and work nearly as well for most laminate applications [5].
How do you join laminate countertops at a corner?
Corner joints are where most post-form installations either look professional or look like a first attempt. The standard method uses miter draw bolts, also called countertop connector bolts.
Here's the process. The two counter sections are cut at a 45-degree miter at the corner. The mating faces get a thin bead of color-matched laminate seam filler before being drawn together. Miter bolts (typically two or three per corner) are installed in routed slots on the underside of both pieces, about 2 inches in from the joint. Tighten them alternately to pull the seam tight and even. The joint should be barely visible from above.
For sheet-laminate countertops, butt joints are sometimes used instead of miters, with the seam hidden along a wall or in a low-visibility location. Butt joints are structurally fine but more visible.
Waterproofing the joint matters. Particleboard (the common substrate) swells badly if water gets in repeatedly [6]. Before tightening the miter bolts, run a bead of 100% silicone caulk along the underside of the joint. This won't make the joint completely waterproof but it slows water intrusion a lot. The seam filler on the face does the same from the top.
If a corner seam ever opens up after years of use, it usually means the draw bolts loosened or the substrate swelled slightly. Loosen the bolts, apply fresh seam filler, retighten. Don't try to fill an open seam with regular caulk from the top. It looks terrible and doesn't last.
How do you secure a laminate countertop to the cabinets?
Most kitchen cabinets have a small triangular or flat mounting cleat (sometimes called a build-up strip) running around the inside top of the cabinet box. You secure the countertop by driving screws up through these cleats into the underside of the countertop.
Screw length is critical. Measure the thickness of your countertop (post-form is usually about 1 inch thick at the field, up to 1.5 inches at the front edge). Your screw must not punch through. Most installers use 1-1/4-inch or 1-1/2-inch coarse-thread screws and check each position before driving.
Before setting the top permanently: dry-fit everything. Set it in place, check the alignment, check that the front overhang is even, check the scribe fit at the back wall. Make any trim adjustments now. Once you apply construction adhesive or drive the screws, corrections get much harder.
If you're using construction adhesive in addition to screws (common on islands or wherever cleats are absent), use a silicone-based or polyurethane adhesive. Apply it in short beads, not a continuous bead, so you can still remove the top later if needed.
Appliances like dishwashers often have brackets that attach to the underside of the counter. Check those clearances before the top goes down, because adding a laminate build-up strip to get the right dishwasher height is much easier before installation. Kitchen installs also have to meet local building codes for structural support so the top can't tip or shift [9].
What edge treatments work with laminate countertops?
The edge is what separates a dated-looking laminate countertop from a modern one. You have several real choices.
Post-form edge: the integral curved front edge that comes standard on post-form tops. Practical, no seam, and very easy to clean. The look is classic 1980s-90s, but it's making a small comeback because of its clean wipe-down surface and no-seam reliability.
Self-edge (applied laminate): a strip of the same laminate material applied to the edge of the substrate, trimmed flush. Clean and modern-looking. The edge-to-face seam shows as a thin line. This is the standard for custom sheet laminate work.
Wood edge: a solid wood strip (typically 3/4 inch thick) applied to the substrate edge, with the laminate face running over or up to it. Gives a furniture-like look. The wood needs finishing and occasional maintenance. It's a good choice for kitchens that mix materials, like a laminate counter with a butcher block countertops island.
Bullnose and other profile edges: a router shapes the substrate edge into a bullnose, ogee, or similar profile, then laminate wraps it. Looks higher-end. Harder to execute without shop equipment.
End caps: for post-form, you buy factory-matched iron-on end caps for exposed ends. Apply with a household iron on medium heat, press firmly, then trim with a file. They look best when the laminate color and grain direction match the top surface.
What can go wrong during laminate countertop installation?
A few mistakes show up constantly, and knowing them ahead of time is worth more than any tool recommendation.
Bubbles in the laminate face. Almost always from too little rolling after gluing, or from an area where the contact cement went on unevenly. You can sometimes fix small bubbles with a heat gun on low heat and a roller, but large bubbles or ones that have been there a while usually mean peeling and re-gluing that section.
Chipout on the cut edge. Caused by the wrong blade, cutting in the wrong direction, or no tape on the cut line. You can fill very small chips with color-matched laminate filler, but it's better to avoid the problem. Cut slowly, use a sharp blade, and always tape.
Miter joint gap. Usually means the cuts weren't exactly 45 degrees, or the draw bolts were tightened unevenly. In a post-form countertop, even a 1-degree error in each piece adds up to a visible gap. Rent or borrow a good miter saw if you're making your own corner cuts.
Water damage at the sink. The most common long-term failure mode. Particleboard substrate at the sink cutout and the backsplash joint soaks up water slowly if it isn't sealed [6]. Apply silicone caulk generously along the backsplash-wall joint and around the sink rim. Some fabricators paint the raw edges of the sink cutout with a waterproof membrane or even a couple coats of exterior primer before setting the sink.
Countertop not level. If the cabinets aren't level, shim them before setting the top. You can shim under the top itself, but it's more stable when the cabinet is level first. A countertop that rocks or has a visible slope looks wrong and causes problems with appliances.
For fabricators quoting laminate jobs at scale, tools like SlabWise help calculate material yield and cut optimization for sheet laminate, which matters when you're buying full 4x8 sheets and nesting multiple jobs.
How does laminate compare to other countertop materials?
Laminate is worth choosing on purpose, not by default. Here's an honest comparison.
| Material | Installed cost (per sq ft) | DIY-friendly? | Heat resistance | Scratch resistance | Seam visibility |
|---|---|---|---|---|---|
| Laminate (post-form) | $20, $50 | Yes | Low | Moderate | Low at corners |
| Laminate (custom sheet) | $30, $65 | Moderate | Low | Moderate | Varies |
| Butcher block | $40, $100 | Moderate | Moderate | Low (knifeable) | Low |
| Tile | $25, $65 | Yes | High | High | High (grout lines) |
| Granite | $75, $150 | No | High | High | Minimal |
| Quartz/engineered stone | $80, $140 | No | Moderate | High | Minimal |
| Corian / solid surface | $65, $135 | No | Low-moderate | Moderate | Invisible |
Sources: HomeAdvisor national cost data [1], NKBA [2].
Laminate's weaknesses are real. It can't handle a hot pan set directly on it (the resin layer can blister or delaminate). It scratches, and scratches can't be sanded out the way they can on solid surface or wood. The substrate is usually particleboard, which swells when it gets wet repeatedly [6].
Laminate's strengths are also real. It's by far the cheapest material, the pattern selection is enormous (some laminate patterns convincingly mimic stone), it's light enough to handle solo, and it doesn't need sealing. For a rental property, a budget flip, or a laundry room, it's a completely rational choice.
If you're weighing laminate against corian countertops or marble countertops, the gap in cost is big but so is the gap in durability and repairability. Decide based on how long you plan to be in the space and how much abuse the surface will take.
For a broader look at all your options before you commit, the kitchen countertops guide covers the full field.
When should you hire a pro instead of doing it yourself?
DIY laminate installation makes sense in a lot of situations. It probably doesn't make sense if any of these are true.
You have an L-shape or U-shape kitchen with inside corners. Inside corners on post-form countertops are genuinely hard. The miter cuts need to be perfect, and pulling that off with a circular saw and no experience is tough. A pro with a miter saw and template experience does this in an hour. You'll spend a full day and may still get a gap.
You're working around a farm sink or undermount sink. Undermount sinks with laminate are tricky because laminate substrates aren't naturally water-resistant at the exposed sink-rim area. A pro knows how to seal and support the cutout properly. A poorly done undermount laminate sink fails in 3 to 5 years as the substrate swells.
Your cabinet boxes aren't level and you're not sure how to shim. Shimming cabinets means knowing what you're doing structurally, and an unlevel counter is a frustrating thing to look at every day.
The job involves removing old tile countertops with a full tile backsplash. Demo that complex can damage drywall or the cabinet boxes, and patching that right before installing the new top adds a layer of work that makes DIY much less appealing.
For simple straight runs, post-form installation is genuinely manageable for a competent DIYer. If you're unsure, get a quote from a local fabricator (the countertop installation guide walks through what to expect from that process) and decide whether the labor savings justify the effort.
Homeowners pricing out their project can get a fast ballpark using SlabWise's instant quote tool before calling fabricators, so they know if quotes land in the right range.
How do you care for laminate countertops after installation?
Laminate is low-maintenance, but a few habits extend its life a lot.
Always use a cutting board. Laminate scratches, and unlike solid surface, those scratches are permanent. The wear layer is thin, and once it's through, the substrate is exposed.
Never set hot pans directly on laminate. The resin can blister, and there's no fix for a heat blister short of replacement. A trivet takes two seconds to grab.
Clean with mild soap and water or a spray cleaner rated for laminate. Abrasive cleaners (powder scrubs, steel wool) dull the surface fast. Bleach is generally fine for disinfecting in low concentrations, but repeated heavy bleach use can lighten some colors over time.
Re-seal the backsplash-to-wall joint with silicone caulk every few years. This is the most common place water gets in and swells the substrate [6]. It takes 10 minutes and costs a few dollars.
For deeper cleaning info on stone surfaces you might pair with laminate (like a stone tile backsplash), the how to clean stone countertops guide has specific product guidance.
Frequently asked questions
How much do new countertops cost?
New countertops range from about $20, $50 per square foot installed for laminate up to $150+ per square foot for natural stone or premium engineered quartz. For a typical 30-square-foot kitchen, laminate runs $600, $1,500 installed. Granite averages $75, $150 per square foot installed. The material, edge profile, number of cutouts, and local labor rates all shift the final number.
Can I install laminate countertops myself?
Yes, for straight runs and post-form tops. A beginner with a circular saw, jigsaw, and a weekend can handle a simple kitchen. Inside corners, custom sheet laminate application, and undermount sinks are harder and worth getting professional help for. The material cost savings on a DIY install typically run $300, $700 for an average kitchen.
How long does it take to install laminate countertops?
A straight single-run post-form kitchen takes 3 to 6 hours for an experienced installer. For a DIYer doing their first install, budget a full day, including measuring, fitting, and cleanup. A kitchen with corners, multiple cutouts, or custom sheet laminate takes 1 to 2 full days. Letting caulk and contact cement cure adds another few hours before you can use the surface.
What kind of blade should I use to cut laminate countertops?
Use a carbide-tipped circular saw blade with at least 60 teeth. Fewer teeth per inch means more chip-out on the laminate face. Cut from the back side of a post-form top (good face down) to minimize face chip-out. Apply blue painter's tape along the cut line before marking and cutting for extra chip protection.
How do I attach a laminate countertop to cabinets?
Drive screws up through the mounting cleats inside the top of each cabinet box into the countertop substrate. Use screws short enough that they won't punch through the top surface. Most post-form countertops are about 1 inch thick, so 1-1/4-inch screws usually work. Dry-fit and check level before driving any screws permanently.
Can laminate countertops be installed over existing countertops?
Technically yes, using thin laminate overlay sheets glued with contact cement over a flat, clean, solid existing surface. In practice, the results are inconsistent. The existing surface must be perfectly flat with no flex or high spots. Edge treatment is difficult. Most experienced fabricators prefer to remove the old top and start fresh rather than deal with laminate overlay problems later.
How do you handle the seam when joining two laminate countertop pieces?
Use miter draw bolts (countertop connector bolts) routed into the underside of both pieces. Apply color-matched seam filler to the mating faces before drawing the joint tight. The miter cuts must be accurate. Apply silicone caulk to the underside of the joint before tightening to slow water infiltration at the seam. Tighten bolts alternately for an even pull.
How do you make a sink cutout in a laminate countertop?
Use the sink's paper template (included with most sinks) to mark the opening. Drill a starter hole just inside the cut line with a 3/8-inch or larger drill bit. Cut with a jigsaw using a fine-tooth blade. Clamp a scrap piece of wood under the cutout before finishing the cut so it doesn't drop and chip the face laminate at the last moment.
Do laminate countertops need to be sealed?
No, the laminate surface itself doesn't need sealing. The surface is non-porous and resists stains without any treatment. What does need attention is the backsplash-to-wall joint and the sink rim, both sealed with 100% silicone caulk. Those joints are where water sneaks into the particleboard substrate and causes swelling and failure over time.
What is the difference between post-form and custom sheet laminate countertops?
Post-form countertops are pre-built one-piece units with an integrated curved front edge, sold in standard lengths at home centers. They're fast to install and inexpensive. Custom sheet laminate means applying plastic laminate sheets to a cut substrate yourself, which allows any size, depth, and edge style but requires more skill, tools, and time. Post-form costs less; custom sheet looks more tailored.
How long do laminate countertops last?
With reasonable care, 10 to 20 years is realistic. The surface resists stains and moisture well, but scratches accumulate over time and the substrate can swell at the sink and backsplash joints if caulk isn't maintained. Heat damage from pans set directly on the surface is the other common life-shortener. Using trivets and cutting boards extends the lifespan significantly.
What contact cement works best for applying laminate sheets?
Solvent-based contact cement gives a stronger initial bond and is the traditional choice in fabrication shops. Water-based contact cement is lower in VOCs and still works well for most residential laminate applications, especially if you're working in a confined space with limited ventilation. Either type requires both surfaces to be coated, allowed to tack, then carefully positioned before contact.
Can laminate countertops be repaired if chipped or scratched?
Small chips near edges can be filled with color-matched laminate filler paste (sold at home centers). Surface scratches can be minimized with laminate polish but not truly removed because the damage is in the wear layer itself. Heat blisters and large damage areas generally can't be repaired; that section of countertop needs replacement. This is laminate's main disadvantage vs. solid surface materials.
Sources
- HomeAdvisor, Countertop Installation Cost Guide: Laminate countertop material costs $5, $15 per square foot; installed cost ranges $20, $50 per square foot.
- National Kitchen and Bath Association (NKBA), Industry Research: Engineered stone countertops such as Cambria typically run $80, $140 per square foot installed; granite averages $75, $150.
- U.S. Department of Housing and Urban Development, Residential Rehabilitation Inspection Guide: Walls in residential construction are commonly out of square by measurable degrees, requiring scribing for tight countertop fits.
- U.S. Occupational Safety and Health Administration (OSHA), Flammable Adhesives Safety Guidance: Solvent-based contact cements release flammable and potentially hazardous VOCs; proper ventilation and ignition-source elimination are required during use.
- U.S. Environmental Protection Agency (EPA), Volatile Organic Compounds in Common Products: Water-based contact cements contain lower VOC levels than solvent-based formulations and are recommended for indoor applications with limited ventilation.
- International Association of Certified Home Inspectors (InterNACHI), Kitchen Countertop Standards: Laminate countertop substrate (particleboard or MDF) is susceptible to moisture swelling at sink cutouts and backsplash joints if not properly sealed.
- Wilsonart LLC, Laminate Installation Guide: Contact cement should not be applied below 50°F (10°C); low temperatures significantly reduce bond strength in solvent-based formulations.
- Formica Group, Professional Installation Instructions: Sheet laminate should be applied to edges before the face, and a J-roller applied firmly to the full bonded area eliminates air pockets after laying.
- U.S. Consumer Product Safety Commission (CPSC), Safety Requirements for Kitchen Installations: Countertop installations in residential kitchens must meet structural support requirements to prevent tipping or collapse; local building codes govern specifics.
- University of Minnesota Extension, Home Improvement Cost and Value: DIY countertop installation can save $300, $700 or more in labor costs on an average kitchen project compared to professional installation.
Last updated 2026-07-09