TL;DR
- Laminate countertop sheets (sold under brands like Formica and Wilsonart) cost $1, $5 per square foot for material alone, or $10, $40 installed.
- They bond to a substrate with contact cement, cut with standard woodworking tools, and last 10 to 20 years with reasonable care.
- They're the cheapest hard surface you can buy, and the one real catch is they can't be refinished once scratched or burned.
What are laminate countertop sheets, exactly?
High-pressure laminate (HPL) is a layered composite: decorative paper printed with a pattern, pressed against kraft-paper core sheets, all saturated in thermosetting resins and fused under heat and pressure exceeding 1,000 psi [1]. The result is a rigid, hard sheet that carries a printed pattern on one face and a plain backing sheet on the other. The face is harder than the paper it started as, but softer than ceramic or stone.
Manufacturers sell these sheets in thicknesses of 0.028" (post-form grade), 0.039" (vertical grade), and 0.050" (standard horizontal grade). For countertops you almost always want horizontal grade at 0.050" or the post-form grade meant for pre-radiused edges. Vertical grade is thinner and made for cabinet doors and panels. Put it on a horizontal work surface and it cracks early.
Sheet dimensions vary by manufacturer, but 4×8, 4×10, and 5×12 feet are the common sizes. Most home-improvement stores stock 4×8. Fabrication suppliers and specialty dealers carry the longer runs you'd need for an island or a peninsula that runs past 8 feet without a seam [2].
For a broader look at how laminate compares to other surface types, the laminate countertops overview is a good starting point.
How much do laminate sheets for countertops cost?
Material alone runs roughly $1, $5 per square foot for the laminate sheet itself, depending on finish, brand, and pattern complexity [3]. Solid colors and basic woodgrains sit at the low end. Elaborate stone-replica patterns or matte textures with registered embossing (where the texture physically matches the printed grain) run higher.
The substrate adds cost. Most fabricators bond laminate to 3/4" particleboard or MDF, which costs $0.50, $1.50 per square foot in sheet form. Exterior-grade plywood costs more but handles moisture better in humid climates.
Installed prices are a different number entirely. The National Kitchen and Bath Association and remodeling cost surveys consistently place laminate countertop installation in the $10, $40 per square foot range, fully installed and finished [3][4]. That spread is wide because it depends on edge profile complexity, how many cutouts the job has, local labor rates, and whether old countertops need removal.
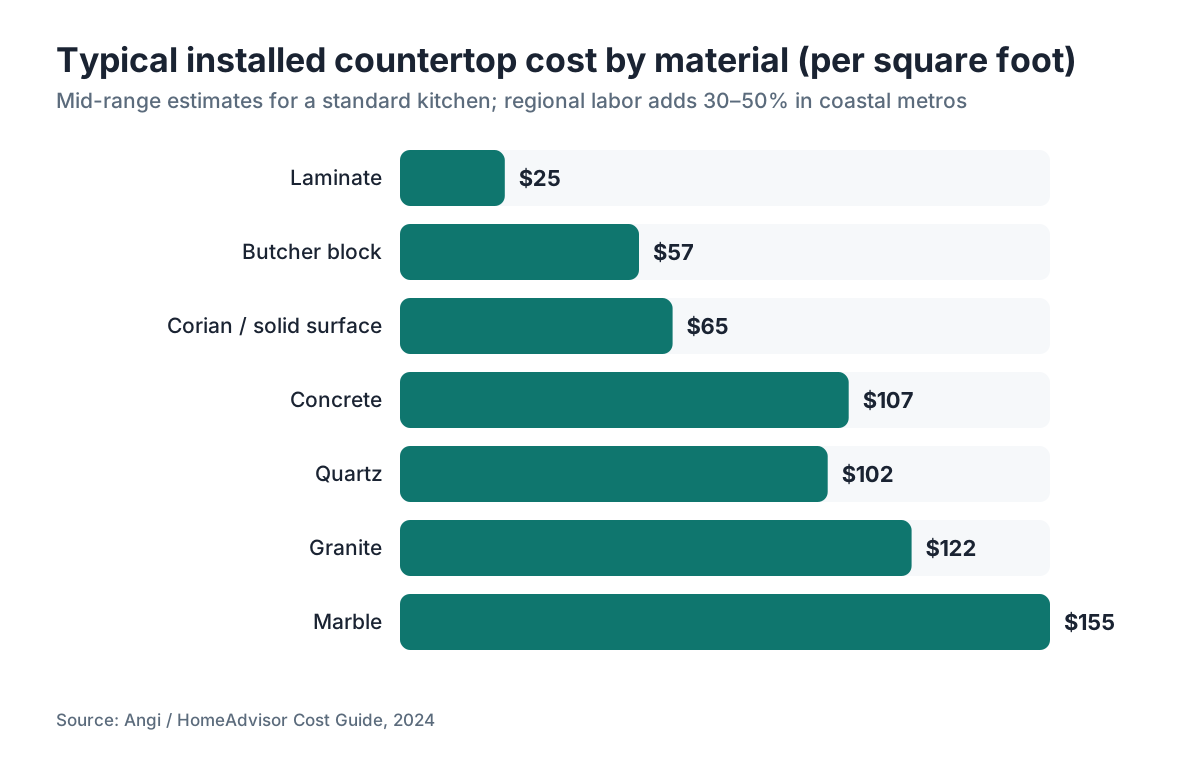
Compared to the alternatives, the gap is real:
| Material | Typical installed cost (per sq ft) |
|---|---|
| Laminate | $10, $40 |
| Butcher block | $30, $85 |
| Quartz | $55, $150 |
| Granite | $45, $200 |
| Marble | $60, $250 |
| Concrete | $65, $150 |
Those ranges come from multiple remodeling cost sources and will vary by region. Labor in coastal metro areas runs 30 to 50% higher than in rural markets, so the top of the laminate range can overlap the bottom of the quartz range if your job has a lot of complex cutouts.
If you want a quick ballpark for your own project, the SlabWise instant quote tool lets you plug in dimensions and get a localized estimate without calling anyone.
What brands of laminate sheets should you consider?
Formica and Wilsonart are the two names most fabricators actually stock. Formica countertops have been made in the US since 1913. Wilsonart, founded in 1956, is their primary direct competitor [5][6]. Both sell horizontal-grade sheets in several hundred patterns, and both offer warranty coverage of around 5 years on residential applications, covering delamination and manufacturing defects but not cuts, burns, or improper installation [11].
Arkema's Pionite and Panolam's Nevamar are also legitimate brands sold through building-supply distributors. They're not as widely stocked at retail, but fabricators who order in volume often buy from them at competitive prices.
For what it's worth, the pattern and texture matter more than brand loyalty at this price point. Get physical samples. A photograph of a stone-replica pattern looks plausible on a screen and unconvincing on a 25-inch-deep countertop. Samples are free from most distributors, and most big-box stores carry a sample booklet at the laminate display.
One finish detail people overlook: gloss level. High-gloss finishes show fingerprints and fine scratches badly in kitchen lighting. Matte and suede finishes hide daily wear much better, which is exactly why they sell better.
What tools and materials do you need to install laminate countertop sheets?
A basic laminate installation needs these on hand before you start:
- 3/4" particleboard or MDF for the substrate (or 3/4" plywood for wet areas)
- Contact cement (solvent-based or water-based)
- A J-roller or rubber hand roller for applying pressure
- A router with a flush-trim bit and a bevel or roundover bit for edges
- A circular saw or jigsaw with a fine-tooth blade (60-80 tooth for crosscuts)
- A belt sander or file for trimming overhanging laminate flush
- Painter's tape and dowel rods or scrap wood strips for the "slip sheet" method
- Seam filler that matches your laminate color (for any butt joints)
Contact cement is the critical consumable. You apply it to both surfaces, let it flash to dry (typically 15 to 30 minutes depending on temperature and humidity), then press the two surfaces together. The bond is immediate and effectively permanent on contact, which is why you need the slip-sheet technique when positioning large sheets.
Solvent-based contact cement bonds faster and has a longer open time, but the fumes are genuinely hazardous. Work outdoors or with serious ventilation and no open flames. Water-based formulas are safer and have improved a lot in bond strength over the past decade, though they need a longer flash time and can be sensitive to high humidity [7].
A router is technically optional if you're using pre-laminated post-form countertop sections from a home center, but it's essentially required if you're building from raw sheets. Flush-trim bits are cheap and make the edge work fast.
How do you install laminate countertop sheets step by step?
The full process has four distinct phases: building the substrate, applying the laminate, routing the edges, and mounting to the cabinets.
Build and fit the substrate first. Cut 3/4" particleboard to your countertop dimensions. If the run is longer than your sheet material, join pieces with biscuits and construction adhesive rather than plain butt joints. Add a front build-up strip (another layer of 3/4" material) along the front edge to bring the finished edge to standard countertop thickness, which is typically 1.5" total.
Laminate the edges before the field. This is the sequence most DIYers reverse and then regret. Cut edge strips slightly oversized, apply contact cement to both the strip and the substrate edge, let both flash, press together, then flush-trim. When you lay the top surface afterward, it overlaps the edge laminate and creates a tighter, more durable seam.
Apply contact cement to both surfaces. Use a paint roller or brush to get even coverage, paying attention to corners. Two coats on porous substrates is standard. Let the cement flash until it's dry to the touch but still tacky, which usually takes 15 to 30 minutes at 70°F [7].
Place using the slip-sheet method. Lay dowel rods or scrap strips of wood across the substrate every 6 to 8 inches. Lower the laminate sheet onto the dowels. Align it carefully, then pull out the center dowel first and press down firmly. Work outward, pulling dowels and rolling with the J-roller as you go. You get no repositioning once the surfaces touch.
Flush-trim and bevel the edges. A router with a flush-trim bit removes the overhang. Then switch to a bevel or roundover bit (10° bevel is traditional) to soften the top edge and prevent chipping.
Mount to the cabinets. Apply a bead of construction adhesive on the top front edge of each cabinet. Set the countertop in place. From inside the cabinet, drive screws up through corner brackets or directly through the cabinet top rail into the substrate. Don't over-tighten. You want the substrate to pull down snug, not bow. Standard practice is 1.25" screws through the cabinet corner blocks, chosen short enough that they never break the laminate surface.
For more context on how countertop installation varies by material type, the kitchen countertops guide walks through the decision tree.
For sink cutouts, use a jigsaw with a fine blade and a template. Support the cutout from below as you finish the cut so the weight doesn't crack the laminate.
How do you install laminate countertops to cabinets securely?
Laminate countertops attach to cabinets in two ways: construction adhesive along the top of the face frame, and mechanical fasteners through corner blocks or the cabinet's top rail. You generally want both.
Run a thin bead of construction adhesive (Liquid Nails or similar) across the front rail and any intermediate support. Then drive 1.25" screws upward through the cabinet's corner blocks at an angle. The countertop substrate should pull down flat and stay there.
Corner seams on L-shaped kitchens need a different approach. Use countertop bolts (also called draw bolts or miter bolts) in routed channels in the underside. These pull the two sections together and hold the seam tight as seasonal movement occurs. Seam filler goes in the joint on top, matched to the laminate pattern as closely as possible.
One thing that creates callbacks: not shimming the cabinets level before installing. The countertop follows the cabinet tops, so a 1/4" dip in a 10-foot run shows up as a visible low spot where water pools. Shim cabinets to level before scribing the backsplash and before cutting your substrate.
For walls that aren't flat, the backsplash area needs scribing. Run a compass along the wall and transfer the wall's irregularities to the laminate or to a separate backsplash piece, then sand or cut to that line. Trying to caulk a 1/4" gap is not a long-term solution.
What are the real drawbacks of laminate countertop sheets?
The single biggest limitation is that laminate can't be refinished. A deep scratch, a burn from a hot pan, or a cut that goes through the surface layer is permanent. The only fix is replacement. That's genuinely different from butcher block countertops, which you can sand and refinish, or from solid surfaces like Corian countertops, which can be buffed and reground.
Edge chipping is common over time, especially at seams and around the sink cutout. The bevel or roundover you cut at install helps, but it doesn't eliminate the vulnerability. Post-form edges (the rolled integral edge on pre-made sections) hold up somewhat better because there's no seam to chip at the top edge.
Moisture is the enemy of particleboard substrates specifically. Laminate itself is fairly moisture-resistant, but if water infiltrates at the seams, a sink cutout, or a failed caulk joint, the particleboard swells and the laminate loses adhesion. Plywood substrates are more forgiving here, and that's worth spending the extra few dollars per sheet in any kitchen.
Seams between sheets are visible. Stone patterns are the worst offenders. Matching the pattern across a seam is essentially impossible in a printed material. Solid colors and small-scale abstract patterns conceal seams better. Designing the layout so seams fall away from high-traffic zones (not directly in front of the sink, for instance) is a simple quality move.
Finally, perceived value. Real estate agents and buyers tend to read laminate as a lower-end finish, which may matter if you're renovating to sell. For a long-term home, personal preference rules. For a flip or a pre-sale renovation, the ROI calculation is less clear.
How long do laminate countertops last?
A well-installed laminate countertop with a plywood or MDF substrate, properly caulked at the sink and backsplash, and used without cutting directly on the surface typically lasts 10 to 20 years before it looks noticeably worn [3]. Some kitchens have had them longer without failure. Others hit problems in 5 years because of chronic water infiltration at a poorly sealed sink.
The laminate surface itself doesn't degrade from UV exposure the way some polymer materials do, and it doesn't require sealing. Cleaning is simple: mild soap and water, or a non-abrasive all-purpose cleaner. Avoid abrasive scrubbing pads, which scratch the surface, and avoid harsh chemical solvents, which can lift the pattern layer on some finishes.
Heat is the real accelerant for failure. Contact cement starts to release at sustained heat, and the core paper layers can delaminate if a hot pan sits directly on the surface repeatedly. Trivets cost nothing. Use them.
For comparison, quartz countertops and granite countertops last effectively forever if sealed and maintained, but they cost 3 to 5x more. The honest trade-off is upfront cost versus longevity and replaceability.
Can you install laminate sheets over existing countertops?
Technically yes, with limitations. If the existing countertop is flat, solid, structurally sound, and free of loose or swollen areas, you can laminate over it. Strip any existing backsplash material, scuff the old surface to improve adhesion, and fill any gaps or divots. Apply contact cement to both surfaces and proceed normally.
The problems start with added thickness. If your sink is a drop-in, the added 0.050" of laminate is usually fine. If appliances are tight or the reveal at the sink is precise, you may create fitment issues. Over tile, the grout lines telegraph through as ridges visible in raking light, which looks bad.
Most professionals skip the overlay approach and build from scratch. Fresh substrate costs $30, $60 in material for a typical kitchen, and you get a flat, predictable surface. Overlaying is a shortcut that often creates problems that cost more to fix than starting clean.
One situation where it makes sense: laminating a DIY workbench or utility counter where looks are secondary and the substrate is already solid.
How does DIY installation compare to hiring a fabricator?
A competent DIYer with basic woodworking tools can absolutely install laminate countertop sheets from scratch. The learning curve is real, the slip-sheet application step is stressful the first time, and router work takes practice, but none of it requires specialized stone equipment or years of trade experience.
Budget roughly $200, $500 in materials for a typical 30-square-foot kitchen, depending on sheet prices and substrate choice. Add $50, $100 for tools if you don't own a router. That's against a professional installation that might run $300, $1,200 for the same job.
Hiring out makes sense when the layout has complex miters or multiple cutouts, when you can't afford a single mistake on an expensive pattern (you can't un-bond contact cement), or when your time genuinely has a high dollar value. Fabricators with CNC equipment can rout precise sink cutouts and complex edge profiles faster and cleaner than most DIYers with a handheld router.
If you run a shop and want an efficient way to quote laminate jobs and track sheet usage per project, SlabWise's job management software handles that without manual spreadsheets. Request a demo at slabwise.com if that's relevant to your shop.
For most single-kitchen DIY projects, the skill ceiling is manageable. Watch a few complete installation videos before you cut anything, dry-fit everything before you open the contact cement, and you'll be fine.
What finish options exist for laminate countertop sheets?
Laminate manufacturers now offer more texture and finish variety than most people realize. The standard categories:
Gloss: High reflectance, shows fingerprints and scratches. Still popular for modern minimalist kitchens where the high-contrast look is intentional, and it wipes clean of surface grime easily.
Matte / Satin: The most practical finish for working kitchens. Diffuses light, hides minor scratches, doesn't show water spots. It accounts for a large share of commercial kitchen and restaurant counter installations for exactly this reason.
Textured (embossed): The surface has a physical texture pressed in. "Registered emboss" means the texture matches the printed pattern, so a printed wood grain also feels like wood grain under your hand. This is the premium tier of laminate and it's genuinely effective at replicating stone and wood textures.
Postforming grade: Thin enough (0.028") to bend around a radius when heated, which is how pre-made post-form countertop sections get their integral curved front edge. You can't DIY this bend without specialized heat equipment. It's a manufacturer step.
Color and pattern libraries run into the hundreds. Stone replicas (marble, concrete, granite looks), solid colors, woodgrains, abstract patterns, and even large-format photographic designs exist. The realistic stone replicas have improved a lot in the past decade with digital printing, though they don't fool anyone up close the way actual marble countertops would.
Edge profiles are the other variable. Self-edge (laminate wrapped to a flat substrate edge), beveled, waterfall/eased, and wood-edged (a solid wood strip applied to the substrate edge before laminating the top) all exist. Wood edges are popular because they look more finished than a laminate edge and are easy to apply.
What safety considerations apply when working with laminate and contact cement?
The laminate material itself is inert once manufactured. Cutting it generates fine dust that you shouldn't breathe, so a dust mask rated N95 or better is appropriate when routing and sanding. HPL dust isn't regulated any differently from general wood dust, but prolonged occupational exposure to fine dust is linked to respiratory issues, so basic respiratory protection is standard practice [8].
Contact cement is the bigger hazard. Solvent-based contact cements contain n-hexane, methyl ethyl ketone (MEK), and toluene depending on formulation. These solvents are flammable with low flash points, and the vapors are heavier than air and pool at floor level. The Occupational Safety and Health Administration (OSHA) sets permissible exposure limits (PELs) for these solvents. For n-hexane, OSHA's PEL is 500 ppm as an 8-hour time-weighted average [9].
In practical terms: work outside or in a well-ventilated space, no pilot lights, no smoking, no power tools throwing sparks until the vapors clear. Water-based contact cement formulas avoid most of these hazards and have become a reasonable substitute for most countertop applications.
Dispose of solvent-soaked rags properly. They can self-ignite if bunched up. Spread them flat to dry fully before disposal, or store them in a sealed metal container with water.
Is laminate a good choice for rental properties and budget remodels?
Laminate is the rational default for rental properties. The math is simple: a landlord replacing a countertop in a rental will likely replace it again within 10 to 15 years regardless of material, because of tenant damage, lease turnover, or just updating the look. Spending $15, $25 per square foot installed on laminate versus $80, $120 on quartz gives you a functional surface at a fraction of the replacement cost.
The same logic applies to budget primary kitchens where the owner plans to renovate more thoroughly in 5 to 7 years. Laminate buys time without locking capital into a surface that might get torn out anyway.
For value-add flips targeting the entry or mid-market, laminate is harder to recommend. Buyers at that price point have seen enough HGTV to notice, and the psychological price discount buyers apply to laminate countertops runs deeper than the actual cost difference in many markets. A modest quartz or even a solid-surface option tends to photograph and show better.
For commercial kitchens and restaurant prep areas, laminate stays common for secondary work surfaces and prep counters. It's easy to replace a section when it wears, and it handles food-safe cleaners without needing sealing.
Frequently asked questions
What is the difference between laminate sheets and post-form countertops?
Post-form countertops are pre-built sections with the laminate already bonded at the factory, including the curved integral edge. They come in standard depths (25.5") and are sold in linear-foot lengths. Laminate sheets are the raw material: flat panels you bond to a substrate you build yourself. Post-form is faster and cheaper for simple straight runs. Sheet laminate is necessary for non-standard depths, complex shapes, or custom edge profiles.
Can you use laminate countertop sheets for outdoor kitchens?
Standard HPL is not rated for continuous outdoor use. Prolonged UV exposure degrades the resin binder and fades the pattern layer. The particleboard or MDF substrate swells and fails fast with outdoor moisture. Some manufacturers make exterior-grade HPL panels with UV stabilizers and phenolic backings, but they're a separate product from standard countertop sheets. For most outdoor kitchens, concrete, tile, or stainless steel are more practical surfaces.
How do you cut laminate sheets without chipping?
Cut with the decorative face down when using a circular saw (the blade tooth travels upward on the exit stroke, causing tearout on the face-up side). Use a fine-tooth blade, 60 to 80 teeth for a 7.25" saw. Score with a utility knife first if using a jigsaw. A router with a sharp flush-trim bit gives the cleanest final trim. Dull blades are the main cause of chipping, so use a new blade on laminate if yours has more than a few cuts on wood.
What kind of substrate is best under laminate countertop sheets?
3/4" industrial particleboard is standard and works well in most kitchens. Moisture-resistant MDF is a small upgrade. 3/4" exterior-grade plywood is best in high-moisture zones (near dishwashers, undersink areas, or in bathrooms) because it tolerates repeated wetting and drying without swelling as much. Avoid interior-grade plywood, which can have voids that telegraph through thin laminate under pressure. Whatever you choose, caulk every penetration at install.
How do you fix a bubble or blister in laminate countertop?
If the blister is small and the laminate isn't cracked, heat it with a household iron set to medium, place a damp cloth between the iron and laminate, and apply firm pressure with a roller while warm. This can re-activate the contact cement. If the blister is large or the laminate has lifted at a seam, inject contact cement under the lifted area with a syringe, press and clamp, and let cure for 24 hours. Cracked laminate can't be repaired invisibly. That section needs replacement.
Can you put a hot pan on laminate countertops?
No. High heat is one of the fastest ways to ruin a laminate surface. Sustained direct contact from a pan at 350°F or above can blister the laminate, soften the contact cement beneath, and cause permanent adhesion failure. The damage is irreversible. Always use a trivet or hot pad. This is the one maintenance rule that matters more than anything else with laminate. Ignoring it shortens the useful life of the countertop dramatically.
How do you match laminate pattern at seams?
You mostly can't, especially with stone replica or large-scale woodgrain patterns. The printed repeat on most laminate sheets isn't designed to line up across a butt joint the way wallpaper might. The practical strategies: choose a small-scale or abstract pattern that reads as consistent regardless of seam alignment, place seams in low-visibility locations (inside corners, away from the primary sight line), and use seam filler matched to the dominant color of the pattern to minimize the visual gap.
Does laminate countertop add value to a home?
Laminate updates a worn kitchen but typically doesn't command a premium over other countertop materials in buyer perception. The National Association of Realtors' remodeling impact reports suggest kitchen updates recoup 50 to 80% of their cost depending on scope and market, but that data isn't broken down by countertop surface alone [10]. In entry-level markets, laminate is often competitive. In mid-range and above, buyers expect quartz or stone and may mentally discount laminate during negotiations.
What adhesive do you use to install laminate sheets?
Contact cement is the correct adhesive for bonding laminate to a substrate. Apply it to both surfaces, allow to flash dry (15 to 30 minutes at 70°F), then press together. The bond forms instantly on contact and doesn't require clamping. Solvent-based contact cement (like DAP Weldwood) is traditional. Water-based formulas (like DAP Weldwood Water-Based) are safer for indoor use and adequate for most countertop applications. Don't use construction adhesive or PVA wood glue. They don't bond laminate reliably.
How do you remove old laminate countertop sheets?
Score the laminate around the perimeter with a utility knife. Heat the surface with a heat gun set to 250 to 300°F to soften the contact cement, working in small sections. Use a stiff putty knife or chisel to pry and lift. The laminate comes off in pieces. Leftover adhesive on the substrate can be scraped and sanded, or dissolved with solvent before re-laminating. If the substrate is swollen or damaged, replace it rather than laminating over a compromised base.
Can you install laminate countertop sheets on a bathroom vanity?
Yes, and it's a common and practical choice. The installation process is identical to a kitchen counter. Use a plywood substrate rather than particleboard in bathrooms because moisture infiltration is more likely around the sink. Seal every edge, every seam, and the entire sink cutout with 100% silicone caulk. The moisture vulnerability isn't the laminate face. It's the substrate and the adhesive joint, so the installation quality matters more than it does in a dry environment.
What's the minimum overhang for a laminate countertop without support?
Standard guidance is a maximum unsupported overhang of 6 to 8 inches for 3/4" substrate laminate countertops before you need corbels or brackets. This isn't a code requirement in most jurisdictions. It's a structural practicality. Heavier materials like granite are limited to less overhang unsupported, which is one practical advantage of laminate for breakfast bars. Beyond 8", add support. Beyond 12", you need a structural calculation or a substantial bracket every 12 to 18 inches.
What is the standard thickness for a finished laminate countertop?
The finished countertop is typically 1.5" thick total: a 3/4" substrate with a 3/4" build-up strip glued along the front edge, plus the 0.050" laminate face. This matches the standard thickness of post-form countertops and sits right at most cabinet top rails. Some fabricators use 1.25" total (single 3/4" layer) for painted or tiled applications, but 1.5" is the conventional standard for a finished laminate countertop.
Sources
- National Electrical Manufacturers Association (NEMA), High-Pressure Decorative Laminates Standard LD 3: HPL is manufactured under heat and pressure exceeding 1,000 psi using thermosetting resins, decorative paper, and kraft core sheets
- Wilsonart, Laminate Sheet Product Specifications: Common laminate sheet dimensions include 4x8, 4x10, and 5x12 feet, with 0.050" horizontal grade for countertop use
- HomeAdvisor (Angi), Laminate Countertop Installation Cost Guide: Laminate countertops cost $10, $40 per square foot installed and last approximately 10 to 20 years with proper care
- National Kitchen and Bath Association (NKBA), Kitchen and Bath Market Index: Laminate countertop installed costs and regional labor rate variation referenced for kitchen remodeling benchmarks
- Formica Corporation, Company History: Formica Corporation has manufactured high-pressure laminate in the United States since 1913
- Wilsonart, About Us: Wilsonart was founded in 1956 and is a primary competitor to Formica in the North American HPL market
- DAP Products, Weldwood Contact Cement Technical Data Sheet: Contact cement flash time is typically 15 to 30 minutes at 70°F; water-based formulas require longer flash time and are sensitive to high humidity
- OSHA, Wood Dust Safety and Health Topics: Prolonged occupational exposure to fine wood and composite dust is associated with respiratory issues; OSHA regulates general wood dust exposure
- OSHA, Permissible Exposure Limits (PELs) for Air Contaminants, 29 CFR 1910.1000 Table Z-1: OSHA PEL for n-hexane (a solvent in solvent-based contact cements) is 500 ppm as an 8-hour time-weighted average
- National Association of Realtors, Remodeling Impact Report: Kitchen updates recoup 50 to 80% of their cost depending on scope and market, per NAR remodeling impact data
- Formica Corporation, HPL Product and Installation Guide: Formica residential warranty covers delamination and manufacturing defects for approximately 5 years; cuts, burns, and improper installation are excluded
- U.S. Environmental Protection Agency, Formaldehyde Emission Standards for Composite Wood Products (TSCA Title VI): Particleboard and MDF used in countertop substrates are subject to EPA formaldehyde emission standards under TSCA Title VI
Last updated 2026-07-09