TL;DR
- Cut laminate countertops face-down with a fine-tooth blade (minimum 80 teeth) on a circular saw, or face-up with a jigsaw.
- Score the cut line first with a sharp utility knife to prevent chip-out.
- Use a straightedge as a fence, cut slow and steady, and sand the edge smooth.
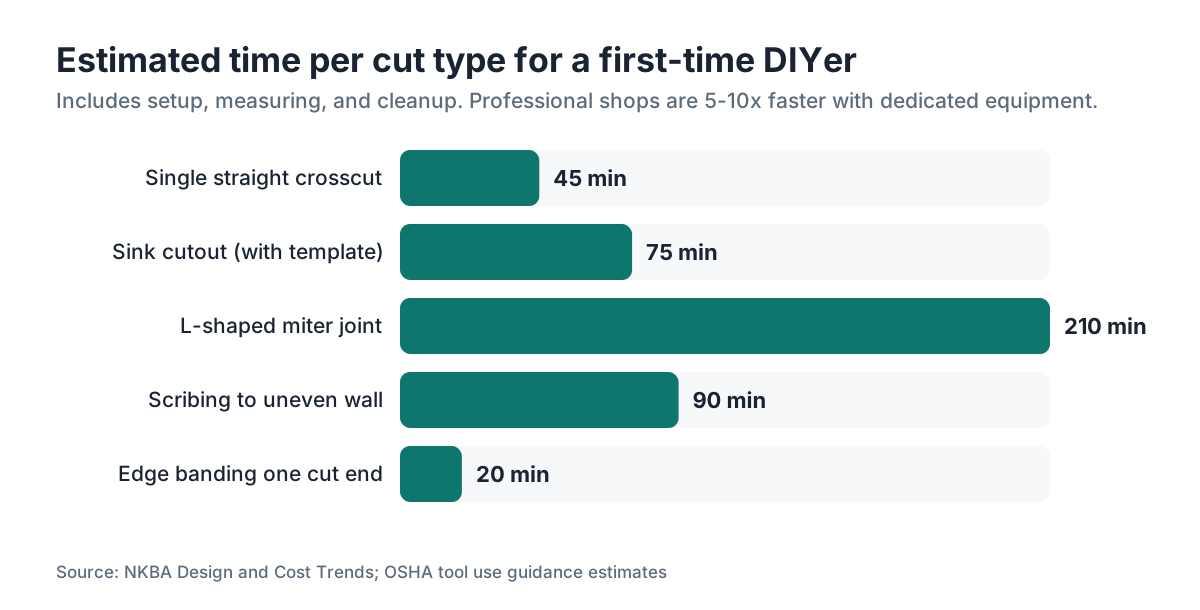
- Budget 30 to 90 minutes per cut for a first-timer.
What tools do you actually need to cut laminate countertop?
You have a few real options, and the right one depends on the cut.
For long, straight cuts, a circular saw is the fastest and most accurate tool. Pair it with an 80-tooth (or higher) carbide-tipped blade and a clamped straightedge fence. The high tooth count is the single most important variable for chip-free cuts. A cheap 24-tooth framing blade will shred the laminate surface.
For sink cutouts and inside curves, a jigsaw with a fine-tooth laminate blade (typically 10 TPI or more) is the right call. Some people use a router with a straight-cutting bit for final trimming along edges, especially when fitting a countertop against a wall that isn't perfectly straight.
Here's a quick rundown of what to have ready before you start:
| Tool | Specific use | Minimum blade spec |
|---|---|---|
| Circular saw | Long straight cuts | 80-tooth carbide |
| Jigsaw | Sink cutouts, curves | 10 TPI fine-tooth |
| Router with straight bit | Edge trimming, scribing | 1/2" carbide flush-trim |
| Utility knife | Scoring the cut line | Sharp replaceable blade |
| Clamps + straightedge | Fence for circular saw | At least 4 ft long |
| Safety glasses + ear protection | All cuts | Required |
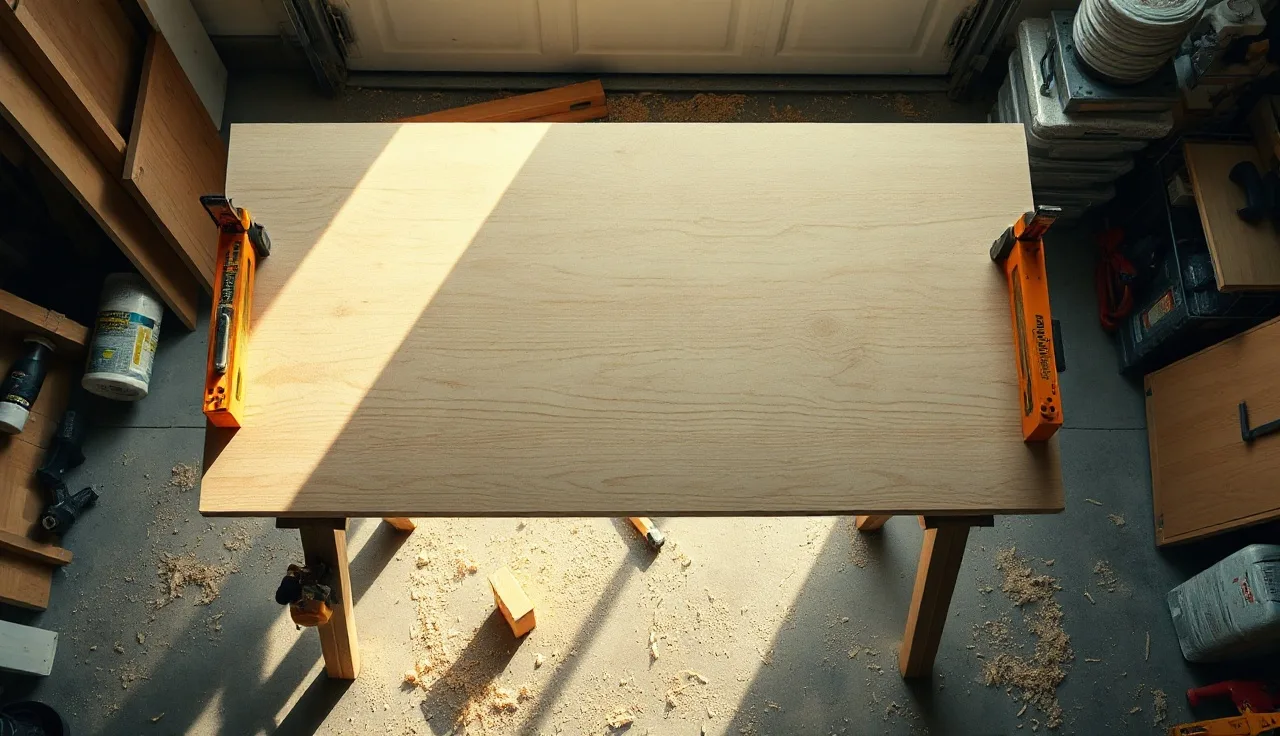
You also need a solid work surface. Cutting a countertop on sawhorses works fine. Just make sure the slab is fully supported on both sides of the cut line so it doesn't pinch the blade or snap under its own weight.
Which direction should you cut to avoid chipping the laminate?
This is where most DIYers go wrong, and it's a simple fix once you understand why it happens.
Circular saw blades cut on the upstroke. The teeth exit through the top face of whatever you're cutting. So chip-out happens on the top surface when the countertop is face-up. The fix is to cut face-down: flip the countertop over, mark your line on the back, and make the cut with the good face pressed against the workbench.
Jigsaws are the opposite. The blade cuts on the upstroke too, but you're working from above, so the chip-out lands on the top face. With a jigsaw, cut face-up and use a blade designed for laminate. Better yet, score the cut line with a utility knife before you start. One firm pass with a sharp blade, cutting maybe 1/32" deep, breaks the surface fibers so the jigsaw can't tear them. It makes a noticeable difference.
Some pros put blue painter's tape along the cut line on the good face, then score through the tape. The tape helps you see the line and gives the surface a little extra support at the edge.
For circular saw cuts, the scoring trick still applies. Score the top face along your cut line before you flip the slab over. When you make the actual cut from the underside, the scored line on the face prevents any residual tear-out.
Slow down. Feeding the saw too fast through laminate is the second-most-common mistake after using the wrong blade. Let the blade do the work.
How do you make a straight cut on a laminate countertop?
Step by step, here's how a straight crosscut or rip cut goes.
-
Mark your cut line on the underside of the countertop with a pencil. Measure twice from at least two reference points because laminate countertop blanks aren't always perfectly square.
-
Score the top face along the same line with a utility knife and straightedge.
-
Clamp a straight piece of lumber or a manufactured saw guide to the underside as a fence. The distance from your fence to the blade depends on your saw's base plate offset. Measure it on scrap first.
-
Set blade depth so it just barely clears the countertop thickness. Most laminate countertops are 1-1/2" thick with a particle board core [1]. Setting the blade 1/4" deeper than the material means less blade exposure and cleaner cuts.
-
Flip the slab face-down onto your work surface with the underside up. Support it fully, with supports on both sides of the cut line and at least a foot beyond each end.
-
Run the circular saw along your fence at a steady, moderate pace. Don't stop mid-cut.
-
After the cut, smooth the raw edge with 120-grit sandpaper on a block, then 220-grit. Apply matching laminate edge banding, or paint the exposed particle board edge with a waterproof sealer if it's going against a wall where moisture could get in.
The whole process for a single straight cut takes about 20 to 40 minutes once you have the setup right. Most of that time is measuring and clamping, not actually cutting.
How do you cut a sink hole in a laminate countertop?
Sink cutouts are where people get nervous, but the process is straightforward if you follow the template.
Most undermount and drop-in sinks come with a paper or cardboard cutout template. If yours didn't, trace the rim of the sink inverted onto the countertop surface, then draw a second line about 1/2" inside that outer line. The inner line is your actual cut line for a drop-in sink. For an undermount installation (less common with laminate, but possible), follow the manufacturer's specific offset.
Here's the process:
-
Mark and double-check the template position. Confirm the cutout is centered on the cabinet opening and at least 1-1/2" from the front edge of the countertop.
-
Drill a 3/4" starter hole inside one corner of the cut line. This is where your jigsaw blade enters the material.
-
Score the cut line on the top face with a utility knife, especially around curves.
-
Insert the jigsaw blade into the starter hole, face the blade toward your cut line, and begin cutting. Stay just inside the line. You can always remove more material. You can't add it back.
-
Near the end of the cut, tape or clamp the falling piece from below so it doesn't sag and crack the laminate at the last moment. Having a helper hold it up works just as well.
-
Clean up the edge with a file or sandpaper. Seal the exposed particle board edge thoroughly with silicone or waterproof paint before the sink goes in. Water infiltration into the particle board core is the number-one cause of laminate countertop failure over time [2].
A sink cutout takes 45 to 90 minutes for someone doing it for the first time. The template is doing most of the thinking for you.
How do you cut laminate countertop for corners and L-shapes?
This is the one cut that trips up a lot of people, because getting two countertop sections to meet cleanly at an inside corner requires a miter joint, and miter joints on laminate need to be accurate.
The standard approach for an L-shaped kitchen is a 45-degree miter cut on each piece so they meet at a 90-degree corner. Most laminate countertop manufacturers sell mitering kits, which include metal draw bolts (sometimes called miter bolts or countertop bolts) that pull the two pieces together from underneath.
For the cut itself, you need a circular saw with the base plate set to 45 degrees, or a track saw if you have access to one. The same face-down rule applies. Mark the miter line carefully, clamp a guide, and make the cut in one clean pass.
After cutting, dry-fit the two pieces before final installation. The miter faces should meet with no visible gap. If you see a gap, a hand plane run lightly across the high spots of the miter face will close it. A router table works even better for this, but it's more setup.
Once you're satisfied with the fit, apply color-matched seam filler (most laminate brands sell this, and hardware stores carry generic versions) to the joint, clamp the draw bolts, and wipe away any squeeze-out immediately. The seam won't disappear entirely, but it should be tight and barely visible.
Laminate countertops in L-shaped kitchens usually come pre-mitered from the factory if you order through a home center, which saves this step entirely. Worth considering if the DIY miter feels like a lot.
Can you cut laminate sheet (not the full countertop) with a different method?
Yes, and it's actually easier. If you're working with raw laminate sheet, like Formica or a similar brand, before it's bonded to substrate, you can score-and-snap it much like you would glass or tile.
Use a laminate scoring tool or a sharp utility knife and a metal straightedge. Score firmly along the cut line three or four times, pressing hard enough to cut at least halfway through the laminate thickness (laminate sheet is typically 1/32" to 1/16" thick). Then clamp the sheet to the edge of a workbench along the score line and snap the overhang down sharply. Clean break, no saw needed.
For curves or irregular shapes in sheet laminate, a router is cleaner than a jigsaw because it leaves a smoother edge. But a jigsaw with a fine blade works fine for rough cuts that will be trimmed with a router or file afterward.
This matters if you're re-facing an existing countertop, which is a legitimate way to refresh old laminate without replacing the whole slab. Formica countertops are available as sheet goods from most home centers, and re-laminating over a solid substrate is a real skill that pays for itself on a tight budget.
What are the most common mistakes when cutting laminate countertop?
A few things go wrong repeatedly, and knowing them ahead of time saves a ruined slab.
Wrong blade. Already covered this, but it bears repeating: a 40-tooth blade will chip laminate badly. Minimum 80-tooth carbide for a circular saw. No exceptions.
Not supporting the cutout piece. When you're doing a sink cutout, the waste piece falls out at the end of the cut. If it's not supported, it can sag and crack the laminate right at the cut line in the last few inches. Always clamp or tape it from below.
Ignoring the exposed particle board. Every cut you make exposes raw particle board. Particle board swells aggressively when it gets wet [2]. Every exposed edge that will face moisture, even just steam from cooking, needs to be sealed.
Rushing the cut. Going too fast causes blade deflection and chip-out. Steady, moderate feed rate only.
Not clamping the fence properly. A fence that moves mid-cut gives you a wavy line that's almost impossible to fix.
Measuring from one point. Kitchens are rarely square. Measure from at least two reference points and check both numbers before cutting.
Cutting the countertop too short. There's no fix for this. Always measure twice, cut once, and leave yourself a hair of extra length that you can trim back. A 1/16" gap between countertop and wall gets covered by backsplash tile or caulk. A countertop that's 1/2" too short does not.
Can you cut on granite countertops, and how do you cut granite?
This question comes up alongside laminate because people are often deciding between materials, or they already have granite countertops and want to know what cutting on them does.
Can you cut food directly on granite? Technically, yes. Granite is hard enough (Mohs hardness around 6 to 7) [3] that a knife won't scratch it under normal use. But the real answer is: don't do it regularly. The stone won't show damage, but your knife will. Granite is abrasive enough to dull a good chef's knife noticeably faster than a wood or plastic cutting board. Use a cutting board.
How do you actually cut granite countertops during fabrication? That's a very different operation than cutting laminate, and it's not a DIY project. Fabricators use wet-cutting angle grinders with diamond blades, bridge saws with diamond blades running under a continuous water stream, and CNC routers for edge profiles. The water is both coolant and dust suppression, because granite dust contains silica and poses a serious inhalation hazard [4].
The Occupational Safety and Health Administration (OSHA) standard for occupational exposure to respirable crystalline silica (29 CFR 1926.1153) sets a permissible exposure limit of 50 micrograms per cubic meter of air as an 8-hour time-weighted average [4]. Dry-cutting granite without respiratory protection is genuinely dangerous.
If you're replacing a granite countertop yourself, hire a fabricator for any cuts that require a straight clean edge. Small rough cuts, like notching around a pipe, can be done carefully with a handheld angle grinder and a dry-cutting diamond blade, with proper dust control and respiratory protection. But for a countertop installation that needs to look right, professional cutting is the only real answer with granite.
For homeowners shopping between materials, the cutting difference is stark. Laminate is entirely DIY-friendly. Granite is not. That's one real reason laminate still holds a meaningful share of the kitchen countertops market despite the popularity of stone.
How do you finish and seal the cut edges of laminate countertop?
Raw cut edges are the most vulnerable part of a laminate countertop, and finishing them right is the difference between a countertop that lasts 20 years and one that swells and delaminates in five.
For edges that will be visible, like a cut end that butts up against an appliance or a wall with no backsplash, use iron-on edge banding that matches your laminate pattern. Most home centers carry it. You press it on with a household iron set to medium heat, trim the overhang with a laminate trimmer or sharp utility knife, then sand smooth with 220-grit paper. It takes about 15 minutes per edge and looks clean.
For edges that will be hidden, like the wall side of a countertop, a bead of silicone or a coat of waterproof sealer on the particle board is enough. The goal is to stop water from wicking into the substrate. Once particle board absorbs water, it swells and doesn't return to its original size [2]. The laminate layer pops up, bubbles form, and the countertop is finished.
For seams between two countertop sections, color-matched seam filler from the laminate manufacturer is the right product. It's available in dozens of colors and does a reasonable job of making the seam less visible.
SlabWise has a quoting tool that fabricators use to price laminate and stone jobs, which breaks out the material and edge treatment costs separately. If you're deciding whether to DIY or hire out, running those numbers gives you a clear comparison.
Sanding the cut face itself: start with 120-grit to remove any roughness, then finish with 220-grit. Don't skip the finish grit. A smooth edge accepts paint and sealer better and is less likely to catch and chip further over time.
How long does it take to cut a laminate countertop, and is it worth doing yourself?
Honest answer: for a simple straight cut on a single-run countertop, a careful first-timer takes 30 to 90 minutes including setup. A sink cutout adds another 45 to 90 minutes. An L-shaped corner with a miter joint can take half a day if you've never done one.
Contrast that with professional fabrication. A shop with a beam saw and automated tooling can cut a complete laminate countertop set, including miters and sink cutout, in under 30 minutes. That speed is one reason laminate countertops are still price-competitive with other materials: the fabrication labor cost is low.
Whether it's worth doing yourself depends on a few things. If you're replacing a single straight section with no sink cutout, DIY is genuinely straightforward and saves real money. Laminate countertop blanks from a home center run roughly $25 to $50 per linear foot [5]. Professional installation might add $30 to $75 per linear foot on top of that [5]. On a 10-foot run, you could save $300 to $750.
If the job involves a sink cutout, an L-shaped miter, or scribing to an uneven wall, the margin for error is higher and the cost of a mistake (buying a new slab) might exceed what you'd pay a professional. Be honest about your skill level and your tolerance for redoing work.
For comparison, stone surfaces like granite or quartz are never a DIY cut job, period. And butcher block countertops sit somewhere in between: cuttable with woodworking tools, but heavy and finicky to finish correctly.
What safety precautions matter when cutting laminate countertop?
Laminate cutting is low-hazard compared to stone, but a few things deserve real attention.
Eye protection is mandatory. Fine laminate chips and particles fly at high speed from a circular saw. Safety glasses, not regular eyeglasses.
Hearing protection. A circular saw runs around 90 to 100 decibels [6]. OSHA's permissible exposure limit for an 8-hour day is 90 dB, and damage starts accumulating before you feel pain [6]. Wear plugs or earmuffs for any cuts over a few seconds.
Dust. Laminate is made partly from paper and resin, with a particle board core. Particle board contains urea-formaldehyde resin [7]. Cutting generates fine dust that carries formaldehyde gas. Work outdoors or in a well-ventilated space. A basic N95 respirator is reasonable protection for occasional DIY cuts.
Blade guards. Don't remove or disable your circular saw's blade guard. It catches a kickback situation before it catches your hand.
Power off before adjusting anything. Blade depth, fence position, bevel angle: set all of it before you plug in.
Secure the workpiece. A countertop blank that shifts mid-cut can bind the blade and cause kickback. Clamp it to sawhorses at multiple points.
These aren't unusual precautions. They're the same things any careful woodworker does on every cut.
Frequently asked questions
How do I cut a laminate countertop without chipping?
Use a minimum 80-tooth carbide blade in a circular saw. Cut face-down so chip-out exits through the back. Score the face side with a utility knife along the cut line before you flip it over. Feed the saw slowly and steadily. Blue painter's tape over the cut line on the face side adds extra insurance. Those four steps together will give you a clean edge on any laminate.
What kind of blade do you use to cut laminate countertop?
For a circular saw, an 80-tooth (or higher) carbide-tipped blade made for laminate or melamine. For a jigsaw, a fine-tooth blade with 10 TPI or more, ideally one labeled for laminate. A standard wood blade will chip the surface badly. Blade quality matters here: a cheap 80-tooth blade from an off-brand still outperforms a name-brand 40-tooth framing blade.
Can you use a jigsaw to cut laminate countertop?
Yes, and a jigsaw is the right tool for sink cutouts and curves. Use a fine-tooth laminate blade (10 TPI or higher), cut face-up, and score the cut line with a utility knife first to reduce chip-out. For long straight cuts, a circular saw with a clamped straightedge fence is more accurate than a jigsaw. Use both tools for what they're best at.
How do you cut a laminate countertop for a sink?
Use the sink's paper template to mark the cutout, or trace the rim and offset 1/2" inward for a drop-in sink. Drill a 3/4" starter hole at a corner of the cut line. Cut with a jigsaw and fine laminate blade. Support the waste piece from below as you near the end of the cut so it doesn't sag and crack. Seal all exposed particle board edges with silicone before installing the sink.
How do you cut an L-shaped laminate countertop corner?
The standard method is a 45-degree miter cut on each piece where they meet. Set your circular saw base plate to 45 degrees, cut face-down with a fine-tooth blade, and use a clamped guide fence. Dry-fit the pieces before final installation. Draw-bolt kits (miter bolt kits) pull the two mitered faces together from underneath. Apply color-matched seam filler to the joint before tightening the bolts.
Can you cut on granite countertops?
You can, but you shouldn't do it regularly. Granite has a Mohs hardness of about 6 to 7, hard enough that a knife won't scratch the stone, but abrasive enough to dull a good knife noticeably faster than wood or plastic. Use a cutting board to protect your knives. The granite itself will be fine either way.
How do you cut granite countertops?
Granite countertop cutting requires diamond blades and wet-cutting equipment to control heat and silica dust. Fabricators use bridge saws, angle grinders with diamond blades, and CNC routers. Dry-cutting generates respirable crystalline silica dust, which OSHA regulates under 29 CFR 1926.1153 with a permissible exposure limit of 50 micrograms per cubic meter. This is not a DIY job for any cut that needs a finished edge.
How do I cut granite countertops at home if I have no choice?
For a rough cut like notching around a pipe, you can use a handheld angle grinder with a dry-cutting diamond blade. Wear a minimum N95 respirator or better, safety glasses, ear protection, and work outdoors. Wet the cut line with water from a spray bottle to reduce dust. Never dry-cut granite indoors. For any finished edge or complex cut, hire a fabricator.
What do you seal the cut edges of laminate countertop with?
Visible edges get iron-on edge banding in a matching color, trimmed and sanded smooth. Hidden edges that will be against a wall get a bead of silicone caulk or a coat of waterproof paint on the exposed particle board. Seams between two sections use color-matched laminate seam filler from the countertop manufacturer. Any unsealed particle board edge near water will swell and eventually cause the laminate to delaminate.
Do I need to score laminate before cutting?
Scoring is highly recommended but not always mandatory. A sharp utility knife drawn firmly along the cut line before you saw breaks the surface fibers and prevents the saw blade from tearing them. The improvement in edge quality is noticeable, especially with a jigsaw. It adds about two minutes to your prep time and is worth it every time. On a circular saw cut from the face-down position, scoring still helps on the visible top face.
Can you cut laminate countertop with a table saw?
Yes, a table saw with an 80-tooth carbide blade works well for rip cuts on laminate countertop if the slab is small enough to handle safely. The challenge is that full countertop slabs are heavy and awkward. You need a helper or a roller stand to support the outfeed end. For most homeowners, a circular saw with a clamped fence is safer and easier. Table saws make more sense for cutting sheet laminate before bonding.
How much does it cost to cut a laminate countertop professionally?
Professional laminate countertop fabrication and installation typically runs $30 to $75 per linear foot for installation on top of the material cost of roughly $25 to $50 per linear foot. Many home centers offer free or low-cost cuts when you buy the material there. On a 10-foot kitchen run, DIY cutting can save $300 to $750 compared to full professional installation, though that number shrinks if you make a mistake and need a replacement slab.
What's the difference between cutting laminate and cutting Corian or solid surface?
Laminate is a thin layer of plastic bonded to particle board; Corian and other solid surfaces are acrylic or polyester resin all the way through. Solid surface cuts more like dense hardwood: less chip-out risk, but you still use a carbide blade. Solid surface is also repairable with sanding, which laminate is not. Both are DIY-cuttable with the right blade. Check the manufacturer's guides for specifics, since products like Corian have their own cutting recommendations.
How do you cut laminate countertop around a corner that isn't square?
Use a scribing compass to trace the wall's exact profile onto the countertop edge, then cut or grind to the scribed line. For slight variations, a belt sander or random-orbit sander removes material slowly enough to sneak up on the fit. For a wall that's badly out of square, a router with a pattern bit and a custom template gives the cleanest result. Test-fit repeatedly and remove material in small increments.
Sources
- Home Innovation Research Labs, Residential Kitchen Countertop Materials Report: Standard laminate countertops use a particle board core and are typically 1-1/2 inches thick
- U.S. Forest Service, Forest Products Laboratory, Wood Handbook Chapter 11: Mechanical Properties of Wood-Based Composite Materials: Particle board swells significantly when exposed to moisture and does not return to original dimensions upon drying
- U.S. Geological Survey, Minerals Information: Granite and Other Dimension Stone: Granite has a Mohs hardness of approximately 6 to 7
- U.S. Occupational Safety and Health Administration, 29 CFR 1926.1153 Respirable Crystalline Silica in Construction: OSHA permissible exposure limit for respirable crystalline silica is 50 micrograms per cubic meter as an 8-hour TWA; dry-cutting granite generates hazardous silica dust
- National Kitchen and Bath Association, NKBA Design and Cost Trends Report: Laminate countertop material costs roughly $25 to $50 per linear foot; professional installation adds approximately $30 to $75 per linear foot
- U.S. Occupational Safety and Health Administration, Occupational Noise Exposure Standard 29 CFR 1910.95: OSHA permissible exposure limit for noise is 90 dB for an 8-hour workday; circular saws operate in the 90 to 100 dB range
- U.S. Environmental Protection Agency, Formaldehyde in Pressed Wood Products and Indoor Air: Particle board contains urea-formaldehyde resin that can off-gas when cut, requiring ventilation
- National Institute for Occupational Safety and Health (NIOSH), Engineering Controls for Silica Dust in Stone Fabrication: Wet-cutting methods are the primary engineering control for silica dust during stone countertop fabrication
- U.S. Consumer Product Safety Commission, Correlated Formaldehyde Emissions from Composite Wood Products: Composite wood products including particle board release formaldehyde and cutting increases short-term exposure
- U.S. Forest Service, Forest Products Laboratory, Use of Wood-Based Panels in Construction: Particle board cores in laminate countertops are vulnerable to irreversible moisture swelling at edges and seams
Last updated 2026-07-09