TL;DR
- Epoxy countertops cost roughly $45 to $150 per square foot installed by a pro, or $8 to $15 per square foot in materials if you DIY.
- The job takes 3 to 5 days from prep to full cure.
- Surface prep decides everything: skip it and the epoxy peels.
- This guide covers material selection, mixing ratios, pour technique, bubble removal, and long-term care.
What exactly are epoxy countertops?
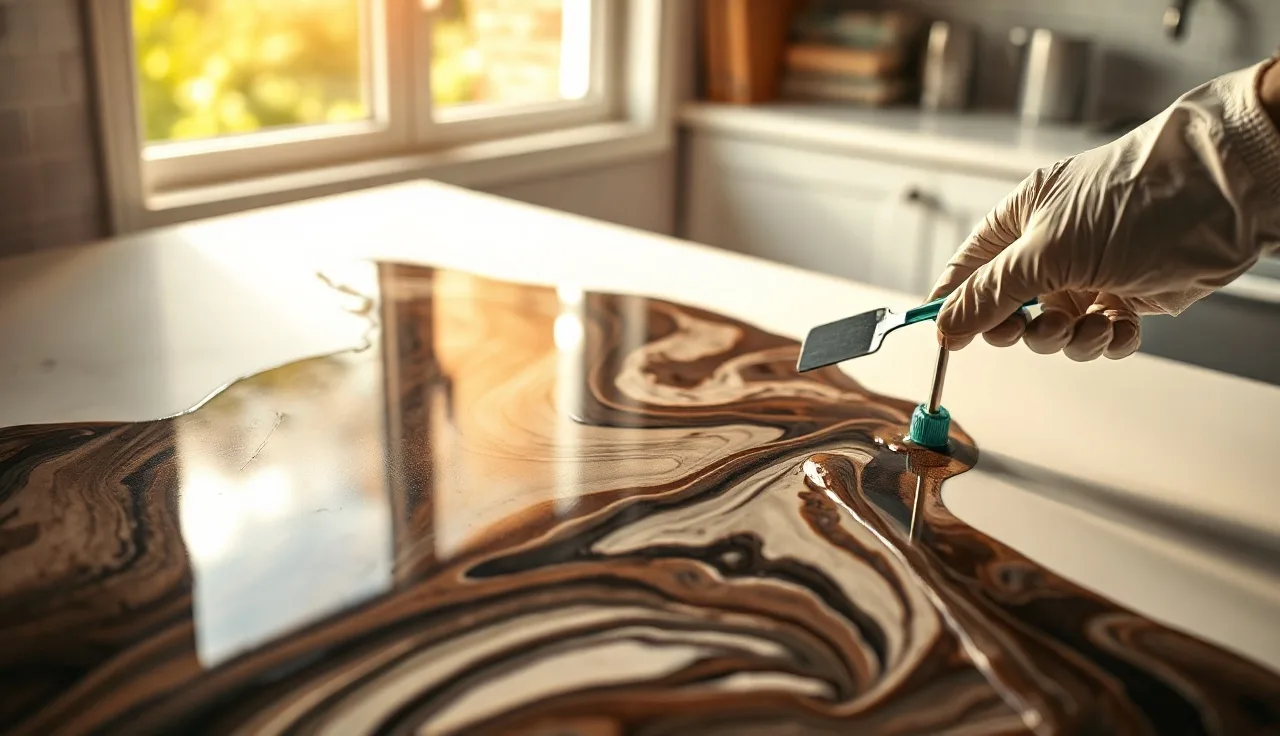
Epoxy countertops are surfaces coated or cast with a two-part resin: a base resin and a hardener. Mix the two in the exact ratio the manufacturer prints on the label, and a chemical reaction turns the liquid into a hard, plastic-like solid. The result sits directly on existing laminate, plywood, concrete, or stone, or it can be cast as a thick poured slab in a form.
Two very different products share the name, and people confuse them constantly. Coating epoxies (Stone Coat, FX Poxy, Leggari) are thin-pour systems built to cover an existing surface at about 1/8 inch or less. Cast or river-table epoxies (Total Boat, Pro Marine Supplies) are deep-pour systems that handle 1 to 4 inches in a single pour, used for thick freestanding slabs or dramatic embedded effects. Each type has its own mixing ratio, pot life, and cure schedule. Double-check which one you're actually buying before you pick up a spreader.
Epoxy is not quartz, not a Corian-style solid surface, not poured concrete, though the terms get swapped around all the time. If you're comparing finishes for a remodel, it helps to see where epoxy sits relative to kitchen countertops in general.
How much do epoxy countertops cost to install?
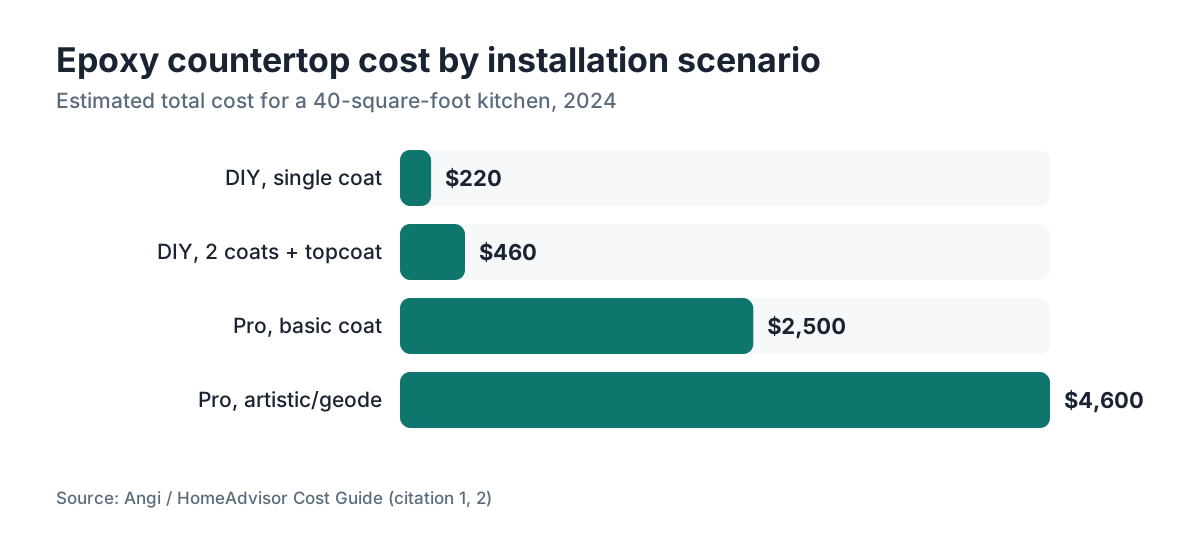
Cost swings hard on one question: do you DIY or hire out? A basic DIY coat over existing laminate runs about $3 to $10 per square foot in materials for a single-color or simple marbled finish [1]. Two coats plus a topcoat on a 40-square-foot kitchen push you to $150 to $400 in product.
That sounds cheap until you add sandpaper, acetone, painter's tape, nitrile gloves, a respirator, a heat gun, and mixing cups. Those add another $50 to $150 depending on what's already in your garage.
Professional installation, where a contractor preps the surface, pours, swirls, clears, and applies a protective topcoat, runs roughly $45 to $150 per square foot all-in [2]. The wide range comes from regional labor rates, surface condition, and how much artistry you want. A solid-color flood coat in Nashville costs less per foot than a multi-layer geode design with gold leaf in San Francisco.
| Scenario | Material cost/sq ft | Labor cost/sq ft | Typical total (40 sq ft) |
|---|---|---|---|
| DIY, single coat | $3, $8 | $0 | $120, $320 |
| DIY, 2 coats + topcoat | $8, $15 | $0 | $320, $600 |
| Pro, basic coat | $10, $20 | $35, $60 | $1,800, $3,200 |
| Pro, artistic/geode | $20, $40 | $60, $110 | $3,200, $6,000 |
For comparison, fabricated granite countertops run $40 to $100 per square foot installed, and mid-range laminate countertops run $15 to $40 installed. Epoxy in the mid-complexity range is not the budget option people assume, once you hire it out.
Here's a number homeowners rarely factor in. If the epoxy fails in 3 to 7 years and needs a full resurface, you pay again. Stone doesn't carry that risk. That changes the long-term math a lot.
What surface prep does epoxy require before you pour?
Prep decides whether your epoxy lasts 10 years or peels in 10 months. There's no shortcut, and nothing you do later makes up for skipping it.
For existing laminate, the most common DIY substrate, clean with a degreaser first, then scuff the whole surface with 120-grit sandpaper. You're not sanding it smooth. You're giving the epoxy mechanical tooth to grip. Wipe everything down with acetone, let it flash off completely, then wipe again. Any oil, wax, or cleaner residue creates a separation layer the epoxy can't bond through.
For plywood or MDF, seal knots and porous areas with shellac or a compatible primer first. Unsealed wood off-gasses during the epoxy's exothermic cure, and that creates bubbles no torch work will fix after the fact.
For concrete, fill pinholes and bug holes with a thin slurry of the same epoxy before your flood coat. Concrete is porous. Those pores blow air up through the still-liquid epoxy if you don't seal them first.
Surface temperature matters more than most people expect. The substrate and ambient air should sit between 70 and 80°F (21 to 27°C) during the pour and cure [3]. Below 65°F the epoxy cures slowly and may stay tacky. Above 85°F the pot life shrinks fast, sometimes under 20 minutes, which isn't enough time for artistic effects on a big surface.
Check that the surface is level before you open the product. Epoxy self-levels to roughly 1/8 inch by gravity. Give it a 1/4-inch slope and it pools at one end and leaves thin spots at the other. Use a digital level, shim the cabinets if you need to, and check twice.
How do you mix and pour epoxy correctly?
Read the technical data sheet for your exact product before you touch anything. Mixing ratios vary by brand: some are 1:1 by volume, others 2:1 or 3:1 resin to hardener. Get the ratio wrong by even 10 to 15 percent and you risk incomplete cure, permanent tackiness, or structural failure of the finish [4].
Pour the measured resin into a clean cup first, then add the hardener. Mix slowly and scrape the sides and bottom of the cup for the full time the manufacturer specifies, usually 3 to 5 minutes. Undermixing is the single most common DIY error. Streaks in the mixed material are a warning. Keep going until it's completely uniform.
Let the mixed epoxy rest for the induction time on the data sheet, often 3 to 5 minutes, before you pour. That short rest lets the reaction begin evenly before you spread it.
Pour in a ribbon pattern across the surface, then spread with a foam roller or notched squeegee, working fast. On a 40-square-foot kitchen with a 20-minute pot life, you have almost no room for second-guessing. Practice on scrap first.
For marbling, drop silicone oil or tinted resin into the wet flood coat while it's still very liquid, then work the pattern with a brush, a straw, or a heat gun. That window runs about 10 to 20 minutes after the pour, shorter in warm rooms.
Work under good light. Overhead task lighting at a low angle shows thin spots, roller marks, and missed sections that look fine under ambient light and awful after cure.
How do you remove bubbles from epoxy countertops?
Bubbles are the most common cosmetic failure in DIY epoxy, and they come from two places: air trapped in the mix, and air outgassing from the substrate.
For surface bubbles, pass a propane or butane torch quickly over the top at 4 to 6 inches. The carbon dioxide from the flame breaks the surface tension and the bubbles pop almost instantly. Never hold the flame in one spot. Keep it moving. Several fast passes beat one slow sweep.
A heat gun on low does the same job without an open flame, which is safer in tight spaces. It's a little weaker on stubborn bubbles but fine for most.
The timing window is narrow. You can work the surface for roughly 20 to 45 minutes after pouring, longer when it's cool, shorter when it's warm. After that the epoxy gets too thick to release bubbles, and whatever's left cures in permanently.
Bubbles that keep rising over the first hour or two point to a substrate you didn't seal well enough. If new bubbles form continuously long after your first torch pass, that's outgassing from below. A seal coat applied the day before the flood coat basically ends this problem.
Once cured, you can sand small surface bubbles with 400-grit wet/dry paper and apply a thin re-coat to bring back the gloss. That works for isolated spots. It does not save a surface riddled with bubbles top to bottom.
How long does epoxy take to cure, and when can you use the countertop?
Epoxy cures in two stages. First comes physical hardening, where you can touch the surface without marking it, usually 12 to 24 hours after the pour depending on product and temperature [11]. Then comes full chemical cure, where the polymer network fully cross-links and the surface hits its rated hardness and chemical resistance. Full cure takes 72 hours to 7 days depending on the system.
Most manufacturers say light use (a coffee cup, your phone) is fine at 24 hours, but hold off on heavy objects, cutting on the surface, or any heat for at least 72 hours. Full resistance to household cleaners and mild solvents typically lands at day 7.
Don't rush the cure by cranking the heat. Ambient temperature above the manufacturer's spec during cure can cause surface wrinkling, amine blush (a waxy film), or heat distortion if the exothermic reaction runs too hot in a thick pour.
Cold curing is the opposite trap. Below 65°F the cure crawls and can leave a soft, permanently tacky surface that never fully hardens. Doing this job in a cold garage in February? Heat the space to at least 70°F for the full cure, more than the pour.
Do epoxy countertops need a topcoat or sealer?
Depends on the product and what the finish will face. Some countertop epoxy systems finish themselves: the final flood coat, mixed and cured right, gives you a hard glossy surface that needs nothing more. Others come with a separate water-clear topcoat that adds UV stability, scratch resistance, and extra chemical protection. Your product's data sheet tells you which.
UV stability is worth caring about near windows. Standard bisphenol A epoxies yellow noticeably under prolonged UV [5]. Products sold as UV-stable usually carry benzotriazole or hindered amine light stabilizer (HALS) additives that slow the yellowing, but no epoxy is fully UV-proof in direct sun over years. In a sunroom or anywhere with several hours of daily direct sun, expect some color shift no matter what topcoat you use.
Scratch resistance is the other honest limit. Epoxy is harder than laminate countertops but nowhere near quartz or granite. Cut directly on it and it scratches. Use a board every time. If you want a surface you can treat rough, epoxy is the wrong pick. Something like butcher block countertops actually gets better with surface work. Epoxy just wears down.
How do you maintain and clean epoxy countertops?
Day to day, cleaning is simple. Warm water, mild dish soap, a soft cloth. That handles nearly every kitchen mess.
The more useful list is what to avoid. Harsh abrasives and scouring pads scratch the surface and cloud the gloss. Bleach-based cleaners, acetone, and paint thinner can attack cured epoxy at high concentrations, especially in the first few weeks before full chemical cure. Even after full cure, don't let solvent-based cleaners sit.
Heat is the real risk. Epoxy countertops typically have a heat deflection temperature (HDT) around 120 to 150°F (49 to 65°C), which sounds like plenty and isn't [6]. A pan off the stove hits 300 to 400°F easily. Always use trivets. A cast iron pan set straight on cured epoxy leaves a permanent white ring or crazes the surface in seconds.
The pH-neutral cleaning habits that keep stone looking good apply here too, so our notes on how to clean stone countertops transfer well.
Light scratches often buff out with automotive polishing compound and a microfiber pad. Deeper scratches need wet sanding from around 400-grit up to 1500-grit, then polishing back to gloss. A patient DIYer can do it, but budget a few hours per incident.
Can you install epoxy over existing countertops, or do you need a new substrate?
You can pour epoxy over existing laminate, tile, wood, concrete, and most solid surface materials in good structural condition. That's one of epoxy's main selling points. No demo required.
The qualifier that matters is "good structural condition." Delaminating laminate, crumbling grout, soft spots from water damage, or a counter that flexes when you press it will all telegraph through or defeat the epoxy. Epoxy bonds the surface. It does not fix the structure underneath. Fix that first, or you're wasting the investment.
For tile, fill the grout lines with epoxy filler or a compatible grout filler and let it cure before your flood coat. Pour straight over deep grout lines and you'll see ghost impressions of the grid in the final surface, worst under raking light.
Poured concrete is a popular epoxy substrate. On the fabricator side, shops running quoting and nesting software like SlabWise often track concrete and epoxy jobs next to stone, since the material quantities and labor times run very differently from natural stone.
What you can't usefully do is pour epoxy over an existing epoxy surface that's peeling, fisheye-prone, or contaminated with silicone. Strip it to bare substrate first. Silicone is a notorious adhesion killer that lingers even after cleaning. Once a surface has silicone on it, only aggressive mechanical abrasion fully removes it.
What are the safety risks of working with epoxy, and how do you protect yourself?
Epoxy resin is not inert. The uncured components include reactive chemicals that cause contact dermatitis and respiratory sensitization with repeated exposure [7]. The hardener, typically an amine, is the aggressive one on skin and mucous membranes.
OSHA and the National Institute for Occupational Safety and Health (NIOSH) both publish guidance on handling epoxy. For a countertop job the practical kit is: nitrile gloves (latex gives almost no protection against epoxy), safety glasses, and a NIOSH-approved respirator with organic vapor (OV) cartridges at minimum [8]. A dust mask does nothing here. The volatile amine off-gassing from the hardener passes straight through particulate filters.
Ventilate the space. Open windows plus a box fan exhausting outward is the floor, not the ideal. Running an epoxy job in a sealed interior kitchen with no airflow is a genuinely bad idea. Best case you get a headache. Worse case, real respiratory irritation with prolonged exposure.
Skin sensitization builds up. Every unprotected exposure raises your odds of a lasting allergic reaction. Pros who pour daily wear full-arm coverage and face shields, well beyond basic gloves. Take the PPE seriously.
Dispose of mixed epoxy waste by your local hazardous waste rules. Fully hardened, reacted epoxy is generally considered inert and can go in the trash in most places, but liquid or partially cured resin belongs at a household hazardous waste facility [9].
How does DIY epoxy compare to hiring a professional fabricator?
The honest answer: DIY epoxy looks great in tutorial videos and is genuinely doable, but it fails more often than the content ecosystem admits. The usual failure modes are bubbles throughout, fisheye spots, uneven thickness, tacky patches from mixing errors, and peeling from bad prep. None of these touch up quickly. Most mean a full strip-down and redo.
A competent pro has done enough pours to know how their specific product behaves at different temperatures, how much working time they really have, and how to read the surface mid-pour. That experience is worth paying for.
On the other hand, a first pour on a laundry room or utility counter, where looks matter less, is a smart way to learn without high stakes. If it comes out imperfect, you've still learned the process and you'll do better next time.
For a kitchen a family uses every day, I'd hire a pro with verifiable past work. Ask to see actual completed projects, more than photos that could be anyone's. The stakes justify the labor cost.
Fabricators who take occasional epoxy work alongside stone should give it its own production workflow. Unlike a granite or marble countertops job where raw material cost dominates, epoxy is heavily labor-driven with tight timing. Pricing these in a quoting tool like SlabWise? Build in realistic labor hours for prep and the wait between coats. Underpricing that time is the most common margin killer I see.
The full installation picture, substrate to finish, sits in our countertop installation guide if you want to compare processes across materials.
How long do epoxy countertops last, and what causes them to fail early?
A professionally installed epoxy countertop in a well-maintained kitchen realistically lasts 10 to 15 years before it looks worn or dated enough to resurface [2]. DIY jobs with clean prep and good technique can reach that range. DIY jobs that cut corners on prep or mixing usually show failure (peeling, cloudiness, deep scratches) in 3 to 5 years.
The biggest causes of early failure:
Poor adhesion from weak prep. This shows up as peeling, usually starting at edges and corners where mechanical stress concentrates.
Heat damage. Hot pans straight on the surface leave white rings, crazing, or soft spots that won't polish out.
UV yellowing. Surfaces near south-facing windows show yellowing within 1 to 3 years on non-UV-stabilized products.
Substrate failure. If the base itself goes (laminate peeling, MDF swelling from water), the epoxy goes with it.
Chemical attack. Acetone, paint stripper, or concentrated bleach left sitting will etch or cloud the surface.
For comparison, granite countertops essentially last the life of the building with proper care, and Corian-style countertops last 20 to 30 years with normal maintenance. Epoxy sits below both on longevity, which is a real factor in the buy-versus-refinish call.
Frequently asked questions
Can you pour epoxy countertops yourself with no experience?
Yes, but the failure rate is real. The chemistry forgives you inside the spec and punishes you outside it. First-timers often trip on mixing, temperature, or prep, and end up with bubbles, tacky patches, or peeling. Start on a low-stakes surface like a laundry room or garage bench to learn the product before you touch a kitchen. Watch the manufacturer's own application videos rather than general tutorials, since formulations vary a lot.
How long does an epoxy countertop take to install from start to finish?
Plan for 3 to 5 days minimum. Day 1 is surface prep. Day 2 is the seal coat (if needed) or first flood coat. Day 3 is the second coat or topcoat. Days 4 to 7 are cure time before full use. Compressing this into a weekend by skipping dry time between coats is the most reliable way to ruin the job. Temperature and humidity shift each phase's timing, so build in buffer.
Is epoxy safe for food contact surfaces like kitchen countertops?
Once fully cured (typically 7 days), most countertop epoxies are considered food-safe for incidental contact under FDA rules for indirect food additives [10]. Uncured epoxy is not food-safe at all. Check whether your product carries FDA 21 CFR 175.300 compliance language, which covers resinous and polymeric coatings in indirect food contact. Don't prep raw meat directly on the surface regardless. Use a cutting board.
Can epoxy countertops be repaired if they chip or crack?
Small chips and scratches fill with a thin pour of the same epoxy, sanded flush after cure and polished back. Match the color exactly and the repair nearly disappears. Cracks that reach the substrate mean a structural problem underneath, and you have to fix that level first. Large-area delamination or peeling means stripping to bare substrate and starting over, which is a real job, not a patch.
Do epoxy countertops yellow over time?
Standard bisphenol A epoxies do yellow under UV, often noticeably within 1 to 3 years near windows [5]. UV-stable formulations (look for HALS or benzotriazole additives on the data sheet) slow it a lot but don't stop it. In direct sun, no epoxy stays perfectly clear forever. Light or white pigmented finishes hide yellowing better than a clear coat over a white substrate.
How do you get a glossy finish on epoxy countertops?
A properly mixed, level flood coat self-levels to high gloss with no polishing, as long as the surface was clean. If you get dull spots, fisheye, or roller texture, wet-sand from 400-grit up through 800, 1200, and 1500-grit, then apply automotive polishing compound with a foam pad. A paste wax can hold the shine afterward, but check your product's compatibility first.
What is the heat resistance of epoxy countertops?
Most countertop epoxy systems have a heat deflection temperature (HDT) of 120 to 150°F (49 to 65°C) [6]. A hot mug of coffee (about 160°F) sitting for a few minutes can leave a ring. A pan off the stove at 300 to 400°F causes immediate damage. Always use trivets. This is one of epoxy's clearest limits against granite or quartz, which take direct heat without harm.
Can epoxy countertops be installed over tile?
Yes. Fill the grout lines first with an epoxy filler or compatible grout filler and let it cure flat. Pour straight over deep grout lines without filling and the grid pattern shows through as ghost impressions, worst under angled light. After filling and curing, sand the whole surface lightly, clean thoroughly with acetone, and go ahead with your seal coat before the flood coat.
How do epoxy countertops compare to laminate or Formica?
Epoxy over existing laminate costs more in materials and time than simply replacing laminate, but the look can be dramatically different. Scratch resistance is roughly comparable, but epoxy loses badly on heat: standard laminate countertops and Formica countertops both handle moderate heat better. The artistic range of epoxy (marbling, geode effects, embedded objects) is a genuine edge laminate can't match.
Does epoxy off-gas volatile organic compounds (VOCs)?
Yes, during mixing, application, and initial cure. VOC content varies by product, and water-based formulations run lower than solvent-based ones. The amine hardeners in many systems give off ammonia-like odors and vapors that call for organic vapor respirators, not dust masks [8]. Ventilate hard during application and for at least 24 hours after. Keep kids and pets out of the space that whole time.
What thickness should epoxy countertops be?
For coating over an existing substrate, 1/8 inch total across two coats is typical and enough. A thicker single pour risks an uncontrolled exothermic reaction, especially when it's warm, which causes wrinkling or yellowing. For freestanding cast slabs or river-table tops, use deep-pour epoxies rated for 1 to 4 inch pours in one layer. Never push a thin-pour countertop epoxy into a thick cast application.
How do you prevent fisheye defects in epoxy countertops?
Fisheye (little craters) almost always trace to silicone or oil on the substrate. Clean with a degreaser, wipe with acetone, and let it fully evaporate. Keep silicone-based products away from the work area before and during the job. If fisheye still shows, add a fisheye eliminator additive (most epoxy suppliers sell one) to your next coat. Don't touch the cleaned surface with bare hands. Skin oils alone can trigger fisheye in some systems.
Are there waterproof epoxy countertop products specifically for bathrooms?
Standard countertop epoxies work in bathrooms and are fully waterproof once cured. Bathroom jobs often go better than kitchens since heat exposure is low. The bathroom-specific detail is the sink cutout edge: seal where the substrate meets the sink with 100% silicone (after the epoxy is fully cured) to keep water out of the substrate over time. Any water that reaches an unsealed edge eventually causes delamination.
Sources
- HomeAdvisor / Angi, Epoxy Countertop Cost Guide: DIY epoxy coating materials cost approximately $3, $10 per square foot for basic single-color applications
- HomeAdvisor / Angi, Epoxy Countertop Cost Guide: Professional epoxy countertop installation runs $45, $150 per square foot and surfaces last 10 to 15 years under normal use
- U.S. Army Corps of Engineers, Engineering and Design: Epoxy Compounds (EM 1110-2-3400): Epoxy application temperature should be maintained between 60 to 90°F for proper mixing and curing; cold temperatures significantly slow cure and can produce permanently tacky surfaces
- U.S. Army Corps of Engineers, Engineering and Design: Epoxy Compounds (EM 1110-2-3400): Incorrect mix ratios of 10 to 15% or more from specification can cause incomplete cure, surface tackiness, or structural failure of the coating
- Polymer Degradation and Stability, Elsevier, 'UV Degradation of Epoxy Systems': Standard bisphenol A epoxies exhibit measurable yellowing under UV exposure; UV stabilizer additives slow but do not eliminate this effect
- Smooth-On, Inc., Technical Data Sheets for Countertop Epoxy Products: Typical countertop epoxy heat deflection temperatures range from 120 to 150°F (49 to 65°C) depending on formulation
- NIOSH, Preventing Sensitization and Asthma from Epoxy Resins (Publication No. 99-104): Uncured epoxy resin and amine hardeners can cause contact dermatitis and respiratory sensitization with repeated unprotected exposure
- OSHA, Epoxy Resin Systems Hazard Communication and PPE Guidance: OSHA recommends nitrile gloves and NIOSH-approved organic vapor respirators when working with epoxy systems; dust masks are insufficient for amine vapor exposure
- U.S. EPA, Household Hazardous Waste: Uncured or partially cured liquid epoxy waste should be taken to a household hazardous waste facility; fully hardened reacted epoxy is generally considered inert
- U.S. FDA, Code of Federal Regulations Title 21, Section 175.300 (Resinous and polymeric coatings): FDA 21 CFR 175.300 covers resinous and polymeric coatings approved for indirect food contact; fully cured compliant epoxies are considered food-safe for incidental contact
- Stone Coat Countertops, Application Guide and Technical Documentation: Countertop epoxy systems typically allow light use at 24 hours post-pour, with full chemical resistance reached at 7 days
Last updated 2026-07-09