TL;DR
- Butcher block countertops cost roughly $40 to $200 per square foot installed, depending on wood species and edge profile.
- A confident DIYer can install a straight run in a weekend with a circular saw, jigsaw, and drill.
- The hardest parts are the sink cutout and the finish.
- Raw wood needs sealing on all six faces before use, or it stains and cups fast.
What does it cost to install butcher block countertops?
Installing butcher block countertops costs $40 to $200 per square foot all-in, driven by wood species, thickness, edge treatment, and whether you hire a pro or swing the saw yourself. That's a wide range. Here's the breakdown.
Material alone runs $10 to $100 per square foot at retail. IKEA's Karlby line in oak or birch sits around $10 to $20 per square foot and is the most common entry point for DIY installs [1]. Mid-range domestic hardwoods like maple, cherry, and walnut from specialty suppliers run $30 to $60 per square foot. End-grain walnut from a custom millwork shop can push $80 to $100 per square foot before anyone touches a saw.
Labor adds $30 to $80 per square foot, or $50 to $150 per linear foot, depending on your market and the shape of the job. A standard kitchen with one or two straight runs sits at the low end. An island with a prep-sink cutout and mitered corners sits at the high end.
Finishing supplies are cheap but easy to underbudget. A quart of food-safe mineral oil costs about $8 to $12 at any hardware store [2]. A penetrating oil-varnish blend like Waterlox Original runs $35 to $55 per quart and covers roughly 200 square feet per coat. Plan on three coats minimum.
Do a 30-square-foot kitchen yourself and you'll spend $600 to $2,500 total. Hire a pro for that same footprint and it runs $1,800 to $5,000 once you add templating, labor, and finishing. Neither number is the right one for everyone. It comes down to your skills and your schedule.
What tools do you need to install butcher block countertops?
The tool list is shorter than most people expect. You don't need a full woodworking shop, and you don't need a single machine that plugs into three-phase power.
For cutting, a circular saw with a fine-tooth blade (40 teeth or more) handles straight cuts cleanly. A jigsaw cuts the sink opening. A belt sander or random-orbital sander flattens the surface and knocks down mill marks before finishing. A sharp hand plane is optional but earns its keep when you're fitting a tight seam between two slabs.
For fastening, use a drill-driver for pilot holes and figure-eight fasteners or Z-clips into the cabinet top rails. Never glue butcher block to the cabinet base. Wood moves with the seasons, sometimes a quarter-inch across a 25-inch-wide slab, and a glued-down slab cracks or splits the cabinet when it does [3].
For measuring and marking, you want a good straightedge (a 4-foot level works fine), a scribing compass for fitting against out-of-square walls, and template material like 1/8-inch luan plywood or IKEA's paper template.
A router with a flush-trim bit is optional but cleans up sink cutout edges if your jigsaw wanders. A pocket-hole jig helps if you're joining two slabs end to end.
Total tool outlay for a one-time install runs maybe $150 if you rent the belt sander and borrow a jigsaw. Own the basics already? The extra spend is close to zero.
What type of butcher block is right for your kitchen?
Three grain orientations exist, and they behave nothing alike. Pick the wrong one for a countertop and you'll fight cupping for years.
Edge-grain is the most common. The long edges of the boards face up, making parallel lines across the surface. It's stable, resists cupping well, and sands flat easily. Most big-box and online butcher block is edge-grain.
End-grain puts the cut ends up, giving you that checkerboard look. It's self-healing to a degree, because knife cuts go into the fibers rather than across them and the fibers spring back slightly. End-grain is heavier, harder to keep flat, and costs two to three times more than edge-grain. It also drinks more finish and needs re-oiling more often.
Face-grain puts the wide face up. You see it on furniture-grade slabs, but it's the least stable orientation for a horizontal counter and the most likely to cup. Skip it.
Species matters as much as grain. Hard maple is the industry standard for durability. It scores 1,450 lbf on the Janka hardness scale, resists denting well, and takes finish evenly [4]. Walnut is softer at 1,010 lbf but more forgiving on dropped glasses and beautiful to look at. Cherry (950 lbf) darkens to a deep red-brown over the years. White oak (1,360 lbf) has gotten popular because it pairs well with two-tone kitchens.
Thickness matters more than most buyers realize. Standard is 1.5 inches. Go to 2.25 or 3 inches for a thick-plank look or a prep island where the look is driving the call. Thicker slabs cost more and weigh more, but they also give you more material to sand down if you ever refinish.
For a full comparison of wood against other surfaces, see butcher block countertops and kitchen countertops.
How do you install a butcher block countertop step by step?
This is the process for a standard straight run with an undermount or drop-in sink. Adjust for your own layout.
Step 1: Measure and template. Measure the cabinet run twice. Note any out-of-square walls with a scribing compass. If your wall is more than 3/8 inch out of square over a 6-foot run, scribe the back edge of the slab to fit rather than pushing it against the wall and hoping.
Step 2: Cut to rough length. Cut the slab 1/4 inch long, then make a finish cut. Clamp a straightedge to the slab as a saw guide. Cut from the underside when you can. A circular saw blade exits upward, so cutting face-down protects the show surface.
Step 3: Cut the sink opening. Mark the cutout with the sink template (it comes with the sink, or trace the rim). Drill a 3/4-inch starter hole inside each corner of the cutout. Cut with a jigsaw, going slow and supporting the waste piece so it doesn't break away and split the wood. For undermount sinks, the cutout edge stays visible, so clean it up with 80-grit then 120-grit sandpaper, or run a flush-trim router bit.
Step 4: Sand the surface. If the slab has mill marks or slight unevenness, start with 80-grit on a belt or random-orbital sander, then step to 120, then 150. Wipe with a damp cloth between grits to raise the grain and knock it down. Finish at 180 or 220 under an oil finish. 150 is fine under a hard-film finish like polyurethane.
Step 5: Apply finish before installing. This is the step beginners skip and regret. Put at least one coat on all six faces of the slab before installation. The underside matters as much as the top. Raw wood exposed to humidity under a sink will cup within months [5].
Step 6: Set and fasten. Place the slab on the cabinet run. Check for level. Shim with cedar shims if the boxes are uneven. Fasten with figure-eight fasteners or Z-clips into the cabinet top rails, with a slightly elongated hole in the figure-eight to let the wood move. Space fasteners every 18 to 24 inches. Do not overtighten.
Step 7: Seal the sink cutout and front edge. Add extra finish to the sink opening and front edge after installation. These are the high-exposure zones.
Step 8: Apply the remaining coats. Let each coat dry per the manufacturer's spec, then buff lightly with 320-grit or a fine scotch-brite pad between coats. Three coats minimum for oil-varnish blends. Six to eight thin coats for hard wax oil products like Rubio Monocoat [6].
For how this compares to installing harder stone surfaces, see countertop installation.
What finish should you use on butcher block countertops?
The finish you pick decides how much maintenance you're signing up for. Get it wrong and the counter suffers for years.
Mineral oil is the classic answer. It's food-safe straight from the bottle, costs almost nothing, and soaks into raw wood beautifully [2]. The catch: it doesn't form a film and doesn't harden on the surface. You reapply it monthly for the first six months, then quarterly. Let it go too long and the wood dries out and checks (small cracks along the grain). For a working prep block, mineral oil is a legitimate choice. For a decorative or wet-bar counter, look elsewhere.
Mineral oil plus beeswax (sold as board cream or cutting board wax) beats plain oil slightly on water resistance. Same maintenance schedule.
Penetrating oil-varnish blends (Waterlox Original is the most tested) soak in and cure by oxidation, forming a flexible, water-resistant surface that's food-safe once fully cured [7]. They outlast mineral oil and need renewing only once every year or two under normal use. Application is simple: wipe on, wait 30 to 45 minutes, wipe off the excess. The smell during application is strong, so ventilate.
Hard wax oils like Rubio Monocoat or Osmo Polyx penetrate and harden without building a plastic film. They look and feel like real wood, spot-repair easily, and Rubio Monocoat is GREENGUARD certified for interior use [6]. They cost more per quart but are the pick if a natural look matters most.
Polyurethane (oil- or water-based) forms a hard film on top. It's the most water-resistant option and the easiest to wipe clean day to day. But when it scratches or chips, which it will around a sink, the fix means sanding the whole surface back to bare wood and refinishing. No spot repair exists. For a counter with an undermount sink and daily wet use, a film finish is a maintenance headache.
My honest take: for most kitchens, a penetrating oil-varnish blend is the right call. Durable, good-looking, food-safe, and renewable without a full strip-and-refinish.
How do you clean butcher block countertops?
Wipe the counter with a damp cloth and a little dish soap, rinse with a clean damp cloth, and dry it immediately with a towel. That's the whole daily routine. The rules that matter are about water, not about scrubbing.
Standing water is the thing people get wrong. Left on the surface, it raises the grain, stains, and eventually damages the finish. A butcher block counter is not a drainboard.
For cutting boards or raw-use areas without a hard-film finish, the FDA Food Code guidance on food-contact surfaces calls for cleaning wood used with raw meat in hot soapy water after each use [8]. Don't submerge or soak the slab. Wash, rinse, dry.
To sanitize after raw chicken, a solution of one tablespoon white vinegar per cup of water works reasonably well. Avoid bleach on oiled or waxed surfaces. It strips oil finishes and lightens the wood. Some fabricators suggest a 3% hydrogen peroxide solution (the pharmacy kind) for a stronger food-safe option, though the evidence for wood-specific use is thin.
Skip abrasive scrubbers on oiled or waxed surfaces. They remove the finish. Don't let lemon juice, tomato, or coffee sit on unfinished areas either, because the acid stains fast.
Stain on an oil-finished surface? Sand the spot with 150-grit until it's gone, then re-apply finish to that patch. This is the real advantage butcher block has over stone: you can sand out damage. You cannot do that with granite countertops or marble countertops.
Polyurethane-finished counters are simpler: soap, water, dry promptly. Just keep acidic liquids off the edges, where the film runs thin.
How long does it take to install butcher block countertops?
A single straight run with no sink cutout takes two to four hours for a competent DIYer, including finish prep. Add one to two hours for a sink cutout. Add another hour for each inside corner or miter joint.
Finishing adds time, and that time happens in layers. A penetrating oil or varnish finish needs 24 to 48 hours between coats [7], so a three-coat job means three days of waiting. You can use the kitchen between coats as long as you keep water off the counter, but planning the install over a long weekend is easier on everyone.
Professional installers do a standard kitchen in half a day to a day, including templating, cutting at the shop, and setting the slab. Some shops pre-finish before delivery, which is the right move. Getting a good finish on a slab that's already set in place is harder.
Stone runs on a different clock. A granite or quartz install usually wraps in a few hours once the slabs arrive, with no on-site finishing, but the lead time from template to delivery is typically 10 to 14 days. Butcher block from a big-box store can go in the same day you buy it if you're ready to work.
Can you install butcher block countertops yourself, or do you need a pro?
Butcher block is genuinely DIY-friendly, more than any other countertop material except laminate. Wood cuts with a circular saw. No CNC machine, no water jet, no bridge saw. Seams don't need epoxy color-matching. And you can sand out a mistake.
That said, some jobs warrant a pro. More than two inside corners, a full wraparound island, or a farmhouse sink with a specific reveal all argue for hiring someone. Complex layouts mean more cuts, more chances to waste material, and more chances to open a gap you can't close.
Moisture is the other flag. Running butcher block next to a dishwasher or over a poorly ventilated base cabinet calls for a conversation with an installer first. A dishwasher that vents steam straight up against the underside of a slab will cause cupping and delamination over time. It's a real failure mode, and it shows up in home inspection reports.
In markets thick with fabrication shops, getting a quote from two or three of them takes less than a day. Fabricator quoting tools like the ones at SlabWise generate ballpark numbers in minutes, which makes it easy to decide whether the price gap between DIY and pro is worth the time you'd save.
Comparing butcher block to other low-cost surfaces you can install at home? Laminate countertops are the only category that's comparably accessible.
What are the common mistakes people make installing butcher block?
A handful of mistakes show up again and again. All of them are preventable.
Not finishing the underside. The bottom of the slab sits in cabinet humidity, especially near dishwashers and under-sink plumbing. Raw wood on the bottom absorbs moisture differently than the sealed top, and that difference causes cupping. Finish all six faces before installation. Full stop.
Gluing or caulking the slab to the cabinet frame. Wood expands and contracts with the seasons. A maple slab 25 inches wide can move 1/4 to 3/8 inch across its width over a year [3]. A rigid bond blocks that movement and cracks the slab or the cabinet. Use slotted figure-eight fasteners.
Sinking the fasteners too tight. Same failure, different cause. The slot in the fastener exists to let the wood move. Overtighten the screw and you kill the slot's whole purpose.
Underestimating the sink cutout. This is where most DIY installs fall apart. The jigsaw blade wanders in dense wood if you push too fast. The corners tear without a starter hole. Measure twice, drill starter holes, cut slow.
Using polyurethane around the sink. The constant wet-dry cycle around an undermount sink cracks hard-film finishes faster than anywhere else in the kitchen, and the cutout edges are the first to go. Use a penetrating finish you can spot-renew in the sink zone, even if you run poly everywhere else.
Ignoring appliance gaps. A counter run usually sits between a refrigerator and a range or a wall. Leave 1/8 inch of clearance at each end. Cut the slab tight, let the wood swell a hair, and you've got a problem that means tearing the kitchen apart to fix.
How do you maintain and refinish butcher block countertops over time?
Butcher block lasts longer than most people give it credit for. A well-kept maple counter looks good for 20 to 30 years. The trick is catching problems early, because wood is repairable in ways stone and engineered quartz simply aren't.
For oil-finished surfaces, re-oil once a year, or whenever the wood looks dry or the water-bead test fails (water sits flat and soaks in fast instead of beading). Apply a thin coat of your penetrating finish, let it absorb, wipe off the excess, and let it cure 24 hours.
For scratches and dings, sand the spot with 120-grit, moving with the grain, until the scratch is gone. Step up to 150 or 180 to smooth it, then re-apply finish to the sanded area plus a few inches around it to blend. On end-grain slabs, scratches hide better to begin with, and light sanding lifts them right out.
For deeper damage around sinks or water-damaged zones, the job is bigger: sand the whole top back to bare wood (80-grit to strip finish, then 120, then 150), clean it, let it dry completely, then re-finish all six faces. It's a weekend of work, but not complicated work.
For cleaning technique, see the section above. Short version: soap, water, dry fast.
Maintaining butcher block takes more active attention than Cambria countertops or Corian countertops, neither of which needs periodic sealing. Want zero maintenance? Wood is the wrong choice.
Is butcher block a good choice next to the sink?
The sink zone is where butcher block either earns its keep or breaks your heart. It comes down to how the sink is set up and how disciplined you are about water.
Drop-in sinks are kinder to wood than undermount. The rim of a drop-in covers the most water-vulnerable edge of the cutout. An undermount leaves that edge exposed every time water splashes.
Going undermount? The cutout edges need extra finish attention. Apply penetrating oil or varnish to those edges before installation, let it cure, then apply again after. Some installers run a thin bead of silicone between the sink rim and the wood to block water from above, then finish the wood cutout edge on its own.
Apron-front (farmhouse) sinks have no undermount reveal problem, since the sink front covers the cabinet face, but the wood around the sink still needs the same care.
Dishwasher placement matters here. Most modern dishwashers vent steam through a front vent that runs under the counter and out the toe-kick. Older or cheaper models may vent straight up against the underside of the counter next door. Check your model before installation and add a heat shield or vent deflector if it vents upward.
Frank assessment: if your household lets dishes air-dry on the counter and puddles gather around the sink, pick a different material. If you're disciplined about wiping water quickly and willing to re-oil once a year, butcher block next to the sink works fine and looks great.
How does butcher block compare to other countertop materials on cost and practicality?
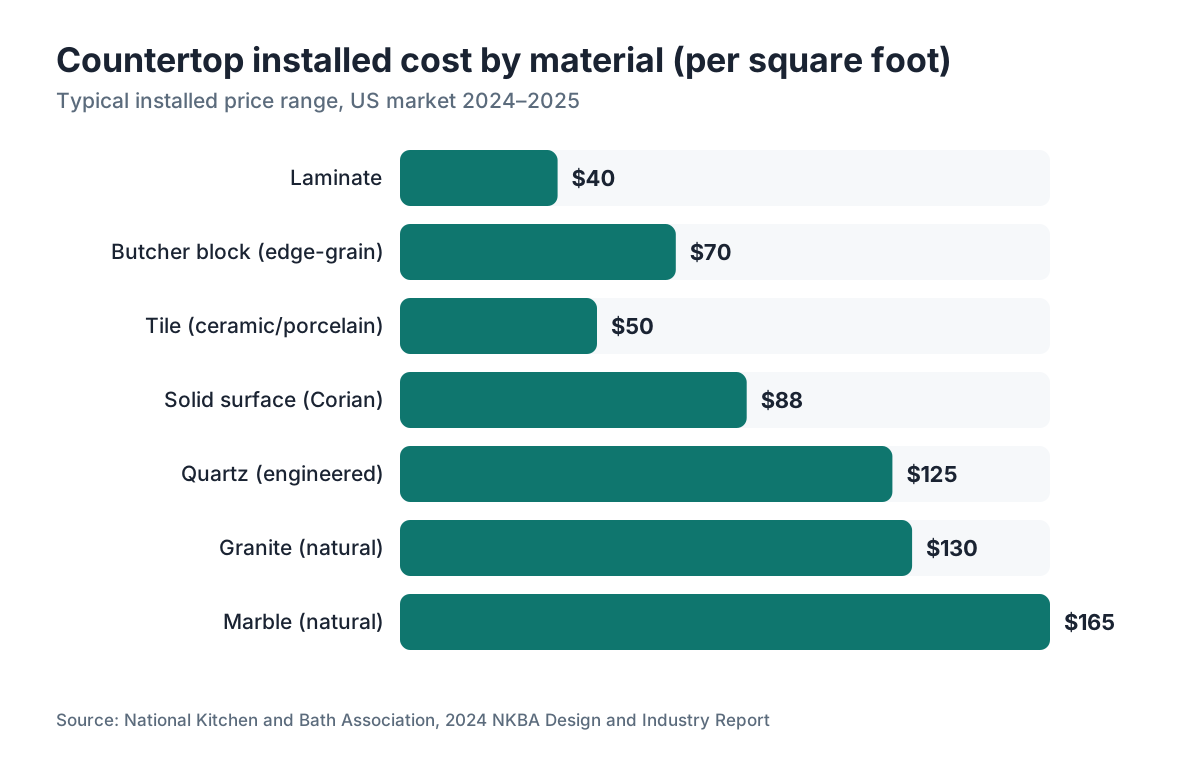
Here's how installed butcher block stacks up against the common alternatives. Prices are installed, per square foot, using 2024-2025 US market data from the National Kitchen and Bath Association and contractor pricing surveys [9].
| Material | Installed cost (per sq ft) | DIY-friendly | Maintenance |
|---|---|---|---|
| Butcher block (edge-grain maple) | $40 to $100 | Yes | Annual re-oiling |
| Laminate (Formica) | $20 to $60 | Yes | Minimal |
| Tile (ceramic or porcelain) | $25 to $75 | Moderate | Grout cleaning |
| Solid surface (Corian) | $55 to $120 | No | Minimal |
| Quartz (engineered) | $75 to $175 | No | Minimal |
| Granite (natural) | $60 to $200 | No | Annual sealing |
| Marble (natural) | $80 to $250 | No | Frequent sealing |
Butcher block is one of the only countertop materials a homeowner can cut, install, and finish with standard tools. That DIY potential is real, and it's the whole argument for the material. The tradeoff is ongoing maintenance. If re-oiling your counter once a year sounds like a chore, look at quartz or solid surface instead.
For more on lower-cost surfaces, see formica countertops. For stone alternatives, granite countertops and how to clean stone countertops cover the maintenance side.
Frequently asked questions
How do you clean butcher block countertops every day?
Wipe with a damp cloth and a little dish soap after each use, rinse with a clean damp cloth, and dry immediately with a towel. Standing water is the enemy. Left on the surface, it raises the grain and, over time, damages the finish. Never use abrasive scrubbers on oiled or waxed surfaces; they strip the finish faster than anything else.
How much does it cost to have butcher block countertops professionally installed?
Professional installation runs $70 to $180 per square foot all-in, including materials, labor, and finishing. A 30-square-foot kitchen comes to roughly $2,100 to $5,400. Your market, wood species, edge profile, and sink cutout complexity all move the final number. Get at least two quotes, because pricing varies a lot by region.
Can you put hot pans on butcher block countertops?
No. Wood scorches around 400°F, and a pan off the stove can hit 500°F or more. One careless pan leaves a permanent burn mark that needs sanding to fix. Use a trivet or heat pad. This is a genuine limitation compared to granite or quartz, which shrug off heat without damage.
How long do butcher block countertops last?
With good maintenance, 20 to 30 years is realistic for hard maple or walnut edge-grain counters. The ability to sand and refinish is the key: scratches, stains, and minor burns come out entirely with sanding, resetting the surface condition. A neglected counter that never gets re-oiled can degrade in as little as three to five years.
What is the best finish for butcher block countertops around a kitchen sink?
A penetrating oil-varnish blend like Waterlox Original, or a hard wax oil like Rubio Monocoat, beats polyurethane near a sink. Penetrating finishes spot-renew when the sink area shows wear. Polyurethane and any hard-film finish must be sanded entirely off the surface before refinishing, which turns a small fix into a big project.
Do butcher block countertops need to be sealed before installation?
Yes. Apply at least one full coat of your finish to all six faces before setting the slab on the cabinets. The underside matters most, since it sits in cabinet humidity and dishwasher steam. Skipping this step is the single most common cause of cupping and delamination in butcher block countertops.
Can you use bleach to clean butcher block countertops?
Avoid bleach on oil-finished or waxed butcher block. It strips oil finishes and lightens the wood. A diluted white vinegar solution (one tablespoon per cup of water) is a safer sanitizing option. On polyurethane-finished surfaces, a heavily diluted bleach solution does less harm but still isn't ideal for regular use. Soap and hot water handle most food-safety needs.
How do you fix water damage on butcher block countertops?
For minor water staining on an oiled surface, sand the spot with 150-grit until the stain is gone, then re-apply finish. For cupping or warping from prolonged moisture, the fix depends on severity: light cupping sometimes corrects itself after drying in low humidity, but significant warping means sanding both faces flat before refinishing.
How do you cut an undermount sink opening in butcher block?
Mark the cutout with the template that came with your sink. Drill a 3/4-inch starter hole inside each corner of the rectangle to prevent tearing. Cut with a jigsaw, moving slowly and supporting the waste piece from below near the end. Finish the cutout edges with 80-grit then 120-grit sandpaper, then apply multiple coats of finish before installing the sink.
Is butcher block food safe?
Yes, when properly maintained. The FDA Food Code covers wood cutting surfaces, and hard maple and other tight-grained hardwoods are acceptable for food contact [8]. The finish matters: mineral oil, food-grade oil-varnish blends, and hard wax oils are food-safe once cured. Polyurethane is generally considered safe after full cure (about 30 days) but isn't used directly as a cutting surface.
How do you attach butcher block to cabinets without splitting it?
Use figure-eight fasteners or Z-clips screwed into the cabinet top rails, with a slightly elongated or slotted hole at the slab end to allow seasonal movement. Space fasteners every 18 to 24 inches. Never glue butcher block to the cabinet frame; wood expands and contracts with humidity, and a rigid bond cracks the slab or the cabinet.
Can you install butcher block over existing countertops?
Yes, in many cases. If the existing surface is flat and structurally sound, butcher block can go on top. The main constraints are height (adding 1.5 inches raises the work surface, which can create clearance issues with appliances and upper cabinet doors) and moisture (old laminate that's delaminating or water-damaged should come off first).
How often should you oil butcher block countertops?
For a newly installed oil-finished counter, apply mineral oil or a penetrating finish monthly for the first six months. After that, once or twice a year is enough for most households, or whenever the surface looks dry and the water-bead test fails (water absorbs fast instead of beading up). High-use kitchens may need quarterly applications.
What is the difference between edge-grain and end-grain butcher block?
Edge-grain has the long sides of the boards facing up, making a striped look. It's more stable, cheaper, and easier to keep flat. End-grain has the cut ends facing up, giving a checkerboard pattern. It's more self-healing for knife marks but costs two to three times more, drinks more finish, and weighs more. Both are excellent countertop choices depending on budget.
Sources
- IKEA US, Karlby countertop product page: IKEA Karlby oak and birch butcher block countertops retail for approximately $10 to $20 per square foot
- USDA Forest Products Laboratory, Wood Handbook (General Technical Report FPL-GTR-190): Mineral oil is a non-film-forming penetrating treatment for wood; food-safe mineral oil is inexpensive and widely available
- USDA Forest Products Laboratory, Wood Handbook Chapter 4: Moisture Relations and Physical Properties of Wood: Wood expands and contracts with humidity changes; a 25-inch-wide maple slab can move 1/4 to 3/8 inch seasonally across its width
- USDA Forest Products Laboratory, Wood Handbook Chapter 5: Mechanical Properties of Wood: Hard maple (Acer saccharum) has a Janka hardness of approximately 1,450 lbf; black walnut approximately 1,010 lbf; American cherry approximately 950 lbf
- USDA Forest Products Laboratory, Wood Handbook Chapter 17: Wood-Based Panels: Unfinished or partially finished wood exposed to differential moisture conditions (one face sealed, one not) will cup toward the drier face
- UL Solutions, GREENGUARD Certification program: Rubio Monocoat hard wax oil is GREENGUARD certified as safe for interior use including food-contact surfaces when cured
- Waterlox, Original Sealer/Finish product documentation: Penetrating oil-varnish blends cure by oxidation to form a flexible water-resistant surface, food-safe once fully cured, and need 24 to 48 hours between coats
- FDA Food Code, food-contact surface guidance: The FDA Food Code addresses cleaning and sanitizing of food-contact surfaces including wood used with raw meat
- National Kitchen and Bath Association, 2024 NKBA Design and Industry Report: Countertop installed pricing benchmarks by material type: laminate $20-$60/sq ft, butcher block $40-$100/sq ft, solid surface $55-$120/sq ft, quartz $75-$175/sq ft, granite $60-$200/sq ft, marble $80-$250/sq ft
- EPA Safer Choice Program: The EPA Safer Choice program provides guidance on food-safe and low-toxicity cleaning products acceptable for wood and food-contact surfaces
- USDA Forest Products Laboratory, Wood as a Building Material (General Technical Report FPL-GTR-282): Wood's movement coefficients and seasonal shrinkage/swelling behavior are documented per species in FPL technical reports
Last updated 2026-07-09