
TL;DR
- A countertop takeoff reads floor plan dimensions from construction drawings, converts them to actual measurements at the correct scale, adds overhangs, subtracts sink cutouts, and produces a square-footage total plus a linear-footage count for edge work.
- Done right, it takes 20-40 minutes per kitchen and gets you within 5-10% of the final template measurement.
What is a countertop takeoff and why does it matter?
A countertop takeoff is the process of measuring a set of construction drawings, or sometimes a finished space, and converting those measurements into the quantities you need to price and order stone: square feet of material, linear feet of edge, and a list of cutouts for sinks and cooktops.
It matters because stone slabs cost real money. In early 2025, a slab of 3cm quartz runs roughly $250-$600 at the fabricator's wholesale cost, and misreading one drawing can mean ordering a second slab, scrapping a piece, or losing a job on a bid because your square footage was inflated by 30% [1]. Get the takeoff wrong and every number downstream is wrong.
For fabricators, the takeoff from drawings happens before the physical template. A customer sends in a PDF of their kitchen plan and expects a quote the same day. If you can't read that drawing accurately, you either over-quote and lose the sale or under-quote and eat the loss. For homeowners trying to verify a quote they received, understanding the basics of a takeoff tells you whether the square footage a shop quoted you is reasonable or padded.
What tools do you need to do a takeoff from drawings?
You need four things: the drawings themselves (a PDF or printed set), a scale ruler (also called an architect's scale), a calculator, and a takeoff worksheet or software.
A printed set is easier to work with because you can draw directly on it. If you're working from a PDF on screen, most PDF viewers let you set a known distance and then the software calculates other dimensions for you. Adobe Acrobat's measure tool works this way, and so do purpose-built takeoff programs.
The architect's scale is a triangular ruler with multiple scales printed on it. Common architectural scales are 1/4" = 1'-0" and 1/8" = 1'-0". At 1/4" scale, every quarter-inch on the drawing equals one real foot. At 1/8" scale, every eighth-inch equals one foot. Commercial projects sometimes use 1/16" scale. You need to know which scale the drawing was drafted at before you put the ruler down.
If the drawing has a graphic scale bar (a little ruler printed right on the sheet), use that instead of trusting the stated scale. Drawings get reprinted at different paper sizes all the time, and a 1/4" = 1'-0" drawing printed at 50% is now effectively a 1/8" = 1'-0" drawing. The graphic scale bar shrinks with the drawing, so it stays accurate [2].
For a software option, programs like On-Screen Takeoff, PlanSwift, or fabrication-specific tools let you click dimensions directly on a PDF. SlabWise includes a quote module where you enter square footage and edge footage from your takeoff and it prices the job against your material and labor rates, which saves time once the measuring is done.
How do you read the scale on a construction drawing?
Every construction drawing sheet has a title block, usually in the lower-right corner, that lists the drawing scale. It might read "Scale: 1/4" = 1'-0'"" or "1:48" (the metric equivalent). That notation means every quarter-inch you measure on paper equals one foot in reality.
To use an architect's scale: find the face of the ruler labeled 1/4. The 0 mark is not at the very end of the ruler; there's a small segmented section to the left of 0 that represents inches. Place the 0 at one end of the dimension you're measuring. Read the footage at the other end. Then read the remaining inches in that segmented section. Practice with a known dimension first. Measure a door opening, which is almost always 3'-0" on a residential plan, to verify you're reading the right face of the scale.
If you're on a PDF, here's the calibration step. Find a dimension that's already labeled on the drawing (say, a 12'-0" cabinet run). Use the measure tool, draw a line the full length of that run, and then set the scale so the tool reads 12'-0". Every measurement you take after that will be at the correct scale for that drawing.
One common mistake: different sheets in the same drawing set can have different scales. The floor plan might be 1/4" = 1'-0" and the cabinet elevations might be 3/8" = 1'-0". Always check the scale notation on the specific sheet you're measuring.
How do you measure countertop area from a floor plan?
Start by tracing every counter run in the kitchen or bath. On a floor plan, counters show up as a pair of parallel lines: the wall line and the front edge of the counter. The distance between them is the counter depth.
For each run, you need two dimensions: the length (parallel to the wall) and the depth (front to back). Multiply them to get square footage. Then add all the runs together.
Standard residential counter depth is 25.5" (2'-1.5") for kitchens, which is a 24" base cabinet plus a 1.5" overhang at the front [3]. If the drawing notes a different depth, use that. Bathroom vanities are typically 21" or 22" deep.
For an L-shaped kitchen, you can break it into two rectangles. Watch the corner: if you measure both legs to the wall, you'll double-count the corner square footage. Measure one leg to the inside corner, and the other leg to the outside wall. This is the single most common measurement error in countertop takeoffs.
Here's a worked example. Leg A runs 8'-0" from the outside wall to the inside corner. Leg B runs 6'-0" from the back wall to the front of the peninsula. Both are 25.5" deep. Leg A: 8.0 × 2.125 = 17.0 sq ft. Leg B: 6.0 × 2.125 = 12.75 sq ft. Total: 29.75 sq ft. That's your net counter area before any adjustments.
For U-shapes and peninsulas, the same logic applies: break into rectangles, watch the corners, and note any area that's already counted in another leg.
How do you account for overhangs, backsplashes, and waterfall edges?
Overhangs add material that the floor plan doesn't show, because the floor plan only shows the cabinet footprint. The standard front overhang is 1.5", already baked into the 25.5" depth assumption above. But islands often have a seating overhang of 12" to 15" on one or more sides, and that material has to be counted [3].
For a 10'-0" island with a 12" seating overhang on one long side, add 10.0 × 1.0 = 10 sq ft to your total. If the drawings call out the overhang dimension explicitly, use that. If they don't, ask. Assuming standard depth on an island with bar seating is a common under-quote.
Backsplash from the countertop slab is a separate line item in most shops. It's usually a 4" or 6" strip behind the counter. Measure the linear footage of that wall run, multiply by the height in feet, and add to your material total. A 10'-0" run of 4" backsplash is 10.0 × 0.333 = 3.33 sq ft. Not huge, but it adds up across a full kitchen.
Waterfall edges are where the countertop material turns the corner and runs vertically down the side of an island or cabinet. Each waterfall panel is its own piece. Measure the height of the panel (usually the cabinet height plus counter thickness, so roughly 36" + 1.25" = 37.25") and the depth of the counter. At 25.5" wide and 37.25" tall, each waterfall panel is about 6.6 sq ft. Two panels on a double-waterfall island add about 13 sq ft, which is nearly half a slab on some materials.
How do you deduct for sinks and cooktops?
Most fabricators deduct sink cutouts from the gross square footage. The standard undermount rectangular kitchen sink cutout is roughly 27" × 16", or about 3.0 sq ft. A round prep sink might be 15" diameter, about 1.2 sq ft. Cooktop cutouts vary widely: a 30" range cutout is roughly 28" × 20", about 3.9 sq ft.
Industry practice on deductions is not uniform. Some shops deduct 100% of the sink opening. Some deduct nothing and treat it as waste. Some deduct only if the cutout piece is over 2 sq ft. If you're doing a takeoff to verify a quote, ask the shop what their deduction policy is, because a shop that deducts nothing will show higher square footage than one that deducts standard sink openings.
For your takeoff, the safest approach is to calculate gross square footage (no deductions), then note each cutout separately with its size. That way you can present either number to the customer and apply whatever deduction policy your shop uses.
The same logic applies to cooktops. If a 30" five-burner cooktop drops in from above, there's a cutout in the stone. If it's a slide-in range with no countertop between the range and cabinets, there's no countertop there to measure at all, and you should exclude that section of the run from your takeoff.
How do you calculate linear feet of edge work?
Edge work is priced per linear foot in most shops, and it's a separate cost from the material itself. You need to identify every exposed edge on the counter layout: the front edge of every counter run, any exposed sides (an island has four potentially exposed edges, though usually only the front and one or two sides get a finished profile), and any edges at the end of a run that aren't against a wall.
For a simple galley kitchen with counter on two walls, the exposed edge is just the front edge of each run. For an L-shaped kitchen, the front edges of both legs are exposed, plus the exposed end of the leg that doesn't run to a wall. Add those lengths up in linear feet.
For islands, go around the perimeter and count every edge that faces outward. A 4' × 6' island with a finished profile on all four sides has 20 linear feet of edge. If only three sides get a profile and the fourth side against a wall gets a clean cut (no profile), that's 16 linear feet.
Note the profile type on your takeoff. An eased edge and a full bullnose take the same time to measure but very different time to fabricate. Some shops price them the same, others charge a premium for complex profiles like ogee or dupont. That distinction lives in your pricing table, not your takeoff, but flag it in your notes.
How do you account for layout and slab yield when doing a takeoff?
A takeoff gives you net square footage. To order stone, you need gross slab square footage, which accounts for material waste in layout.
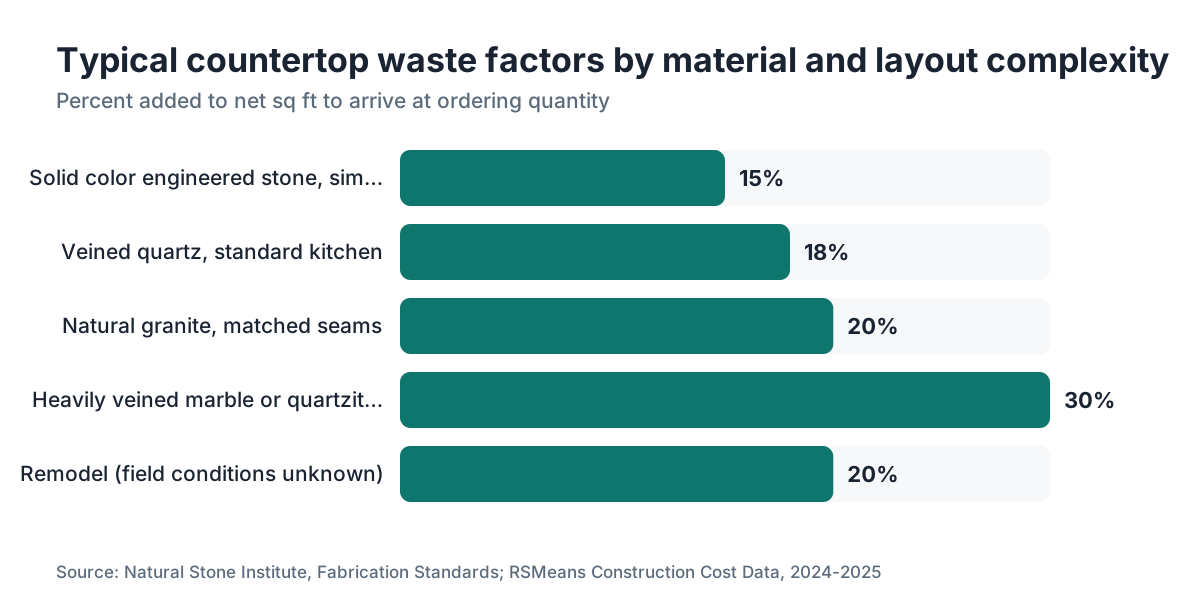
A standard residential slab of 3cm material is typically 55-65 sq ft of usable area after accounting for natural variation, vein direction, and edge waste [1]. The rule of thumb most fabricators use is to add 15-20% to your net takeoff square footage to get your ordering quantity. A kitchen that measures 45 sq ft net probably needs about 52-54 sq ft of slab, which means you're ordering one slab unless you have a large island.
For patterned or veined material, that waste factor climbs. Matching a dramatic vein across a seam means positioning pieces carefully, and you may end up using only 60% of a slab's area to get the match right. Budget more material on heavily veined marbles or quartzites.
Seams are another consideration. Slabs come in a fixed width, usually 54-63" for most engineered stone, and up to 70"+ for some natural stone [1]. If your counter run is longer than the slab width, you need a seam. Note the seam location on your takeoff drawing. Seams at corners, near sinks, or in high-visibility spots affect both material layout and price.
For a quick look at how slab sizes compare across common materials, see the table below.
What are the most common mistakes in a countertop takeoff from drawings?
Wrong scale is the biggest one. Measuring at 1/4" scale on a sheet that's actually 1/8" scale doubles every dimension and quadruples the area. Always verify with a labeled dimension before you start.
Double-counting corners comes next, especially on L-shaped and U-shaped layouts. Measure one leg to the inside corner, not both legs to the outside wall.
Forgetting the overhang. Floor plans show the cabinet depth, not the counter depth. If you measure from the wall to the front of the base cabinet, you're 1.5" short on every run. It doesn't sound like much, but on a 20-linear-foot kitchen it's 2.5 sq ft of material you didn't price.
Ignoring islands. Islands often have unusual depths, overhangs on multiple sides, and waterfall features. They deserve their own section in your takeoff, not a quick estimate.
Using dimensions that include the wall finish thickness. Architectural drawings sometimes show dimensions to the stud face, not to the finished wall surface. Drywall adds about 0.5" and tile adds 0.375" to 0.75". If the drawings note dimensions to finished face, you're fine. If they note dimensions to stud or rough-in, adjust.
Not noting the edge profile. You can calculate linear feet but forget to write down which profile was specified in the drawings or finish schedule. Then you quote eased edge and the customer shows up expecting an ogee.
Skipping the plumbing locations. Know where the faucet holes are. A farmhouse sink, an undermount, and a vessel sink all require different cutout and mounting details that affect both material and labor pricing.
How accurate is a takeoff from drawings compared to a physical template?
Honest answer: a drawing takeoff is an estimate. A physical template is ground truth.
In new construction, walls are framed square and cabinets are installed to plan dimensions, so a careful takeoff from good drawings can be within 2-5% of the final template measurement. That's close enough to order material with confidence.
In remodels, drawings often don't reflect as-built conditions. A kitchen that was supposed to be 120" of counter per the original plan might be 116" because of a poorly-framed corner or a cabinet that shifted during installation. Remodel takeoffs from drawings should carry a 10% contingency in both square footage and budget [2].
For pricing purposes, most fabricators quote from the drawing takeoff and then reconcile at template. If the template measurement comes in higher, some shops adjust the price; others have a small overage allowance built into their quote. That policy should be spelled out in your quote documentation.
The drawing takeoff also can't catch field conditions: a wall that's out of plumb, a ceiling-height cabinet that changes the scribing requirement, or a window that's closer to the counter than the plan shows. Those details come out at template. The drawing takeoff is for quoting. The template is for fabrication.
How do you format and present a countertop takeoff?
A takeoff document should have three sections: the measurements, the summary, and the notes.
Measurements section: list every counter run by location (e.g., "North wall run", "Island", "South wall return"). For each run, record the length, the depth, the gross square footage, any edge lengths, and any cutouts with their dimensions. Show your math.
Summary section: total gross square footage, total net square footage (after any deductions your shop uses), total linear feet of edge by profile type, and a count of cutouts. This is what feeds into your quote.
Notes section: anything that affects the quote but isn't a number. Material specified in the drawings. Finish schedule references. Seam locations you've flagged. Questions about overhangs or profiles that need clarification before you finalize the quote.
If you're using software like SlabWise, the quote module takes these inputs and produces a priced proposal automatically, which cuts the time from takeoff to customer quote to under 10 minutes. But the measurement work is still yours.
For physical drawings, draw directly on a printed copy: circle each run, write the dimensions you measured, and highlight any questions in a different color. That marked-up print becomes your record if there's a dispute later.
For PDFs, export the marked-up version and attach it to the job file. Some shops use a single shared folder structure per job; others use job management software. Either way, the marked-up drawing and the takeoff worksheet should live together.
What does a countertop takeoff worksheet look like in practice?
Here's a worked example for a typical L-shaped kitchen with an island.
| Location | Length | Depth | Gross Sq Ft | Edge LF | Cutouts |
|---|---|---|---|---|---|
| North wall run | 8'-0" | 2'-1.5" | 17.0 | 8.0 (eased) | 1 undermount kitchen sink (27"×16") |
| West wall return | 5'-6" | 2'-1.5" | 11.7 | 5.5 (eased) | None |
| Island (main top) | 4'-0" × 7'-0" | N/A (rectangle) | 28.0 | 14.0 (3 sides, ogee) + 7.0 (1 side, eased) | 1 cooktop (30"×19") |
| Island waterfall (2 panels) | 2'-1.5" × 3'-1" ea. | N/A | 13.1 | 0 (no profile) | None |
| 4" backsplash, north wall | 8'-0" | 0'-4" | 2.7 | 0 | None |
| 4" backsplash, west wall | 5'-6" | 0'-4" | 1.8 | 0 | None |
| Totals | 74.3 gross sq ft | 34.5 LF | Sink: ~3.0 sq ft, Cooktop: ~3.9 sq ft |
Net sq ft after deductions (if shop policy deducts sink and cooktop): 74.3 - 3.0 - 3.9 = 67.4 sq ft.
Ordering quantity at 15% waste factor: 74.3 × 1.15 = 85.4 sq ft (roughly 1.5 slabs, so order 2).
This format is easy to check, easy to hand off to another estimator, and maps directly to a quote line item. The time to fill it out for this kitchen: about 25 minutes from a clean PDF.
Frequently asked questions
What scale are most residential kitchen drawings?
Most residential kitchen floor plans are drawn at 1/4" = 1'-0" (also written as 1:48). Cabinet elevations in the same set are often at 3/8" = 1'-0" or 1/2" = 1'-0". Always check the scale notation in the title block of each individual sheet, because they can differ across pages in the same drawing set.
Do I deduct sink cutouts from my square footage total?
It depends on your shop's policy, and policies genuinely vary. Some fabricators deduct 100% of sink and cooktop openings; others deduct nothing and treat it as waste; others only deduct openings over 2 sq ft. The safest approach for takeoffs is to calculate gross square footage first, note each cutout separately with its dimensions, and then apply your shop's deduction rule when you build the quote.
How do I handle an island with a seating overhang on the drawings?
A seating overhang won't show in the base cabinet footprint on the floor plan. Look for it in the notes, sections, or cabinet elevations. Standard bar-height seating overhangs are 12-15". Measure the length of the island side with the overhang, multiply by the overhang depth in feet, and add that to your square footage. Don't skip this; it can be 10+ sq ft on a large island.
How do I measure a corner countertop (diagonal cut or curved)?
For a diagonal corner, measure the rectangle that encloses the diagonal and use that as your material quantity (the cut-off triangle is waste, not deductible). For a curved corner, measure the enclosing rectangle as well. Curved pieces require more material than their net area because the blank needs to accommodate the curve sweep. Flag these on your takeoff as requiring a template before final pricing.
What if the drawings don't have labeled dimensions?
You're stuck measuring off scale. Confirm the scale from the title block or a graphic scale bar, calibrate against a known standard element (a door is almost always 3'-0" wide, a standard base cabinet is 24" deep), and measure. Your accuracy will be lower than from labeled dimensions, and I'd add a 10% contingency to any quote built from unlabeled drawings. Ask the designer or GC for a dimensioned set before quoting if the job is large.
How do I find the overhang when the drawings only show the cabinet line?
The floor plan shows the top of the base cabinet, which is 24" deep. Standard countertop overhangs the front of the base cabinet by 1.5", making the total counter depth 25.5". Add 1.5" to the floor plan depth for every front-edge kitchen run. For bathrooms, standard base depth is 21" and overhang is typically 1", so counter depth is 22". Always check the specifications or notes for any non-standard depth.
Can I do a countertop takeoff from a sketch instead of a formal drawing?
Yes, but only if the sketch includes labeled dimensions for every run, depth, overhang, and cutout. A sketch without dimensions is useless for a takeoff. Ask the homeowner or contractor to dimension the sketch, or do a field measure instead. A sketch with complete dimensions and a clear layout is almost as good as a formal drawing for a straight-forward kitchen.
How long does a countertop takeoff take from construction drawings?
A straightforward single kitchen with labeled dimensions takes 15-25 minutes from a PDF. A complex kitchen with islands, waterfall panels, multiple bathrooms, and unlabeled drawings can take 45-60 minutes. New construction projects with many identical units can be templated once and copied, cutting per-unit time dramatically. Building your own worksheet format shortens it after the first few times.
What's the difference between a countertop takeoff and a countertop template?
A takeoff is done from drawings before fabrication, for quoting. It gives you estimated square footage and edge footage. A template is done in the field after cabinets are installed; a templater traces or digitally scans every actual surface. The template is what the fabricator cuts from. The takeoff gets you to a signed quote; the template gets you to a cut slab.
How do I convert countertop square feet to slabs to order?
Take your gross square footage (before deductions), add 15-20% for waste, and divide by the usable area of the slab you're ordering. A typical 3cm quartz or granite slab has 55-65 sq ft of usable area. A 60 sq ft net kitchen at 15% waste needs about 69 sq ft of slab, so one slab. At 20% waste it needs 72 sq ft, still one slab. A 90 sq ft kitchen needs two slabs regardless. Always check specific slab dimensions with your supplier.
Should I include the backsplash in the countertop takeoff?
Only if the backsplash is being cut from the same stone slab as the countertop, which is common for 4" integral backsplashes. Measure the linear footage of the backsplash run, multiply by the height in feet, and add to your material total. Tile backsplashes done by a separate trade don't belong in the countertop takeoff at all.
How do I handle a waterfall edge in a takeoff from drawings?
Each waterfall panel is a separate piece. Measure the height (cabinet height plus counter thickness, typically about 37") and the depth of the counter (typically 25.5"). One panel is roughly 6.5-7 sq ft. A double waterfall island adds about 13-14 sq ft. These panels also need matched veining in most designs, which affects both layout waste and the number of slabs you need to order.
What information should I ask a homeowner or GC for before starting a takeoff?
At minimum: the drawing set in PDF with a scale noted, the finish schedule or material spec (what stone is specified), and any notes on special features like islands, waterfall edges, or unusual sink types. Ask whether dimensions are to finished wall face or to stud. For remodels, ask whether existing cabinets are staying or being replaced, because as-built dimensions often differ from the original plan.
Sources
- Natural Stone Institute, Dimension Stone Design Manual: Standard residential slabs run 55-65 sq ft of usable area; slab widths typically 54-70 inches depending on material and source
- National Institute of Building Sciences, Whole Building Design Guide: As-built conditions in remodels frequently diverge from original plans; contingency allowances for field variation are standard practice in finish estimation
- National Kitchen and Bath Association, NKBA Planning Guidelines: Standard kitchen countertop depth is 25 inches (24-inch base cabinet plus 1-inch overhang minimum); bar seating overhangs are 12-15 inches
- U.S. Department of Housing and Urban Development, Minimum Property Standards: Standard residential interior door width is 2'-8" to 3'-0", a common calibration reference on architectural drawings
- American Institute of Architects, Architectural Graphic Standards: 1/4 inch equals 1 foot (1:48) is the standard scale for residential floor plans; title block scale notation is required on all construction documents
- Marble Institute of America (now Natural Stone Institute), Fabrication Standards: Countertop layout waste factors of 15-20% are standard industry practice for residential stone jobs
- Construction Specifications Institute, MasterFormat Division 12: Countertop edge profiles and backsplash heights should be specified in the finish schedule, not assumed from floor plan drawings alone
- OSHA, Construction Industry Standards 29 CFR 1926: Drywall thickness is nominally 0.5 inches; wall finish thicknesses affect as-built dimensions versus framing dimensions on construction drawings
- National Institute of Standards and Technology, Measurement Uncertainty Guide: Photographic or digital reproduction of scaled drawings can introduce dimensional error; graphic scale bars are the reliable reference on reproduced drawings
- RSMeans Construction Cost Data (Gordian): Wholesale fabricator cost for 3cm quartz slab material ranges approximately $250-$600 per slab depending on material and region, as of 2024-2025 data
Last updated 2026-07-11