TL;DR
- Measure every countertop run in inches, record depth (usually 25.5 inches for standard base cabinets), and note overhangs, sink cutouts, and corner types.
- Multiply length by depth for square footage per section, add 15% waste, then sum the sections.
- With a good tape and these steps, you land within 5 to 10% of a template measurement.
Why measure countertops before the template visit?
A template is the gold standard. A CNC-traced or hand-drawn template taken directly off the cabinets is what fabricators actually cut from. But templates cost money and time, and nobody wants to schedule a full shop visit just to learn the project is 40% over budget.
Pre-template measuring fixes that. It gives you a realistic square-footage number, a rough cut list, and a dollar range you can quote or compare before anyone rolls a truck. For homeowners, it means fewer surprises when the real quote lands. For fabricators, it means the first phone call produces a ballpark close enough to close the job.
The tradeoff is honest. A tape-measure sketch will not catch a wall that's 2 degrees out of square, a cabinet run that bows in the middle, or a sink that sits an inch off-center. Those things matter at fabrication time, not quote time. For a quote, a careful measurement is accurate enough.
What tools do you actually need?
Nothing exotic. A 25-foot tape measure does most of the work. A 6-foot level tells you whether a long run bows. A notepad or a phone sketch app records dimensions. Some people bring a laser distance measure for long runs, but a tape beats it on short depths and inside corners.
For a proper sketch, bring graph paper or print a blank kitchen outline. Draw the kitchen from above, even roughly, and label every wall with a letter. That way your notes say 'Wall A: 144 inches' instead of 'the long wall by the window,' which is useless once you're back at the shop.
One thing trips people up constantly: measure in inches, not feet-and-inches. Fabricators work in inches. Writing '11 feet 3 inches' is a transcription error waiting to happen. Write 135. Done.
How do you measure a straight countertop run?
Start at the wall and measure to the outside edge of the last cabinet in the run. That's your length. For depth, measure from the wall to the front edge of the cabinet box, not the door face. Standard base cabinets in the US are 24 inches deep, and with a standard overhang the finished countertop depth comes out to 25 to 25.5 inches. Verify this on every job; older kitchens and custom cabinets vary.[1]
Write down both numbers. Length times depth gives you square inches. Divide by 144 to get square feet. A 10-foot run (120 inches) at 25.5 inches deep is 3,060 square inches, or 21.25 square feet.
Measure each independent run separately. Don't roll them into one big number until you have the full room sketch. You'll need the individual segments when you work out slab layout and seam placement later.
How do you measure an L-shaped or U-shaped kitchen?
An L-shaped kitchen has two runs that meet at a corner. Measure each leg from wall to wall, including the corner cabinet. Here's the part people get wrong: the corner is shared space. If you measure Wall A all the way to the outside corner and then measure Wall B to the same corner, you've counted that corner square footage twice.
The fix is to let one wall own the corner. Measure Wall A from its outside edge all the way into the corner, wall to wall. Then measure Wall B starting from the inside of the corner (the back wall) out to its outside edge. The corner belongs to whichever wall you assign it to, as long as you stay consistent.
For a U-shape, run the same logic on all three sections. A U-shaped kitchen usually has two inside corners, and both need this treatment.
Note where the corners are and what type they are: a standard 90-degree inside corner, a diagonal (clipped) corner, a curved corner, or a full lazy-susan cabinet that creates a much larger corner box. Diagonal and radius corners eat more material and take longer to fabricate. Flag them clearly in your sketch.
The total square footage you land on for L-shapes and U-shapes should feel slightly conservative. That's intentional. You'll add waste separately.
What countertop depth should you use for the measurement?
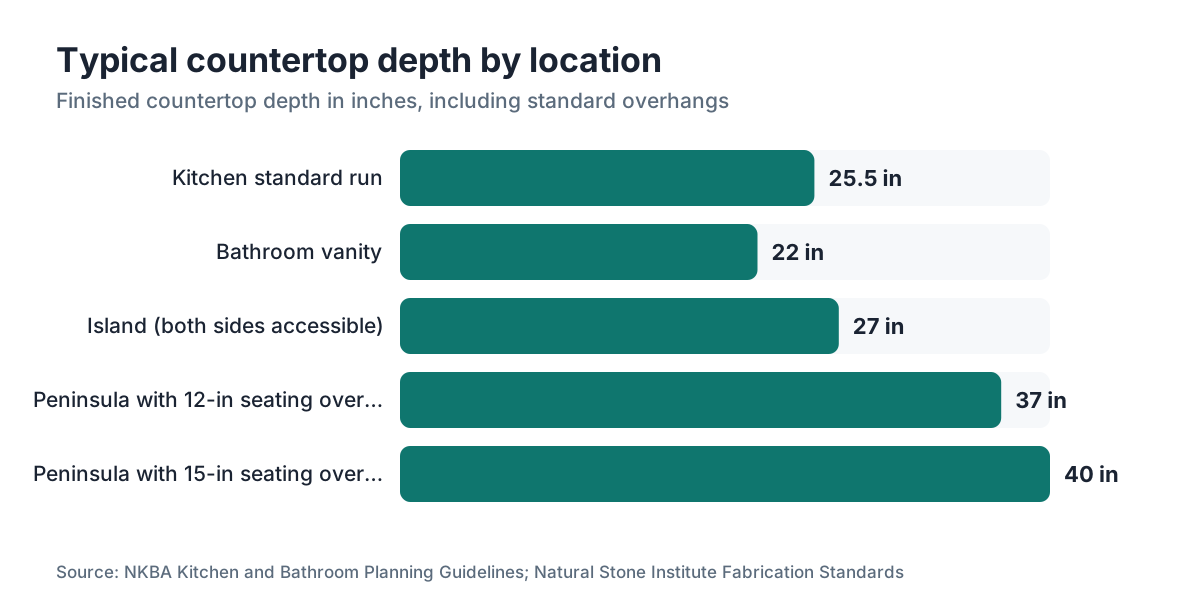
Use 25.5 inches for a standard kitchen run. Standard US base cabinets are 24 inches deep, and most fabricators add a 1.5-inch front overhang with a zero overhang (scribe) at the wall.[1] That number is close enough for quoting a normal kitchen.
Exceptions change the price fast. Breakfast bars and peninsulas often carry an extended overhang on the seating side, anywhere from 12 inches (tight knee clearance) to 15 inches (comfortable) or more. Measure the actual overhang you want and add it to the cabinet depth. A 15-inch seating overhang on a peninsula backed by 24-inch cabinets makes the countertop depth on that run 24 + 15 = 39 inches, not 25.5. That extra material moves the price a lot.
Bathroom vanities are typically 21 inches deep with a 1-inch overhang, so 22 inches total. Laundry rooms vary all over the place. Always measure; never assume.
| Location | Typical cabinet depth | Standard overhang | Typical countertop depth |
|---|---|---|---|
| Kitchen (standard) | 24 in | 1.5 in | 25.5 in |
| Breakfast bar / peninsula seating | 24 in | 12-15 in | 36-39 in |
| Bathroom vanity | 21 in | 1 in | 22 in |
| Island (both sides accessible) | 24 in (centered) | 1.5 in each side | 27 in |
| Laundry / utility | varies | 0-1 in | measure each job |
How do you handle a kitchen island in the measurements?
An island is usually the easiest piece to measure because it's freestanding and you can reach all four sides. Measure the length and width of the cabinet base. Add the overhang on every side that overhangs. A standard island with a 1.5-inch overhang on all four sides adds 3 inches to both the length and the width of the cabinet footprint.
If the island has a seating overhang on one end or along one side, measure that intended overhang and record it separately. It changes the slab requirement and can force a seam that wouldn't otherwise exist.
Island tops are almost always a single piece if they fit within slab dimensions, which is a big if. A typical large-format slab runs about 55 to 65 inches wide and 110 to 130 inches long, though oversized slabs exist.[2] An island top at 48 by 96 inches might come from one slab. At 52 by 108 inches, it probably won't, and you need a seam. Note the maximum single-piece size you can cut from available slabs; that affects price and looks both.
How do you account for sinks, cooktops, and other cutouts?
Don't subtract cutouts from your square footage. The slab still has to be the full size before anything gets cut out, so a fabricator prices the full countertop piece, not the net area after cutouts. A few shops deduct for very large cutouts, but it's uncommon and usually small.
What you do need to record is location and type. A sink sitting 4 inches from the front edge versus one that's centered changes how the fabricator lays out the cut. An undermount sink, a farmhouse (apron-front) sink, and a drop-in sink each need different fabrication work and edge profiles around the cutout. Note the sink type and the approximate rough opening size (usually printed on the manufacturer's spec sheet).
For cooktops, pull the cutout dimensions from the installation manual. The countertop has to support the cooktop frame, and some wide induction cooktops leave very little stone on either side. That's a structural detail the fabricator needs at quote time, not on installation day.
How much waste should you add to the square footage?
Add 15 to 20% for waste. That's the standard in stone fabrication.[3] The waste comes from saw kerfs, unusable offcuts at the ends of slabs, cutouts that can't be reused, and the extra material needed to book-match veining or keep a pattern oriented correctly.
A simple galley kitchen with no seams and no pattern-matching can get by on 10%. A complex L-shape in veined marble that needs the veins to flow across a seam can push 25%.
My default for a quote is 15%. It matches what fabricators actually factor in, and it stops the common mistake of quoting too low because you measured net area only.
Here's the math. If your measured square footage is 60, add 15% to get 69. That's what you price. If slabs sell per square foot, 69 is your material quantity. If slabs sell whole and you need to figure out how many, divide by the usable yield per slab, which is typically 65 to 75% of the full slab area on a normal kitchen layout.[3]
How do you build a simple cut list from your measurements?
A cut list is just a table of individual pieces with their rough dimensions. You need it to figure out slab count and to spot where seams have to go.
List every piece you measured:
- Piece A: 144 x 25.5 inches (Wall A run)
- Piece B: 96 x 25.5 inches (Wall B run)
- Piece C: 84 x 39 inches (peninsula with seating overhang)
- Piece D: 48 x 28 inches (island)
Compare each piece against your available slab dimensions. If a slab is 55 x 120 inches, Piece A at 144 inches long won't come from that slab in one piece and needs a seam. Piece C at 84 inches long might fit, depending on width.
You don't need full nesting optimization for a quote. You do need to flag which pieces require seams. Seams add labor, and a seam in a visible, high-use spot (like the middle of an island) is a conversation to have with the homeowner before they get attached to a price.
Fabricators using quoting and nesting software, including tools like SlabWise, can run this cut-list analysis automatically and see exactly how many slabs a job needs. For a hand-measured quote, you're doing a simplified version of the same logic.
What edge profiles and extras should you capture at measurement time?
Material cost is only part of the price. Labor and extras make up a big share, and they tie back to things you capture during measurement.
Edge profile: record which edges are exposed to the room and which sit against a wall. Exposed edges get a finished profile (eased, bullnose, ogee, and so on). Every linear foot of finished edge adds cost. A simple eased edge on a 10-foot run costs far less than a stacked ogee on 30 feet. Measure the total linear footage of exposed edge separately.
Splash: decide whether you want a backsplash in the same material. A 4-inch full-height backsplash is common in stone. A full-height backsplash to the underside of upper cabinets (typically 18 inches) burns a lot more material. Measure the linear footage of wall that gets a backsplash.
Waterfall edges on an island: a waterfall side panel drops from the countertop to the floor on one or both ends. Each panel is an additional piece and often needs the veining to mirror the top, which forces careful slab selection and positioning.
All of these are dollar items a quote has to include. None of them show up if you only record length times depth.
How accurate is a tape-measure quote compared to a real template?
A good tape-measure quote lands within 5 to 10% of the final fabricated square footage. The main sources of error are walls that aren't square (a tape measurement assumes they are), cabinets that aren't perfectly level or plumb, and irregular features like curved walls or unusual corner boxes.
For pricing, 5 to 10% variance is fine. Quotes are not contracts. Most fabricators put language in their quotes saying final pricing is subject to template. That protects both sides.
Tape-measure quotes go badly wrong for reasons that aren't the tape's fault. Someone forgets an entire section (it happens more than you'd think in complex kitchens). Someone uses feet-and-inches while everyone else uses inches. Someone misses the seating overhang on a peninsula. Those are process errors, not measurement errors. The checklist at the end of this article kills most of them.
On kitchen countertops made from material that's expensive per square foot, like marble countertops or granite countertops, a 10% error is real money. Be more careful, not less, on high-value selections.
What is the measurement checklist to use before you leave the kitchen?
Before you walk out the door, confirm you have all of the following:
- A labeled sketch of the kitchen from above with every wall identified.
- Length of every run, measured in inches from wall to wall or wall to outside cabinet edge, depending on the run.
- Depth of every run, verified at the front of the cabinet box (not the door face).
- Overhang dimensions on any seating edge, peninsula, or island side.
- Corner types noted (inside 90, diagonal, radius, or lazy-susan box).
- Total linear footage of exposed edges that need a finished profile.
- Sink type and approximate rough opening, plus distance from front edge.
- Cooktop cutout dimensions from the manufacturer's spec sheet, if available.
- Backsplash: yes or no, 4-inch or full-height, linear footage.
- Any waterfall edges or special details.
- Island dimensions: length, width, and overhang on each side.
- Photos. Shoot every corner, every sink area, and any wall irregularity. You'll forget details that the photo shows.
With that list complete, you have everything needed to produce a serious quote. A fabricator quoting countertop installation from these numbers will be close enough to put a real dollar range on the job.
How do fabricators convert measurements into a material quote?
The fabricator takes your cut list, works out which pieces fit on which slabs, and counts the total slabs needed. Slab prices swing hard by material. A basic granite slab might run $250 to $450 at wholesale.[4] An exotic quartzite or a designer quartz like Cambria countertops can run $400 to $800 or more per slab at wholesale, before any fabrication.[4]
Fabrication labor, edge work, cutouts, and installation typically add $30 to $60 per square foot on top of material cost, though it varies by region and shop.[5] Shops in high-cost metro areas run higher. Rural shops run lower. There is no universal published rate.
For materials like laminate countertops or formica countertops, pricing works differently because laminate sells by the sheet rather than the slab, and waste factors are lower. Butcher block countertops and corian countertops carry their own pricing structures too, but the measurement process here is the same across all solid-surface materials.
Once the fabricator has the slab count, they apply their margin, add edge work linear footage, charge for cutouts (typically $100 to $200 each for sink or cooktop cutouts), and add installation.[5] That's the quote. A well-measured project produces a quote that doesn't move much after the template visit, which is what both parties want.
For fabricators who want to speed this up and skip the mental math, SlabWise handles the slab-count and nesting calculations automatically once you enter the cut list.
Frequently asked questions
What unit should I use when measuring countertops for a quote?
Measure in inches, not feet or feet-and-inches. Fabricators work in inches, and converting on the fly creates transcription errors. If you measure a run as 11 feet 3 inches, write 135 inches in your notes. Every dimension goes in as a whole number of inches. This small habit eliminates one of the most common quoting mistakes.
How do I measure a countertop that wraps around a corner?
Assign the corner to one wall only. Measure Wall A from its outside edge all the way to the back wall at the corner. Measure Wall B starting from the inside face of the adjoining wall, not from the same outside corner. This prevents double-counting the corner square footage. Note the corner type (90-degree inside, diagonal, or radius) because each requires different fabrication.
Does the sink cutout reduce the countertop square footage I need to buy?
No, not meaningfully. Fabricators price the full slab piece before any cutouts. The material has to be there to be cut out. Some shops give a small deduction for very large cutouts, but it's uncommon and typically minor. Include the full rectangular area in your square footage, and record the sink type and cutout size separately as a labor line item.
How much waste should I add to my countertop measurements?
Add 15% for a standard kitchen with no pattern-matching. Go to 20% for complex layouts or veined stone where you need the pattern to flow across seams. Simple straight runs with no seam requirements can use 10%. The waste accounts for saw kerfs, unusable offcuts at slab edges, and cutouts. Quoting net area without waste almost always underprices the job.
What's the standard depth for kitchen countertops?
Standard US base cabinets are 24 inches deep. Most fabricators add a 1.5-inch front overhang, giving a finished countertop depth of 25.5 inches. Seating overhangs on islands or peninsulas extend this a lot, typically 12 to 15 extra inches. Always verify; older kitchens and custom cabinetry vary from the standard.
How do I know if my countertop will need a seam?
Compare your piece dimensions to the slab size available from the supplier. A typical stone slab is 55 to 65 inches wide and 110 to 130 inches long. Any countertop piece longer than the slab's long dimension needs a seam. Islands with long runs, U-shaped kitchens with long wall runs, and any piece over about 9 to 10 feet typically require at least one seam.
Do I need to subtract for appliances like a range or dishwasher?
No. The countertop doesn't run over a freestanding range, but it still runs continuously on either side of it, and the slab piece is cut to fit around the appliance opening. You don't subtract the appliance width from your length measurement. The full length of the run is what the fabricator needs to plan slab layout and seam placement.
How accurate is a tape-measure quote versus a CNC template?
A careful tape measurement lands within 5 to 10% of the final templated square footage. The main sources of error are walls that aren't perfectly square and cabinets with minor bows. For quoting, this variance is acceptable. Most fabricators include language saying final pricing is confirmed at template. The big errors come from skipping sections or wrong overhang dimensions, not from the tape itself.
Should I measure backsplash separately from the countertop?
Yes, always record it separately. A 4-inch integral backsplash in the same stone material uses meaningfully less material than a full-height backsplash to the underside of upper cabinets, which is typically 18 inches. Note the linear footage of wall that gets backsplash and the height. It's a separate line item in the quote, not bundled into countertop square footage.
What photos should I take at the measurement visit?
Photograph every inside corner, every area where a sink or cooktop will go, and any wall that has an outlet, window, or irregular feature. Also shoot the overall kitchen from each corner of the room. Photos capture what a tape measure misses: a backsplash outlet that sits low, a window sill the countertop has to work around, or a corner that isn't a true 90 degrees.
How do I measure a kitchen island for a countertop quote?
Measure the cabinet base length and width. Add the planned overhang on each side that overhangs. A standard 1.5-inch overhang on all four sides adds 3 inches to both the length and width. If one side has a seating overhang, measure the intended knee clearance (typically 12 to 15 inches) and add it to that side only. Record all four final dimensions.
What's the difference between a quote measurement and a fabrication template?
A quote measurement uses a tape measure to get approximate dimensions for pricing. A fabrication template captures the exact shape of the installed cabinets using a CNC arm, laser, or physical material strips. Templates account for walls out of square, cabinet variations, and precise cutout locations. Fabricators cut from the template, not the quote measurement. Both serve different purposes at different stages of the job.
Can I measure countertops myself as a homeowner, or do I need a pro?
You can absolutely measure them yourself for a quote. A 25-foot tape, a notepad, and the measurement checklist in this article are enough to get a quote accurate to within about 10%. What you can't do is produce a fabrication template. That step still requires a professional before any stone is cut. The DIY measurement gets you into a real pricing conversation without a service call fee.
Sources
- National Kitchen and Bath Association (NKBA), Kitchen Planning Guidelines: Standard US base cabinets are 24 inches deep; countertop depth with standard overhang is typically 25 to 25.5 inches
- Natural Stone Institute, Dimension Stone Design Manual: Typical stone slab dimensions run approximately 55 to 65 inches wide and 110 to 130 inches long for standard commercial slabs
- Natural Stone Institute, Fabrication and Installation Standards: Standard waste factor for stone countertop fabrication is 15 to 20% of measured square footage; usable yield per slab on typical kitchen layouts is 65 to 75%
- RSMeans Building Construction Cost Data (Gordian), 2024 edition: Wholesale granite slab prices range approximately $250 to $450 per slab; premium quartz and quartzite slabs range $400 to $800 or more at wholesale
- Angi, Countertop Installation Cost Guide, 2024: Fabrication labor, edge work, cutouts, and installation add approximately $30 to $60 per square foot on top of material cost; sink and cooktop cutouts typically cost $100 to $200 each
- U.S. Census Bureau, American Housing Survey, 2021: Standard residential kitchen configurations and cabinet depth norms used as baseline for countertop planning guidelines
- NKBA, Bathroom Planning Guidelines and Access Standards: Bathroom vanity cabinets are typically 21 inches deep; finished vanity countertop depth with standard overhang is approximately 22 inches
- Marble Institute of America (now Natural Stone Institute), Tech Bulletins on Seam Placement: Seam placement and slab layout planning require knowledge of individual piece dimensions relative to slab size; pattern-matching stone may require 20-25% waste allowance
- International Code Council, International Residential Code (IRC), Sections R305 and R702: Building code standards for kitchen clearances and standard work surface heights informing countertop depth and overhang conventions
- Consumer Reports, Kitchen Countertop Buying Guide, 2023: Standard kitchen countertop seating overhang for comfortable knee clearance is 12 to 15 inches; islands with seating overhangs significantly increase material requirements
Last updated 2026-07-09