TL;DR
- Template your own countertops by measuring every run in inches, sketching the layout with exact dimensions, marking sink and cooktop cutout centerlines, and noting backsplash height.
- A clear dimensioned drawing plus calculated square footage lets any fabricator quote stone, quartz, or solid surface without a site visit.
- Plan on 30 to 90 minutes in a normal kitchen.
What does 'templating' actually mean and why do fabricators need it?
Templating is how you record the exact shape, size, and edge conditions of your counter space so a fabricator can cut a slab to fit. Shops do it one of two ways. Physical templates use thin luan or cardboard cut to the exact countertop footprint. Digital templates use a laser arm or a photogrammetry system. What you're doing when you template yourself is the paper-and-tape version: a dimensioned drawing that gives the fabricator enough to build a cutting layout and a price.
Fabricators need this because countertop pricing runs almost entirely on square footage of material and the number and complexity of cuts. Without real measurements they're guessing. A guess that's off by a few square feet can swing a granite or quartz quote by $200 to $500 or more, depending on the slab. A shop that cuts before it templates is a shop that eats expensive mistakes.
For a homeowner, a rough self-template buys you one thing that matters: real quotes from several fabricators before anyone sets foot in your house. That gets you apples-to-apples pricing. Understand the limit, though. A fabricator will still send someone out before cutting stone. You're producing a quote template, not a cut template.
What tools do you need to measure countertops at home?
Very little. A 25-foot tape measure covers almost any kitchen. A framing square or a reliable right-angle lets you check whether your walls actually meet at 90 degrees (most don't, and it matters). Graph paper or a blank pad for sketching. A pencil with an eraser. And a phone camera, because photos of every corner, sink, and appliance beat any drawing you'll make.
Want more accuracy? A laser distance measure like a Bosch GLM 20 (around $30 to $50) lets one person measure long runs without a helper. Nothing fancier is worth buying.
Skip these entirely: any template-cutting system, a level (it doesn't matter for a quote), and specialized countertop software. Those are shop tools. Your goal is a dimensioned sketch, not a cut file.
One cheap tool earns its keep: painter's tape or a marker. Use it to mark the centerline of your sink, the center of any cooktop cutout, and the spot of any outlet or column that breaks the run, right on the existing top or cabinet. Then photograph the marks. That single habit kills most of the back-and-forth with a shop.
How do you measure a kitchen countertop run accurately?
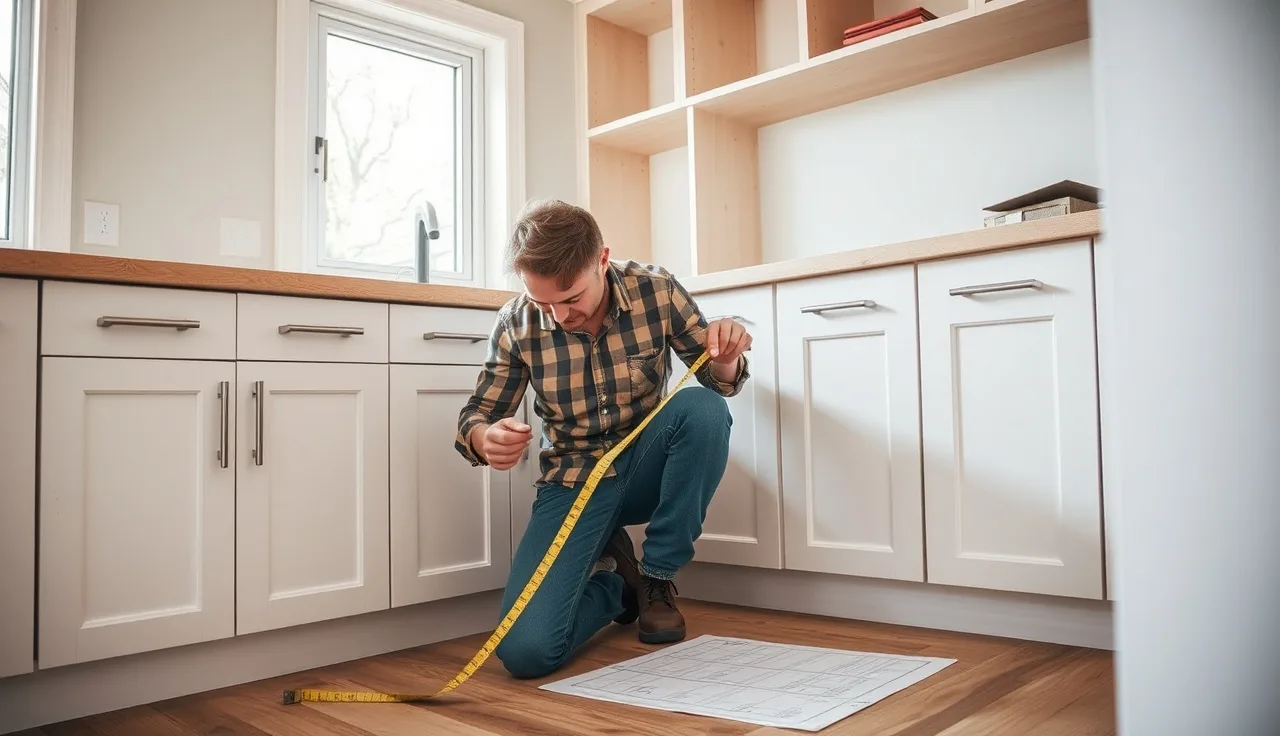
Start at one end of a run and measure straight to the other end, flush to the wall or cabinet face. Write the number in inches, not feet and inches. Fabricators work in inches because fractions stay clean and there's no conversion error. A run that reads 10 feet 4 and 3/8 inches goes on your sheet as 124 3/8".
For an L-shaped kitchen, measure each leg separately. For a U-shape, measure all three runs separately. Where two runs meet, measure each leg to the inside corner point and also note the outside corner dimensions. The overlap at that corner becomes the miter or the corner notch, and the shop needs both legs to price it right.
Depth matters as much as length. Standard base cabinets are 24 inches deep, and a typical overhang puts the countertop at 25 to 25.5 inches, but kitchens drift. Measure actual depth at three or four points along any long run. Write down the minimum and the maximum. If the spread is more than a quarter inch, flag it.
Walls go out of square more often than people think. Pull a diagonal tape corner to corner and note that dimension on your sketch. A good fabricator asks for it anyway. You can also check with a framing square in the corner: if the gap at the 12-inch mark on each leg is more than 3/8 inch, sketch it in. [1]
Measure twice. Then photograph each run with the tape laid along it so the shop can cross-check your numbers against the picture.
How do you account for the sink cutout in your template?
The sink cutout is the most detail-sensitive part of the whole sketch. Fabricators need three things: the overall sink dimensions, the centerline of the sink relative to the run, and the installation type (undermount, drop-in, or farmhouse/apron front).
For a drop-in sink, pull the template from the box (manufacturers include one) or measure the outer rim and the actual hole size. Standard drop-in kitchen sinks cut openings roughly 1/2 inch smaller than the outer rim on each side, but check the spec sheet for yours.
For an undermount sink, the cutout is usually the same size as or slightly smaller than the inside of the bowl, with the exact profile set by the fabricator based on the clip system they use. What you give them: the sink make and model, or the inside bowl dimensions (length, width, and cutout depth as seen from below), plus the centerline from both the front edge and one end of the run. Example: centerline is 14" from the front edge and 32" from the left end of the run.
Farmhouse and apron sinks change the cabinet face and need a different reveal cut. If you have one or want one, write down the brand and model. The fabricator wants the exact specs no matter what you record, so be precise about the model number.
A standard kitchen sink cutout adds roughly $150 to $250 to a stone fabrication quote, part for the cut and part for polishing the inside edges. [2] Undermount polishing costs more than drop-in because all four edges get finished.
What information do fabricators need beyond the basic dimensions?
Plenty of homeowners hand over a dimension sketch and think they're done. They're not. A complete template package also carries these:
Edge profile. A standard eased edge (a simple broken corner) is usually baked into base pricing. Ogee, waterfall, dupont, and other decorative profiles add $10 to $30 per linear foot. [2] Haven't chosen? Write "TBD," but know it moves the quote.
Backsplash. Full-height (slab running up to the upper cabinets or ceiling) or a standard 4-inch built-up piece? Full-height is a lot more square footage. Note the height. A standard backsplash on a 96-inch run adds about 32 square feet at 4 inches, or roughly 48 square feet at 6 inches.
Cooktop or range cutout. Same drill as the sink: make, model, centerline, cutout dimensions. Cooktop cutouts generally add $75 to $150 each. [2]
Seam locations. Slabs have a maximum usable size, typically around 120 by 55 to 65 inches for most granite and quartz. [3] A run longer than that needs a seam. You can suggest a spot (away from a direct sightline, or near an existing break like a sink), but the fabricator decides based on the actual slab.
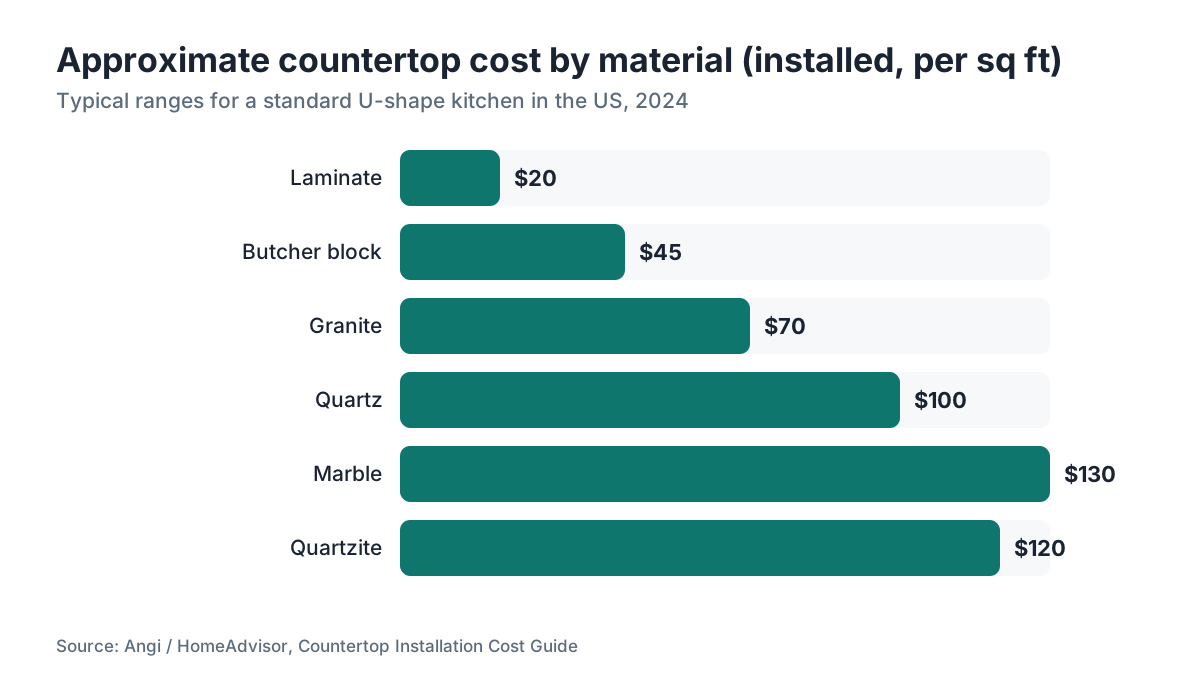
Material choice. Pricing swings hard by material. Granite countertops typically run $40 to $100 per square foot installed, quartz runs $55 to $150, and marble countertops range from $60 to $200 or more by origin and rarity. [2] Write down what you're considering so the shop quotes the right tier.
Old countertop removal. Need the existing top pulled? Ask for it as a separate line item. Removal and disposal usually adds $100 to $300 by material and size. laminate countertops and tile are the easiest to pull. Stone takes two people.
How do you calculate square footage from your measurements?
Fabricators quote by the square foot of material used, not by your countertop footprint alone. They account for slab area eaten up by each piece, including cutting waste. You still owe them a usable-area number to start from.
The math is simple. Multiply length by depth in inches, then divide by 144 for square feet. A run 110 inches long and 25.5 inches deep: 110 times 25.5 equals 2,805 square inches, divided by 144 equals 19.5 square feet.
Total each run separately, then add them up. Include the backsplash if it's the same material. Do not subtract the sink cutout. The slab area gets consumed whether or not that chunk becomes your sink, so the shop counts it. Many shops also carry a minimum square footage charge, often 15 to 20 square feet, because small jobs still eat setup time. [2]
Here's a quick reference for common layouts:
| Layout type | Typical linear feet | Approx. square footage (25" depth, no backsplash) |
|---|---|---|
| Galley (one wall) | 8 to 12 ft | 17 to 25 sq ft |
| L-shape | 15 to 22 ft | 31 to 46 sq ft |
| U-shape | 22 to 30 ft | 46 to 63 sq ft |
| Island only | 6 to 10 ft | 13 to 21 sq ft |
| U-shape + island | 28 to 40 ft | 58 to 84 sq ft |
These are rough ranges. Your kitchen may land outside them. Use them to sanity-check your own math before you send it to a shop.
What mistakes do homeowners most often make when self-templating?
Measuring depth at only one point is the big one. Cabinets set against a wall that bows inward run shallower at the midpoint than at the ends. Give the fabricator a single depth number and they cut to it, then you get a gap or an uneven overhang.
Measuring to the wrong reference is number two. Always measure to the wall, not to the backsplash tile. Tile thickness (usually 3/8 to 1/2 inch for standard ceramic) should not land in your countertop dimension unless the counter goes in after the tile, which is unusual. Most of the time the counter goes in first and tile runs up to it. Confirm the sequence with your installer.
Skipping the sink centerline. "Sink goes in the middle" is not a dimension. Measure from both sides and pick a reference point that makes sense, usually from one end of the run.
Mixing feet and fractions. Do every calculation in inches, verify it, then hand it over.
Missing out-of-square corners. A wall corner at 85 degrees instead of 90 leaves a gap behind the counter or fights the cabinet face. If the counter won't sit flush at both corners at once, your walls are out of square. Note it. The fabricator can scribe the back edge.
Rounding the square footage to something tidy. If your math says 43.7 square feet, write 43.7. Don't drop it to 40 because it feels like enough. Shops add their own waste factor on top of your number, so a rounded-down figure just gives them bad data.
Should you use an app or software to template countertops yourself?
A few consumer apps handle room measurement (RoomScan Pro on iOS, MagicPlan), and they do fine on simple rectangular rooms. For countertops they're weaker, because the detail you actually need (exact depth variations, cutout locations, corner conditions) comes faster from a tape measure and a freehand sketch than from fighting a phone camera in a cluttered kitchen.
Shops that want to standardize how customers submit measurements use tools like SlabWise to send a structured intake form that captures the right fields (material, edge, cutouts, finish) so quotes compare cleanly across jobs. That's a different job than homeowner self-measurement, but it explains why the field list above matters. Fabricators are asking homeowners to fill in a structured data set, even when the format is a sketch on a napkin.
If you run a shop and you're tired of incomplete measurement packets, an online quoting intake form (just a quote request with required fields, not a full-visit template) cuts your back-and-forth by a lot. Shops that switch to structured intake see fewer revision cycles on quotes.
Homeowners: skip the app. A tape measure, graph paper, and your phone camera do the job and read clearly to any fabricator.
How do you handle an island or peninsula in your template?
Islands are the easiest shape to template because they're usually rectangles. Measure length, then depth, in inches. Note the unsupported overhang on each side that will carry seating. Most fabricators recommend no more than 12 inches of unsupported overhang for stone without corbels or brackets, though some will go to 15 inches on thicker material. [4] Planning more? Note it, because the shop may require support before they'll warranty the install.
Note whether the island gets a waterfall edge, where the slab continues vertically down one or both sides. A waterfall needs extra slab area and a miter joint, and it adds real money. Some shops charge a flat waterfall fee, often $200 to $600, on top of the material cost for the vertical panel. [2]
For a peninsula tied to a wall on one end, template it like an L-shape leg. The wall end is a plain butt joint. The open end gets the same edge profile as any exposed edge.
Don't forget seating height. Standard counter height is 36 inches, bar height is 42 inches. If your island steps up (part at 36, part at 42), draw them as two separate pieces with a dimension showing the step.
How accurate does your self-template need to be for a quote versus an actual cut?
For a quote, plus or minus 1/4 inch is fine. What the shop needs from your sketch is a confident overall footprint so they can size the material and price the job. They will not cut stone to your sketch. Before any material moves, a trained templater visits with either a physical template or a digital measuring rig.
Digital templating tools (Prodim Proliner, Slabsmith, LT-55 laser arm) produce point-cloud or vector cut files accurate to 1/32 inch or better. [5] Your sketch will never touch that, and it shouldn't try. Its only job is to get you to a priced proposal.
Here's the line you don't cross: never hand a fabricator your sketch and tell them to cut from it, even if they offer. That's how you end up with a $3,000 granite slab that doesn't fit. Any reputable shop insists on a physical or digital template before the blade touches stone.
For countertop installation to go clean, the cut template and the final measurement have to catch every real condition: out-of-square walls, imperfect cabinet leveling, sink depth, the exact edge profile you picked. Your sketch catches none of that. It answers two questions only: can I afford this, and is this shop competitive?
What does a complete self-template packet look like?
A fabricator who gets a complete packet can turn a quote around same day. Complete looks like this:
A top-view sketch of the whole layout, drawn roughly to scale on graph paper. Each run labeled ("run A," "run B") with length and depth in inches. Corner dimensions noted. Sink location marked with centerline from one end and from the front edge. Sink make and model written right on the sketch.
A separate line for each cutout: cooktop or range (make, model, centerline) and any other openings.
Edge profile preference, or "TBD."
Backsplash: yes or no, and the height in inches if yes.
Material preference (stone type, color range, or the specific slab if you've already walked a stone yard).
Overhang dimensions for any seating areas.
Photos: at least one per run looking straight down at the cabinet tops, one per corner showing the wall-to-wall joint, and one of each sink and appliance location. A wide shot from the doorway gives the shop a reality check.
Total calculated square footage from your sketch, with your math shown.
A note if any wall is obviously out of square.
That's the whole packet. Email it as a PDF or a zip of photos. The shop will still come back with questions, but they'll be specific ones about your job instead of "tell me more about your kitchen."
How does your template affect the final fabricator quote price?
A clear template gets you a tighter, lower-risk quote. Working from vague measurements, a fabricator pads the price because uncertainty costs them money if they guess low. Hand over precise numbers and they can quote close to their real cost.
These quote components ride directly on your template:
Material square footage is the biggest line, typically 60 to 70 percent of the total installed cost. [2] Every square foot you over-report costs you on the quote. Every square foot you under-report becomes a problem when the shop orders material.
Number and type of cutouts. Each sink or cooktop cutout is a separate labor charge. Your template has to name every one so nothing gets forgotten and slapped on later.
Edge linear footage. Shops price edge profiles per linear foot of exposed edge. Your sketch lets you count exactly how much edge is exposed versus buried against a wall.
Seam count. Knowing your run lengths lets the shop check them against slab availability. A 144-inch run from one standard slab is cheaper than a 145-inch run that forces an oversized slab or a seam.
The National Kitchen and Bath Association reports that the average kitchen remodel budget puts 14 to 15 percent toward countertops. [6] On a $60,000 remodel, that's $8,400 to $9,000. A complete self-template that produces an accurate quote keeps that number from ballooning late in the project.
Frequently asked questions
Can I use my architect's floor plan instead of measuring myself?
Use it as a starting point, not a final source. Architectural drawings show nominal dimensions (what the design intended), not as-built dimensions (what got installed). Cabinet runs shift during install. Walls deviate from plans. Verify every dimension with a tape measure against the actual cabinets before you send anything to a fabricator.
What unit should I use when writing down my countertop measurements?
Inches with fractions, never feet. Write 127 3/8", not 10' 7 3/8". Fabricators program CNC equipment and price material in inches, so mixing units creates errors. Every measurement in your packet should use the same unit. If your tape shows feet, convert before you write anything down.
How do I measure a curved or radius countertop for a quote?
For a simple convex radius (a bullnose corner on an island), measure the straight run to where the curve starts, note the radius in inches if you know it, and photograph the corner. For a custom curved run like a curved peninsula, string a straight line across the chord and measure the perpendicular depth at its deepest point. Curved cuts cost more because they take more machine time.
Do I need to remove my old countertop before templating?
No. Template over the existing top. The fabricator needs the cabinet dimensions, and the old top is sitting on those cabinets. Measure to the wall from the back edge of the existing top, and note whether that top has a built-in backsplash you're removing. If walls behind the backsplash will get exposed, note that too, because it can affect the new backsplash height.
How do I measure for a full-height backsplash in my template?
Measure from the countertop surface (not the cabinet top) to the underside of the upper cabinet, at three or four points along the run. Walls and upper cabinets are rarely level, so you'll get a range. Record the minimum and maximum. The fabricator needs the smallest clear height to make sure the slab fits. A full-height backsplash can add 20 to 40 percent more square footage, so include it in your area math.
What's the difference between a quote template and a cut template?
A quote template is a dimensioned sketch accurate enough to calculate material cost. A cut template is an exact-shape physical or digital record used to program the CNC saw and waterjet. You make the quote template. The fabricator makes the cut template on-site with laser tools or cardboard luan. Never let a shop cut stone from a homeowner-made sketch.
How much does a fabricator charge for professional templating if I don't do it myself?
Most fabricators fold templating into the job cost when they win the work. If they charge separately, expect $75 to $200 for a standard kitchen. Some shops charge a template fee upfront and credit it back if you move forward. Shops running digital laser templating (Prodim Proliner or similar) sometimes charge more, but the precision cuts down on fit problems.
Does the orientation of the slab pattern matter for my template?
Yes, if you're buying a material with a strong directional vein like bookmatched marble or heavily veined quartzite. The fabricator needs to know whether you want veins running length-wise or across the counter, and whether continuity across a seam matters. Note it in your packet. It affects how much slab you need and sometimes whether a single slab can cover your longest run.
Can I get quotes from multiple fabricators using the same self-template?
Yes, and it's one of the main reasons to template yourself before anyone visits. Send identical packets to three or four shops and you get comparable quotes on the same job. Let each shop template independently and they may read conditions differently, which makes quotes harder to compare. Keep your packet as a PDF so it attaches easily to email.
How do I handle a countertop that goes around a corner where a dishwasher or appliance will sit?
Measure the appliance opening (width and height clearance from cabinet top to the underside of the counter). Note whether the counter runs over the top of the appliance for a built-in look or stops at the cabinet edge beside it. If the counter passes over a dishwasher, the fabricator needs that opening dimension so the stone doesn't block the door.
What photos should I send with my template drawing?
At minimum: one straight-down shot per run with a tape extended across it, one shot of each inside corner, one of each outside corner, a shot of the sink area with the sink in place, and one wide shot of the whole kitchen from the doorway. For stone pattern questions, photograph any existing stone in the space. More photos, fewer phone calls.
Does self-templating work for bathroom vanities too?
Yes, and it's easier because vanity tops are simpler shapes. Measure the cabinet width and depth, and note the sink type (undermount, vessel, drop-in, integral). Vessel sinks may need no cutout at all. Same rules apply: inches only, note the centerline of any cutout, photograph the faucet hole configuration if you're reusing faucets, and specify the edge profile.
Will a fabricator reject my quote request if my drawing isn't professional-looking?
No reputable shop will. They care whether the numbers are there, not whether the drawing is to scale. A rough hand-sketch with every dimension labeled and photos attached gets you a quote faster than a clean CAD drawing missing cutout information. Legibility beats aesthetics every time.
Sources
- HomeAdvisor / Angi, Countertop Installation Cost Guide: Countertop material cost ranges, edge profile upcharges, cutout fees, and removal costs
- Natural Stone Institute (formerly Marble Institute of America), Technical resources: Standard slab dimensions for granite and quartz typically 120 by 55 to 65 inches usable
- International Code Council, International Residential Code (IRC): Structural loading requirements relevant to unsupported overhangs exceeding 12 inches
- National Kitchen and Bath Association (NKBA): Average kitchen remodel budget allocates 14 to 15 percent to countertops
- US Census Bureau, American Housing Survey: Data on kitchen remodeling frequency and average project scope
- Occupational Safety and Health Administration (OSHA), Silica in Construction: Reference for stone fabrication shop safety standards relevant to cutting operations
- National Institute of Standards and Technology (NIST), Office of Weights and Measures: Standards for dimensional measurement practices used in fabrication contexts
- University of Florida IFAS Extension (EDIS): Standard kitchen layout dimensions and counter depth guidance
Last updated 2026-07-11