TL;DR
- Installing a vanity countertop takes 2 to 6 hours depending on material and whether you reuse the sink.
- You need a level surface, 100% silicone, and enough plumbing skill to reconnect the drain.
- Stone slabs need two people and a template.
- Most homeowners spend $150 to $800 on materials; hiring a fabricator adds $300 to $1,200 in labor.
What does installing a vanity countertop actually involve?
A vanity countertop sits on a bathroom cabinet base and holds the sink, faucet, and drain plumbing. Replacing one means disconnecting the drain and supply lines, lifting the old top, prepping the cabinet surface, setting the new top with adhesive, and reconnecting everything underneath. That's the whole job.
Difficulty swings hard by material. A prefab cultured marble top with an integrated sink drops right onto the cabinet in under two hours. A custom granite or quartz slab needs a template, shop time, two people to carry it in, and careful silicone work. Laminate and solid surface sit in between.
You don't need a plumber for a basic swap if the supply lines are long enough to reuse and the drain rough-in doesn't move. Moving the drain, adding a second sink, or running new supply lines through the wall changes that. Pull in a licensed plumber for any of those. Most states require a licensed plumber for new rough-in work but exempt fixture swaps at an existing location [1].
Before you buy anything, measure twice. The depth (front to back) and width (side to side) have to match the cabinet or overhang it by a consistent amount, usually 1 inch on exposed sides. Standard vanity depths run 19 to 22 inches. Standard widths go 24, 30, 36, 48, and 60 inches [2].
What tools and materials do you need before you start?
Most of this you probably already own.
Tools: adjustable wrench, basin wrench (for the under-sink nuts you can't reach with anything else), putty knife, level, tape measure, pencil, cordless drill, jigsaw (for drop-in sink cutouts in laminate), safety glasses, and work gloves. Add a caulk gun and a utility knife.
Materials: 100% silicone sealant (not latex caulk), plumber's putty or silicone for the drain flange, Teflon tape, and a bucket and rags for the water sitting in the P-trap. Setting a stone top? Add a construction adhesive rated for stone (Loctite PL Premium works) alongside the silicone at the cabinet perimeter.
For drop-in sinks on laminate or solid surface, you need a jigsaw with a fine-tooth blade and a template, or the sink itself as a guide. Undermount sinks in stone get bonded at the fabricator's shop before delivery, so there's no field cutting on those.
One thing people skip: a roll of painter's tape. Run it along the cabinet edge before you lay the silicone bead. It catches squeeze-out and looks cleaner when you pull the tape right after setting the top.
A second person is less optional than most DIY guides admit. A 36-inch cultured marble top weighs 40 to 60 pounds. A 36-inch granite or quartz top weighs 90 to 130 pounds [3]. The Consumer Product Safety Commission recommends two people for heavy home products, and a countertop qualifies [10]. A second set of hands prevents dropped slabs and cracked sinks. For any countertop installation, plan for the helper.
How do you remove the old vanity countertop without damaging the cabinet?
Shut off the hot and cold supply valves under the sink. Turn on the faucet to bleed pressure. Slide the bucket under the P-trap, unscrew the slip-joint nut, and pull the trap. Disconnect the supply lines from the faucet shanks with the adjustable wrench.
Now figure out how the old top is attached. Most prefab tops are held by a silicone bead around the cabinet perimeter, sometimes with a few dabs of construction adhesive underneath. Run a utility knife or thin putty knife along the joint to break the seal. Work slowly. A heavy top that falls forward splits the cabinet face frame.
Older installs sometimes hide screws driven up through the cabinet's corner blocks into a wood substrate under the top. Feel around the inside corners with a flashlight before you try to pry anything.
Once the seal is broken, lift straight up with your helper at the opposite end. For a heavy stone top, slide it onto a moving blanket on the floor instead of carrying it straight out.
Check the cabinet top for level before you do anything else. Use a 4-foot level in both directions. A cabinet out of level by more than 1/8 inch over its length needs shimming now, not after the new top is on. Cedar shims cost about $4 a pack and are far easier to trim than to add later.
How do you prepare the cabinet for the new countertop?
Scrape off all the old silicone with a putty knife, then wipe the surface down with a silicone remover or denatured alcohol. Silicone won't bond to old silicone. This step matters more than it looks.
Check the cabinet top rail for flatness, more than level. A cabinet that's racked or twisted puts uneven stress on a stone top and can crack it over time. See a gap over 1/16 inch at any corner? Shim it or sand the high spot.
Adding a new drop-in sink? Mark the cutout now, before the top goes on. Most sinks ship with a paper template. Tape it down, confirm the centerline matches the faucet holes and the drain rough-in, then cut with the jigsaw. Cut laminate face-up (the blade cuts on the upstroke, so a fine blade on the finished face chips least). Cut solid surface face-down.
Stone from a fabricator arrives with the undermount sink already bonded. Your only prep is confirming the cabinet is plumb, level, and exactly the right width. Fabricated stone is cut to the dimensions on the signed template, and it doesn't flex. A cabinet that ends up 1/2 inch narrower than when it was templated leaves a gap at the wall. Check the dimensions the day before delivery.
How do you set and secure the new vanity countertop?
Dry-fit first. Set the top in place with no adhesive, check the overhang on all exposed sides, and confirm the backsplash (if it's a separate piece) sits flush to the wall. Mark the position in pencil on the cabinet if the top likes to slide.
For a prefab cultured marble or solid surface top with an integrated sink: run a 1/4-inch bead of 100% silicone around the top of the cabinet rails, set the top down, press firmly, and check level. Wipe squeeze-out right away.
For a stone slab (granite, quartz, quartzite, marble): lay a snake bead of silicone around the cabinet rail perimeter, then add three to five dabs of construction adhesive in the center to fill any flex. Lower the slab onto your dry-fit pencil marks. Do not slide it. Lift and place. Check level, and shim under the cabinet base legs if needed rather than under the stone.
For laminate countertops or Formica countertops, the same silicone perimeter bead works. Some laminate tops have a particle-board substrate that screws down through the cabinet corner blocks from below. Check the manufacturer instructions. Both methods are common.
Let silicone cure at least 24 hours before you connect the plumbing and use the sink. Most silicone sealants reach full cure in 24 to 72 hours depending on bead thickness and humidity [4].
Installing Corian countertops or another solid surface? The manufacturer's instructions usually call for mechanical fasteners on top of adhesive. Follow those specs exactly. Solid surface warranties void when the install deviates.
How do you reconnect the sink plumbing after setting the top?
This is where most first-timers slow down. Work in order: drain assembly, supply lines, P-trap.
Drain assembly first. Thread the drain flange down through the sink drain hole. Ring the flange lip with plumber's putty (or silicone if the sink is granite composite or solid surface, since putty stains those). From below, thread on the rubber gasket and the drain locknut. Hand-tighten, then snug with pliers. Don't overtighten. You'll crack the sink or strip the nut.
Faucet second. Reusing the faucet? Feed the supply lines up through the faucet holes before the top goes on. If you forgot, a basin wrench makes the under-sink nut work possible but miserable. Mount new faucets before the top is set whenever you can.
Supply lines third. Connect the braided lines to the shutoff valves and faucet shanks. Hand-tight plus a quarter turn with a wrench. Teflon tape on the threaded male ends is good practice.
P-trap last. Reconnect it to the drain tailpiece and the wall stub-out. Slip nuts go hand-tight, then a snug. Run water for two minutes and check every connection with dry paper towels underneath. Fix any drip now, not next week.
How do you caulk and finish the vanity countertop edges?
The gap between the backsplash and the wall gets a caulk bead. Use a mold-resistant 100% silicone in a color that matches the countertop or the grout. Painter's tape on both sides of the gap, one smooth bead, a wet finger to tool it, tape pulled before the skin sets. That's the whole technique.
Don't grout this joint even if tile sits right next to it. The wall and counter move independently, and grout cracks. Caulk flexes.
Underneath, where the stone meets the cabinet, any visible gap at the front edge can be filled with color-matched caulk or left open if the overhang hides it. Most stone tops carry a 1/4-inch eased edge at the bottom of the front profile that rides just past the cabinet face and hides the joint.
Where a counter meets a wall on a left or right end, a small bead of matching caulk finishes it off. Some fabricators supply color-matched epoxy fill for chip repairs, and that same material closes hairline gaps between the stone and the wall tile.
Let everything cure before the first use. 24 hours minimum. 48 is better in a humid bathroom.
How much does it cost to install a vanity countertop?
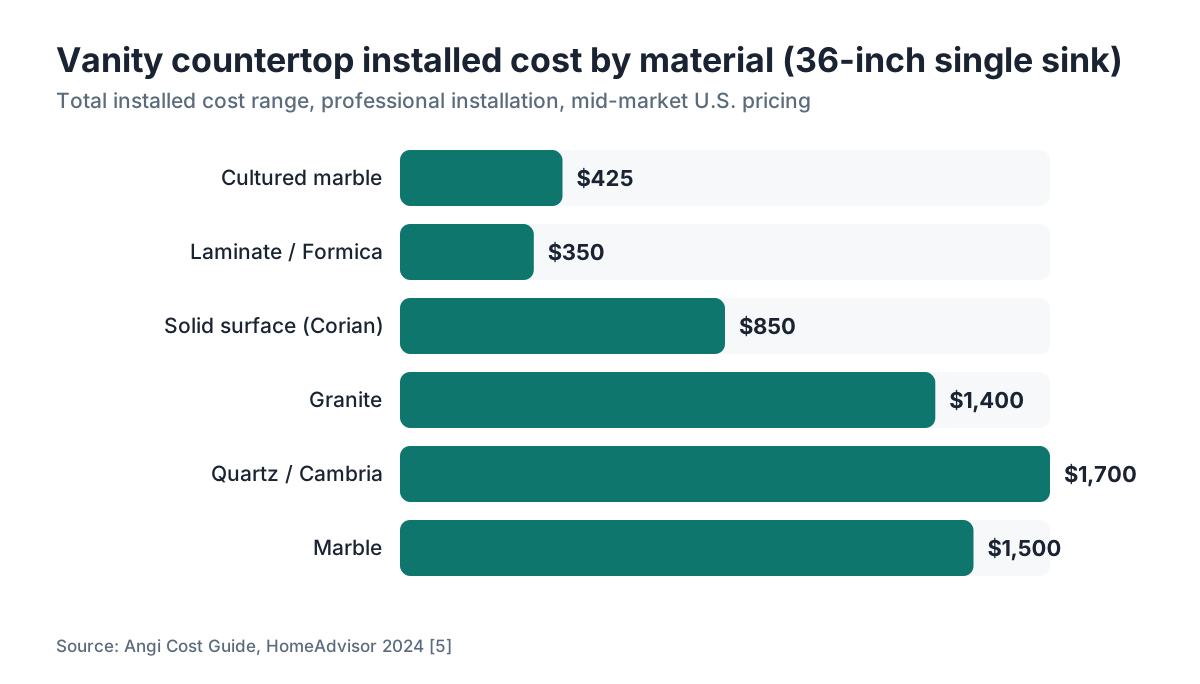
Cost depends on material and whether you DIY or hire out. Here's an honest breakdown from current retail and contractor pricing [5][6].
| Material | DIY cost (materials only) | Installed by pro (total) |
|---|---|---|
| Cultured marble (prefab) | $80 to $300 | $250 to $600 |
| Laminate/Formica | $50 to $200 | $200 to $500 |
| Solid surface (Corian, etc.) | $200 to $600 | $500 to $1,200 |
| Granite (custom fab) | $400 to $900 | $800 to $2,000 |
| Quartz/Cambria | $500 to $1,200 | $900 to $2,500 |
| Marble | $400 to $1,000 | $800 to $2,200 |
Those ranges assume a single-sink 36-inch vanity. Double the width and costs rise 50 to 80 percent, not double, because the fixed fabrication and install overhead stays the same.
Plumbing reconnection by a licensed plumber usually adds $75 to $200 for a simple reconnect at an existing location. That tracks with Bureau of Labor Statistics data putting the median plumber wage near $61 an hour nationally as of May 2023 [7]. A full rough-in is a separate job.
Fabricators building quotes can let software like SlabWise handle the material costing and markup math, so nobody's repricing every small job by hand.
One honest caveat: the spread between the low and high end of each range is mostly countertop quality and your local market. A rural Midwest shop charges less than a San Francisco shop for the same granite. Get three quotes.
What are the most common mistakes when installing a vanity countertop?
Skipping the dry fit is the most expensive one. Catch fit problems before you have silicone curing and a 100-pound slab stuck in the wrong spot.
Using latex caulk instead of silicone is common and always regrettable. Latex breaks down in constant moisture, shrinks, and molds. 100% silicone costs a dollar more per tube and lasts years longer in a bathroom [4].
Not checking for level before setting the top. A cabinet that looks level can still be twisted. Check both directions. Fix the cabinet, not the countertop.
Overtightening the drain locknut. Cracked porcelain sinks are a real and expensive outcome. Hand-tight plus a snug is plenty.
Ordering stone without a template. Dimensions on your tape measure and dimensions in a fabricator's shop are not the same thing. Walls are never square. A fabricator who visits with a digital template (or a laser measure and a drawing) cuts a top that fits. One working off your numbers alone is gambling with your money and their stone. Most reputable stone shops won't cut a custom piece without a template visit.
Not letting silicone cure. 24 hours minimum. Running water through the drain the same evening you install invites a slow leak at the drain flange.
When should you hire a professional instead of doing it yourself?
DIY makes sense for prefab tops (cultured marble, laminate, prefab solid surface) if you're comfortable with basic plumbing disconnects and have a helper. The material is cheap enough that a mistake isn't a disaster, and the tops are light enough to handle safely.
Hire a pro when the top is custom stone over 60 inches wide, you're moving the drain or faucet hole locations, the cabinet is damaged and needs repair, or you're doing an undermount sink on a material that needs shop bonding. Stone is unforgiving. A 72-inch granite top that doesn't fit goes back to the shop. There's no field fix.
Some jurisdictions require a permit and a licensed plumber for any work that changes the drain or supply rough-in. The International Plumbing Code, adopted in some form by most states, requires permits for new plumbing installations but generally exempts maintenance and replacement of existing fixtures at their existing locations [8]. Check your local municipality before assuming you don't need one.
Unsure about the cabinet's structural condition? A quick call to a cabinet maker or carpenter before the stone shows up is cheap insurance. Finding a rotted cabinet rail after the top is set is a much bigger headache.
What are the material options and which one is best for a bathroom vanity?
The honest answer: material depends on budget, how hard the bathroom gets used, and how long you plan to stay in the house.
Cultured marble is the most practical and most overlooked option. It's cast resin with a marble-look gel coat, ships in one piece with the sink integrated, shrugs off moisture, and costs less than any natural stone. The downside is the gel coat scratches and can't be repolished the way stone can. Good pick for guest baths and rentals.
Laminate (including Formica countertops) is cheap, easy to cut and install, and comes in every color made. It hates standing water at seams and around sink cutouts. Use waterproof construction adhesive and keep the seams sealed.
Granite countertops are hard, scratch-resistant, and heat-resistant. Seal them yearly and they outlast the house. Cost is mid-range. Weight is the main install challenge.
Marble countertops are beautiful and etch from acid (toothpaste, citrus, some cleaners). In a bathroom, where the exposure is mostly water, etching bothers people less than it does in a kitchen. That makes marble more practical here than most people assume.
Quartz (engineered stone like Cambria countertops) is non-porous, never needs sealing, and resists stains. It's the easiest stone-look product to live with. Price runs higher than granite on average.
Butcher block countertops in a bathroom are niche but real, best in powder rooms that stay dry. Seal with a water-resistant finish and keep the wood away from constant moisture. Not for undermount sinks with heavy daily use.
Once it's in, see how to clean stone countertops, plus the care guides for quartzite and soapstone.
How do fabricators and shop owners estimate vanity countertop jobs accurately?
A vanity job looks small but the estimate carries real complexity: remnant use versus fresh slab, undermount versus drop-in cutout time, edge profile labor, sink bonding, the delivery fee on a small job, and the template visit cost.
Shops that price vanities off a flat square-foot rate lose margin on cutout labor and undercharge on small jobs where fixed trip costs dominate. A 20-square-foot vanity top with an undermount sink and two faucet holes eats nearly as much shop and delivery time as a 35-square-foot top.
The better approach: price the template, fab, edge, cutouts, and install as separate line items, then add material on top. Margin stops evaporating on the small jobs. SlabWise's quoting module runs exactly that structure, splitting material from labor line items and setting remnant credit automatically.
On templating: digital tools (LT-55, Proliner, or photo-based systems) hold template-to-cut accuracy to within about 1mm on most vanity installs, which cuts the remakes that quietly kill margin on small work [9].
Frequently asked questions
Can I install a vanity countertop without removing the old one?
No. You need the old top off to prep the cabinet surface, check for level, remove old silicone, and get the new top sitting flat. Stacking surfaces creates height problems at the plumbing connections and voids most material warranties. Removal takes 30 to 60 minutes and is worth doing right.
Do I need to turn off the water main to replace a vanity countertop?
Usually not. Most vanities have individual shutoff valves on the hot and cold supply lines under the sink. Close those, open the faucet to relieve pressure, and you're safe to disconnect. If the shutoffs are stuck, corroded, or missing, then yes, shut off the main and replace the valves while you're in there.
How long does vanity countertop installation take?
A prefab cultured marble or laminate top takes 1 to 2 hours including plumbing reconnection. A custom stone slab with an undermount sink takes 3 to 6 hours, counting delivery coordination, setting, caulking, and plumbing. Add 24 hours of cure time before using the sink no matter the material.
Can you install a stone vanity countertop yourself?
Yes, if the slab is under 60 inches and you have two people. The fabricator delivers the finished, polished slab with the undermount sink already bonded. Your part is silicone, setting the slab with help, checking level, and reconnecting plumbing. The real risk is cracking the stone during carry-in on narrow hallways or stairs.
What adhesive should I use to set a vanity countertop?
Use 100% silicone sealant in a continuous bead around the cabinet rail perimeter. For heavy stone tops, add three to five dabs of construction adhesive (like Loctite PL Premium) in the center to stop any flex under load. Skip latex caulk. It degrades in bathroom humidity and loses adhesion within a few years.
How do I know what size vanity countertop to buy?
Measure the cabinet's outside width and outside depth (front to back, including the face frame). Standard prefab tops add 1 inch of overhang at the front and exposed sides. For custom stone, a fabricator templates to the exact cabinet dimensions. Standard vanity widths are 24, 30, 36, 48, and 60 inches. Custom widths are common in older homes.
Do vanity countertops need to be sealed?
Cultured marble, laminate, and quartz are non-porous and need no sealing. Natural stone (granite, marble, quartzite, soapstone) should be sealed before first use and yearly after. Use a penetrating impregnator, not a topical coating. The test: drop water on the surface. If it beads, you're fine. If it soaks in, reseal.
What is the standard overhang for a vanity countertop?
The front overhang on a bathroom vanity runs 1 to 1.5 inches past the cabinet face frame. Side overhangs on exposed ends match the front. Countertops meeting a wall on the sides have no overhang there. They butt to the wall with a caulk joint. There's no code requirement for overhang. It's a design convention.
Can I install an undermount sink in a laminate vanity countertop?
No. Undermount sinks need a rigid, waterproof substrate (stone, solid surface, or thick engineered quartz) because the sink lip bonds to the underside of the countertop. Laminate can't hold the weight or seal against water at the bond line. Use a drop-in (self-rimming) sink with laminate. The rim sits on top of the cutout and seals with silicone.
How do I fix a gap between the vanity backsplash and the wall?
Fill gaps up to 1/4 inch with a bead of mold-resistant 100% silicone in a color matched to the countertop or wall tile. Tape both sides, run the bead, tool it with a wet finger, and pull the tape before the skin sets. For gaps larger than 1/4 inch, push in a backer rod first, then caulk over it.
Do I need a permit to replace a vanity countertop?
In most jurisdictions, no permit is needed for a like-for-like countertop and sink swap at an existing location with no change to the drain or supply rough-in. If you're relocating the drain, adding supply lines inside the wall, or working in a commercial building, permit rules vary by state and municipality. Check with your local building department.
How do I cut a hole in a vanity countertop for a drop-in sink?
Tape the sink's paper template to the top. Confirm the cutout centers on the faucet holes and clears the cabinet frame below. Drill a starter hole inside a corner of the outline, drop in a jigsaw with a fine-tooth blade, and cut along the line. For laminate, cut face-up with a downstroke blade to reduce chipping. Sand the raw edge and seal it with waterproof adhesive.
How long after installing a vanity countertop can I use the sink?
Wait at least 24 hours for silicone to skin and reach working strength. Full cure runs 24 to 72 hours depending on bead size, temperature, and humidity. You can technically use the sink at 24 hours if the plumbing is reconnected and tested, but keep heavy water off the caulk joint for the first full day.
Sources
- International Association of Plumbing and Mechanical Officials (IAPMO), Uniform Plumbing Code overview: Most states require a licensed plumber for new rough-in work but generally exempt maintenance and replacement of existing fixtures at their existing locations.
- National Kitchen and Bath Association (NKBA), Bathroom Planning Guidelines: Standard vanity depths run 19 to 22 inches; standard widths are 24, 30, 36, 48, and 60 inches.
- Natural Stone Institute (formerly MIA+BSI), Dimension Stone Design Manual: A 36-inch granite or quartz countertop slab weighs approximately 90 to 130 pounds depending on thickness.
- Dow Chemical, DOWSIL 786 Mold Resistant Silicone Sealant technical data sheet: 100% silicone sealants reach full cure in 24 to 72 hours depending on bead thickness and ambient humidity; latex caulk deteriorates faster in constant moisture environments.
- Angi (formerly HomeAdvisor), Countertop Installation Cost Guide: Installed vanity countertop costs range from $250 for cultured marble to over $2,000 for custom quartz or granite, depending on material and market.
- The Home Depot, Bathroom Countertops product pricing, accessed 2024: Prefab cultured marble vanity tops retail for $80 to $300; laminate tops for $50 to $200 at major home improvement retailers.
- U.S. Bureau of Labor Statistics, Occupational Employment and Wage Statistics: Plumbers, Pipefitters, and Steamfitters (May 2023): Plumbers earn a national median hourly wage of approximately $61 per hour as of the May 2023 BLS OEWS survey.
- International Code Council, International Plumbing Code (IPC) 2021: The International Plumbing Code requires permits for new plumbing installations but generally exempts maintenance and like-for-like replacement of existing fixtures at existing locations.
- Natural Stone Institute, digital templating best practices resources: Digital templating systems hold template-to-cut accuracy to within roughly 1mm on typical vanity installs, reducing remakes.
- U.S. Consumer Product Safety Commission (CPSC): Heavy home products should be handled by two people to prevent injury and property damage during installation.
Last updated 2026-07-10