TL;DR
- Installing an undermount sink in a stone countertop means cutting the sink opening at the fabricator (or on-site with a wet saw), setting the sink with epoxy or silicone adhesive, clamping it from below with mounting hardware, and sealing the rim with 100% silicone.
- The whole process takes 2 to 4 hours once the stone is in place and the adhesive cures fully in 24 hours.
What is an undermount sink and why does it need stone?
An undermount sink mounts below the countertop surface instead of sitting in a hole with a lip on top. The sink rim bonds directly to the underside of the stone, leaving the top surface completely unobstructed. That clean look is why undermount sinks almost always go with stone or solid-surface materials.
Here's the thing: you can't do a true undermount on laminate or tile. Those materials crack or delaminate at the unsupported edge of the cutout when weight and water stress the joint. Stone gives you a solid, polished edge that holds the adhesive bond and shrugs off moisture at the rim [1]. Quartz engineered stone, granite, marble, quartzite, and soapstone all work. For more on material options, see kitchen countertops.
The finished edge of the cutout is what you actually see after installation. Fabricators call this the reveal, and they polish it to match the top surface. That polished edge is load-bearing, so the stone thickness matters. Most fabricators won't cut an undermount opening in stone thinner than 3/4 inch (2 cm), and 1.25 inches (3 cm) is the standard residential thickness because the extra mass supports the sink weight without stress fractures at the corners.
What tools and materials do you need before starting?
Get everything on the bench before the stone goes in. Hunting for a tube of silicone after the countertop is set is a fast way to create problems.
Tools:
- Wet diamond saw or angle grinder with diamond blade (if cutting on-site; fabricators use CNC routers)
- Jigsaw with diamond or carbide blade for minor trimming
- Oscillating multi-tool for plumbing clearance
- Caulk gun, preferably a drip-free ratchet style
- Mixing sticks and disposable cups (for two-part epoxy)
- Clamps or undermount sink mounting clips and a driver
- Flashlight or work light
- Denatured alcohol and clean lint-free rags
- Painter's tape
- Torpedo level
Materials:
- 100% silicone sealant rated for kitchen/bath (neutral-cure, not acetoxy, to avoid acid attack on stone) [2]
- Two-part epoxy adhesive, stone-specific, such as Akemi or Tenax Akepox series
- Undermount mounting clips (usually 4 to 8 per sink; some sinks include them)
- Masking tape or foam backer rod for silicone tooling
The silicone choice matters more than most guides admit. Acetoxy-cure silicones release acetic acid as they cure, which etches polished marble and limestone. The tube smells like vinegar if it's acetoxy. Neutral-cure silicones set without that acid off-gassing, and they're the correct product for stone [2].
Granite and marble are both porous to varying degrees, so the adhesive bond to the underside relies on a clean, dry stone surface. Even a thin film of oil or dust from fabrication will degrade adhesion. See granite countertops and marble countertops for how those materials differ.
How is the sink cutout measured and made in stone?
This is where most DIY jobs go sideways. Stone does not forgive a bad cut. The cutout dimensions come from the sink manufacturer's template, which ships with the sink or downloads from their site. That template accounts for the sink's flange width and the reveal (how much stone overlaps the sink rim on the underside).
Standard reveal is 1/8 inch to 3/16 inch. That small ledge is what the adhesive and clips grip. Go wider and you see a gap from above. Go tighter and you lose your bonding surface.
In a professional shop, the CNC router cuts the opening before the slab is installed, while it's flat on the table. The router path follows a CAD template derived from the sink's spec sheet. This is by far the best approach because the stone is stable, supported, and you can check the fit dry before any adhesive goes down [3].
On-site cutting (retrofitting an existing countertop for a new sink) is possible but harder:
- Tape the template to the stone surface, transfer the outline with a fine marker.
- Drill 1/2-inch plunge holes at each corner of the cutout using a diamond-tipped hole saw. These are your blade entry points and corner radii.
- Cut along the marked line with a wet saw or angle grinder using a continuous-rim diamond blade. Keep water running the entire time to control dust and heat [4].
- Support the cutout piece from below with a wooden brace so it doesn't crack and drop when the cut completes.
- Smooth any rough edges with a diamond hand pad.
Silica dust from cutting stone is a serious occupational hazard. OSHA's permissible exposure limit for respirable crystalline silica is 50 micrograms per cubic meter as an 8-hour time-weighted average [4]. Wet cutting drops airborne dust by roughly 85 to 90 percent compared to dry cutting [12]. Always wet-cut and wear a properly fitted P100 respirator for any on-site stone work.
Corner radii on the cutout matter structurally. Sharp square corners concentrate stress and are where fractures start. Fabricators specify a minimum corner radius of 1/2 inch to 3/4 inch on undermount cutouts. If you're cutting on-site, the drill bit diameter sets your corner radius, so use a 3/4-inch or 1-inch bit.
How do you attach and secure the sink to stone?
The sink attaches through two systems working together: an adhesive bond at the rim and mechanical clips underneath. Neither alone holds a heavy cast-iron or fire-clay sink.
Step 1: Dry-fit the sink. Set the sink up into the opening from below with no adhesive. Check that the rim sits flush against the stone underside with consistent contact all the way around. Shim if needed. A sink that rocks or gaps in one quadrant will leak.
Step 2: Clean both surfaces. Wipe the sink rim and the stone underside at the contact zone with denatured alcohol. Let it flash dry completely, about 5 minutes. Any oil, silicone residue, or stone dust will compromise the bond.
Step 3: Apply adhesive. There are two schools here:
- Silicone only: Apply a continuous 3/16-inch bead of neutral-cure silicone around the sink rim. Set the sink, clamp with mounting clips, and let cure 24 hours. This works for stainless steel and composite sinks up to roughly 30 to 35 pounds.
- Epoxy plus silicone: For heavy sinks (cast iron runs 90 to 200 pounds [5]) apply small dabs of two-part stone epoxy every 4 to 6 inches around the rim for structural hold, then fill the continuous joint with silicone for a waterproof seal. The epoxy sets in 5 to 30 minutes depending on product; mix per manufacturer directions.
Step 4: Install mounting clips. Thread the mounting clips into the pre-drilled holes on the sink underside (or clamp style around the rim per your sink's hardware). The clips pull the sink up against the stone from below. Hand-tighten until snug, then a quarter-turn with a driver. Over-tightening can crack the stone or distort the sink rim.
Step 5: Wipe excess adhesive. Before it cures, tool the silicone joint smooth with a wet finger or a plastic tool, then remove excess with denatured alcohol on a rag. Cured silicone is a pain to remove from polished stone.
Step 6: Let it cure. 100% silicone takes a full 24 hours to cure at 70°F and 50% relative humidity [2]. Don't run water or stress the joint during that time. In cold or dry conditions, cure time extends.
What type of silicone or adhesive should you use on stone?
Short answer: 100% neutral-cure silicone sealant for the waterproof joint, and optionally a two-part stone epoxy for structural hold on heavy sinks.
Neutral-cure silicone (sometimes labeled "non-corrosive" or "non-acetoxy") cures by reacting with atmospheric moisture without releasing acid byproducts. Dow, GE, and Mapei all make versions. Read the technical data sheet rather than the front label, because "kitchen and bath" products vary by formulation.
Two-part epoxies marketed for stone (Akemi Akepox 2010, Tenax Tefill Kit, Integra Adhesives) are the professional standard for structural bonding at undermount cutouts. These are what fabricators stock. They come in small cartridges with a static mixing nozzle, cure hard in 10 to 60 minutes, and sand and buff flush to an invisible joint in matching stone color. They're overkill for a 15-pound stainless sink but they're the right call for a 150-pound cast-iron farmhouse style.
Avoid construction adhesives like PL Premium or Liquid Nails. They aren't made for stone-to-metal or stone-to-composite interfaces at a continuously wet joint, and they fail over time.
For marble countertops specifically, use a white or translucent silicone so any slight bleed-through at the top seam doesn't show as a dark line.
How do you connect the plumbing after the sink is set?
Plumbing connections happen after the adhesive fully cures, not before. Running water against a fresh silicone joint is a common and preventable mistake.
Once cured (24 hours minimum):
- Install the faucet into the deck holes. If you're drilling new holes in stone for a faucet, use a diamond-tipped hole saw with continuous water cooling, same silica precautions as cutting the sink opening [4].
- Connect the supply lines to the shutoff valves under the cabinet. Hand-tighten compression fittings, then snug with pliers. Do not use pipe dope on compression fittings; use it only on threaded connections.
- Install the drain strainer/basket into the sink using the rubber gasket and mounting nut. Apply plumber's putty or silicone under the flange per the strainer manufacturer's instructions.
- Attach the P-trap and drain arm to the house drain stub-out. Check local code on trap arm length and venting. Most residential codes follow the Uniform Plumbing Code or the International Plumbing Code, which require the trap arm to slope 1/4 inch per foot toward the drain [6].
- Turn on the shutoff valves slowly. Check every connection for drips with the drain plugged and water running.
A faucet through stone takes the same wet-cutting discipline as the sink opening. Use a 1-3/8-inch diamond hole saw for standard faucet bodies. Mark center, tape the surface to stop blade wander, and keep the blade cool with water.
If the stone overhangs the cabinet by much, brace the countertop from below at the sink location before plumbing work. Leaning into the cabinet while tightening fittings puts torque on the stone at the cutout edge, and the adhesive bond isn't built for that load.
Can you install an undermount sink yourself, or do you need a pro?
Honest answer: the cutout is the hard part. If your stone is already installed and you're retrofitting, the risk of cracking the countertop is real. The adhesive and clamping steps are DIY-accessible for most handy homeowners.
Here's how to think about it:
- Stone already cut by fabricator, sink not yet installed: This is a reasonable DIY project. The fussiest part (the cutout) is done. You're doing adhesive, clips, and plumbing. Budget 2 to 3 hours.
- Retrofitting a new sink opening into existing stone: Higher risk. Wet cutting in place takes a steady hand, proper tooling, and silica dust controls. One crack and you're replacing a countertop. If the sink and stone are both under 3 years old, check whether you have a fabricator warranty that would void with DIY modification.
- Heavy cast-iron or fire-clay sink in a large cutout: The weight (90 to 200 pounds [5]) and the pull on the adhesive joint favor professional installation, especially if you're doing structural epoxy bonding for the first time.
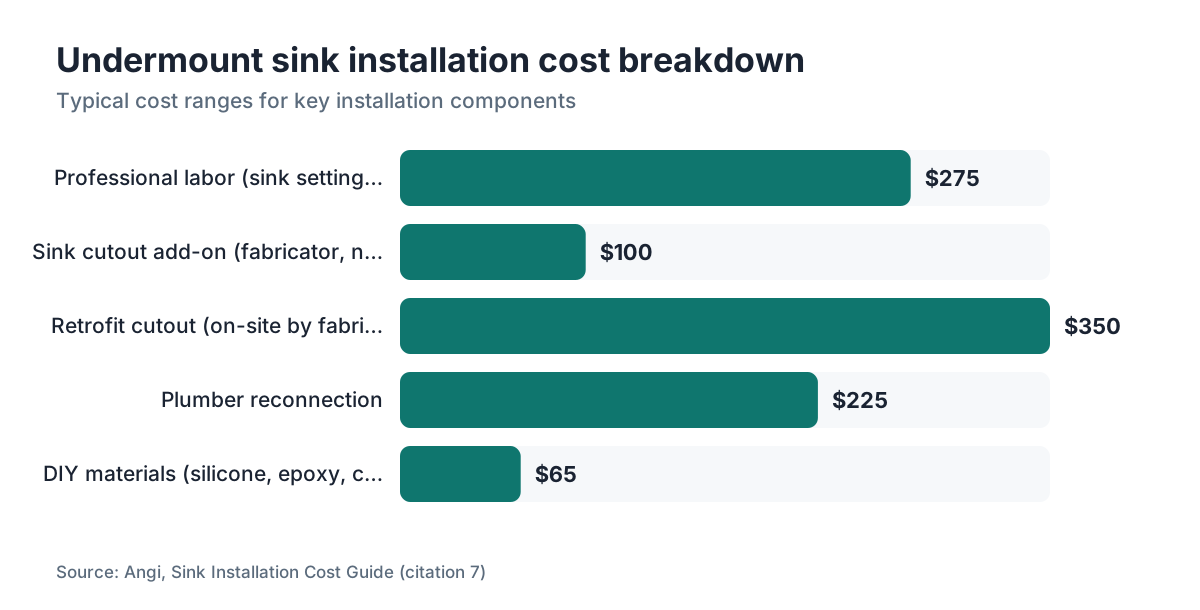
Professional sink installation by a plumber or countertop fabricator typically runs $150 to $400 for labor alone, separate from plumbing rough-in work [7]. That's not an outrageous premium for peace of mind on a $2,000 stone countertop.
Fabricators who run shop software like SlabWise typically document cutout specs digitally, which means the sink template dimensions get archived. If you're planning a future sink swap, ask your fabricator to save the cutout DXF file. Any future retrofit then starts with a known baseline instead of a measure-and-hope situation.
If you do hire out, countertop installation has more on what to expect from the full process.
How do you seal the gap between the sink and countertop?
The visible seam at the top of the sink-to-stone joint gets sealed with silicone, and this is the one part of the job that shows. Get it right.
After the sink is mounted and cured from below, inspect the top joint from above. A well-set sink shows a uniform reveal of 1/8 to 3/16 inch. If there's a slight gap (which is normal, because stone surfaces aren't perfectly flat), that gap has to be fully sealed.
Process:
- Tape both sides of the joint with painter's tape to keep lines clean.
- Apply a thin bead of neutral-cure silicone into the joint.
- Tool smooth immediately with a wet finger or silicone finishing tool.
- Remove the tape before the silicone skins over (within 10 minutes).
- Let cure 24 hours before wetting.
Color match your silicone to the stone where possible. Most sealant makers offer white, almond, clear/translucent, gray, and black. For darker granites or a black sink in dark stone, use gray or black. For white marble or quartz, translucent or white.
The joint needs redoing every 5 to 10 years under normal use. Silicone at the sink rim is a wear item. It degrades from heat cycling, cleaning chemicals, and mechanical movement over time. Replacing it is a 30-minute job with a utility knife and a fresh tube of silicone: cut out the old bead, clean both surfaces with alcohol, re-apply.
What can go wrong, and how do you fix common problems?
A few problems come up over and over on undermount installations. Most are preventable if you know to look for them.
Sink drops after installation. Usually caused by acetoxy silicone (which doesn't bond well to stone) or by skipping the surface cleaning before adhesive. Fix: remove the sink, clean both surfaces thoroughly, and re-bond with epoxy plus neutral-cure silicone, adding more mounting clips.
Water intrusion at the rim. The silicone joint failed or was never complete. This wrecks the cabinet and can wick into the stone. Fix: remove old silicone completely, dry the area for 48 hours, and re-seal with fresh neutral-cure silicone. Don't apply new silicone over old.
Crack at the cutout corner. Happens on stones with natural fissures running toward the corner, or when corner radii were too sharp, or when a heavy sink hung without adequate adhesive cure time. Fix requires professional assessment. Small hairline cracks can sometimes be filled with color-matched epoxy. A crack that runs to the countertop edge usually means replacement [8].
Sink isn't level. A sink that tilts front-to-back pools standing water at one end. Fix: if you're still in the adhesive cure window, loosen clips, re-shim, re-clamp. If fully cured, this is a harder problem. The epoxy may have to be mechanically released with a utility knife and oscillating tool.
Faucet hole drilled off-center. Mark carefully and drill slowly. If you drift, a diamond hole saw leaves a kerf; minor corrections can be filed with a diamond hand pad, but major misplacements need a new hole (leaving the bad hole to be plugged with a deck button or second accessory).
Discoloration or etching at the rim. Acetoxy silicone on marble or limestone acid-etches at the joint line. The only fix is to have the stone honed and re-polished by a stone restoration professional after switching to neutral-cure sealant.
How long does the installation take and what does it cost?
Time and cost swing a lot based on who's doing what part of the work.
Time breakdown for a standard installation:
| Task | DIY time | Pro time |
|---|---|---|
| Dry-fit and surface prep | 30 min | 15 min |
| Adhesive application and clamping | 30 min | 20 min |
| Adhesive cure (wait) | 24 hours | 24 hours |
| Plumbing connections | 60 to 90 min | 30 to 45 min |
| Sealing top joint | 20 min | 15 min |
| Total active work | 2.5 to 3.5 hours | 1.5 to 2 hours |
The 24-hour cure period is non-negotiable no matter who does the work.
Cost breakdown:
Professional undermount sink installation labor runs roughly $150 to $400, according to contractor pricing data compiled by HomeAdvisor and Angi [7]. That's sink-setting labor only. If the fabricator cuts the opening as part of a full countertop job, the cutout is usually included or adds $50 to $100 to the slab quote.
DIY material costs are low: a tube of silicone is $10 to $20, stone epoxy cartridges run $20 to $60, and a set of undermount clips is $15 to $40 [7]. Total materials come in under $100 for most installations.
Where costs blow up: crack the stone during a DIY retrofit cutout and countertop replacement averages $1,500 to $5,500 for kitchen-size runs depending on material [9]. That math favors hiring a pro for the cut.
Shops running quoting software like SlabWise can price undermount cutouts and edge profiles into the initial quote instead of adding them as surprises at invoice, which helps homeowners budget accurately from the start.
Does the type of stone change how you install the sink?
Mostly no on the process, but yes on a few specific details.
Granite is hard and relatively forgiving to cut. Corner radii hold well. The main issue is sealer: granite benefits from a penetrating sealer applied before sink installation so the adhesive doesn't wick into unsealed stone pores around the cutout edge [10].
Quartz (engineered stone) cuts cleanly and holds edges well because the resin binder adds flexibility. Same process. Some quartz manufacturers (Cambria, for example) require installers to use neutral-cure silicone at the sink joint to keep warranty coverage. Check the manufacturer's installation guidelines [11]. See also Cambria countertops.
Marble needs the most care. It's softer (Mohs 3 to 4 vs. granite's 6 to 7), prone to chipping at the polished edge, and acid-sensitive. Neutral-cure silicone is non-negotiable. Seal the stone before installation. Move the sink into position slowly.
Soapstone is dense and heals minor scratches on its own. Many shops work it with carbide tools rather than diamond. The undermount process is the same, but check with your fabricator on adhesive compatibility, since soapstone's talc content can affect bond strength. For care after installation, see how to clean soapstone countertops.
Quartzite (the natural stone, not quartz) is hard and abrasion-resistant but can carry natural fissures. Inspect the slab around the cutout location before cutting. A fissure running toward a corner is a crack waiting to happen under the stress of a mounted sink. For care notes, see how to clean quartzite countertops.
For any polished stone, our guide on how to clean stone countertops covers maintaining the finish near the sink joint.
How do you maintain an undermount sink installation long term?
The sink-to-stone joint is the highest-wear spot on any stone countertop. Water, soap, heat, and cleaning chemicals all degrade the silicone bead over time.
Inspect the silicone joint once a year. Look for cracking, separation, or dark discoloration (which signals moisture intrusion and possible mold growth under the seal). If you see separation, re-seal right away. Left alone, water gets under the stone and into the cabinet, causing wood rot and eventually the kind of damage that means full countertop replacement.
Don't use silicone spray lubricants near the sink joint. They contaminate the surface and make future silicone adhesion impossible without thorough cleaning.
Heavy pots and pans dropped in the sink create impact loads that travel through the sink body to the rim and into the stone. Cast-iron sinks handle this; thin-gauge stainless can deform. Either way, repeated heavy impacts over years stress the adhesive joint. This is low-drama for most households but worth knowing if you cook hard.
For stone care right at the sink area: wipe standing water rather than letting it sit, because even sealed stone can be affected by prolonged moisture. Hard water deposits at the rim come off with a pH-neutral stone cleaner. Avoid vinegar, bleach, or abrasive scrubbers on the polished edge, all of which damage the finish over time.
Frequently asked questions
Can you undermount a sink in a 2cm thick stone countertop?
Most fabricators strongly recommend against it. At 3/4 inch (2 cm), the reveal edge at the cutout has very little mass to hold the adhesive bond and mounting clips, and corner stress concentration is much higher. The industry standard is 3 cm (1.25 inches) for undermount installations. If you have 2 cm stone, many fabricators will build up the cutout edge with a laminated strip to create a thicker mounting surface.
How long should you wait before using the sink after installation?
Wait a full 24 hours after the adhesive and silicone are applied before running water. At 70°F and normal humidity, 100% silicone reaches handling strength in a few hours but doesn't fully cure to its rated bond strength until 24 hours. In cold conditions (below 50°F) or very dry air, add another 12 hours. Don't stress the joint by leaning on the countertop or running the dishwasher during cure.
Do undermount sinks need special mounting clips, or will any hardware work?
Use clips designed for undermount stone installation. Generic hardware store fasteners often don't have the reach or clamping geometry to pull a sink rim flush against a 3 cm stone underside. Most sinks ship with clips, but if yours didn't, Blanco, Kraus, and other sink manufacturers sell compatible clip kits. Get clips rated for your sink weight, especially for cast iron where structural epoxy plus heavy-duty clips is the correct combination.
What's the difference between undermount and drop-in sink installation on stone?
A drop-in (self-rimming) sink sits in the cutout with its rim resting on top of the stone. Installation is simpler: set it in, seal around the rim with silicone, done. An undermount bonds below the stone and requires mounting clips plus epoxy. Drop-in is easier to install and replace, but leaves a rim lip that traps water and debris. On stone, most people choose undermount for the look and easier wiping.
Can you convert a drop-in sink cutout to an undermount cutout?
Usually not directly. A drop-in cutout is sized for the sink bowl with the rim sitting on top. An undermount cutout is slightly smaller (the rim grips the underside of the stone, not the top). The edge also needs to be polished on an undermount. To switch types, the fabricator would cut a new, correctly sized opening and polish the edge, which on an existing installed countertop carries real crack risk.
Will an undermount sink installation void my quartz countertop warranty?
It can if the installation doesn't follow the manufacturer's specified process. Cambria, for example, publishes installation guidelines that require specific adhesive types and professional installation for warranty coverage. Silestone and Caesarstone have similar provisions. Download the technical installation guide for your specific quartz brand before starting. Using the wrong silicone or an unqualified installer can void coverage for the countertop itself.
How much does it cost to have a fabricator cut and install an undermount sink opening?
A sink cutout added to a full fabrication job typically costs $50 to $150 depending on complexity and region. If you're retrofitting an existing countertop, expect $200 to $500 for a fabricator to come out, cut the opening safely, and set the sink, since the on-site work is slower and riskier than shop cutting. Plumbing reconnection is separate and runs another $150 to $300 for a plumber.
What's the correct silicone bead size for sealing an undermount sink?
Apply a continuous bead of about 3/16 inch (roughly 5 mm) diameter around the full sink rim perimeter. This is thick enough to fill minor gaps and create a waterproof seal, but not so thick that excess squeezes out everywhere and needs major cleanup. For very heavy sinks using epoxy plus silicone, the epoxy dabs can be smaller (3/8 inch dots every 4 to 6 inches) with the silicone bead filling between.
Is silicone the only option, or can you use caulk to seal the sink joint?
Use only 100% silicone sealant. Standard latex or acrylic caulk doesn't bond to stone or metal effectively under continuous wet conditions and fails in months. Silicone stays flexible through temperature cycling and resists the water and soap exposure a sink joint gets daily. Sanded caulk is for tile grout joints, not stone-to-sink sealing.
How do you remove an old undermount sink from stone without cracking the countertop?
Cut through the silicone joint with a stiff utility knife or an oscillating multi-tool with a thin blade, working around the full perimeter. Then use a flexible putty knife to break the epoxy bond gradually. Never pry against the stone edge. If structural epoxy was used, heat from a heat gun (low setting, move constantly) softens it slightly. The process takes 20 to 45 minutes done carefully. Support the sink weight from below the whole time.
Do you need to seal the stone around the cutout edge before installing the sink?
Yes, especially for granite, marble, quartzite, and other natural stones. Apply a penetrating impregnating sealer to the polished edge and the underside of the stone in the adhesive contact zone before setting the sink. This stops adhesive from wicking into porous stone, which can cause discoloration and weaken the bond. Wipe off sealer residue and let cure per the sealer's instructions before applying adhesive.
Can a single person install an undermount sink in stone, or do you need help?
You need a helper for most sinks. Holding the sink up against the stone underside with one hand while applying adhesive or installing clips with the other is nearly impossible, especially with heavier sinks. One person works from below inside the cabinet, one person steadies the sink from above or the side. For a cast-iron sink, you realistically need two people below the counter just to hold the weight while clips get set.
What corner radius should the sink cutout have in stone?
A minimum of 1/2 inch radius, with 3/4 inch being better practice for most stones. Tight square corners concentrate stress dramatically at the corner point. Natural stone can have microscopic fissures that propagate from those stress points, especially under the dynamic load of a heavy sink used daily. CNC-cut openings in a fab shop apply consistent radii automatically. On-site cuts get their radius from the plunge drill bit diameter.
Sources
- Natural Stone Institute (formerly Marble Institute of America), Dimensional Stone Design Manual: Undermount sinks require stone or solid-surface materials; laminate and tile do not provide adequate edge support for the bonded rim.
- Dow Inc., DOWSIL 786 Neutral-Cure Silicone Technical Data Sheet: Neutral-cure silicone avoids acetic acid off-gassing that etches calcareous stones; full cure at 70°F and 50% RH takes approximately 24 hours.
- Natural Stone Institute, Countertop Fabrication Standards: CNC routing of undermount sink openings prior to installation is the professional standard; shop cutting on a flat, supported slab reduces crack risk versus on-site cutting.
- U.S. Occupational Safety and Health Administration, Silica Rule for Construction (29 CFR 1926.1153): OSHA's permissible exposure limit for respirable crystalline silica is 50 micrograms per cubic meter as an 8-hour TWA; wet cutting is a listed engineering control that substantially reduces airborne silica.
- Kohler Co., Cast Iron Sink Product Specifications (representative product data): Cast iron undermount sinks typically weigh 90 to 200 pounds depending on size and configuration.
- International Association of Plumbing and Mechanical Officials, Uniform Plumbing Code Section 1007: The Uniform Plumbing Code requires trap arms to slope 1/4 inch per foot toward the drain connection.
- Angi (formerly Angie's List), Sink Installation Cost Guide: Professional undermount sink installation labor runs approximately $150 to $400; DIY materials (silicone, epoxy, clips) typically total under $100.
- Natural Stone Institute, Stone Restoration and Maintenance Standards: Cracks propagating to the countertop edge from undermount cutout corners typically require slab replacement; small non-propagating cracks may be filled with color-matched epoxy by a stone restoration professional.
- HomeAdvisor, Kitchen Countertop Installation Cost Guide: Kitchen countertop replacement averages $1,500 to $5,500 depending on material and size.
- Natural Stone Institute, Sealing Natural Stone: Best Practices: Applying a penetrating impregnating sealer to granite cutout edges before adhesive application prevents wicking and potential bond contamination.
- Cambria Company LLC, Cambria Care and Installation Guide: Cambria specifies neutral-cure silicone and professional installation at undermount sink joints as conditions for maintaining product warranty coverage.
- U.S. Centers for Disease Control and Prevention / NIOSH, Silica Dust Hazards in Construction: Wet-cutting stone reduces airborne respirable silica by approximately 85 to 90 percent compared to dry cutting.
Last updated 2026-07-10