TL;DR
- Hand polishing a countertop seam means working through diamond pads from 200 to 3000 grit, keeping the surface wet, and finishing with a stone polish or honing compound.
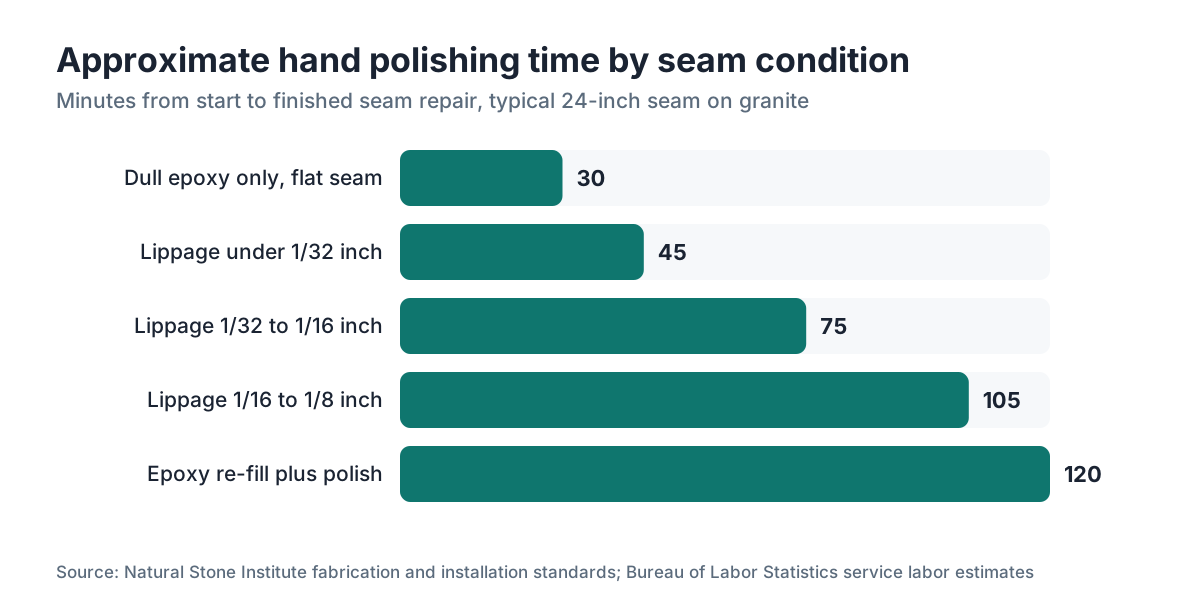
- The job takes 30 to 90 minutes depending on the stone and the height mismatch.
- It fixes lippage and dull epoxy hazing.
- It does not fix gaps wider than about 1/16 inch.
What does 'hand polishing a seam' actually mean?
A countertop seam is where two slabs meet, usually at a corner, an L-turn, or wherever the slab ran out of length. The fabricator joins them with color-matched epoxy and, done right, leaves the surface flush and polished to match the rest of the stone. Real life is messier. Small problems show up after installation: one edge sits a hair higher than the other (lippage), the epoxy cured with a slightly different sheen, or the installer's polishing wheel left a faint haze along the joint.
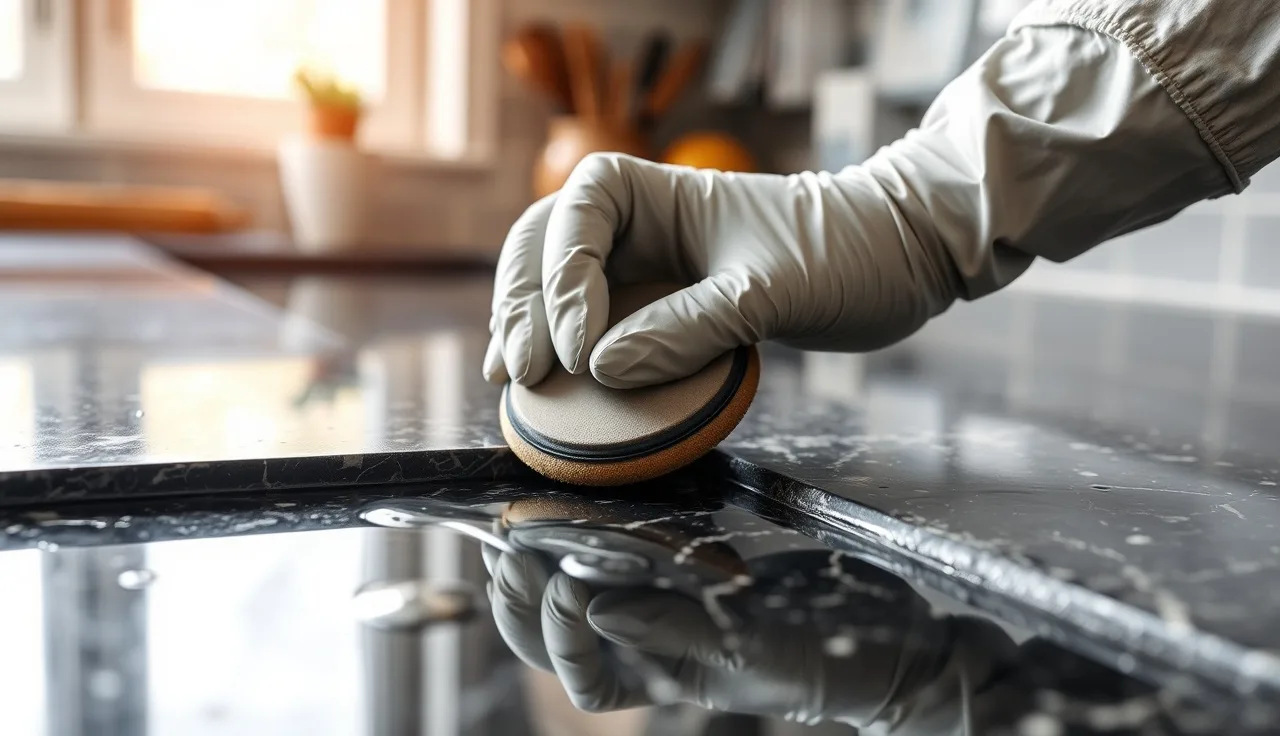
Hand polishing is the fix. You abrade and then buff a narrow strip of stone, maybe two to four inches on each side of the seam, using diamond-impregnated pads worked by hand or with a small variable-speed angle grinder or polisher. The goal is to bring both surfaces to the same level and the same gloss, then blend that into the surrounding factory polish so the repair disappears.
This is not the same as re-polishing a whole slab. You work a strip, not a field. That scope difference is why a careful homeowner or a tech on a site visit can handle it without dragging a big wet polisher through a finished kitchen.
Which stone types can you actually hand polish at a seam?
Granite is the most forgiving material for this repair. It's hard (Mohs 6 to 7), it takes diamond abrasion predictably, and the crystalline structure lets you blend a polished patch back into the surrounding surface without an obvious color change [1]. Most fabricators hand-polish granite seam corrections as routine work.
Marble and quartzite polish by hand too, with more patience. Marble is soft (Mohs 3 to 4) and scratches fast, so you start at a finer grit and go slower [2]. Quartzite sits close to granite in hardness but varies a lot slab to slab, so test in a hidden spot first. See the full guide to marble countertops for more on how the material behaves under abrasion.
Engineered quartz (Silestone, Cambria, and the rest) is a different animal. The surface is a polymer-resin matrix with quartz aggregate, and the factory finish is not the same thing as a natural stone polish [3]. You can hone and polish quartz at a seam, but the odds of leaving a visibly different sheen patch go up. Plenty of fabricators would rather leave a slight matte or honed look at the seam than chase a glossy match that won't hold. Check Cambria countertops for brand-specific notes.
Soapstone is soft (Mohs 1 to 2) and wants progressively finer sandpaper plus a light coat of mineral oil, not diamond pads [4]. Honing compound made for soapstone works well on seam touch-ups. Read how to clean soapstone countertops for context on how oiling changes the surface.
Laminate, Formica, and Corian are not stone. Laminate seams don't polish in the same sense at all. Corian (solid surface) sands and buffs, but that's a separate process.
| Stone type | Mohs hardness | Hand-polishable? | Typical starting grit |
|---|---|---|---|
| Granite | 6-7 | Yes | 200-400 |
| Marble | 3-4 | Yes, carefully | 400-800 |
| Quartzite | 6-7 | Yes, test first | 200-400 |
| Engineered quartz | 7 (composite) | Marginal | 400-800 |
| Soapstone | 1-2 | With sandpaper/oil | 220 sandpaper |
| Travertine | 3-4 | Yes | 400 |
What tools and supplies do you need before you start?
The core tool is a set of wet diamond polishing pads in a grit sequence. A standard set runs 200, 400, 800, 1500, and 3000 grit, sometimes with a 50 or 100 grit pad for serious lippage and a buffing pad at the end. They come in hook-and-loop (Velcro-back) 4-inch or 5-inch sizes. A full set from a real stone supply house (Weha, Tenax, or similar) costs roughly $40 to $120 depending on quality and how many grits are included.
For the driver you have two options. A variable-speed angle grinder with a backer pad works fine and is what most fabricators use. Run it slow, roughly 2,000 to 4,000 RPM, because heat is the enemy. A random-orbit or flex polisher built for stone is gentler and much harder to over-grind, but it costs more upfront. For a one-time repair, a $30 to $50 angle grinder from a home center plus a $10 backer pad is a reasonable outlay.
You also need a spray bottle of clean water (that's your coolant and lubricant), painter's tape to protect the cabinet and wall, a grease pencil or chalk marker to flag the high edge if there's lippage, clean microfiber cloths, and a stone polish or honing powder for the final step. Tenax Ager, Gel-Gloss, or any pH-neutral stone polish handles the final buff. Skip anything with wax if you plan to seal afterward, because wax blocks sealer.
One thing people forget: dry stone dust is a silica hazard. OSHA guidance is direct, stating that "wet cutting" and similar controls reduce respirable crystalline silica exposure [5]. Keeping the surface wet the whole time protects your lungs, more than the stone.
Total cost for a one-time kit runs roughly $60 to $150. A fabricator making a service call usually charges $75 to $200 for a seam polishing visit, so doing it yourself pencils out if you're comfortable with power tools [6].
How do you assess the seam before you touch it?
Run a fingernail across the seam. If it catches, you have lippage, and the only question is how much. Under 1/32 inch is subtle and comes out fast with 400 grit. A 1/16-inch mismatch means real work starting at 200 or even 100 grit. Anything larger than 1/8 inch is almost never a hand-polish problem. That's a reinstallation, or at minimum a professional grinder job.
Look at the epoxy line itself. Flush, sunken, or proud? Proud epoxy (filler sitting higher than the stone) happens when the installer used too much or didn't scrape it before it cured. You feel it as a slight ridge. Sunken epoxy leaves a hairline depression, which polishing alone won't fix and may need a second fill.
Check the gloss. Hold a flashlight at a low angle along the seam and watch where the reflection breaks. A dull stripe means the installer's pad missed that area, or the epoxy absorbed light differently. This kind of problem responds well to hand polishing even when the surface is already flat.
Photo the seam before you touch it. If anything goes wrong, you want the before shot.
What is the step-by-step process to hand polish a granite seam?
This covers granite, the most common case. Adjust the grit selection for other stones using the table above.
Step 1: Protect the surroundings. Tape off the backsplash, cabinet fronts, and wall. Diamond pads throw a fine slurry of stone dust and water, and it stains grout and paint if you don't mask first.
Step 2: Wet the surface. Spray a generous layer of water over a 4-inch strip centered on the seam, and keep it wet through every step. Running a pad dry generates heat that can microcrack the surface or discolor the epoxy.
Step 3: Start at the right grit. Lippage means starting at 200 grit. Flat but dull means 400 or 800. Attach the pad, keep the tool under 3,500 RPM, and work in a slow oval pattern along the seam, not across it. Going across risks catching the pad edge on the epoxy line. Keep the pad nearly flat, no more than a 5-degree tilt.
Step 4: Check every 60 to 90 seconds. Wipe the strip dry with a microfiber cloth and look at the reflection. The scratch pattern from your current grit should be uniform before you step up. Moving up too soon just hands the finer pad deeper scratches to remove, which takes longer.
Step 5: Work through the grits. 200 to 400, then 400 to 800, then 800 to 1500, then 1500 to 3000. Each step takes two to five minutes over a small seam area. Spray water the whole time.
Step 6: Final polish. After 3000 grit the surface looks almost polished but may carry a slight haze. Put a small amount of stone polish or polishing powder on a soft cloth or the buffing pad and work it in. Buff dry. You want a gloss that blends into the surrounding factory polish.
Step 7: Clean up and inspect. Pull the tape, wipe everything down, and run the flashlight-at-low-angle test again. A good seam repair is nearly invisible under raking light. Some faint variation can hang on with very dark stones like Absolute Black granite, because those surfaces are so reflective that any deviation in flatness catches the light [7].
If you plan to seal, wait at least 24 hours after polishing so residual moisture can escape the stone. See how to clean stone countertops for sealer timing.
How do you fix a seam that has visible epoxy or a color mismatch?
This is the most frustrating seam problem, because polishing alone won't touch it. If the cured epoxy is a noticeably different color from the stone, you're looking at a re-fill, not a polish.
Re-filling means the old epoxy gets removed or recessed, the joint cleaned thoroughly, and new color-matched epoxy applied. Fabricators use a two-part polyester or epoxy seam setter (Tenax Tixo and similar products are common in the trade) tinted with pigment to match the stone [8]. Doing this well as a homeowner is genuinely hard, because color matching takes experience and a pigment set you probably don't own. If the mismatch is minor, a tinted stone enhancer or color-impregnating sealer can sometimes knock down the contrast enough to live with.
If the epoxy line is slightly sunken after curing, overfill it lightly, let it cure, scrape flush with a razor blade, then polish. The polishing sequence is the same one described above.
Shops that track job details carefully, down to epoxy color codes per slab and per customer, have a far easier time matching a repair months later. Software like SlabWise can log those material details against each job so a return visit doesn't start from zero on color.
Can a homeowner do this, or should you call the fabricator?
Honest answer: most homeowners can handle a seam that's dull or has minor lippage under 1/32 inch. The tools aren't exotic, the process is slow and forgiving if you stay wet and don't rush the grits, and a mistake is usually recoverable by backing up to a lower grit.
Call the fabricator in these cases. The gap is wider than 1/16 inch and you can see daylight through it or catch it with a fingernail on both edges. The lippage is more than 1/8 inch. The stone cracked near the seam, which points to a bad substrate and a crack that will come back. The epoxy color is badly off and needs a re-fill. Or the counter is leathered or honed granite, because matching those textures by hand is brutal.
One more thing. If the countertop is still under any installer warranty, doing the repair yourself may void it. Read your contract before you pick up a grinder.
For fabricators making a service call: the most common failure on seam touch-ups is skipping grits to save time. A 200-grit scratch in dark granite will not come out with 1500 grit in any reasonable stretch. Work the sequence. See the countertop installation guide for more on how seam quality ties back to the install itself.
What grit sequence is right for your stone and finish type?
There's no single universal sequence, and anyone who tells you there is has oversimplified. The starting grit depends on how much material you need to remove. The ending grit depends on the finish you're matching.
For a high-gloss polish (the standard kitchen granite finish), start at the lowest grit that solves the problem and finish at 3000 grit plus a polishing compound. For a honed finish (matte or satin), stop at 400 to 800 grit and skip the high-grit polish. Trying to match honed by polishing to 3000 and then dulling it back down is harder than just stopping at the right grit.
For leathered or brushed finishes, this is the hardest match by hand. Leathered stone gets its texture from flaming or diamond brushing in a factory. You can approximate it with a coarse diamond brush pad, but an exact match without factory equipment is unlikely.
| Finish type | Stop at this grit | Polishing compound? |
|---|---|---|
| High-gloss polish | 3000 | Yes |
| Honed (matte/satin) | 400-800 | No |
| Semi-polished | 1500 | Optional |
| Leathered | Not well-matched by hand | N/A |
How do you prevent heat damage and scratches while polishing?
Heat is the main risk. Diamond pads cutting dry stone can hit surface temperatures high enough to stress the stone, discolor the epoxy, and burn out the pad's diamond bond faster than normal wear. Water solves all three.
Spray constantly. Some people use a squeeze bottle that lets them drizzle water while the other hand runs the polisher. Others tape a wet sponge nearby and dip the pad between passes. Either works. The surface should always look wet when the pad touches it.
Pressure matters too. Bearing down does not speed up polishing. It just makes heat and wear. Let the diamond surface do the work at light-to-medium pressure. For lippage removal, steady pressure at low speed beats hard pressure at high speed every time.
Scratch prevention comes down to keeping the pad and the stone free of grit contamination between steps. When you jump from 200 to 400, wipe the surface, rinse the pad, and rinse your hands. A single 200-grit particle trapped under a 1500-grit pad leaves a deep scratch you'll have to go all the way back and remove. This sounds fussy. It's the number one reason amateur seam jobs look worse than expected.
One more rule: don't polish over dry epoxy hazing. If there's a thin film of dried epoxy smear on the stone around the seam (this happens when the installer wipes excess epoxy with a dry cloth), take it off first with a razor blade and a little acetone on a cloth, then let the acetone flash off completely before you wet-polish. Grinding epoxy smear into stone with a diamond pad just embeds it.
How do you know when the seam repair is finished?
The raking light test is the most reliable check. Hold a flashlight or phone light at a very low angle, nearly parallel to the counter, and move it slowly across the seam from a few inches away. Leftover lippage, an inconsistent scratch pattern, or a gloss difference all show up as a shadow, a bright streak, or a dull patch.
Dark stones make this test brutal, because the reflective surface amplifies tiny variations. Lighter, busier stones like Bianco Romano and most white granites hide minor flaws in their own pattern, so the result reads acceptable sooner.
Second test: run the back of a fingernail (not the tip) across the seam from one slab to the other. A properly flat seam feels like nothing. Any catch means there's still a height difference.
Don't compare against the factory edge finish. The factory polish comes off large, high-speed heads under ideal conditions. Your hand-polished strip might land at 95 to 98% of that gloss, which is invisible in normal kitchen light and only slightly off under a flashlight at close range. That's normal and fine. If the seam looks good under the kitchen light and feels flat to the fingernail, you're done.
What should fabricators know about seam polishing as a warranty service?
Seam complaints are one of the most common post-installation callbacks in stone fabrication. The Marble Institute of America (now part of the Natural Stone Institute) publishes dimension stone design manuals and installation guidelines that set acceptable seam standards, including the expectation that seams sit as tight and flush as the stone allows [9]. That guidance gets cited as the industry reference in contract disputes.
On the money side, a seam polishing callback costs a shop roughly $100 to $200 in labor plus drive time, figuring under two hours on site. Some shops fold a seam touch-up into the job price as a standard 30-day follow-up. Others treat it as warranty work. Either way, tracking which jobs generated callbacks and why (lippage, color, gap) tells you where your install process is leaking.
Software that logs job details, slab lot numbers, epoxy color codes, and install team assignments makes it much easier to diagnose why seams fail on specific jobs. If you're running more than a handful of installs a week, SlabWise (slabwise.com) gives you that job-level history so a callback doesn't start as a mystery.
Want to cut callbacks before they happen? The Natural Stone Institute standards specify seam placement, substrate requirements, and support recommendations. Following them reduces both callback frequency and your liability if a customer disputes a seam [9].
See the kitchen countertops guide for how seam placement decisions during templating shape the final result.
How do you seal and maintain a seam after polishing?
After polishing, the stone is clean and slightly more open at the surface than before, so it may drink up sealer faster than the surrounding area. That's good for protection, but it means you apply sealer carefully to avoid a blotchy look.
Wait 24 hours after the final polish before sealing. Then apply a penetrating impregnator sealer (not a topical wax or coating) across the whole counter, more than the seam [10]. Sealing only the polished strip leaves a visible boundary where absorption differs. The entire surface gets the same treatment.
Granite typically needs sealing every one to three years depending on porosity and use. Marble needs it more often, sometimes yearly. A water-drop test tells you when: put a quarter-teaspoon of water on the stone and watch it. If it soaks in within a few minutes, seal it. If it beads for 10 to 15 minutes, the sealer is still doing its job.
For ongoing seam care, don't let water pool at the joint, because repeated wet-dry cycles work on the epoxy over the years. Wipe the seam dry after heavy water use. Clean daily with a pH-neutral cleaner, not vinegar and not bleach. Both of those, acidic and oxidizing, degrade epoxy over time and etch marble [11]. More on daily care at how to clean quartzite countertops and how to clean stone countertops, which cover principles that apply across most stone types.
Granite countertops has a more complete breakdown of sealing schedules by stone porosity.
Frequently asked questions
Can I hand polish a seam on a quartz countertop?
Engineered quartz like Silestone or Cambria polishes at a seam, but the results are less reliable than natural stone. The factory finish is a polymer-resin surface, and matching it precisely by hand is hard. Most fabricators aim for a honed or near-matte finish at the seam instead of chasing an exact gloss match. If the seam is flat and the gloss mismatch is minor, it usually reads as acceptable in kitchen lighting.
How long does it take to hand polish a countertop seam?
A typical seam with minor lippage and dull epoxy takes 30 to 60 minutes, including setup and cleanup. A seam with 1/16-inch lippage that starts at 200 grit and works through five or six steps can run 90 minutes or more. The most common mistake is rushing the grit progression, which adds time by creating scratches you then have to remove.
What polishing pads should I buy for a seam repair?
Hook-and-loop diamond wet polishing pads in a sequence of 200, 400, 800, 1500, and 3000 cover most jobs. A 4-inch pad set from a stone supply house like Weha costs roughly $40 to $120. Skip the cheapest sets, because the diamond bond wears out fast. You also need a backer pad to attach them to your angle grinder or polisher.
What causes lippage at a stone countertop seam?
Lippage (one slab sitting higher than the other) comes from a few sources: uneven substrate support, two slabs that were slightly different in thickness, edges that weren't squared perfectly during fabrication, or the epoxy shifting one piece before full cure. Minor thickness variation between slabs from the same quarry is common and not a defect. It just needs correcting during seam polishing.
Can I use a regular orbital sander instead of a diamond pad?
No. Regular abrasive discs or sandpaper scratch stone but won't polish it to a matching gloss. Stone polishing needs diamond-impregnated pads, which use an industrial diamond bond to abrade and refine the surface at each grit level. Ordinary sandpaper also loads up with stone dust and quits fast on hard stone like granite. Soapstone is the exception, where wet sandpaper works.
Is there a way to fix a wide seam gap without reinstalling?
A gap wider than 1/16 inch is past what polishing can reach. The standard repair is to re-fill the gap with fresh color-matched epoxy, let it cure fully, scrape it flush with a razor blade, then polish. If the gap is structural (more than 3/16 inch or visible from standing height), reinstallation may be the only real fix. A seam filler alone won't hold up to normal use in a large gap.
How do I match the epoxy color to the stone?
Fabricators use polyester or epoxy seam setters tinted with dry stone pigments or pre-tinted color kits. Common brands include Tenax Tixo and Akemi. You build the color by mixing base tones and adding pigment bit by bit, then testing against the actual slab in natural light. This is hard to do well without experience. Homeowners are usually better off having the original fabricator handle re-fills, since they may have noted the original mix.
Will hand polishing a seam remove the stone's factory finish?
Done right, hand polishing brings the seam area up to match the surrounding factory finish rather than degrading it. The risk is polishing too large an area or using too aggressive a grit without working back up through the sequence, which leaves a patch that looks different. Work a narrow strip, stay wet, and end at 3000 grit plus polishing compound. A well-executed repair is not distinguishable from the factory finish in normal kitchen light.
Can I seal the stone right after polishing the seam?
Wait at least 24 hours after polishing before sealing. Polishing opens the surface slightly and leaves residual moisture from the wet process. Sealing too soon can trap that moisture and cause a hazy look under the sealer. When you do seal, apply it to the full counter surface, more than the seam strip, to avoid visible differences in absorption.
What's the difference between honing and polishing a stone seam?
Honing produces a matte or satin surface by stopping at a lower grit, typically 400 to 800. Polishing goes further, up to 3000 grit and beyond, for a glossy reflective finish. Which one you want depends on the original finish of the countertop. Polishing a seam on a honed countertop leaves a shiny patch that's more obvious than the original problem.
How much does a professional seam polishing service call cost?
Most fabricators charge $75 to $200 for a seam touch-up, depending on drive time, severity, and whether re-filling is needed. Shops that include a 30-day seam warranty often do the first callback free. If the seam requires removing and reinstalling one slab, the cost jumps sharply, typically $300 or more plus material.
How do I clean up after hand polishing a stone seam?
The slurry from wet diamond polishing is water, stone dust, and abrasive residue. Wipe it up right away with damp microfiber cloths before it dries, because dried slurry is hard to remove without re-scratching the surface. Rinse cloths often. Watch the drain if slurry ran into it, since stone dust settles and accumulates. Pull masking tape while everything is still damp.
Why does the seam look worse after I tried polishing it?
Usual causes: you skipped grit steps and left coarser scratches a finer pad can't remove, you polished dry and generated heat that discolored the epoxy, or you polished too wide an area and created a patch with a different gloss than the surrounding stone. Back up to the grit that matches the scratch depth, wet the surface, and work through the sequence again, slower this time.
Sources
- USGS Mineral Resources Program: Granite hardness is approximately Mohs 6 to 7, making it suitable for diamond abrasive polishing processes.
- USGS Minerals Information (marble and carbonate stones): Marble hardness is approximately Mohs 3 to 4, meaning it abrades faster than granite under diamond pads.
- NSF International (NSF/ANSI 51 Food Equipment Materials Standard): Engineered quartz surfaces are a polymer-resin composite, distinct in structure from natural stone polishing surfaces.
- USGS Mineral Resources (talc and pyrophyllite, soapstone): Soapstone (primarily talc) has a Mohs hardness of 1 to 2, requiring gentler abrasion than diamond pads used on granite.
- OSHA, Crystalline Silica page: Stone polishing and fabrication generate respirable crystalline silica dust; OSHA identifies wet methods as a control that reduces airborne exposure.
- Bureau of Labor Statistics, Occupational Employment and Wage Statistics: Median hourly wages for tile and stone setters provide the labor cost basis for estimating seam service call pricing in the $75 to $200 range.
- Natural Stone Institute (formerly Marble Institute of America): Dark absolute-color granites such as Absolute Black show polishing variations more visibly due to high surface reflectivity, a recognized challenge in dimension stone standards.
- Tenax USA, stone repair and seam setting product documentation: Two-part polyester and epoxy seam setters tinted with pigment are the standard for granite and marble seam repair and filling.
- Natural Stone Institute, Dimension Stone Design Manual: The institute publishes seam placement, substrate support, and lippage standards widely used as the industry reference in countertop installation contracts and disputes.
- EPA, Safer Choice Program: Penetrating impregnator sealers are preferred over topical wax coatings for stone countertops where long-term protection is desired.
- American Institute for Conservation (care of stone objects): Acidic cleaners including vinegar and bleach-based oxidizing cleaners degrade stone epoxy joints and etch carbonate stones like marble over repeated application.
Last updated 2026-07-10