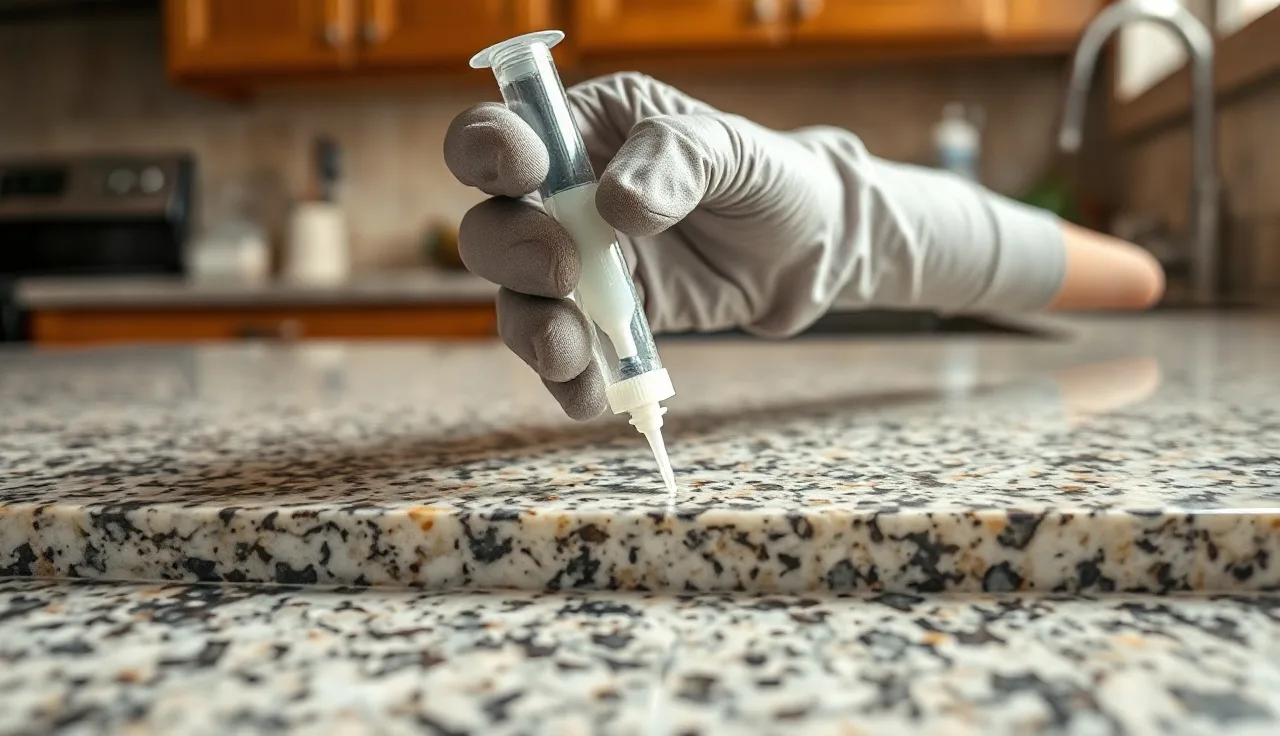
TL;DR
- A cracked stone countertop seam usually repairs with color-matched epoxy or polyester adhesive in a few hours.
- DIY works for a hairline crack where the two slab halves sit flush and haven't shifted.
- If one side is higher, the gap is wider than 1/16 inch, or the stone is chipped at the seam, hire a fabricator.
- Professional seam repair runs $150 to $600.
What actually causes a stone countertop seam to crack?
Stone seams crack for a handful of reasons, and the cause changes how you fix it. Get the diagnosis wrong and your repair fails in six months.
Cabinet settlement is the usual culprit. Houses move, especially in the first few years after construction or after a foundation shift. When the cabinet base drops even a few millimeters on one side, the slab above has nowhere to go, so it cracks at its weakest point. That weakest point is always the seam [1]. This is structural movement, not a product failure.
Poor support under the seam comes next. Fabricators are supposed to run a stretcher or support rail directly under every seam, because unsupported stone over a span eventually cracks under its own weight or from the impact of a heavy pot. Skip that step and the seam is living on borrowed time from day one.
Thermal cycling matters less, but it's real. Kitchens heat and cool over and over, and adhesive expands and contracts at a different rate than granite or quartzite. Over years, that difference can open a hairline gap in the epoxy filler without cracking the stone itself. That specific failure is the easiest one to fix.
Then there's impact. Drop a cast-iron pan edge-first near a seam and you can chip or crack the material on either side. That's a repair regardless of whether the original seam was perfect.
Before you touch anything, figure out which scenario you have. Slide a business card across the seam. If one side sits higher than the other, the cabinets moved, and no surface epoxy will hold until the support problem underneath gets fixed.
Can you repair a cracked stone seam yourself, or do you need a fabricator?
It depends on the severity of the crack and your willingness to buy a few tools you may never touch again. Here's the honest line between the two.
DIY makes sense when the crack is a hairline gap, both slabs sit at the same height, no material is missing (no chips or spalls), and the stone is granite, engineered quartz, or quartzite. These materials take epoxy repairs without much drama, and color-matched kits are easy to buy from stone supply houses and online.
Call a fabricator the moment you see any of these: one slab higher than the other, a gap wider than about 1/16 inch, chipping along the seam edge, marble or a delicate bookmatched slab (color matching gets genuinely hard), or a crack running from the seam into the field of the stone. That last one sometimes means the whole slab needs replacement.
Quartz manufacturers are strict. Most engineered quartz warranties, including Cambria and Silestone, exclude cracks caused by structural movement or bad installation and require factory-authorized repairs to keep any coverage alive [2]. A DIY repair on a quartz slab under warranty can void it. Check your paperwork before you open the epoxy.
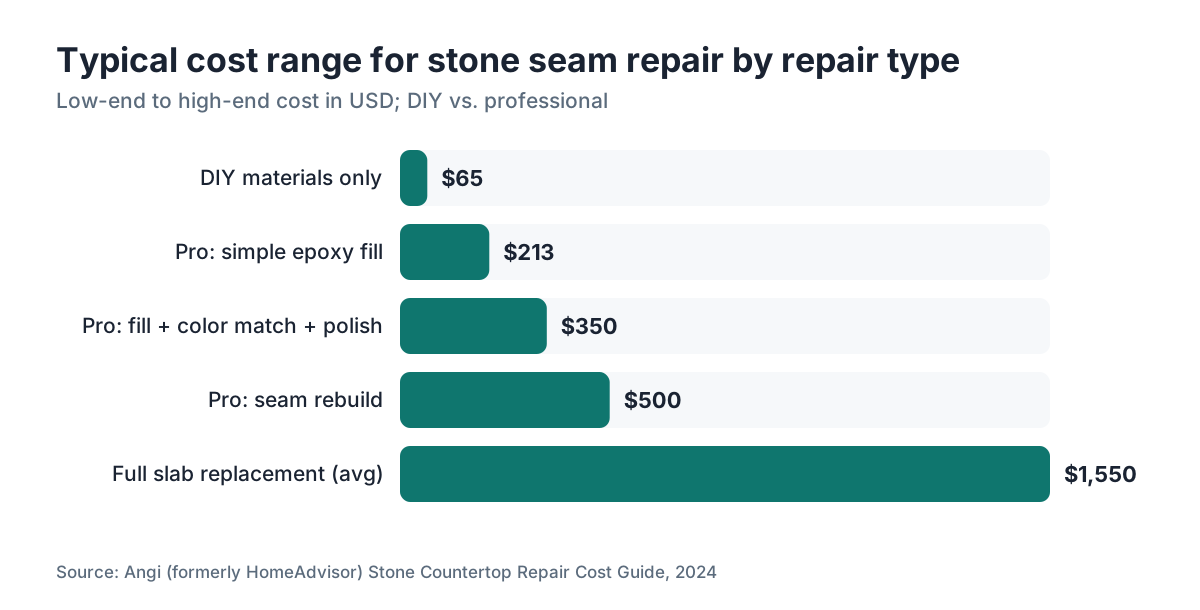
For most shops, a seam repair is a few hours of work. Quotes start around $150 for a simple epoxy fill on an easy-to-reach countertop and climb to $600 or more when the stone needs color-matched filler, polishing, and a return visit. Some shops charge a $100 to $150 minimum trip fee just to show up [3].
What materials and tools do you need to repair a stone seam yourself?
If DIY is the right call, here's the actual list. Read all of it before you buy anything, because some items cover for others.
Color-matched epoxy or polyester adhesive is the core material. Stone suppliers sell two-part seam adhesives in dozens of stone colors. Tenax and Akemi are the two brands fabricators reach for, and both sell consumer-accessible products. Use a flowing (low-viscosity) adhesive for hairline cracks and a paste adhesive for gaps up to about 1/8 inch. Match the color to your stone's background tone, not its veining.
A razor blade scraper, acetone, and clean rags handle prep. You cannot skip prep. Any grease, old filler, or cleaner residue in the crack kills adhesion.
Low-tack blue painter's tape protects the surrounding surface while the adhesive cures.
A plastic spreader or a toothpick pushes adhesive into narrow gaps.
For polishing after cure, get wet-dry sandpaper from about 220 through 400 grit, then a compound matched to your finish. Honing compound for matte, polishing compound for glossy. On polished granite, a felt polishing pad on a variable-speed angle grinder beats hand sanding, but it also risks overheating the stone or grinding a visible flat spot. Go slow.
Total DIY material cost runs $40 to $90, depending on whether you already own polishing supplies [3].
One thing fabricators know that most homeowners don't: epoxy gets harder to color-match as it cures under UV light. Mix only what you'll use in five minutes, and keep it out of direct sunlight until it's down in the crack.
Step-by-step: how to repair a hairline crack at a stone countertop seam
These steps apply to a hairline crack where the slabs are flush and no material is missing.
Step 1: Clean the crack. Wipe out the crack and the surface on both sides with acetone on a clean rag. Let it dry, which takes about five minutes. Old silicone, cooking grease, or cleaner residue will kill adhesion.
Step 2: Mask the surface. Run two strips of painter's tape along the seam, leaving just the crack exposed. This keeps squeeze-out off your polished surface.
Step 3: Mix the adhesive. Two-part epoxies come in a dual-barrel cartridge with a mixing tip that combines the components as you dispense. Polyester adhesives need manual mixing with a catalyst. Follow the ratio exactly; get it wrong and it never cures.
Step 4: Apply into the crack. Work in small sections. Push adhesive down into the gap with a toothpick or plastic spreader. Overfill slightly, because you'll scrape the excess off after it cures.
Step 5: Let it cure. Most stone adhesives reach working hardness in 30 to 90 minutes at room temperature, but check your product's spec sheet. Don't rush it. A cold kitchen (below 60 F) slows cure time hard [4].
Step 6: Scrape flush. Once cured, hold a sharp razor blade nearly flat against the stone and shave the hardened adhesive flush with the surface. Thin passes only. Aggressive scraping scratches the stone.
Step 7: Polish. Work through your grits from coarse to fine, keeping the surface wet. Finish with a compound that matches your stone's surface finish.
Step 8: Seal. If your stone is porous (granite, quartzite, marble), apply an impregnating sealer over the repaired area after polishing. Quartz doesn't need sealing [5]. For ongoing care, see our guide on how to clean stone countertops.
How do you color-match epoxy to granite or marble?
This is the part most DIY tutorials skip, and it's the part most likely to make your repair look worse than the crack did.
Granite and marble are never one color. They're a field color plus multiple mineral tones plus veining. Most crack repairs don't need to match all of that, because the crack itself is narrow. You're really matching the dominant background tone so the filler doesn't read as a contrasting stripe.
Fabricators mix pigments into clear adhesive in small batches and test them on a scrap piece or the back of a cabinet door before they commit to the seam. You can copy that with a small kit of universal stone colorants (Tenax makes one) and mix into your adhesive base in tiny amounts.
A practical trick: photograph your stone in natural daylight, then take the photo to a stone supply house (not a big-box store) and ask them to pull their closest epoxy color. Stone supply houses stock 40 to 60 colors. Big-box stores carry maybe six.
For veined marble, some fabricators paint veins into the cured filler with a fine artist's brush and acrylic paint before sealing. It looks absurd while you're doing it. It often looks surprisingly good when it's done.
Dark stones are unforgiving. On Absolute Black granite or black quartz, even a slightly off repair shows badly. If the stone is dark and the crack is prominent, that's the scenario where I'd call a fabricator instead of guessing at the color.
See the full breakdown of granite countertops and marble countertops for more on how stone type changes your repair options.
What does a professional stone seam repair cost?
Professional stone seam repair costs $150 to $600, with DIY materials at $40 to $90 and full slab replacement running $600 to $2,500 or more. The spread is wide enough that a table beats a paragraph.
| Repair Type | Typical Cost | Who Does It |
|---|---|---|
| DIY hairline epoxy fill | $40, $90 in materials | Homeowner |
| Pro epoxy fill, simple seam | $150, $275 | Fabricator |
| Pro fill + color match + polish | $250, $450 | Fabricator |
| Seam rebuild (gap, chipping) | $400, $600+ | Fabricator |
| Full slab replacement | $600, $2,500+ (material + labor) | Fabricator |
These figures come from industry pricing surveys and quotes gathered by stone trade publications. Actual prices vary by region, stone type, and shop [3]. Urban markets like New York and San Francisco typically run 30 to 50 percent above the national midpoint.
A few things run the bill up fast. If the fabricator has to pull a sink or lift a cooktop to reach the seam, add $75 to $150 for that. If both sides of the seam need a fresh polish to blend the repair, that's another 30 to 60 minutes of labor.
For shops repairing a job they originally quoted, clean records with the slab dimensions and adhesive colors used save real time. That's the kind of job data quoting software like SlabWise keeps at the project level, so a return repair visit doesn't turn into an archaeology dig through old paperwork.
Repair almost always beats replacement on cost, unless the crack is a symptom of a bigger structural problem. If the cabinets settled once, they can settle again, and you'd be right back where you started.
When is a cracked seam beyond repair and needs slab replacement?
Some cracks aren't worth repairing. Knowing which ones saves you from dropping $400 on a fix that fails in six months.
Replace the slab (or at least call a structural professional first) when any of these is true:
The crack runs from the seam into the body of the slab and is longer than 6 to 8 inches. That usually means the stone fractured under stress, not that the epoxy joint failed.
One slab sits measurably higher than the other and the cabinet or substrate hasn't been corrected. You can fill the gap, but the differential stress will pull it open again.
The seam is at a sink cutout and the crack has run around the cutout corners. Sink cutouts are already stress concentration points. A crack there says the slab is structurally compromised [1].
The stone is fragile, like onyx or a thin (under 2 cm) marble slab, and the crack spans more than a few inches. These materials don't take grinding and polishing well.
Cracks show up across the countertop surface, not only at the seam. That points to widespread cabinet movement or a bad substrate, and patching seam by seam is a losing game.
If you're weighing full replacement, the countertop installation guide covers timeline and disruption. Sometimes a cracked seam is the nudge that makes a full countertop update worth doing anyway.
How do you prevent a stone countertop seam from cracking again?
Once you've repaired a seam, you want it to stay repaired. A few things actually move the needle.
Get the cabinet base inspected before you finish the repair. A leveling problem that caused the first crack will cause the next one. A carpenter or general contractor can check cabinet shimming in under an hour.
Make sure a support rail or stretcher runs directly under the seam. If a pro is doing the repair, ask whether proper substrate support is in place. If it isn't, it can be added (sometimes just a piece of plywood screwed to the cabinet frame) before the stone goes back down.
Don't stand or sit on the countertop near the seam. Stone is strong in compression and weak in tension. A 150-pound adult on an unsupported span flexes the substrate enough to reopen a fresh epoxy joint.
Use a penetrating sealer once a year on natural stone. Sealer won't stop cracking, but it keeps the seam area clean and cuts the chance that water works into the joint and makes the epoxy discolor or let go over time [5].
For natural stone care that reduces long-term wear at seams, see how to clean quartzite countertops or how to clean soapstone countertops, depending on your material.
Does a cracked seam affect the structural safety of the countertop?
Usually no, not right away. But there's a real exception, and it's the overhang.
For most countertops, a cracked seam is a cosmetic and functional problem (water working in, debris collecting, a rough surface) rather than a safety hazard. The stone isn't going to collapse.
Cantilevers are the exception. If the countertop has an overhang longer than about 12 inches with no corbel or bracket underneath, and the seam sits in or near that overhang, a crack can progress until the cantilevered section separates from the main run. Someone leaning on that counter could cause a sudden fracture. The Marble Institute of America recommends that unsupported granite overhangs stay under 12 inches without extra support, and similar guidance applies across stone types [6].
If your cracked seam is in an overhang, add support before you worry about the epoxy repair.
One more thing near cooking surfaces. A seam behind a range sees more thermal cycling than the rest of the counter, so it moves more and re-cracks more readily than a seam near a window. Keep an eye on those.
How do fabricators repair stone seams professionally, and what's different about their process?
Pro seam repairs beat DIY in three ways: prep is more aggressive, color matching is more refined, and polishing uses powered gear that actually restores gloss.
A fabricator usually starts by routing or grinding out the cracked joint with a small angle grinder and a diamond cup wheel. That removes old adhesive completely and gives fresh stone edges for the new epoxy to bond to. That step alone takes 20 to 30 minutes and isn't really doable for a homeowner without risking the countertop surface.
The adhesive goes in layers on wider gaps, each layer partially curing before the next. That prevents the shrinkage voids you get when a deep gap gets filled in one pour.
Color matching is done by hand, by a technician mixing pigments by eye and often referencing the original slab remnant if it's around. A good fabricator gets within about 95 percent of the original look. Nobody promises invisible. They promise unobtrusive.
Finishing uses a variable-speed wet polisher with diamond pads stepped from 50 grit up through 3,000 grit or finer, then a polishing compound. On polished granite or engineered quartz, the result can be nearly impossible to spot against the surrounding surface [7].
Shops that keep the original job on file, including the adhesive color and slab lot, have a real edge on return visits. That's one more argument for solid job records, in a spreadsheet or in purpose-built shop software.
Does homeowner's insurance cover a cracked stone countertop seam?
Usually not. The reason matters before you pick up the phone with your agent.
Standard HO-3 homeowner's policies cover sudden and accidental damage, which is the language that controls most countertop claims [8]. A crack from a dropped object might qualify. A seam that opened slowly from cabinet settlement almost certainly won't, because insurers file that under maintenance-related deterioration, which most policies exclude outright.
If the crack traces back to a covered event (a pipe burst that soaked the cabinets and made them settle, say), you may have a claim for consequential damage. Document everything and talk to your adjuster before you start repairs. Starting repair work before the adjuster visits can complicate the claim.
Builder's extended home warranties sometimes cover countertop installation defects for the first year or two. If your home is newer and you hold a builder's warranty, read the coverage terms before you pay out of pocket. Coverage varies a lot by contract.
For a DIY repair that costs $60 in materials, a claim isn't worth the possible premium hit. For a $500 professional repair or a possible slab replacement, it's worth a call to understand exactly what your policy says.
Frequently asked questions
How wide a gap can epoxy fill in a stone countertop seam?
Paste-consistency epoxy fills gaps up to about 1/8 inch reliably. Past that, the filler shrinks as it cures and leaves a void or a sunken line. Gaps wider than 1/8 inch need multiple thin layers, or the fabricator grinds out the joint and resets the seam with fresh adhesive. If the gap is wider than 1/4 inch, the slab probably needs repositioning.
Can you repair a cracked quartz countertop seam the same way as granite?
The basic process is similar, but quartz makers like Cambria and Silestone specify polyester adhesive rather than epoxy for their products, and repairs done outside factory-authorized channels can void the warranty. Color matching on quartz is harder too, because the pattern is printed and consistent while granite color varies naturally. For quartz under warranty, contact the manufacturer before you attempt anything.
How long does a professional stone seam repair take?
A simple epoxy fill and polish takes two to three hours on site. Bigger repairs, where the old joint gets ground out, rebuilt, and refinished, run four to five hours. Keep the countertop out of service for at least 24 hours after the repair to let the adhesive fully cure, even if the fabricator says it's touch-dry sooner.
Will the repaired seam be invisible?
No. A well-done professional repair on granite or engineered quartz is very hard to see from normal standing height, but it won't be invisible under close inspection in raking light. The goal is unobtrusive, not perfect. On highly polished dark stone or bookmatched marble, even professional repairs are detectable by a trained eye. Set that expectation upfront and you won't be disappointed.
Can I use super glue or regular household adhesive to fix a stone seam?
No. Fabricators sometimes use cyanoacrylate (super glue) on very small chips, but it yellows fast under UV light and doesn't sand or polish well enough for a seam. Construction adhesives like PL Premium aren't made for stone color matching and show far more than a proper stone epoxy. The wrong filler also makes a later professional repair harder, since it has to be ground out first.
How do you know if the crack is in the epoxy joint or in the stone itself?
Look at the crack with a flashlight. Joint failure shows as a clean line between the stone edges with a slight color difference where the old filler sits. A crack in the stone shows the raw, lighter-colored mineral fracture surface and often follows a slightly irregular path rather than the straight seam line. Run a fingernail across it: a stone crack often has a sharp edge, while a filler failure sits flush.
Does a cracked seam mean my countertop was installed incorrectly?
Not necessarily. Cabinet settlement, impact, and thermal cycling can crack even a perfectly installed seam over time. That said, a seam that cracks within the first year often does point to an installation problem: inadequate substrate support under the seam, bad adhesive mixing, or a seam placed over a void. If your countertop is under a builder's warranty, a first-year crack is worth pursuing as a claim.
What's the difference between a seam crack and a seam that's just dirty or discolored?
A discolored seam where the filler darkened from grease or cleaning products looks like a crack but isn't one. Run your fingernail across it: if the surface is smooth and continuous, it's staining or discoloration, not a structural crack. Acetone often removes superficial discoloration in the joint. An actual crack has a tactile gap or edge you can feel.
Can a stone seam crack if the countertop gets too hot?
Direct sustained heat can soften epoxy adhesive, which may open a seam slightly or let the slabs shift. Setting a hot pan on a seam over and over is bad practice for that reason. The stone itself won't crack from cooking temperatures, but the joint can weaken. Use a trivet, especially near seams. For engineered quartz, manufacturers warn against direct heat contact, which affects the resin binder throughout the slab rather than only at the seam.
How do you prep a stone countertop seam for repair if the old epoxy is still in place?
The old filler has to come out. For a hairline gap, a razor blade or an oscillating multi-tool with a narrow blade scrapes out the old adhesive. For a wider joint, a rotary tool with a small grinding bit works better. After mechanical removal, clean with acetone to strip any residue. Applying new epoxy over old is one of the most common reasons DIY repairs fail within a few months.
Does the type of stone affect how hard the repair is?
Yes, a lot. Granite is the most forgiving: it's hard, polishes predictably, and most fabricators have done dozens of granite seam repairs. Marble is softer and scratches more easily during prep, and it etches from acidic cleaners used in cleanup. Quartzite is hard but variable in porosity. Engineered quartz needs manufacturer-specified adhesives. Onyx and travertine are the hardest, because they're soft, porous, and nearly impossible to vein-match.
Is it worth repairing a cracked seam on an older countertop I plan to replace anyway?
Only if the crack is causing immediate problems like water damage to the cabinet below, or if the repair is cheap and quick. A $50 tube of epoxy dabbed into a hairline crack to stop water infiltration until you renovate makes sense. Spending $400 on a professional polish-and-refinish for a countertop you're replacing in two years does not.
Sources
- Marble Institute of America, Dimension Stone Design Manual: Cabinet settlement and inadequate substrate support are primary causes of seam failure in stone countertops; seams require direct substrate support beneath them.
- Cambria, Cambria Product Warranty: Cambria's warranty excludes damage caused by structural movement, improper installation, and repairs performed outside authorized channels.
- Angi (formerly HomeAdvisor), Stone Countertop Repair Cost Guide: Professional stone seam repair costs range from approximately $150 to $600 depending on complexity; DIY material costs run $40 to $90.
- Tenax USA, Technical Data Sheets for Stone Adhesives: Stone epoxy and polyester adhesives cure more slowly below 60 F and require temperature management for proper hardness development.
- Natural Stone Institute, Care and Cleaning of Natural Stone: Porous natural stone such as granite, quartzite, and marble should be treated with an impregnating sealer; engineered quartz does not require sealing.
- Marble Institute of America, MIA+BSI Technical Bulletin on Countertop Overhangs: The Marble Institute of America recommends that unsupported granite countertop overhangs not exceed 12 inches; overhangs beyond that require corbels or brackets.
- Natural Stone Institute, Fabrication Standards for Dimensional Stone: Professional stone polishing uses diamond polishing pads from 50 through 3,000 grit or finer and polishing compounds to restore surface finish after seam repair.
- Insurance Information Institute, Homeowners Insurance Basics: Standard HO-3 homeowner's policies cover sudden and accidental physical damage but exclude gradual deterioration, maintenance-related damage, and settling.
- Silestone by Cosentino, Warranty Terms and Conditions: Silestone specifies polyester adhesive for seam repairs and requires authorized fabricator repairs to maintain warranty coverage.
- U.S. Department of Housing and Urban Development (HUD), Residential Construction and Materials Guidance: Stone countertop seam failures are most frequently attributed to substrate movement and inadequate support rather than material defects.
Last updated 2026-07-10