TL;DR
- A bad quartz seam that's raised, sunken, gapped, or discolored can sometimes be fixed at home with color-matched seam filler for under $30.
- Bigger problems like a lifted or cracked seam need a professional re-seam, which runs $150 to $400 depending on length and access.
- Check your warranty before spending a dime.
- Installation defects fall on the fabricator, not the slab brand.
What exactly makes a quartz seam 'bad'?
Not every imperfect seam is the same problem, and the fix depends entirely on which one you have.
A visible gap is the most common complaint. The two slabs didn't pull tight during install, or the adhesive failed, leaving a crack you can see or feel. Gaps wider than 1/16 inch fall outside the tolerances most fabricators consider acceptable [1].
A height mismatch, where one side sits higher than the other, is called lippage. Slight lippage happens when cabinets aren't level or when the installer skipped back-grinding the seam edges to match. It's uncomfortable to touch and it catches crumbs.
A color mismatch at the seam line happens when the installer picked the wrong epoxy shade, or when the filler oxidized over time and turned yellow or dark. This is the easiest problem to fix yourself.
A cracked or separated seam usually means structural movement, adhesive failure, or a seam placed over a weak support point. This one is not a DIY project.
Then there's grout or caulk stuffed in the seam instead of color-matched epoxy. Some installers, especially on rushed jobs, fill the gap with whatever's handy. Grout stains, cracks, and looks terrible within months. You'll see this fail on kitchen countertops of every material, but quartz is less forgiving because the surface is non-porous and the seam sits right there in plain view.
Is a bad quartz seam covered under warranty?
Check this first. Before you buy a tube of epoxy or call a repair company, read your warranty documents.
Most major quartz makers, including Cambria, Silestone, and Caesarstone, offer limited lifetime or long-term warranties that cover manufacturing defects in the slab. Installation defects are the fabricator's responsibility, not the brand's [2]. A seam that opened up because the installer rushed falls on the shop that did the work, not the company that made the slab.
The Natural Stone Institute (formerly MIA+BSI) publishes the industry standards for acceptable seam quality. Their guidance for engineered stone puts seam gaps at no more than about 1/16 inch and lippage at no more than 1/32 inch on polished surfaces [1]. If your seam fails those numbers, you have a legitimate complaint to put in writing to the fabricator.
Document everything with photos before you touch anything. Some fabricators will point to a DIY attempt as a reason to deny a warranty claim. Get the fabricator's written response, then decide whether to DIY or push further.
If the fabricator goes quiet, your options include filing a complaint with your state contractor licensing board or taking the matter to small claims court, where the published stone standards become useful evidence [3].
What does a professional quartz seam repair actually cost?
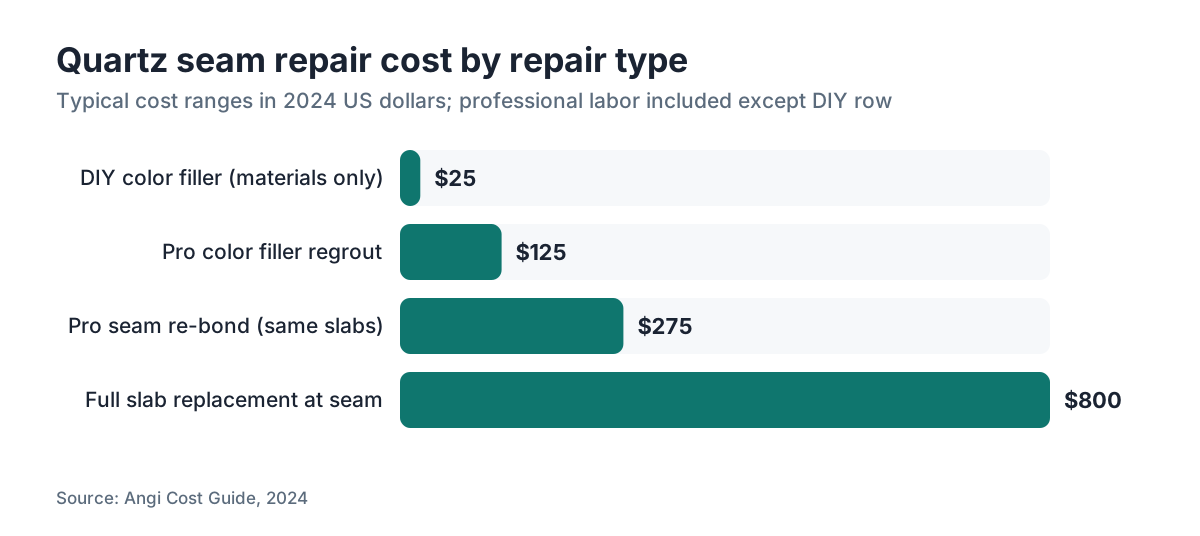
A professional color-fill repair runs $75 to $175. A full re-seam where the slab is re-bonded costs $150 to $400. Full slab replacement jumps to $400 to $1,200 or more. The final number depends on your location, seam length, access, and whether the fabricator is doing a quick color fix or pulling and resetting a slab.
Here's a realistic breakdown based on trade pricing in 2024:
| Repair Type | Typical Cost Range | Notes |
|---|---|---|
| Color filler regrout (DIY) | $15 to $30 | Materials only; tube of seam epoxy |
| Color filler regrout (pro) | $75 to $175 | One to two hours labor |
| Seam re-do (same slabs, re-bond) | $150 to $400 | Requires grinding, resetting |
| Full slab replacement at seam | $400 to $1,200+ | Material + labor; varies by slab |
| Fabricator warranty repair | $0 | If within warranty and clearly installer error |
These ranges come from fabricator trade forums and published service pricing. Your exact number could run 20 to 30 percent higher in high cost-of-living metros like San Francisco or New York [4].
Full slab replacement, the priciest scenario, comes up when the seam cracked the material itself or when the damaged slab is a discontinued pattern and a patch would look worse than starting over.
Can you fix a quartz seam yourself, and should you?
Yes, for a color mismatch or a small gap under 1/16 inch, a careful DIY repair is reasonable. For anything structural, don't.
Color-filling a quartz seam yourself isn't hard, but it punishes impatience. The epoxy sets fast, usually in 5 to 15 minutes depending on the product. Apply too much and let it harden proud of the surface, and now you're sanding it flush and risking scratches on the polished finish around it.
Here's what makes a DIY fix work:
-
You need the right color match. Many fabricators use two-part polyester or acrylic seam fillers from companies like Integra Adhesives or Tenax. These come in dozens of colors, and the wrong shade makes things worse. Bring a photo, or better, a chip of your slab remnant to a stone supply house instead of guessing.
-
The gap has to be clean and dry. Any moisture, old adhesive residue, or grease blocks the bond. Clean with isopropyl alcohol (90 percent or higher) and let it dry fully.
-
Mask both sides of the seam with painter's tape so the filler lands only in the joint.
-
Mix the two-part epoxy exactly per instructions. Off-ratio mixing means it won't cure right.
-
Let it cure fully before scraping flush with a plastic razor blade. Steel blades scratch quartz.
If the seam has lippage, DIY gets harder. You either live with the step or grind down the high side, which takes wet polishing gear and skill most homeowners don't have. Call a pro for that one.
What materials do you need to fix a quartz seam at home?
Keep the list short and buy quality. Cheap seam filler from a big-box store often isn't formulated for engineered stone, and it shows.
Color-matched two-part epoxy or polyester adhesive. This is the core product. Integra Adhesives and Tenax Colorfill are two widely used trade brands sold through stone supply distributors and online [5]. Expect $20 to $60 for a cartridge, depending on brand and quantity. Do not use silicone caulk, tile grout, or standard construction adhesive. None of those bond well to quartz and all of them look bad fast.
Mixing nozzles. Two-part cartridges need disposable mixing nozzles. They usually come included, but buy extras.
90 percent or higher isopropyl alcohol. For surface prep. Regular rubbing alcohol at 70 percent carries too much water.
Blue painter's tape. Mask 1 to 2 millimeters back from the seam edges.
Plastic razor blade or a flexible plastic scraper. For shaving flush after cure. A metal blade scratches the surface.
A heat gun or blow dryer (optional). Warming the substrate to 70 to 80 degrees Fahrenheit helps adhesion in cold rooms.
Total materials cost for a single seam fix: $25 to $70, depending on what you already have.
Step-by-step: how to repair a quartz seam gap yourself
Work slowly. This is the part where rushing causes bigger problems than the original seam.
Step 1: Clean the seam. Remove any old caulk, epoxy, or debris with a wooden or plastic pick. Skip metal tools that can chip the quartz edge. Vacuum out the debris, then wipe both sides of the gap with isopropyl alcohol on a clean cloth. Wait 10 minutes for full evaporation.
Step 2: Tape the seam. Run painter's tape along both sides, keeping the tape edge about 1 to 2 millimeters back from the gap. This gives you a clean line to work against.
Step 3: Prep your epoxy. Attach the mixing nozzle to the two-part cartridge. Purge a small bead onto a disposable surface first to clear the tip, then check that the color matches your slab. If it doesn't, stop.
Step 4: Fill the gap. Work from one end to the other in a slow, continuous bead. For gaps under 1/16 inch, slightly overfill rather than underfill, because you can shave it down but you can't add material after it cures. For wider gaps, do two passes: one to partially fill, one to top off after the first tacks up.
Step 5: Level before full cure. Most epoxies have a gel stage around 5 to 8 minutes where they're still workable. Use a plastic spatula to smooth the bead roughly level with the surface.
Step 6: Remove tape. Pull the tape while the epoxy is still slightly soft, not fully liquid and not fully hard. Wait too long and the tape tears off, leaving a ragged edge.
Step 7: Final scrape. After full cure (typically 20 to 60 minutes; follow the product instructions), use the plastic razor blade held at a low angle, 15 to 20 degrees, to shave any proud material flush. Light, controlled strokes.
Step 8: Polish if needed. If the filled area looks dull next to the surrounding surface, a small amount of polishing compound made for engineered stone (not car wax, not marble polish) can restore some sheen. The filled area will never vanish under raking light, but it should read as a clean seam line.
When should you call a professional instead of DIY?
Four situations where you stop and call the shop.
The seam has separated and there's actual movement. If you feel the slabs shift when you press or hear a click, the adhesive bond failed. The stone needs re-bonding or resetting, which means lifting it or applying structural adhesive from below through the cabinet. That is not a surface repair.
There's lippage you can feel when you run your hand across it. Grinding down a high spot takes a wet polisher with progressive grit pads. Done wrong, you leave scratches more visible than the original lippage.
The gap is wider than 1/8 inch. At that width, a filled seam looks obvious and the filler may not cure with the same strength. The underlying cause (settlement, failed support, sloppy install) also needs addressing.
The quartz is cracked through. A crack running from the seam line into the slab body is a structural failure, not a cosmetic one. Filling it delays the problem instead of fixing it.
For countertop installation issues like these, a reputable fabricator usually charges a service call fee of $75 to $150 to assess the situation, and that often gets credited toward the repair.
Why do quartz seams go bad in the first place?
Knowing the cause helps you dodge the same problem when you replace a slab or vet a new installer.
Rushed installation is the most common cause. Epoxy has a working time, usually 5 to 20 minutes depending on product and temperature, and if the installer can't get the slabs positioned and clamped in time, the bond sets imperfectly. You get a visible line with inconsistent fill.
Poor seam placement is second. A seam directly over a sink, over an unsupported span, or at the corner of a cutout is prone to stress cracking. The Natural Stone Institute recommends keeping seams away from sink corners and other stress points [1]. Some installers place seams where they're convenient for the cut, not where the structure supports them best.
Cabinet movement and settlement open seams over time. Wood cabinets expand and contract with humidity, and if the countertop is rigidly bonded across a point of movement, the seam absorbs the stress and eventually gaps.
Temperature shock can crack a quartz seam too. Pouring boiling water directly onto the surface near a seam, over and over, weakens the adhesive bond. Quartz makers generally warn against exposing the surface to temperatures above 150 degrees Fahrenheit [6].
Mismatched lots cause the rest. Quartz slabs get manufactured in batches, and two slabs from different runs can carry subtle color and texture differences that look fine alone but read as a color shift at the seam. A good fabricator matches lot numbers when possible, especially on large jobs. Seam planning is one of the layout details that quoting and nesting software like SlabWise helps shops track before the saw runs.
How do you prevent a bad seam on future quartz countertop installs?
Prevention comes down to choosing the right fabricator and having the right conversation before installation day.
Ask to see the seam layout drawing before your slabs get cut. A good fabricator produces a digital or paper layout showing where every seam lands. If a proposed seam sits over a sink corner or in a high-traffic area with weak support, push back. Seams running parallel to the front edge of an island hide better than those running perpendicular.
Ask about lot matching. For any install using more than one slab, the fabricator should pull slabs from the same production lot. This is standard practice, but not universal on budget jobs.
Require a two-part color-matched epoxy, not caulk, not grout, not silicone. Ask to see the product they plan to use.
Get your cabinets level before the stone goes in. A good installer checks and shims, but if your boxes sit 1/4 inch out of level, you're asking for lippage.
If you're choosing between quartz brands, surface quality and consistency differ. Cambria countertops, for example, are made in the US under a quality process that holds tight color consistency across slabs from the same batch, which makes lot matching easier.
For comparison across countertop types, marble countertops and granite countertops follow their own seaming conventions, since natural stone has grain and veining that call for different matching techniques than engineered quartz.
How visible will a repaired quartz seam be after it's fixed?
Honestly: usually still somewhat visible under raking light, but often unnoticeable under normal kitchen lighting.
A properly color-matched epoxy fill in a tight gap under 1/16 inch, done carefully, can be very hard to spot under typical overhead or under-cabinet lighting. The seam reads as a thin hairline instead of an open gap.
Under direct sunlight or a raking flashlight held low, even a good repair shows. Quartz is a highly engineered surface with specific light reflectivity, and epoxy filler carries a slightly different sheen and texture no matter how well it's done. That's physics, not skill.
A professional re-grind and re-fill by an experienced stone restorer gets significantly closer to invisible, because they can polish the filled area to match the surrounding gloss. Expect to pay for that level of finish.
If the original seam had a color mismatch from different slab lots, no amount of filler fixes the underlying difference. The only real solution there is replacing one of the slabs.
For homeowners weighing other surfaces where seam visibility matters less, corian countertops and laminate countertops sometimes seam or repair with less visible results, because the repair materials match the substrate more closely.
What should you say to your fabricator when demanding a fix?
Be specific, be documented, be calm. Hostility almost always slows the resolution.
Write a short email, not a text, not a phone call. Include the installation date, photos that show the seam problem clearly, a note about which industry standard the seam fails (published Natural Stone Institute tolerances are a good reference), and a specific ask, such as evaluating and repairing the seam at no charge within a set timeframe.
Give the fabricator a reasonable window to respond. Five to seven business days is fair. Most reputable shops would rather fix their work than field a complaint. If they push back and claim the seam is within tolerance, ask them to show you the measurement in writing.
If the fabricator denies the claim without a good reason, your escalation path depends on how they're licensed. In most states, stone fabricators and countertop installers work under a general contractor's license or a specialty trade license issued by the state contractor licensing board [3]. A formal complaint to that board can prompt action and builds a paper trail if you go to small claims court.
Most small claims courts handle disputes under $5,000 to $10,000 depending on the state, which covers most countertop repair or replacement costs [7]. The published stone quality standards make useful evidence there.
For fabricators reading this: clear documentation of seam placement and adhesive specs, built into your job workflow, protects you in exactly these disputes. Shops using digital job tracking, including tools like the SlabWise fabrication platform, can pull that documentation fast when a warranty question lands.
Frequently asked questions
Can I use regular caulk to fill a gap in a quartz seam?
No. Silicone or latex caulk won't bond well to quartz, discolors within months, and looks visibly different from the stone. You need a two-part color-matched polyester or acrylic epoxy made for engineered stone, sold through stone supply distributors. Products like Integra Adhesives or Tenax Colorfill are the right category. Caulk is a temporary patch that creates a bigger problem later.
How long does a quartz seam repair take?
The hands-on work takes 30 to 60 minutes for a single seam, but account for epoxy cure time, typically 20 to 60 minutes before you can scrape it flush, then another hour or two before the surface handles normal use. Set aside half a day if you want to do it right and not rush the cure. A professional usually finishes a color-fill repair in one to two hours on site.
Will quartz warranty cover a bad seam?
Manufacturer warranties (like Cambria's lifetime warranty or Silestone's long-term warranty) typically cover manufacturing defects in the slab itself, not installation workmanship. A bad seam is usually a fabricator and installer issue, not a material defect. Your claim belongs with the shop that installed it. Document the seam with photos, reference published stone tolerances, and contact the fabricator in writing before the installation warranty period expires.
How much does it cost to have a professional fix a quartz seam?
A color filler repair by a professional stone restorer typically runs $75 to $175 for a single seam. A full re-seam where the slab gets re-bonded costs $150 to $400. If a slab needs full replacement, costs jump to $400 to $1,200 or more depending on material and labor in your area. If the failure is clearly the fabricator's fault and within warranty, it should be zero.
Can quartz seams be made invisible?
No countertop seam in any material is truly invisible under all lighting, quartz included. A well-placed, properly color-matched seam in a polished quartz surface can be very hard to see under normal kitchen lighting. Under raking light or direct sun, it shows. Darker or busier quartz patterns hide seams better than solid white or light gray. Seam placement and lot matching matter more than the installer's skill alone.
What is the acceptable tolerance for a quartz countertop seam?
The Natural Stone Institute sets the industry standard. For engineered stone, an acceptable seam gap is generally no more than 1/16 inch wide, and lippage (the height difference between the two slabs) should not exceed 1/32 inch on polished surfaces. If your seam exceeds those numbers, you have grounds to request a repair from the fabricator. Take photos with a tape measure in frame.
What causes a quartz seam to crack or open over time?
The most common causes are cabinet settlement, humidity-driven wood movement under the stone, poor seam placement over unsupported spans or near sink corners, and adhesive failure from rushed installation. Repeated heat shock near the seam, from hot pots or boiling water, can also weaken the epoxy bond. A seam that opens after years of use often traces back to an installation shortcut rather than a sudden event.
Is there a way to match the color for a quartz seam repair?
Yes, but it takes more than picking 'white' off a shelf. The best approach is to bring a remnant of your quartz (most fabricators leave one) to a stone supply distributor who carries Integra Adhesives or a similar line. Their technical staff can often help you pick or mix the closest match. Getting the color right before you apply anything is the most important step in a DIY seam repair.
Can a raised or uneven quartz seam be fixed without replacing the slab?
Sometimes. If one slab sits slightly higher than the other, a professional stone restorer can wet-grind the high side down and re-polish it to reduce the lippage. Results depend on how much height difference exists and the quartz pattern. If the mismatch is more than 1/16 inch, grinding back that much material risks changing the surface appearance in a visible zone. A pro should evaluate before committing to this approach.
How do I know if my fabricator used the wrong epoxy for the seam?
Signs of the wrong filler include a seam line that yellowed or darkened within the first year, a filler that crumbled or pulled away, and a color that never matched from the start. Some installers reach for silicone or generic construction adhesive when they run out of the correct product. You can often spot silicone by its rubbery texture when you pick at the seam edge. The correct product is a two-part polyester or acrylic color-matched epoxy.
What should I do if the quartz seam cracked the slab itself?
Stop and call a professional immediately. A crack running from the seam into the slab body is a structural failure that a surface repair won't fix. You need the fabricator or a stone restoration company to assess whether the slab can be stabilized with injected adhesive from below or whether it needs replacement. Document everything with photos before anyone touches it, and notify the fabricator in writing to preserve warranty rights.
Does the type of quartz brand affect how easy it is to repair a seam?
Slightly, yes. Thicker slabs (3 cm rather than 2 cm) hold seam edges better and chip less during install. Brands with tighter manufacturing consistency across production lots make color matching easier at the seam. Surface finish matters too: a polished surface shows seam filler more clearly than a honed or leathered finish, where the texture helps disguise the repair line.
Can I sand down a quartz seam that is raised above the surface?
You can, but it's risky without the right equipment. Quartz is an engineered material with a specific surface finish applied during manufacture. Hand-sanding with abrasive paper leaves scratches and a dull patch around the seam. Proper grinding and re-polishing needs wet diamond polishing pads on an angle grinder or variable-speed polisher, plus progressive grit work from coarse to fine to restore gloss. Hire a stone restoration professional rather than reaching for sandpaper.
Sources
- Natural Stone Institute (formerly Marble Institute of America), Dimension Stone Design Manual and technical standards: The Natural Stone Institute publishes industry standards for acceptable seam quality in engineered and natural stone, including gap and lippage tolerances and seam placement guidance
- Cambria, Warranty Documentation: Cambria's warranty covers manufacturing defects in the quartz material itself; installation defects are the responsibility of the fabricator/installer, not the manufacturer
- California Contractors State License Board (CSLB), License Requirements: Stone fabricators and countertop installers typically operate under state contractor licensing boards; complaints can be filed with those boards for installation failures
- Angi, Countertop Repair Cost Guide: Professional countertop seam repair costs range from $75 to $400 depending on type of repair; costs in high cost-of-living metros can run 20 to 30 percent higher
- Integra Adhesives, Product Information: Integra Adhesives manufactures two-part color-matched seam epoxy products used by professional stone fabricators for quartz and other engineered stone surfaces
- Silestone by Cosentino, Care and Maintenance Guide: Quartz manufacturers recommend against exposing engineered stone surfaces to temperatures above approximately 150 degrees Fahrenheit to prevent damage to adhesive bonds and surface resin
- United States Courts, small claims and state court information: Most state small claims courts handle disputes under $5,000 to $10,000, covering typical countertop repair or replacement costs
- Tenax USA, Colorfill and Stone Adhesive Product Line: Tenax Colorfill is a widely used color-matched adhesive product for filling and repairing seams in quartz and engineered stone countertops
- Caesarstone, Technical Specifications and Installation Guide: Caesarstone's installation documentation specifies use of color-matched two-part adhesive for seaming; improper seam adhesive use voids installation warranty
- NSF International, standards for food contact surfaces: Surface materials used for food preparation, including quartz, must meet material safety standards; repair materials should be food-safe once cured
Last updated 2026-07-09