TL;DR
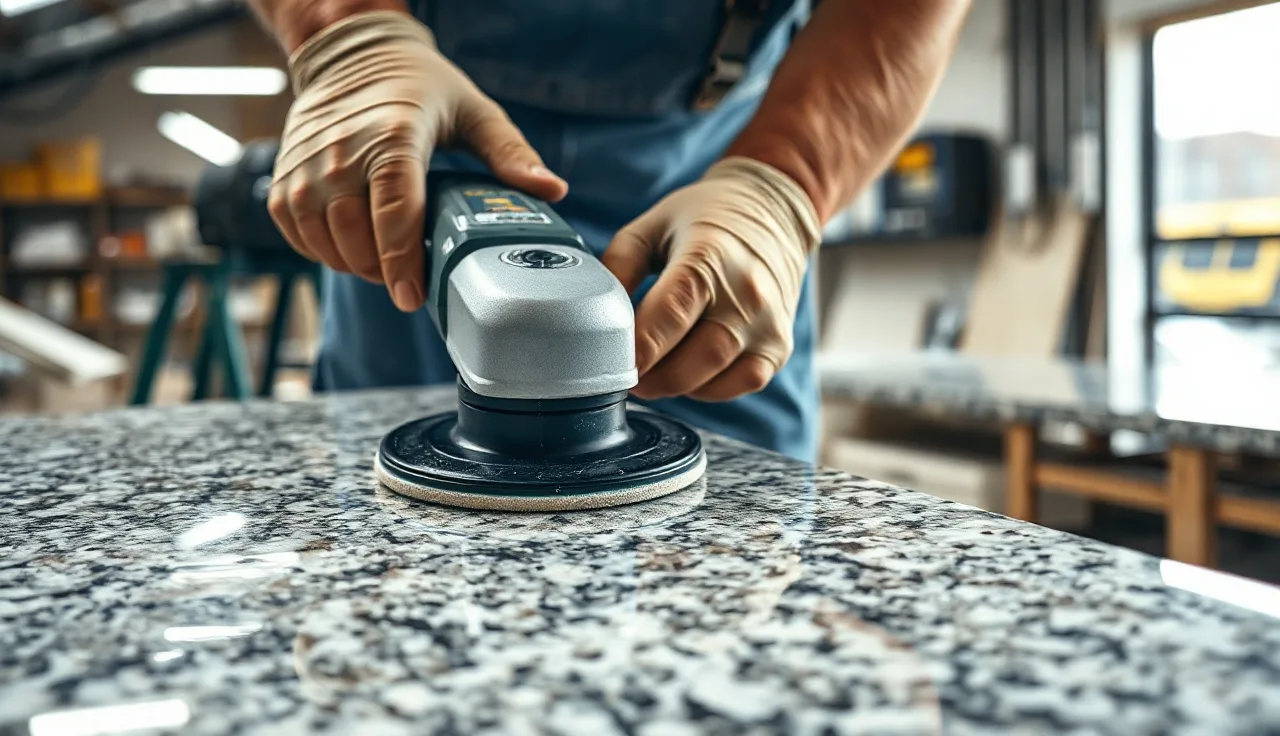
- Polishing a stone countertop in the shop means running a progressive sequence of diamond abrasives, usually from 50 or 100 grit up through 3,000 or higher, then finishing with a compound on a felt or foam pad.
- The exact sequence depends on stone hardness, starting surface, and target sheen.
- Most shops wet-polish granite and marble.
- Some dry-polish engineered quartz, which is a health risk without proper controls.
What does 'polishing' actually mean for stone countertops?
Polishing is not cleaning. It's a mechanical process that removes microscopic scratches by working through progressively finer abrasives until the surface is flat enough to reflect light evenly. The stone looks shiny because the scratches left by the final abrasive are too small for your eye to catch.
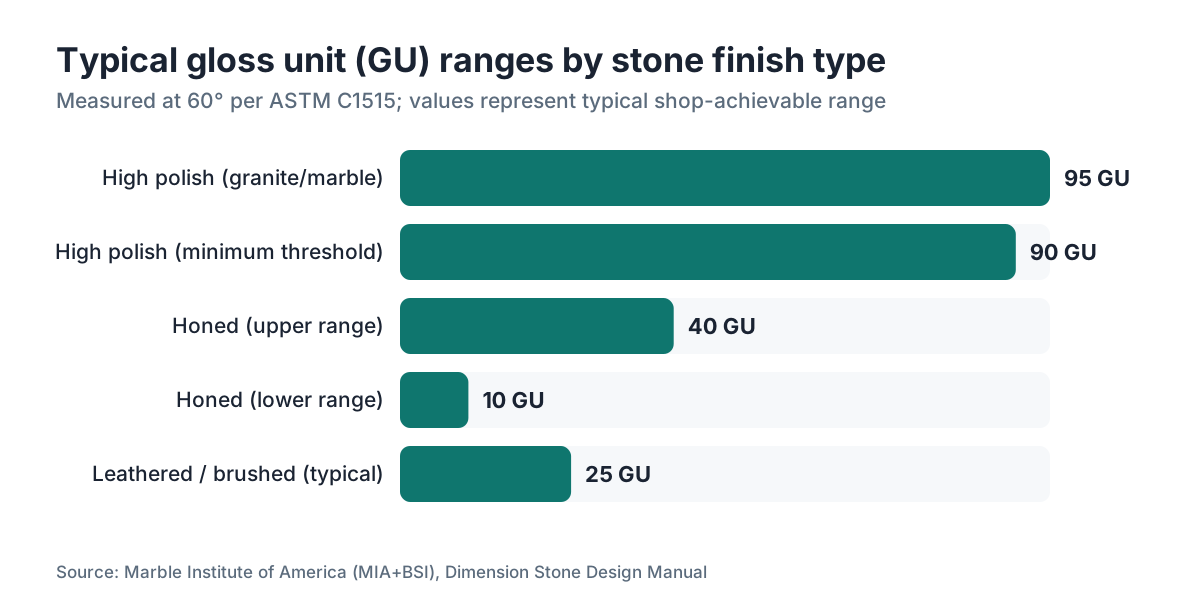
For natural stone, the standard target is a high polish reading above 90 gloss units (GU) measured with a glossmeter at 60 degrees. [1] Honed finishes land between 10 and 40 GU. Leathered and brushed finishes sit somewhere in the middle. The Marble Institute of America's specifications define these finish levels plainly, and a lot of customer disputes trace back to a shop and a client never agreeing on which target they were chasing.
Engineered quartz is a different animal. Brands like Cambria build the surface finish into the slab at the factory. You're mostly polishing Cambria countertops or other engineered surfaces to repair damage or blend a seam, not to set a finish from scratch. Same story with laminate countertops or Corian countertops, which get buffed rather than diamond-polished.
This article is about natural stone: granite, marble, quartzite, and the materials that behave like them.
What equipment do you need to polish stone in the shop?
The core tool is a variable-speed angle grinder or dedicated stone polisher with a 4-inch or 5-inch spindle, running between 1,500 and 4,500 RPM depending on the stone and the pad stage. [2] Most fabricators reach for a 4-inch grinder on edge work and a 5-inch on flat surfaces. A low setting (around 1,500 to 2,500 RPM) protects soft stones like marble from heat. Granite takes higher speeds without complaint.
For wet polishing you need a water feed. That's either a water swivel on the grinder spindle or a helper running a hose at low pressure aimed at the pad. Water cools the pad, clears swarf, and keeps the resin bond from glazing over.
Here's the basic equipment list:
- Variable-speed angle grinder (4" or 5") with a Velcro backer pad
- Full set of resin-bond diamond polishing pads: 50, 100, 200, 400, 800, 1500, 3000 grit (minimum)
- Polishing compound (aluminum oxide or cerium oxide based)
- Felt or foam finishing pad
- Water source or wet grinder
- Shop vacuum rated for slurry
- Glossmeter if you're working to spec (optional but useful on commercial jobs)
Pad sets from a reputable supplier run $60 to $200 for a full grit sequence. [3] Cheap pads wear fast and leave grit lines. This is not where you save money.
For large flat surfaces, a random orbital stone polisher or a bridge-saw-mounted polishing head cuts your time way down. High-volume shops run a CNC with polishing heads for consistent results, but that's a serious capital line item.
What grit sequence should you use for granite, marble, and quartzite?
The right starting grit depends on the surface, not the stone. A freshly sawn or calibrated slab starts at 50 grit. A piece that already has a decent surface often starts at 200 or even 400. Start too coarse and you burn through pads for no reason. Start too fine and you never fully erase the previous scratch pattern.
| Stone Type | Typical Start Grit | End Grit | Notes |
|---|---|---|---|
| Granite (hard) | 100 to 200 | 3000+ | Tolerates higher RPM and drier conditions |
| Marble | 50 to 100 | 3000 | Stay slow; marble scratches from heat as easily as from grit |
| Quartzite | 100 to 200 | 3000 | Varies wildly by variety; test a corner first |
| Engineered quartz | 200 to 400 | 3000 | Mostly for seam blending; check manufacturer guidance |
| Limestone/Travertine | 50 to 100 | 1500 to 3000 | Porous; don't overwork or you open pores |
The rule every fabricator lives by: each grit stage has to remove the scratches from the stage before it. Rush from 200 to 800 and skip 400, and those 200-grit lines stay visible under the 800 finish. No amount of compound will erase them. [4]
On granite countertops specifically, some shops stop at 1500 and bring up the final gloss with a tin oxide powder compound on a felt pad. Others run all the way to 3000 and skip the compound. Both can hit 90+ GU. It comes down to the granite's mineral makeup and how clean the pad sequence was.
Marble is the one that bites people. It scratches from heat as easily as from abrasion. Keep the water flowing, hold RPM below 2,500, and never linger on one spot.
What's the difference between wet and dry polishing?
Wet polishing is the default for natural stone in a shop. Water does three jobs. It cools the diamond bond so the pad lasts longer, it carries swarf (the stone dust and worn diamond particles) off the surface, and it keeps the pad from glazing. A glazed pad looks shiny and cuts nothing.
Dry polishing uses resin-bond pads built to generate their own heat, which helps the resin flow slightly and cut the stone. It's faster for some materials and skips the wet slurry cleanup. The tradeoff is silica dust, which is a serious health hazard. [5] OSHA's Permissible Exposure Limit for respirable crystalline silica is 50 micrograms per cubic meter of air, averaged over an 8-hour shift. [6] Dry grinding granite, marble, or quartzite can push silica concentrations to many times that level. If you dry-polish, you need engineering controls (local exhaust ventilation) or a properly fitted N95 at minimum, and ideally a P100 respirator.
Most professional shops wet-polish. The slurry cleanup is a pain, but it's the responsible call.
On edges, some fabricators run a hybrid: wet polishing through the grit sequence, then a quick dry buff with compound on a foam pad for the final shine. That works fine as long as the surface is clean and dry before the compound step.
How do you polish a countertop edge in the shop?
Edge polishing is where skill shows. A flat surface forgives you. A profiled edge (ogee, dupont, bullnose) does not. The fundamentals hold, but the geometry punishes sloppy hands.
For simple eased or beveled edges, a 4-inch grinder with a Velcro pad runs the same grit sequence you'd use on a flat surface. Keep the pad flat against the bevel face. Rock it and you round off the profile.
For curved profiles like a bullnose or half-bullnose, flexible diamond hand pads give you more control than power tools at the final stages. You can also buy profile-specific polishing pads that match common edge radii, sold in full grit sets by several suppliers.
The trick for a consistent edge polish is counting passes. Run ten strokes at each grit angle before moving up. Consistency beats speed. Uneven dwell time leaves visible bands, and dark stones show every one of them.
Sandpaper on a foam block (automotive wet-dry, 1500 to 3000 grit) is a cheap way to finish edge details on marble that the power tool can't reach cleanly. It's slow. The result is excellent.
Production shops running many linear feet of edge per day should look at an edge polishing machine (a multi-spindle edge grinder). Entry-level machines start around $8,000 to $15,000. CNC edge machines cost a lot more. [3]
How do you apply polishing compound to finish the surface?
Polishing compound is the last step after the diamond pad sequence. It's an abrasive in a carrier (water, wax, or oil), and the abrasive is aluminum oxide, cerium oxide, or tin oxide depending on the stone and the finish you want.
Aluminum oxide compound is the most common and works well on granite. Cerium oxide cuts more gently, so it's the pick for soft stones like marble and limestone. Tin oxide powder mixed to a paste is a traditional marble choice that still delivers.
Application is simple. Put a quarter-sized dollop per square foot on the surface, spread it with a foam or felt pad on the grinder at low speed (under 1,500 RPM), and work in overlapping circles. The compound has to stay slightly wet. Let it dry out and it can score the surface. Add a few drops of water as needed.
Wipe the residue with a clean microfiber towel and check the gloss. If you own a glossmeter, measure now. If you don't, hold a bright shop light at a shallow angle and hunt for haze or swirl marks.
Swirl marks from the compound itself mean one of three things: you went too fast, used too much compound, or the felt pad is contaminated. Clean the surface, grab a fresh pad, and make a second pass.
Don't seal right after polishing. Let the surface degas for at least two hours, ideally overnight, before any penetrating sealer. The pores need to be open and cool for sealer to soak in.
How do you blend a seam or repair a scratch during shop polishing?
Seam blending is one of the hardest things to do well. The goal is a polished zone across the seam that looks continuous with the surrounding surface. The enemy is a mismatched gloss level or a visible ridge of epoxy filler.
Work the process in order. Once the epoxy fully cures (most two-part color-matched epoxies need at least 90 minutes at room temperature, and longer in a cold shop) [7], scrape the excess flush with a razor blade. Then polish across the seam, not along it, using the same grit sequence you'd use on any fresh surface. Perfectly flush epoxy lets you start at 200 or 400. Any ridge, start at 100.
The hard part is feathering. You're polishing a small zone while the stone on either side already sits at final polish. Work outward from the seam in overlapping passes so the gloss transitions gradually instead of ending at a hard line. Then run a compound pass over the whole seam area.
For scratch repair on a piece that came back from an install, first judge the depth. A scratch you can feel with a fingernail is probably 10 to 50 microns deep and needs diamond pads. A scratch you can only see is likely superficial and may lift with compound alone. Test with compound first. If it doesn't vanish in two passes, start the diamond sequence.
Quartzite and harder granites take longer to recover from deep scratches than marble does. The hardness that makes them durable also makes them harder to cut. More on that at how to clean quartzite countertops.
What are the most common mistakes fabricators make when polishing?
Skipping grits tops the list. It looks like a time saver and almost never is. Jump from 200 to 800 and you'll spend twice as long at 800 chasing 200-grit scratches, and you might still miss some. The time you saved was never real.
Using worn pads is second. Resin-bond pads have a finite life, and a worn pad cuts slow and uneven. If a pad that used to clear a scratch in four passes now takes ten, it's done. Nursing it through a big job produces inconsistent results.
Too much speed on marble is a recurring one, especially at shops that mostly run granite. Marble's calcite matrix is soft (Mohs 3 for the calcite component), and excess heat from a fast pad creates micro-thermal fractures that read as a dull haze even at 3000 grit. [8] Slow down. Use more water.
Not enough water at the 1500 to 3000 grit stages. Early grits forgive a light water supply. Fine grits don't. The swarf from fine grit work is a slurry, and if it dries on the surface it turns into an abrasive that reintroduces scratches.
Polishing over contamination. Silicone, wax, or oil on the surface clogs the pad immediately and gives you a blotchy finish. Clean the slab with a stone-safe degreaser before any polishing. This matters most on slabs back from an install where caulk or adhesive got applied nearby.
Shops quoting jobs with polish work should track time per linear foot of edge and per square foot of flat surface. SlabWise's quoting tools let you log those labor rates and apply them to future estimates, which keeps polish labor from getting chronically undercharged.
How long does it take to polish a countertop in the shop?
It depends on the surface area, the stone, the starting condition, and how many grits you run. A rough benchmark from fabricators: a standard 25-square-foot kitchen countertop in good condition takes 45 to 90 minutes for a complete flat-surface polish sequence from 200 grit through compound. [3]
Edge polishing runs slower per linear foot than flat polishing. A simple eased edge on a 10-foot run takes roughly 20 to 40 minutes by hand with a 4-inch grinder. A dupont or ogee on the same run can double that.
Run an edge machine and throughput jumps to roughly 10 to 15 linear feet per hour depending on the machine and the profile. [3]
A complete countertop installation job, shop polish plus job-site touch-up included, typically runs 15 to 25 percent of total fabrication time. Tracking actual time, not estimated time, is the only way to know if you're pricing it right.
Do you need to seal stone after polishing in the shop?
Most natural stones benefit from a penetrating sealer after polishing, but not all of them need it, and timing matters. A fresh high-polish surface has temporarily open pores from the heat and abrasion of polishing. Seal it too soon and you can trap compound residue in those pores.
Standard guidance is to wait at least 2 hours after finishing the polish, ideally overnight, before sealing. [9] The stone should be at room temperature and bone dry.
Low-porosity granite (many granites absorb almost nothing) may not need sealer at all. Here's a practical test. Put a few drops of water on the polished surface and time how long it takes to darken. Darkens in under 4 minutes, seal it. Takes 10 minutes or more, sealing is optional.
Marble and most quartzites are more porous and benefit from a quality penetrating sealer applied in the shop before delivery. Far easier there than on-site.
For marble countertops, sealer does nothing against etching from acids. Nothing does. Etching is a chemical reaction, not a porosity problem. Polishing removes etch marks. Sealer does not protect against them.
Soapstone and butcher block countertops don't use this polishing chemistry at all. Soapstone gets a mineral oil or wax treatment. More at how to clean soapstone countertops.
What safety rules apply to polishing stone in the shop?
The biggest hazard is crystalline silica dust. Granite, quartzite, sandstone, and many other stones contain quartz, which throws off respirable crystalline silica when cut, ground, or polished. The International Agency for Research on Cancer classifies crystalline silica inhaled from occupational sources as a Group 1 carcinogen (known to cause cancer in humans), linked to silicosis and lung cancer. [5]
OSHA's silica standard for construction (29 CFR 1926.1153) and for general industry (29 CFR 1910.1053) both require fabricators to assess exposure, put engineering controls in place where possible, and provide respiratory protection when exposures pass the action level of 25 micrograms per cubic meter. [6] Wet polishing is the primary engineering control for shop work.
Practical safety checklist for shop polishing:
- Always wet-polish natural stone; never dry grind without proper ventilation and respiratory protection
- Use a P100 respirator if any dry work is unavoidable
- Keep bystanders out of the polishing area
- Wear safety glasses or a face shield; fine stone particles travel farther than you expect
- Wear cut-resistant gloves; polishing pads can grab and a grinder can do real damage
- Ground fault circuit interrupter (GFCI) protection is required wherever water and power tools meet [10]
- Dispose of slurry properly; many municipalities have rules about stone slurry in drains because the alkalinity messes with wastewater treatment
Shops running engineered quartz should know some products carry very high silica content (some over 90 percent by weight). Several states, including California, have enacted specific rules for engineered stone fabrication. California's Division of Occupational Safety and Health (Cal/OSHA) updated its silica standard in 2023 to address engineered stone directly. [11]
How does shop polishing differ for engineered quartz vs. natural stone?
Engineered quartz surfaces from Cambria, Silestone, or Caesarstone come with a consistent factory finish that natural stone doesn't have. You aren't building a polish from scratch the way you would on a raw slab. You're blending or repairing a finish that's already there.
The practical upshot: start with a finer grit than you would on natural stone. For seam blending on quartz, many fabricators start at 400 and rarely drop below 200. The resin binder in engineered quartz responds to diamond abrasives differently than calcite or feldspar does.
Quartz is also more heat-sensitive than its hardness suggests. The polymer binders can soften, yellow, or cloud above about 150 degrees Fahrenheit. [12] Dry polishing engineered quartz is almost always a mistake. Wet polish with plenty of water.
Warranty terms often say repairs must use manufacturer-approved methods and materials. Check those terms before doing aggressive polishing on a slab that might still be covered.
For care and maintenance guidance to pass on to homeowners, how to clean stone countertops covers the basics.
How do you inspect and measure the finished polish quality?
Visual inspection under a raking light (a bright light held at a very low angle to the surface) catches swirl marks, grit lines, and uneven gloss that hide under overhead lighting. Every fabricator should do this before a piece leaves the shop.
A glossmeter gives you an objective number. The Marble Institute of America's dimensional stone standards reference ASTM C1515, the gloss measurement method for stone. [1] Consumer glossmeters run $80 to $300. Worth owning if you do commercial work with finish specs written into the contract.
For most residential work, the raking light test is enough. Look for:
- Visible grit lines (parallel scratches meaning a pad sequence wasn't finished)
- Swirl marks from compound work
- Dull patches where the pad didn't dwell long enough
- Edge blush, a slight haze where the flat polish meets the edge polish
Pass the raking light test, feel a consistent gloss under a clean fingertip dragged across the surface, and it's done.
Shops on fabrication software like SlabWise can log finish type and QC status in the job record, which matters when a customer disputes the finish on delivery. Having "polished to high-gloss, QC passed" documented on the work order is a small thing that ends arguments fast.
From here a correctly polished slab is ready for sealing if needed, then packaging and countertop installation.
Frequently asked questions
Can you polish a stone countertop by hand without power tools?
Yes, but it takes a long time and real physical effort. Hand polishing pads in a full grit sequence (50 through 3000) produce a genuine polish on marble or softer stones, though it's impractical on granite. Automotive wet-dry sandpaper on a foam block works for final stages and edge detail. For an entire countertop surface from scratch, power tools are the realistic choice.
What grit diamond pad do you start with on a brand-new slab?
For a freshly calibrated slab with sawmill marks, start at 50 or 100 grit. For a slab that already has a decent surface (factory-ground or lightly honed), you can often start at 200 or even 400. The surface condition sets the starting grit more than the stone type does. Start too fine and you never remove the existing scratch pattern underneath.
How many grit stages do you need to get a high-gloss finish on granite?
Most fabricators run 7 to 9 stages: 50 or 100, 200, 400, 800, 1500, 3000, then a compound step with aluminum oxide on a felt pad. Some shops skip 50 and start at 100 on granite, since it's hard enough that 50 grit removes material faster than needed. Skipping intermediate grits (jumping 200 to 800) reliably leaves grit lines that compound won't remove.
Why does marble get cloudy when I try to polish it?
The usual cause is heat. Marble's calcite crystals are Mohs 3, and too much heat from a fast pad or too little water causes micro-fractures that read as a cloudy haze even at fine grits. Keep RPM below 2,500, keep water flowing, and don't linger on one spot. Silicone or wax contamination on the surface before polishing causes the same symptom.
Do you have to seal a granite countertop after polishing it?
Not always. Low-porosity granites barely absorb water and don't need sealer. Test it: put a few drops of water on the polished surface. If it darkens in under 4 minutes, apply a penetrating sealer. If it stays beaded for 10 minutes or more, sealing is optional. Wait at least 2 hours after polishing before sealing so the stone cools and the pores close properly.
What's the safest way to polish engineered quartz in the shop?
Always wet-polish engineered quartz. The polymer binders soften above about 150 degrees Fahrenheit, and dry polishing generates enough heat to cloud or yellow the surface. Start at a finer grit than you'd use on natural stone (400 is common for seam blending). Several states, including California, have specific rules for engineered stone fabrication because of the high silica content in some products.
How do you remove etch marks from polished marble?
Etch marks are chemical damage, not scratches. Acids (lemon juice, wine, vinegar) dissolve the calcite surface and leave a dull spot. To fix them in the shop, re-polish from whatever grit removes the depth of the damage: superficial etches respond to compound alone, deeper etches need diamond pads starting at 400 to 800 grit. Sealer does not prevent etching. It only protects against staining.
What RPM should you run a polishing pad on granite vs. marble?
On granite, 2,500 to 4,000 RPM works for coarser grits, dropping to 2,000 to 3,000 for fine grits and compound. On marble, stay under 2,500 RPM throughout to avoid heat damage to the calcite matrix, and always keep water flowing. Variable-speed grinders are worth the extra cost specifically for shops that work both stone types.
How do you blend a polished area with the surrounding surface after a repair?
Start your repair grit sequence about 2 to 3 inches wider than the damaged area. Work through all grits with overlapping passes that gradually extend the polished zone outward, so the transition feathers in instead of ending at a hard boundary. The compound step should cover the whole area plus a few extra inches. Check with a raking light: a hard gloss boundary means you need a wider overlap.
Is wet polishing required, or can you dry-polish stone in the shop?
Wet polishing is strongly preferred and is standard industry practice for natural stone. Dry polishing creates respirable crystalline silica dust, which OSHA classifies as requiring engineering controls once exposures pass 25 micrograms per cubic meter of air. California has enacted specific rules for engineered stone fabrication because of silica hazards. Dry polishing without a proper local exhaust ventilation system is a health and compliance risk.
How do you polish a profiled edge like a bullnose or ogee?
For bullnose edges, flexible profile-specific diamond pads that match the radius give the most consistent result. For ogee and other complex profiles, most fabricators combine power tool work on the open curves with hand pads on the tight transitions. Count your strokes at each grit stage (aim for 10 consistent passes) to avoid uneven dwell time, which shows as banding on dark stones.
What polishing compound should you use on marble vs. granite?
Cerium oxide is the traditional pick for marble and limestone: it cuts gently and brings up a warm, deep polish on calcite-based stones. Aluminum oxide compound is more common for granite and works well on feldspar and quartz minerals. Tin oxide powder mixed to a paste is slower but excellent on marble if you want maximum depth. Avoid abrasive auto polishes with silicone, which contaminates the stone.
How long should you wait after polishing to apply a sealer?
Wait at least 2 hours after the final polishing step, ideally overnight. Heat from polishing temporarily opens the stone's pores, and sealing before the surface cools can trap compound residue inside the stone. The slab should be completely dry and at room temperature before sealing. This matters most on porous stones like some quartzites and marbles.
What causes swirl marks after polishing and how do you fix them?
Swirl marks after the compound step usually mean the pad moved too fast, the compound dried out during application, or the felt or foam pad is contaminated with coarser grit. Fix it: clean the surface thoroughly with a stone degreaser, use a fresh pad, apply fresh compound, and work at lower speed (under 1,500 RPM) with the surface slightly damp. Keep passes overlapping and consistent.
Sources
- Marble Institute of America (MIA+BSI), Dimension Stone Design Manual: High-polish finish for stone is defined as above 90 gloss units at 60 degrees per ASTM C1515 measurement method
- Natural Stone Institute, Stone Industry Education (SIE) Training Materials: Full diamond pad grit sets cost $60 to $200; entry-level edge polishing machines start around $8,000 to $15,000; flat surface polishing benchmark is 45 to 90 minutes for a 25 sq ft surface
- Natural Stone Institute, Fabrication Best Practices: Each grit stage must fully remove the scratch pattern of the previous stage before advancing; skipping grits leaves visible lines that compound cannot remove
- International Agency for Research on Cancer (IARC), Monograph on Silica, IARC Vol. 100C: IARC classifies crystalline silica inhaled from occupational sources as a Group 1 carcinogen linked to silicosis and lung cancer
- OSHA, Occupational Exposure to Respirable Crystalline Silica (29 CFR 1926.1153 and 29 CFR 1910.1053): OSHA's Permissible Exposure Limit for respirable crystalline silica is 50 micrograms per cubic meter over an 8-hour shift; action level is 25 micrograms per cubic meter
- USGS, Mineral Resources Program: Calcite Hardness and Properties: Calcite, the primary mineral in marble, rates Mohs 3 on the hardness scale, making marble susceptible to heat-induced micro-fractures during high-speed polishing
- Natural Stone Institute, Sealing Natural Stone Best Practices: Standard guidance is to wait at least 2 hours after polishing, ideally overnight, before applying penetrating sealer
- OSHA, Electrical Safety in the Workplace: GFCI Requirements: Ground fault circuit interrupter (GFCI) protection is required wherever water and power tools are used together in shop environments
- California Department of Industrial Relations, Cal/OSHA Engineered Stone Silica Standard (2023): California's Cal/OSHA updated its silica regulations in 2023 with provisions specifically addressing engineered stone fabrication due to silica content exceeding 90 percent in some products
- Caesarstone USA, Product Care and Warranty Documentation: Engineered quartz polymer binders can soften, yellow, or cloud at temperatures above approximately 150 degrees Fahrenheit, making dry polishing inadvisable
Last updated 2026-07-10