TL;DR
- Most chips in quartz countertops fix with a clear or color-matched epoxy resin, a razor blade, and sandpaper in about two hours.
- Small chips under 1/4 inch are solid DIY territory.
- Chips bigger than a half-inch, cracks running to an edge, or damage near a sink cutout usually need a professional fabricator to avoid a worse outcome.
What kind of chip do you actually have?
Spend two minutes on this before you buy anything. The repair changes a lot depending on chip size, location, and depth, and getting it wrong costs you an afternoon.
Quartz is an engineered stone, roughly 90-95% crushed natural quartz bound with polymer resin [1]. That resin binder is your friend here. It means epoxy grabs the existing material better than it would grab a porous natural stone. The same construction gives a chip a telltale look: the resin matrix shows as a slightly lighter or translucent edge around the break, while the quartz aggregate underneath looks grainy.
Here's a rough triage guide:
| Damage type | Size | DIY fix? | Notes |
|---|---|---|---|
| Surface chip, no crack | Under 1/4 in | Yes | Cleanest DIY outcome |
| Surface chip, no crack | 1/4 to 1/2 in | Usually | Color matching gets harder |
| Chip with hairline crack | Any | Maybe | Stop the crack first or it spreads |
| Chip near sink cutout or edge | Any | Risky | Structural stress; pro advised |
| Full crack across countertop | Any | No | Fabricator or full replacement |
If the chip sits on the flat field of the counter and you can cover it with a dime, you're in good shape to fix it yourself. If it's on a bullnose edge and you can see daylight through the piece, call a fabricator.
What materials do you need to fix a chip in quartz?
The core repair uses a two-part epoxy or a UV-cured acrylic adhesive. Both sell at hardware stores and countertop supply distributors. Clear epoxy works if the quartz is light-colored or the chip hides in a low-visibility spot. For darker or patterned quartz, you need a color-matched kit, or you tint clear epoxy with pigment powder yourself.
Here's the basic supply list:
- Two-part clear or tinted epoxy resin (5-minute or 30-minute pot life; 30-minute gives you more working time)
- Alcohol-based stone cleaner or acetone for prep
- Plastic mixing card or popsicle sticks
- Razor blade or plastic scraper
- 400-, 800-, and 1500-grit wet/dry sandpaper
- Painter's tape
- Lint-free cloths
- Color pigment powder if color-matching (sold by stone supply houses)
- Optional: UV-cure resin pen for very small chips
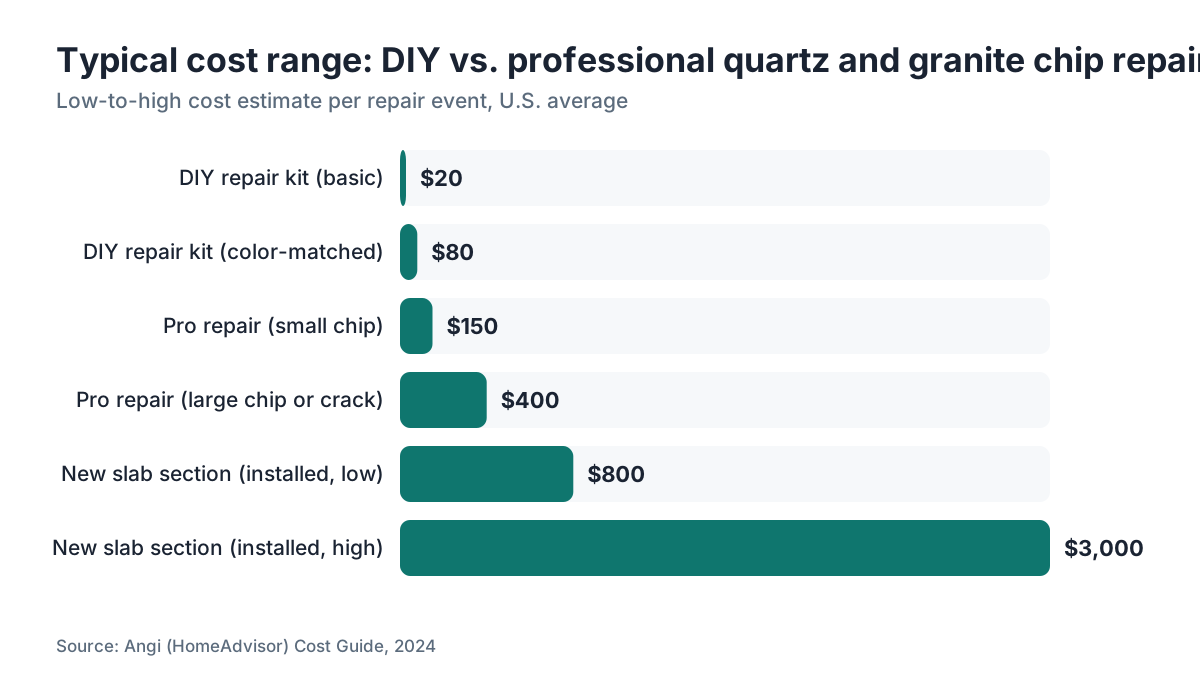
A basic repair kit runs $20 to $60 at a hardware store. A professional color-matched kit from a stone supply distributor runs $40 to $120 [2].
Do not use super glue (cyanoacrylate) as your primary filler on quartz. It bonds fast, but it turns cloudy, shrinks slightly, and won't sand cleanly. Some fabricators use it as a gap-filler underneath epoxy, but only as a substrate, never as the final fill.
If you have a Cambria or other branded engineered stone, call the manufacturer first. Brands like Cambria offer a transferable warranty that covers chips caused by installation defects [3]. A DIY repair won't void the warranty on the rest of the surface, but it also won't get you a warranty-covered repair on that specific chip. One phone call before you open the epoxy is worth it.
How do you fix a chip in quartz step by step?
Work in a room between 65°F and 80°F. Epoxy cures poorly below 60°F and can bubble or set too fast above 85°F.
Step 1: Clean the chip. Wipe the damaged area with acetone on a lint-free cloth. Get every speck of grease, grit, and dust out of the chip cavity. Let it dry at least five minutes. Any contamination under the epoxy causes bonding failure.
Step 2: Tape around the chip. Run painter's tape right up to the chip edges on the surface. This keeps excess epoxy off the surrounding stone and gives you a clean boundary to scrape against.
Step 3: Mix the epoxy. Follow the product ratio exactly. Most two-part epoxies are 1:1 by volume. If you're tinting, add pigment a tiny bit at a time until you match the background color of the quartz under natural light, not under your kitchen task lighting. Mix at least 60 seconds until the blend is completely uniform.
Step 4: Fill the chip. Use a popsicle stick or plastic card to press epoxy into the chip, slightly overfilling it. You want a small mound above the surface, not a sunken fill. Drag the stick across the fill slowly to work out air bubbles.
Step 5: Let it cure. For 30-minute epoxy, leave it undisturbed at least 90 minutes before touching it. For full hardness, 24 hours is better. Don't rush this.
Step 6: Scrape flush. Once fully cured, hold a sharp razor blade at about 30 degrees to the surface and scrape the excess until it's close to flush. Work slowly. Gouging the surrounding quartz here is the most common mistake people make.
Step 7: Sand smooth. Wet-sand starting at 400 grit, then 800, then 1500. Keep the paper flat and use circular motions. Wipe between grits. You're matching the sheen of the surrounding surface, nothing more.
Step 8: Polish. Apply a quartz-safe polishing compound or a small amount of Bar Keepers Friend paste, then buff with a soft cloth. Most standard quartz finishes are honed or low-polish, around a 400-grit equivalent, so don't chase a mirror shine if the rest of the counter isn't that way.
Pull the tape and inspect under different light angles. A good repair on a small chip reads nearly invisible. On heavily veined or patterned quartz it will still show if you get close, but from standing height it should look clean.
How do you color-match epoxy to your specific quartz?
Color matching is the hardest part of this repair. Quartz surfaces carry dozens of mineral colors, vein patterns, and glitter-like reflective particles that are almost impossible to copy exactly.
Here's the practical approach. Start with the base color of the quartz background, not the veins. Mix pigment into clear epoxy until the fill looks right in daylight. Get as close as you can. Once the primary fill cures and you've sanded it smooth, use an ultra-fine paint pen (Molotow or Posca brands work) to hand-draw veins or flecks on top of the cured epoxy. Seal that with a light coat of clear resin or a UV-cure pen.
This two-step technique, fill then detail, is what most stone restoration pros use on quartz. It won't fool a fabricator standing six inches away. At counter level in normal light, it looks good.
If your quartz has a brand name printed on the edge, search that brand plus the color name plus "touch-up kit." Several manufacturers and distributors sell premixed color-matched fillers for popular colors. Daltile, MSI, and some Cambria dealers carry them. A small kit runs $25 to $80 [2].
When should you call a professional fabricator instead of DIYing?
Some chips genuinely need a pro. Here's how to decide.
Call a fabricator if the chip is bigger than 3/4 inch in any dimension, if a crack extends from the chip more than two inches, if the chip sits on or near a cutout edge (sink, cooktop, or faucet holes), or if the piece is part of a waterfall or mitered edge. Cracks near cutouts are a stress problem, not a cosmetic one. A large fill with no structural support behind it can eventually cause a bigger break.
A professional stone repair costs $150 to $400 for most chip and crack jobs, though pricing swings by market and by whether the fabricator has to build scaffolding or cut the slab out for shop repair [2]. If the damage is bad enough to need a new slab section, you're paying for countertop installation plus material, which for quartz runs roughly $40 to $200 per square foot installed depending on material grade and location [4].
If you're a fabricator pricing a repair job, this is exactly the kind of line item that benefits from a structured quoting workflow. Shops using SlabWise build repair and touch-up services as custom line items so quotes stay consistent across technicians.
Homeowners who aren't sure whether damage qualifies for a pro repair should get at least two quotes. Most fabricators do a visual assessment for free.
How do you fix a chip in a granite countertop?
Granite chip repair follows the same basic process as quartz, with two differences: granite is a natural stone with no polymer binder, and it's more porous, so epoxy adhesion behaves a little differently.
Granite is a coarse-grained igneous rock made of interlocked crystals, mostly feldspar, quartz, and mica, with no resin matrix [5]. That means the chip edges are harder and less flexible than quartz chip edges, and you'll sometimes see the chip pop out as a clean piece instead of crumbling. If you still have the fragment, clean both surfaces with acetone and re-bond it with a two-part stone epoxy or a color-matched granite filler. Press firmly for five minutes, then let it cure 24 hours under a weight or clamp if you can.
No fragment? Fill with color-matched epoxy the same way you would for quartz, but expect the crystalline grain to fight your pigment. Granite flecks and crystal reflections are very hard to fake with pigment powder alone. Most professional granite repairs mix actual fine granite dust from the same stone into the epoxy for a closer visual match.
You can source that dust by lightly sanding an inconspicuous underside edge of the slab with 80-grit paper and catching the dust on a piece of tape.
For more on granite surfaces and their care, the granite countertops guide covers material properties in depth. Granite is porous, so sealing after any repair keeps moisture out of the repair site. The how to clean stone countertops guide covers sealer types and application.
One granite-specific note: on a polished granite surface, you may need a higher-grit final sand (up to 3000 grit) and a granite polishing compound to bring the repair back to a matching sheen. Granite polishes to a higher gloss than most quartz, so the final buffing step matters more.
What mistakes turn a small chip into a bigger problem?
The biggest one is rushing the cure. Epoxy scraped or sanded before it's fully hard pulls away from the chip edges and leaves a visible gap. Every product label lists a minimum cure time. Double it before you sand.
Second most common: too much acetone on the prep wipe. Acetone cleans well, but flood the chip cavity and let it pool, and it can soften or craze the surrounding resin binder in some quartz formulations. A quick, firm wipe is enough.
Third: overfilling and expecting one hard scrape to get you flush. Thick epoxy pads are tough to scrape without dragging across the adjacent surface and scratching it. Underfill slightly, cure, add a second thin layer, cure again, then scrape.
Fourth: color-matching under artificial light. Kitchen task lighting has a warm cast that makes epoxy color read different than it will in daylight. Check your mixed color under natural window light before you apply.
Fifth: skipping grit stages. Jumping from 400 straight to 1500 leaves 400-grit scratches that 1500 can't efficiently remove. Each grit does a specific job. Don't skip.
Can you prevent chips in quartz or granite countertops?
Quartz rates a 7 on the Mohs hardness scale, which sounds tough, and it is tough against most kitchen activity [7]. The edges and corners are the weak points. A cast iron pan dropped on a bullnose edge from counter height hits with enough force to chip or crack even well-made quartz.
The prevention habits that actually matter:
- Use a trivet or cutting board, not because quartz scratches easily from knives, but because the impact vibration of chopping near an edge over time can start micro-fractures.
- Don't use the countertop as a step stool or a work platform for heavy tasks.
- Pad the corners of heavy appliances when you move them near the counter edge.
- Watch the sink cutouts. The thin quartz bridge between the sink cutout and the counter edge is the most fragile part of any quartz installation.
Granite edges are just as vulnerable, especially on softer granite varieties. If you've had multiple chip events in the same spot, that area may have a small existing fracture that's spreading. A fabricator can look at it and inject consolidant to stabilize it before it becomes a full crack.
For how different countertop materials compare on durability and maintenance, the kitchen countertops overview covers the full lineup.
Does a repaired chip hurt the resale value of your home?
A well-executed small chip repair is invisible to nearly every buyer and most real estate agents. It won't show up on a general home inspection. The inspector hunts for structural, safety, and mechanical issues, not countertop cosmetics.
A sloppy repair is a different story. A fill that's discolored, raised, or crumbling flags in a buyer's mind and invites negotiation. The industry standard is that a repair is acceptable if you can't detect it from normal standing height in normal lighting [9]. If yours flunks that test, spend $150 to $400 to have a professional stone restoration company redo it before you list.
For large chips or cracks near cutouts that hurt the structural integrity of the slab, disclosure rules vary by state. Many states require sellers to disclose known material defects in a home's condition. A cracked countertop that could cause injury or further property damage might fall into that category depending on severity and your state's law [6]. When in doubt, disclose it and get it professionally repaired.
How is fixing a chip in quartz different from other countertop materials?
The repair varies more than people expect across materials.
Marble countertops chip similarly to granite but are softer (Mohs 3-4) and more porous, so epoxy adhesion is easier while moisture intrusion at the repair site is a bigger worry [7]. Always seal marble repairs.
Corian countertops and other solid-surface materials chip differently because they're homogeneous acrylic all the way through. You can often sand shallow chips out entirely. Deep chips get filled with matching acrylic compound and wet-sanded, and a skilled repair can be literally invisible because the color runs through the full depth [10].
Laminate countertops are the trickiest. The surface is a thin decorative layer over particleboard. A chip almost always exposes the core, and there's no good way to replicate the printed finish pattern. Color-matched laminate paste exists, but the result stays visible up close. For a large laminate chip, full section replacement often beats repair on cost.
Formica countertops, being a brand of laminate, follow the same logic.
Butcher block is its own case. A chip in butcher block countertops usually gets filled with food-safe wood filler, sanded, and re-oiled. Because wood is the finish surface, repairs blend more naturally with the grain.
Quartz sits in the middle: harder to scratch than most alternatives, repairable by a careful DIYer, but color-matching is genuinely hard on patterned slabs.
Frequently asked questions
How much does it cost to professionally repair a chip in quartz?
Professional quartz chip repair typically costs $150 to $400 depending on chip size, location, and local labor rates. Repairs near sink cutouts or on mitered edges cost more because they're structurally riskier and take longer. Full slab replacement runs $40 to $200 per square foot installed, so a professional repair almost always makes financial sense unless the slab is already old or heavily damaged.
Can I use super glue to fix a chip in quartz?
Super glue (cyanoacrylate) bonds quickly but turns cloudy, shrinks slightly as it cures, and won't sand to a smooth finish. Some fabricators use it as a sub-fill to stabilize loose chip fragments before applying epoxy over the top. As a standalone repair it produces a visible white or frosted patch. Use a two-part epoxy or UV-cure stone resin instead for any fill that needs to look good.
How do you fix a chip in a granite countertop at home?
Clean the chip with acetone, let it dry completely, then fill with a two-part color-matched stone epoxy. If you have the original chip fragment, re-bond it directly. For granite, mixing fine granite dust from the same slab into the epoxy helps match the crystalline grain. After curing 24 hours, scrape flush with a razor blade and wet-sand through 400, 800, and 1500 grit. Seal the repair area afterward.
How do you fix a granite countertop chip when you don't have the original piece?
Fill the cavity with a two-part epoxy tinted to match the granite's background color. Scrape fine dust from an inconspicuous edge of the same slab using 80-grit sandpaper and mix it into the wet epoxy to replicate the stone's grain. After curing, wet-sand through 1500 or 3000 grit and polish with granite polishing compound. The repair won't be invisible up close, but it will look clean from normal viewing distance.
Will a quartz chip repair void my warranty?
Most manufacturer warranties on quartz cover fabrication and material defects, not chips caused by impact. So a DIY repair generally doesn't void coverage on the rest of the slab. But if you have an active claim for a defect-related chip, check with the manufacturer before repairing. Brands like Cambria have transferable warranties with specific service processes, and making a DIY repair on a warrantied defect claim could close that claim.
How long does a quartz chip repair last?
A properly executed epoxy fill on quartz can last many years without failing if the chip was clean, the epoxy was mixed correctly, and full cure time was observed. The most common failure is the repair popping out because the chip edges weren't fully cleaned or the fill got scraped before hardening. Heat and UV exposure can discolor clear epoxy over time, which is why color-tinted fills tend to age more gracefully than clear ones.
What grit sandpaper should I use to finish a quartz chip repair?
Start at 400 grit to knock down the cured epoxy above flush, then move to 800 to erase the 400 scratches, then 1500 for a near-final finish. Most factory quartz surfaces have a polished or semi-polished finish equivalent to about 800-1500 grit. Use wet silicon carbide sandpaper and keep it wet throughout. A final light buff with a soft cloth and quartz polishing compound brings the sheen up to match.
Is there a repair kit made specifically for quartz countertops?
Yes. Several stone supply distributors and some manufacturers sell color-matched quartz repair kits, priced from $25 to $120. They usually include pre-tinted epoxy, a mixing card, a razor blade, and sometimes sandpaper. They're the easiest route if your quartz has a common color (whites, grays, blacks). Unusual or heavily veined patterns may not have a matching kit, in which case clear epoxy with custom pigment tinting is the better path.
Can a large crack in quartz be repaired without replacing the slab?
A crack running more than a few inches, especially one that reaches an edge or cutout, usually can't be repaired to a structurally sound state with DIY methods. A fabricator can inject epoxy consolidant into the crack, clamp it, and sand it flush, but a crack under stress (near a sink or cooktop cutout) may re-open. If the crack compromises the slab's integrity, section replacement or full replacement is the safer outcome.
Does homeowner's insurance cover a chipped quartz countertop?
Standard homeowner's policies cover sudden accidental damage under certain dwelling protection clauses, but countertop chips from normal use or impact are typically excluded as wear and maintenance items. If a chip resulted from a covered peril (like a falling object during a covered event), you may have a claim. Review your specific policy and call your insurer before paying for repairs, since a small claim may not clear your deductible.
How do you tell if a chip in quartz is getting bigger over time?
Put a piece of tape directly over the chip and draw a permanent-marker line across the chip edge onto the tape. Check it every few days. If the crack or chip margin has moved past the marker line, the damage is spreading and you need a professional to stabilize it. Growing chips almost always mean a stress fracture under the surface, more than cosmetic damage. Don't delay on a growing crack near a sink cutout.
Can you fix a chip in quartzite countertops the same way as quartz?
Quartzite is a natural metamorphic stone, not an engineered product, so it behaves more like granite than engineered quartz. The basic epoxy repair process is the same, but quartzite has no resin binder and is typically more porous, especially in softer varieties. Clean thoroughly with acetone, fill with color-matched stone epoxy, and seal after repair. See the quartzite care guide for more on the material's specific properties.
Sources
- USGS National Minerals Information Center: Quartz is the dominant mineral in engineered stone countertops, which contain approximately 90-95% crushed quartz bound with polymer resins.
- Angi (HomeAdvisor) Cost Guide: Countertop Repair: Professional countertop chip and crack repair costs $150 to $400 for most jobs; color-matched repair kits from distributors range $25-$120.
- Cambria Surfaces Warranty Documentation: Cambria offers a transferable limited lifetime warranty covering manufacturing defects in their engineered quartz surfaces.
- Angi (HomeAdvisor) Cost Guide: Quartz Countertop Installation: Quartz countertop installation costs roughly $40 to $200 per square foot installed depending on material grade and regional labor markets.
- USGS National Minerals Information Center: Granite is a coarse-grained igneous rock composed primarily of feldspar, quartz, and mica crystals with no polymer binder.
- National Association of Realtors: Most states require sellers to disclose known material defects in a home's condition that could affect value or safety.
- Mohs Hardness Scale, USGS Education: Quartz rates 7 on the Mohs hardness scale; marble rates 3-4, making quartz significantly more scratch-resistant than marble in countertop applications.
- EPA Safer Choice Program: The EPA Safer Choice program provides guidance on chemical safety for adhesives and sealers used in building material repair.
- Natural Stone Institute: Professional stone repair standards call for chip repairs to be undetectable from normal standing distance in normal lighting conditions.
- International Surface Fabricators Association (ISFA): Solid-surface materials like Corian can be repaired by sanding because their color and composition are uniform through the full material depth.
Last updated 2026-07-09