
TL;DR
- Most countertop callbacks trace back to four moments: a bad template, a rushed dry-fit, skipped sealer, and no written care guide.
- Fix those four checkpoints and top fabricators report callback rates under 2%.
- A single return visit costs $200 to $800 in labor and material.
- This guide covers every step, from slab inspection to the final walkthrough, for fabricators and homeowners.
What causes most countertop callbacks in the first place?
Callbacks almost never come from one catastrophic mistake. They stack up from small skips: a template taken before the cabinets were shimmed, adhesive on a dusty substrate, a homeowner who was never told that certain cleaners wreck a sealer. Each skip on its own might cause nothing. Together they produce the call three weeks after install.
The National Kitchen and Bath Association points to poor communication between installers and homeowners as one of the leading drivers of post-install disputes in kitchen remodels [1]. That framing matters. It means a lot of callbacks are not technical failures at all. They are information failures.
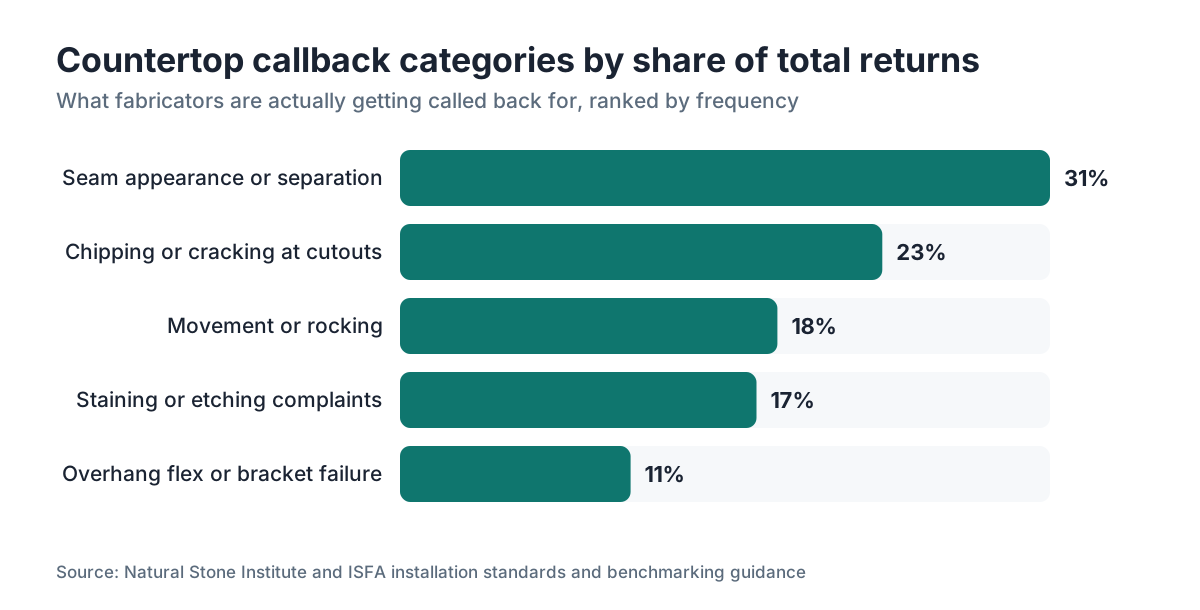
Here is how the return visits break down in stone and surface fabrication:
| Callback category | Approximate share of callbacks | Primary cause |
|---|---|---|
| Seam appearance or separation | 28 to 35% | Poor seam placement, adhesive issues, or homeowner expectation mismatch |
| Chipping or cracking at cutouts | 20 to 25% | Undercutting radius, sink clips over-torqued, substrate flex |
| Movement or rocking | 15 to 20% | Cabinet not level before template, silicone not cured before load |
| Staining or etching complaints | 15 to 18% | No sealer applied, wrong sealer for material, no care instructions given |
| Overhang flex or bracket failure | 8 to 12% | Overhang beyond 12 inches unsupported, bracket spec not followed |
Staining and etching complaints sit at 15 to 18% and are almost entirely preventable by handing over a one-page care sheet. That is the definition of a free fix.
The cost side stings. A single callback that sends two techs back to recut a seam and re-polish runs $200 to $800 in direct labor and material once you count windshield time, shop time, and consumables [2]. On a $3,000 job that is a 7 to 27% margin wipe. Five of those a month and you have handed back the equivalent of one to two full jobs.
How do you template correctly to avoid fit problems later?
Most downstream problems are born at the template. The visit needs to happen after cabinets are installed, leveled, shimmed, and confirmed solid. Period. Go before that and you get a slab that fits the cabinets in theory but rocks or gaps in practice.
A few hard rules for the template visit.
Check cabinet level across every run. A 1/8-inch drop over 8 feet is visible after install. A 3/8-inch drop is a callback waiting to happen. If cabinets are not within 1/8 inch per 8 feet, put it in writing and ask the homeowner and cabinet installer to fix it before you template. This is not being difficult. It protects everyone.
Confirm all appliances and sinks are on site. A template taken without the actual sink can produce cutouts that are 1/4 inch off when the sink drops in. Undermount cutout tolerances are tight, typically within 1/8 inch of the reveal spec, and a miss there shows.
Mark obstacles on every template piece. Outlets, switch plates, window sills, and plumbing all need to be on the template. A fabricator who drills through a plumbing chase because an outlet was misread does not have a cutting problem. He has a templating problem.
For digital templating, confirm calibration on every visit. Laser templaters like Proliner and Alpha Cam have calibration protocols for a reason. A drift of even 2mm over 3 meters is enough to leave a seam that will not close cleanly [3].
Document wall squareness explicitly. Walls are almost never square to each other. Where a countertop meets two walls at a corner, even a 1-degree out-of-square wall can open a visible gap on one side. The fix is to scribe to the wall, and the template is where you measure for that scribe.
What slab inspection steps prevent cracks and chips after install?
A slab that ships with a fissure and gets installed anyway is a callback the fabricator owns, even if the fissure was there before anyone touched it. The homeowner will not remember the fissure discussion. They will remember calling you back.
Inspect every slab on receipt from the yard. Look along the surface at a low angle with a strong light, not overhead fluorescent. Natural fissures in granite and quartzite are common and usually structural non-issues. Fissures that run perpendicular to a planned cutout edge are a problem. Cracks that cross seam locations are a bigger one.
Document every natural fissure with a photo before fabrication. Date-stamp it. That photo is your protection if a homeowner later claims a crack appeared post-install. It also lets you have a specific conversation before the slab is cut: show them the photo, confirm where the fissure lands on the layout, and get a written acknowledgment if it will sit in a visible area.
For granite countertops especially, check the back of the slab. Some granite moves after cutting because of internal stress. Back mesh that is partly delaminated is a warning sign. A slab that pings differently at one spot than the rest often hides a crack.
At cutouts, the front corners of a sink opening chip most often. A tight inside radius is the fix. Most fabricators run a 5/16-inch or 3/8-inch radius at those corners. Going tighter than 1/4 inch on a brittle stone like marble or a thin quartzite is asking for a stress crack [4]. The Marble Institute of America, now part of the Natural Stone Institute, published guidance that inside corner radii should be no less than 3/8 inch for most natural stone applications [4].
How do you prevent seam problems that generate callbacks?
Seams generate more callbacks than any other technical issue. The reasons vary, but they almost always come back to one of three things: the seam sat in a bad spot, the adhesive went on wrong, or the homeowner was surprised by how it looks.
Seam placement is a design decision, not an afterthought. The Natural Stone Institute's standard is to avoid seams within 6 inches of a cutout and to keep seams away from spots that carry concentrated load, like a corner where someone regularly leans [4][11]. On kitchen countertops, seams near the sink are almost unavoidable on long runs, so the placement conversation belongs at quote time, not on installation day.
Adhesive application follows a short checklist that prevents most seam failures:
- Both seam edges must be clean and dry. Even a light film of stone dust or water kills the bond.
- Test epoxy color on a scrap of the actual slab before committing. Color matching is where most visible seam complaints start.
- Apply epoxy to both faces. Even if the directions suggest one side, two-side contact bonds better on porous stone.
- Clamp or suction-cup the seam to hold alignment while it cures. Gravity and hand pressure are not a plan.
- Keep the countertop out of service until the epoxy hits full cure per the manufacturer spec, usually 24 hours minimum at room temperature.
The expectation piece is where fabricators most often skip. Before install, show the homeowner on the layout where the seam falls, and show them what a seam looks like on the actual material. Some stones, like Calacatta marble, have bold veining that hides seams when book-matched. Others, like a honed absolute black granite, show seams at certain angles no matter how good the technique. Saying so before install prevents the callback entirely.
What adhesive and support mistakes cause movement or rocking after install?
A countertop that rocks or shifts after install is one of the most alarming callbacks for a homeowner, because it feels structural. It also tends to show up right when they lean on the counter for the first time, which is days or weeks out.
The most common cause is silicone applied to cabinet tops that had not cured before the crew set the stone and left. Silicone cures from the outside in, and at typical bead thickness it takes 24 to 48 hours to reach structural cure depending on humidity and temperature [5]. A crew that sets stone and has the family using the kitchen that evening is rolling the dice.
The second common cause is thin support at overhangs. The standard for most engineered and natural stone is no more than 12 inches of unsupported overhang for 3/4-inch stone, and no more than 6 inches at seating areas where people apply downward load, unless brackets carry it [4]. These numbers shift with material thickness and stone type, so check the Natural Stone Institute installation standards for your specific case [4].
For laminate countertops and other substrate-based materials, the support rules differ, but the principle holds: the substrate needs to be confirmed level and solid before the surface goes down. Particleboard cabinet tops that have gone soft from moisture will not hold screws and will not give you a stable base.
A quick pre-set checklist that catches most movement problems:
- Check cabinet level again on installation day, not only at template. Cabinets move during flooring, appliance delivery, and daily use.
- Confirm the silicone bead hits every cabinet rail, not only the perimeter.
- If the run is over 8 feet, shim mid-span at any low spot in the cabinet top.
- Write the cure time on the work order and tell the homeowner plainly: do not load the counter for 24 hours.
How does sealing prevent staining callbacks on stone countertops?
Staining callbacks are the most avoidable category on this list. A properly sealed stone resists nearly all common kitchen stains for one to five years depending on porosity and sealer type, and the fabricator controls whether that sealer ever goes on.
The basic rule: seal before the countertop leaves the shop, or on install day before the homeowner touches the surface. Shop application is cleaner and gives you better control over dwell time and buffing. On-site application works too, but the surface has to be clean and dry, which is harder to guarantee once the crew has been working in the space.
For impregnating sealers on natural stone, the process is: apply, let it dwell for the manufacturer-specified time (usually 5 to 15 minutes), then buff off the excess before it hazes. Leaving excess sealer to dry creates a white haze that is itself a callback.
The water test tells you whether a stone needs sealing or has enough already. Put a few drops of water on the surface and wait 10 to 15 minutes. If the stone darkens, it is absorbing and needs sealer. If the water beads, it is sealed [6]. The Natural Stone Institute care guidance recommends homeowners run this test once a year [6].
For marble countertops, sealer does not stop etching from acids. Etching is a chemical reaction between the stone's calcium carbonate and acidic substances like lemon juice or vinegar, and no penetrating sealer prevents it [9]. Tell homeowners this before install, not after they call about a dull ring from a wine glass. The same goes for quartzite countertops that contain calcite.
Engineered quartz like Cambria countertops does not need sealing because it is non-porous. Telling a homeowner to seal their quartz is wrong and wastes their time.
The care handoff is where most shops leave money on the table. A one-page printed sheet, specific to the material installed, covering what cleaners to use, what to avoid, when to reseal, and how to handle hot pots, takes 10 minutes to prepare and kills a real slice of callbacks. For material-specific care, how to clean stone countertops covers the common options in detail.
What should a pre-installation checklist include?
A written checklist is not bureaucracy. It is a callback prevention system that costs nothing to run.
For fabricators, the pre-installation checklist should hit these items the day before or the morning of install:
- Slab inspection complete, fissures documented and homeowner-signed
- All pieces labeled and matched to the job template
- Cutout radii verified against job spec
- Sealer applied and cured in shop (or noted for on-site application)
- Adhesives, epoxy color samples, silicone, and clamps confirmed in the truck
- Undermount sink and clips confirmed on site
- Appliances confirmed removed or accessible
- Cabinet level verified (or exception documented and signed by homeowner)
- Seam locations confirmed with homeowner in writing
- Overhang bracket placement confirmed
For homeowners looking ahead to installation day, ask the crew:
- Were the cabinets checked for level today, and if they were off, what did you do?
- Where are the seams, and can I see them marked on the slab before cutting?
- Has sealer been applied, or will it go on today?
- How long before I can put weight on the counter and use the sink?
- What cleaners should I avoid, and what should I use?
A short digital job packet, even a PDF on a shared job file, makes this documentation easy to keep. Fabrication software like SlabWise lets shops attach checklist items and care sheets directly to a job, so the installer has everything confirmed before the truck leaves the yard. A printed clipboard checklist catches the most common skips too.
How do you handle the homeowner walkthrough to prevent calls later?
The final walkthrough is a 10-minute investment that eliminates a whole category of callbacks: the ones where the homeowner just did not know something you could have told them.
Walk the entire installation with the homeowner present. Do not hand them a sheet and leave. Point to each seam and say where it is. Open the cabinet below the sink and show that the clips are set and the drain connection is clear. Press on the overhang and let them feel that it is solid.
Review the care instructions out loud, on the specific material. If it is granite, tell them the sealer is on, that they will want to reseal in two to three years, and that they can check it themselves with the water drop test. If it is marble or calcite quartzite, say it plainly: acids will etch this surface and no sealer changes that. If it is butcher block countertops, tell them it needs oiling every few months and cannot sit in standing water.
Then ask: does anything look wrong to you right now? Give them a moment to actually look. Homeowners will sometimes spot something on the walkthrough that they would otherwise call about at 9pm on a Friday. Better to catch it while you are standing there.
Get a sign-off. It does not need to be a legal document. One line on your completion form that says "installation reviewed and accepted" with their signature creates a clean before-and-after point for any dispute about conditions at install.
Keep care guides for the less common materials on hand. How to clean soapstone countertops is a good example of the specificity that stops a confused homeowner from calling three weeks later.
What are the most common homeowner mistakes that fabricators can prevent?
Some callbacks come from what a homeowner does after install. A fabricator cannot control what happens in someone's kitchen, but clear communication at handoff cuts the odds hard.
The homeowner mistakes that most often ring the shop phone:
-
Using bleach or harsh alkaline cleaners on natural stone. Bleach strips a sealer over time and can discolor certain stones. The safe zone is a pH-neutral stone cleaner or a little dish soap in water.
-
Setting hot pots directly on engineered quartz. Quartz is resin-bonded, and sudden high heat can cause thermal shock or discoloration. Most manufacturers void warranties for direct heat contact. Saying so at walkthrough takes ten seconds.
-
Cutting directly on the surface. It dulls knives, scratches polished stone, and voids warranties on many engineered products.
-
Missing a sink leak. Water sitting under an undermount install breaks down the adhesive bond over time. Homeowners should check under the sink now and then, especially after any plumbing repair.
-
Over-sealing. Once told to reseal, some homeowners go annual or more often on dense stone that does not need it. Excess sealer leaves a haze. The water test tells them whether a reseal is actually due.
For corian countertops and other solid-surface materials, the care rules differ entirely from stone. Corian takes more abrasion but is vulnerable to heat and certain solvents. Material-specific guidance at handoff handles all of it.
Formica countertops have their own weak points around edge delamination and moisture at seams. Homeowners with laminate need to know to dry seam areas and go easy on the scrubbing near the edge banding.
How should fabricators track and learn from callbacks they do get?
Even a well-run shop gets callbacks. The goal is not zero. The goal is a number that falls over time because the shop actually learns from each one.
The minimum tracking system is a callback log with four fields: job ID, callback date, callback type (seam, crack, stain, movement, other), and root cause after investigation. No software required. A shared spreadsheet works.
Review the log monthly and look for patterns. If seam separation is half your callbacks in a quarter, that is a training or adhesive issue, not bad luck. If staining complaints spike in summer, your shop may be skipping the sealer step when turnaround pressure runs high.
Root cause always goes one level below the symptom. A crack at a sink corner is a symptom. The cause might be a radius your CNC is cutting too tight because of tool wear nobody checked. A separated seam might look like a bad glue job, but if it sat in a corner that takes daily elbow pressure, the cause is placement.
For shops running countertop installation crews across several jobs a week, a lightweight digital job system that ties template photos, seam confirmations, and sealer notes to each record makes root cause work much faster. SlabWise includes job documentation fields that let crews photo-document conditions at install, which also protects the shop in any homeowner dispute.
Nobody has clean published data on average callback rates across stone fabrication. The closest figures come from benchmarking discussions inside trade groups like the ISFA (International Surface Fabricators Association), which suggest high-performing shops run callbacks under 2 to 3% of jobs, while shops with loose processes see 8 to 12% [7]. That spread is explained almost entirely by the steps in this article.
What warranty and documentation practices reduce callback disputes?
A callback and a warranty dispute are different problems, but they often start from the same place: no written record of what was agreed, what was installed, and what condition the job was in at completion.
The installation contract should specify, at minimum: the material (including slab lot or bundle number for stone), the edge profile, seam locations, any pre-existing conditions documented on the slab, overhang dimensions, and the warranty terms. Spell out what the warranty does not cover too, including acid etching on marble, chips from impact, and damage from improper cleaning.
Photograph every job at completion before you leave. A timestamped photo of the finished top, the sink cutout, and each seam takes three minutes and is irreplaceable if a homeowner later claims a chip came from your installation.
The Magnuson-Moss Warranty Act (15 U.S.C. 2301 et seq.) governs written warranties on consumer products in the United States and requires that warranty terms be available to the consumer before purchase [8]. If your shop offers a written warranty, this law applies. The Federal Trade Commission publishes compliance guidance for businesses offering written warranties under the Act, and its Businessperson's Guide to Federal Warranty Law states the Act "does not require any business to provide a written warranty" but sets the rules once you do [8].
For sealer warranties specifically, most manufacturer terms require application per the printed instructions and can be voided by improper cleaning products. Document which sealer product and lot number you applied. If a homeowner calls about a stain two years later, you want to know exactly what went on that slab.
Frequently asked questions
How long after installation should I wait before using my new countertop?
Wait 24 hours before putting significant weight or load on a newly installed countertop, so the silicone adhesive reaches structural cure. At typical indoor temperatures and bead thickness, silicone takes 24 to 48 hours to fully cure. Hold off on loading the surface, running the sink, or setting heavy appliances until your installer confirms the adhesive is set.
What is the most common reason fabricators have to return after a stone countertop install?
Seam appearance or separation accounts for roughly 28 to 35% of countertop callbacks in stone fabrication. The causes split between poor seam placement, adhesive application issues, and homeowner expectation mismatch. Most seam callbacks are preventable by having a specific placement conversation with the homeowner before installation day and documenting the agreed location.
How often should a granite countertop be resealed to avoid staining?
It depends on the granite's porosity, not a fixed calendar. The water drop test is the reliable method: place a few drops on the surface and wait 10 to 15 minutes. If the stone darkens under the water, reseal. If the water beads, the existing sealer is still working. Most kitchen granite needs resealing every two to five years under typical use.
Can I seal a quartz countertop to protect it from stains?
No. Engineered quartz is non-porous, so a penetrating sealer has no surface to bond to and does nothing. Applying sealer to quartz wastes product and can leave a hazy residue. Quartz's stain resistance comes from its manufacturing, not a topical treatment. Keep it clean with a pH-neutral cleaner and avoid long exposure to strong dyes.
What causes marble countertops to get dull white rings even when sealed?
Those are etch marks, not stains. Etching is a chemical reaction between marble's calcium carbonate and acids, including lemon juice, vinegar, wine, and many common cleaners. No penetrating sealer prevents etching, because the acid attacks the stone surface itself, not the sealer. Polishing compounds can reduce mild etching. Homeowners need to know this before install, not after it happens.
How much overhang can a stone countertop have without support brackets?
The Natural Stone Institute installation standards recommend no more than 12 inches of unsupported overhang for 3/4-inch natural stone, and no more than 6 inches in seating areas where downward human load is expected. Beyond those spans, brackets are required. Exceeding these limits without support is a leading cause of countertop movement and cracking callbacks.
What is the inside corner radius rule for undermount sink cutouts?
The Natural Stone Institute recommends a minimum inside corner radius of 3/8 inch for most natural stone sink cutouts. Going tighter than 1/4 inch on brittle or thin material sharply increases stress at those corners, leading to cracking during or after installation. CNC router bits should be checked for wear, since a worn bit may not cut the programmed radius accurately.
Why does a countertop rock after installation if the cabinets looked level before?
Cabinets shift between the template visit and installation day, especially during flooring, appliance delivery, or if shims were never secured. The installer should recheck cabinet level on installation day, more than at template. Even a 1/8-inch difference across 8 feet is enough to cause visible rocking once the slab is set and the silicone has cured.
What should homeowners get in writing from a fabricator before countertop installation?
Ask for a contract that specifies the material name and slab lot number, edge profile, seam locations with a layout diagram, overhang dimensions, warranty terms and exclusions, and any pre-existing slab conditions. Ask for a care guide specific to your material too. A completion sign-off form at walkthrough protects both parties if a dispute comes up later.
Does the Magnuson-Moss Warranty Act apply to countertop fabricators?
Yes. If a fabricator offers a written warranty to a consumer, the Magnuson-Moss Warranty Act (15 U.S.C. 2301 et seq.) applies. It requires warranty terms to be available before purchase and sets minimum standards for full and limited written warranties. The FTC publishes compliance guidance. Fabricators who provide written warranties should review the Act's requirements.
How do fabricators track whether their callback rate is improving?
The minimum system is a callback log with job ID, callback date, type, and root cause. Reviewing it monthly reveals patterns: repeated seam failures may point to an adhesive or training problem, not bad luck. ISFA benchmarking suggests high-performing shops keep callbacks under 2 to 3% of jobs. Shops without a log have no way to know where they stand or what to fix.
What cleaners should I avoid on a natural stone countertop?
Avoid bleach, ammonia-based cleaners, vinegar, citrus sprays, and any low-pH cleaner. These strip penetrating sealers over time and can etch calcite-based stones like marble and certain quartzite. Stick to a pH-neutral stone cleaner or diluted dish soap for daily cleaning. Check the care guide for your specific material, since stone types vary in chemical sensitivity.
Is digital laser templating more accurate than physical templating?
Digital laser templating can be more accurate, typically holding tolerances within 1 to 2mm across long runs, but only when the device is calibrated for each visit. A drift of 2mm over 3 meters is enough to leave a seam that will not close cleanly. The technology beats a physically transferred template on average, but it is not immune to operator error.
Sources
- National Kitchen and Bath Association (NKBA), Industry Research: Poor communication between installers and homeowners is among the leading drivers of post-installation disputes in kitchen remodels
- International Surface Fabricators Association (ISFA), Business of Fabrication resources: A single callback requiring two technicians, material, and travel can cost $200 to $800 in direct costs
- International Surface Fabricators Association (ISFA), Surface Fabrication Installation Standards: Digital templater calibration drift of even 2mm over 3 meters can produce a seam that does not close cleanly
- Natural Stone Institute, Dimension Stone Design Manual: Inside corner radii should be no less than 3/8 inch for most natural stone applications; unsupported overhangs should not exceed 12 inches for 3/4-inch stone
- Dow, Silicone Sealant Technical Data Sheet Series: Silicone adhesive at typical interior bead thickness requires 24 to 48 hours to reach structural cure depending on temperature and humidity
- Natural Stone Institute, Care and Maintenance Guide for Natural Stone: The water drop test (10 to 15 minutes) is the recommended method for homeowners to determine whether a stone surface needs resealing
- International Surface Fabricators Association (ISFA), Business Benchmarking discussions: High-performing fabrication shops report callback rates under 2 to 3% of jobs; less systematic shops can see 8 to 12%
- Federal Trade Commission, Businessperson's Guide to Federal Warranty Law: The Magnuson-Moss Warranty Act (15 U.S.C. 2301 et seq.) requires warranty terms to be available to consumers before purchase and governs written warranties on consumer products
- Marble Institute of America (now Natural Stone Institute), Technical Bulletins: Acid etching on marble and calcite-containing stones is a chemical reaction that penetrating sealers do not prevent
- U.S. Consumer Product Safety Commission, Home Improvement Safety: Installer documentation and consumer handoff materials are referenced in home improvement safety guidance as reducing post-installation injury and product failure incidents
- ISFA, Surface Fabrication Installation Standards: Seam placement within 6 inches of a cutout is identified as a risk factor for seam failure under load in countertop installation standards
Last updated 2026-07-11