TL;DR
- The best finish for butcher block countertops depends on how you use them.
- Food-safe mineral oil or a hardwax oil works for cutting surfaces.
- Polyurethane or water-based varnish protects better around sinks and heavy moisture.
- Expect 3-7 coats, 24-48 hours between coats for oils, and a full cure of 3-30 days depending on the product.
What are the real differences between butcher block finishes?
There are three families of finish for butcher block, and they behave nothing alike.
Penetrating finishes, mainly mineral oil and hardwax oils, soak into the wood fiber. They don't build a surface film. That means they're easy to spot-repair and food-safe once dry, but they offer minimal water resistance and need re-application every one to three months depending on use [1].
Film-building finishes, polyurethane, varnish, and lacquer, cure on top of the wood to form a hard shell. They resist water, stains, and heat far better than oils. But when they fail they peel and scratch rather than wearing gracefully. Repairs mean stripping and sanding back to bare wood [2].
Hardwax oils sit between the two. They penetrate but also form a micro-thin surface layer. Brands like Rubio Monocoat and Osmo Polyx cure to a finish that's tougher than pure mineral oil and easier to maintain than polyurethane. That's why they show up in a lot of professional kitchen installs.
There's no single best option. If you cut directly on the surface, you want something in the penetrating category, because a film finish chips under knife edges. If the countertop lives next to a sink and rarely sees a cutting board, a film finish wins on durability.
Choosing wrong costs you real time. Stripping a polyurethane finish to switch to oil means renting or buying a random-orbit sander, going through 80- to 120-grit paper, and starting over. Make the call before the first coat goes on.
How do you make a butcher block countertop from scratch?
If you're building your own rather than buying a pre-made panel, here's the short version of how to make a butcher block countertop.
Start with dried hardwood. Hard maple (Acer saccharum) is the industry standard for butcher block, running 1,450 lbf on the Janka scale [3]. Red oak and walnut work but are softer or more expensive, respectively. Moisture content should be between 6% and 8% before you mill anything, or the finished slab will move after assembly.
Rip boards to consistent width, typically 1.5 inches for face-grain construction or 3.5 inches for edge-grain. Face-grain shows the widest face of each board and looks like a cutting board. Edge-grain shows the long edge, which is harder and more uniform in appearance. End-grain, the cathedral-ring surface, is the most durable for cutting but the hardest to flatten and finish.
Glue-up comes next. Use a waterproof glue rated for food contact once cured. Titebond III Ultimate Wood Glue, once cured, meets FDA regulation 21 CFR 175.105 for incidental food contact [4]. Clamp at 150-250 psi of clamping pressure across the width and let it sit at least 24 hours at room temperature above 50°F.
After the glue dries, flatten the slab. Professionals run it through a wide-belt or drum sander. At home, a hand plane followed by a random-orbit sander gets you there, but it takes longer. Start at 80 grit and work through 120, 150, and 180. Stop at 180 unless you're applying a penetrating oil, in which case 220 or even 320 grit helps the oil absorb more evenly.
For more context on how butcher block fits into the broader countertop market, the butcher block countertops guide covers pricing, species comparisons, and installation options.
What do you need before you start finishing?
Surface prep matters more than product choice. A finish applied over an uneven, dusty, or oily surface fails faster and looks worse.
You'll need: random-orbit sander with 80-, 120-, 150-, and 180-grit discs; shop vacuum with a dust bag or HEPA filter; tack cloth or lint-free microfiber; mineral spirits for cleaning (if using oil) or just a dry wipe (if using water-based finish); the finish product and applicator appropriate for that product; nitrile gloves; and good ventilation.
If the countertop was factory-sanded, check the grit. Many pre-made panels come sanded to 150. You can usually start applying finish at that stage, but give the surface a quick pass with 180 grit to knock down any mill glaze, which is a faint burnishing left by machine sanding that reduces absorption.
Any prior finish means stripping to bare wood. There's no shortcut. A random-orbit sander with 80-grit paper followed by progressively finer grits gets you there.
Work in a space above 50°F and below 90°F. Most finishes, particularly water-based ones, fail to cure properly below 55°F [2]. Humidity affects drying too: above 70% relative humidity slows oil curing noticeably.
How do you apply mineral oil to a butcher block countertop?
Mineral oil is the starting point for most food-prep surfaces, and the process forgives mistakes.
Use food-grade mineral oil, the same product sold as a laxative at pharmacies, or a product marketed for butcher block. Do not use vegetable oil, olive oil, or coconut oil. Those oils turn rancid inside the wood over time and create an off-putting smell that no amount of cleaning removes [1].
Step 1: Sand to 180 grit and vacuum all dust. Wipe with a dry lint-free cloth.
Step 2: Warm the oil slightly if you can, about 90-100°F. Warm oil absorbs faster. A few minutes in a bowl of hot water does it.
Step 3: Apply a generous coat with a lint-free cloth or brush. Work it into the surface in the direction of grain. The wood will look wet.
Step 4: Let it sit 20-30 minutes, then wipe off any oil the wood hasn't absorbed. Leaving excess oil on the surface leads to a sticky, gummy film that never fully dries.
Step 5: Wait at least 24 hours before the next coat. Apply a minimum of 3 coats for a new countertop, and many finishers recommend 5-7 coats on initial application.
The wood is saturated when new oil sits on the surface after 10-15 minutes without absorbing. At that point, stop adding coats.
After the initial saturation, re-apply every 1-3 months depending on how much water exposure the counter gets. Many people combine mineral oil with beeswax as a paste (sold as 'board cream') to add a small amount of surface protection between oil treatments.
How do you apply a hardwax oil like Rubio Monocoat?
Hardwax oils cost more than mineral oil but give you better water resistance with a similar food-safe profile once cured. Rubio Monocoat claims one-coat coverage on bare wood thanks to its reactive molecular bonding [5]. Osmo Polyx typically calls for two coats.
The process differs from mineral oil in a few ways.
Step 1: Sand to 120 grit. Counterintuitively, a slightly coarser grit helps hardwax oils bond. Rubio recommends 120 grit for bare wood [5].
Step 2: Apply a very thin coat with a lint-free white Scotch-Brite pad, working in the direction of the grain. These products are designed to go on thin. Applying too much, a common mistake, actually slows curing and leaves a greasy surface.
Step 3: Buff the excess off with a clean cloth after 3-5 minutes. The rule: if you can write in it, you applied too much.
Step 4: Initial cure takes 24-36 hours. Full hardness develops over about 5 days at room temperature.
Hardwax oils answer well for people who want a natural-looking, low-sheen finish that's easier to maintain than polyurethane but tougher than pure mineral oil. On the food-safe question: Rubio Monocoat's product data sheet states the finish is food-safe once fully cured, which they define as 5-7 days [5]. Check the specific product's Technical Data Sheet for the finish you buy, because formulations vary.
How do you apply polyurethane or varnish to butcher block countertops?
If the countertop won't see direct knife contact and sits in a wet zone near a sink, polyurethane is often the right call. It's not glamorous, but it holds up.
Oil-based polyurethane takes longer to dry (4-8 hours between coats) but tends to be harder and more amber in color, which can warm up lighter woods. Water-based polyurethane dries in 2-3 hours, stays clearer, and has lower VOC emissions [2].
Step 1: Sand to 180 grit. Vacuum and wipe with a tack cloth.
Step 2: Apply a thin first coat with a good-quality brush or foam applicator. Thin brushstrokes in the direction of grain. Don't overload the brush.
Step 3: Let it dry per the manufacturer's time, typically 2-4 hours for water-based, 6-8 hours for oil-based. Lightly sand with 220-grit sandpaper or a gray Scotch-Brite pad between coats. This knocks down dust nibs and gives the next coat something to grip.
Step 4: Wipe off the sanding dust with a tack cloth before each new coat.
Step 5: Apply 3 coats minimum. High-traffic or wet areas benefit from 4-5 coats.
Full cure for oil-based polyurethane is typically 30 days. Water-based is usually ready for light use in 7 days, full hardness in 21-30 days [2]. Put nothing heavy or wet on the surface during that cure period.
VOC note: California's Air Resources Board (CARB) regulates VOC content in architectural coatings. Oil-based polyurethane typically exceeds CARB's 275 g/L limit for varnishes sold in California, so check your product label if you're in a regulated state [6].
How do you finish the edges and underside of butcher block countertops?
The edges and underside are easy to overlook and they cause real problems when you do.
Raw wood edges absorb water from cleaning and humidity faster than any other surface. That moisture swells the wood unevenly, which can cup or warp the slab over time. Apply the same finish to all four edges as you do the top, same number of coats.
The underside matters too. Seal the top and leave the bottom raw, and the slab tries to absorb moisture asymmetrically. It will likely cup toward the finished side. Apply at least two coats of oil to the underside, or one coat of whatever film finish you're using on top. It doesn't need to look perfect, just to be sealed.
Be extra diligent at the sink cutout if you're using an oil finish. Water pools around sink rims. Some installers run a bead of silicone sealant around the sink perimeter to keep standing water off the wood entirely. That's a smart move.
Think about countertop installation details early, because decisions about sink type, overhang depth, and support blocking all interact with how you finish and maintain the edges.
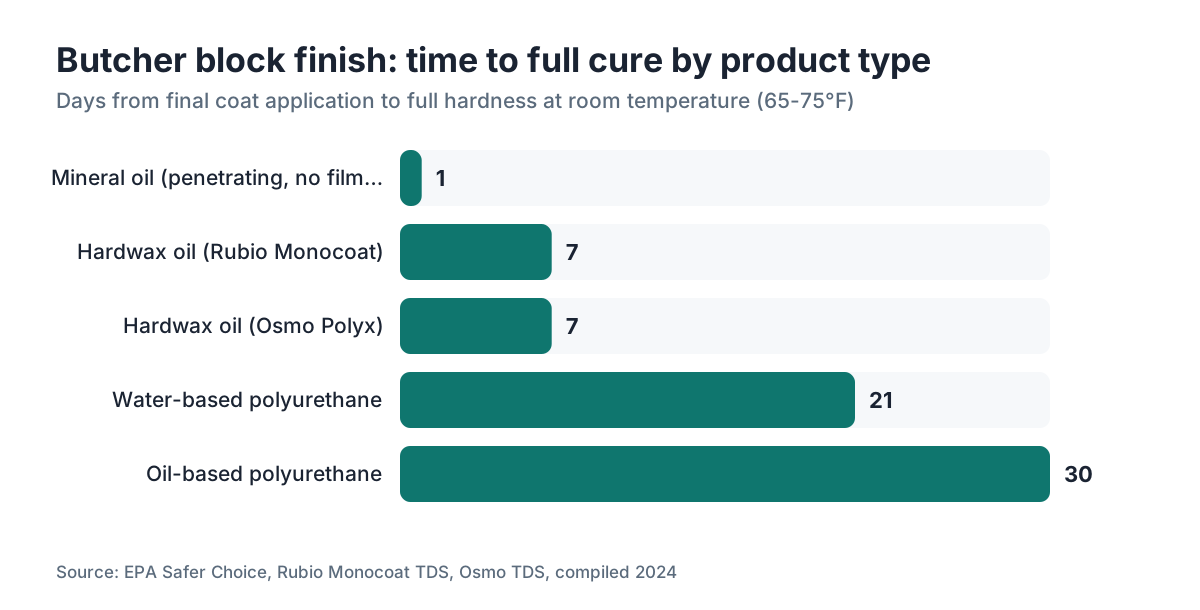
How long does butcher block finish take to dry and cure?
Drying time and cure time are different things, and confusing them causes most finish failures.
Drying means the surface is no longer tacky and you can add another coat or set light objects on it. Cure means the finish has reached full hardness through chemical cross-linking or oxidation, and it can handle real use.
Here's a comparison of typical timelines:
| Finish type | Between coats | Light use | Full cure |
|---|---|---|---|
| Mineral oil | 24 hours | After final coat + 24 hrs | No chemical cure; absorbs in stages |
| Hardwax oil (Rubio Monocoat) | N/A (1 coat) | 24-36 hours | 5-7 days [5] |
| Water-based polyurethane | 2-3 hours | 7 days | 21-30 days [2] |
| Oil-based polyurethane | 6-8 hours | 24-48 hours | 30 days [2] |
| Lacquer | 30-60 minutes | 24 hours | 7-14 days |
Temperature and humidity shift these numbers. In a cold garage (below 60°F) in winter, add 50% to any estimate. High humidity slows water-based finishes especially.
Here's the practical advice. If the countertop goes in before the kitchen project is finished, apply the finish, mark the cure-complete date on a piece of tape stuck to the cabinet below, and don't let anyone use the surface as a staging area for tools and paint cans during that window.
What about food safety? Is any butcher block finish safe for food contact?
The short answer: pure mineral oil, beeswax, and properly cured hardwax oils are food-safe. Polyurethane and varnish are generally considered safe once fully cured, but they're not meant for surfaces where food is cut directly.
The FDA regulates indirect food contact surfaces under 21 CFR Part 175 [4]. Finishes used in food processing environments have to meet those standards. For home countertops, the standard isn't legally enforced, but the logic is the same: once a film finish is fully cured, it's inert and doesn't leach into food.
The practical issue with polyurethane and direct food prep isn't the toxicity of the cured finish. It's that knives chip the surface, and those chips get into food. That's the real reason film finishes don't belong on cutting surfaces.
Want a countertop you can cut on that's unambiguously food-safe? Use a penetrating oil or hardwax oil. Keep a good cutting board out anyway, for the sake of your knives and the countertop.
Food-safe mineral oil costs roughly $10-20 per quart at a pharmacy or kitchen store. Specialty butcher block conditioners (mineral oil plus beeswax) run $15-30 for 15 oz and last several applications [1].
How do you maintain and refinish butcher block countertops over time?
Maintenance is where butcher block either becomes a favorite kitchen fixture or a headache, and it depends almost entirely on finish choice.
For oil-finished surfaces: re-oil when the surface starts to look dry or whitish, or when water no longer beads but soaks straight in. That might be every month for a heavy-use kitchen or every six months for a countertop that rarely sees wet anything. Clean with mild dish soap and water, dry immediately. Never soak the surface or let standing water sit.
For polyurethane-finished surfaces: cleaning is easier, just wipe down with a damp cloth and mild cleaner. When scratches accumulate or the finish starts to look dull and worn, you have two options. Light scuffs can sometimes be spot-repaired by sanding just that area with 220 grit, cleaning thoroughly, and applying one or two fresh coats of the same finish. Deep scratches or peel require stripping back to bare wood and starting the full process over.
Refinishing a heavily used butcher block top every 5-10 years is normal. The wood itself, if it's solid hardwood, can be sanded and refinished many times. That's one real advantage over surface materials like laminate countertops or formica countertops, which can't be sanded and refinished once the surface layer is compromised.
For fabricators managing multiple butcher block jobs and tracking finishing schedules, material costs, and shop time, SlabWise has quoting tools that handle wood slab jobs alongside stone, which matters when you're running a mixed shop.
Common mistakes that ruin a butcher block finish
Most finish failures trace back to a handful of mistakes. Here's what to avoid.
Skipping grit stages. Jump from 80 to 220 in one step and you leave deep scratches that the coarse paper put in, and those show clearly under an oil finish. Work through the grits: 80, 120, 150, 180.
Not letting the first coat dry fully. Applying a second coat of oil before 24 hours traps uncured oil under a new layer. It can stay tacky for days or weeks.
Applying too much hardwax oil. This is probably the most common mistake with products like Rubio Monocoat. Apply thin, buff off excess, and resist the urge to add more. More is not better.
Leaving the underside raw. This causes cupping within weeks in humid kitchens.
Using a kitchen cleaner with bleach or ammonia on an oil-finished surface. Both strip penetrating oils fast. Mild dish soap and quick drying are all you need.
Finishing in cold temperatures. Below 55°F, water-based finishes don't cure properly and can stay permanently soft or milky-looking [2].
Applying polyurethane over an oiled surface. Oil and polyurethane don't bond. If you ever used oil and want to switch to polyurethane, you have to sand back to bare wood first.
How does butcher block finishing compare to finishing other countertop materials?
Butcher block needs more ongoing maintenance than nearly any other countertop material in common use. That's fair to say honestly.
Stone countertops, granite, marble, quartzite, need sealing but generally once a year is enough, and the sealer process is much simpler than a full multi-coat oil application. Engineered stone (quartz, Cambria) and solid surface (Corian) need essentially nothing. Granite countertops and marble countertops have their own maintenance demands around sealing and etching, but those come up less often. For cleaning advice on stone surfaces, see how to clean stone countertops.
So why does butcher block stay popular given that maintenance burden? Warmth, repairability, and cost. A solid maple butcher block countertop in the $35-75 per square foot installed range [7] can look new again after sanding and re-oiling, which no stone or engineered surface can match. A scratch in granite is a scratch. A scratch in butcher block is an afternoon project.
For people who like working with wood and don't mind periodic maintenance, butcher block is genuinely satisfying. For people who want to install and forget, stone or quartz fits better. Both are legitimate choices. The key is being honest with yourself about which category you fall into before the countertop goes in.
For a broader view of kitchen countertops and how different materials compare on cost and durability, that overview covers the full picture.
Frequently asked questions
How many coats of mineral oil does butcher block need?
New butcher block typically needs 5-7 coats of mineral oil on first application to properly saturate the wood. Apply one coat per day and stop when oil sits on the surface without absorbing within 10-15 minutes. After that initial saturation, maintenance coats every 1-3 months keep the wood protected.
Can you use regular polyurethane on butcher block countertops?
Yes, with caveats. Polyurethane works well on butcher block that won't see direct knife contact, particularly around sinks or in areas with heavy moisture exposure. It's durable and water-resistant. The trade-off: it chips under knife edges, can't be spot-repaired easily, and must be stripped completely before you can switch to an oil finish.
How long do you have to wait before using a butcher block countertop after finishing?
With mineral oil, light use is fine 24 hours after the final coat. Hardwax oils like Rubio Monocoat need 24-36 hours before light use and 5-7 days for full hardness. Water-based polyurethane needs 7 days before light use and up to 30 days for full cure. Oil-based polyurethane needs at least 30 days to reach full hardness.
What is the best finish for butcher block countertops near a sink?
Polyurethane or a water-based varnish with 3-5 coats is the best choice near a sink. Penetrating oils alone don't resist standing water well, and sink areas get wet repeatedly. Some fabricators also run a silicone bead around the sink perimeter as a secondary barrier regardless of finish type, which is a smart precaution.
Is mineral oil or tung oil better for butcher block?
Mineral oil is safer and more predictable for kitchen use. Pure tung oil (not 'tung oil finish,' which is often a heavily diluted varnish blend) is food-safe once cured, dries harder than mineral oil, and offers slightly better water resistance. But tung oil takes longer to dry and some people have nut allergies to consider. Mineral oil wins on simplicity.
How do you fix water damage or black stains on a butcher block countertop?
Black stains from water damage are mold or tannin oxidation in the wood fiber. Sand the area with 80-grit paper until the stain disappears, then work through 120, 150, and 180 grit to blend with the surrounding surface. If the stain goes deeper than about 1/8 inch, you may need to plane or thickness-sand the whole slab. Re-apply finish to the repaired area.
Can you finish butcher block countertops without sanding first?
Only if the surface is already prepped to the right grit for your chosen finish. Most pre-made butcher block panels come sanded to 150 grit, which is close to acceptable. A light pass with 180-grit paper before finishing improves adhesion and absorption significantly. Skipping sanding on a surface that has any prior finish, wax, or contamination will cause the new finish to fail.
What grit sandpaper should I use before finishing butcher block?
Work through 80, 120, 150, and 180 grit for most finishes. Stop at 180 for oil or polyurethane. For hardwax oils like Rubio Monocoat, the manufacturer recommends stopping at 120 grit on bare wood, because the slightly coarser surface helps the product bond and penetrate correctly. Going to 220 or 320 before hardwax oil reduces absorption.
Do you need to finish the underside of butcher block countertops?
Yes. Leaving the underside raw while the top is sealed causes the wood to absorb moisture unevenly, which leads to cupping or warping over time. Apply at least two coats of oil or one coat of film finish to the underside. It doesn't need to be pretty, just sealed well enough to balance moisture movement on both faces.
How do you make a butcher block countertop at home?
Mill dried hardwood (6-8% moisture content) to consistent widths, glue up with a waterproof food-safe glue like Titebond III, clamp at 150-250 psi for 24 hours, then flatten with a drum sander or hand plane. Sand through 80-120-150-180 grit, then apply your chosen finish. Hard maple is the most common species due to its hardness and availability.
How often do you need to re-oil butcher block countertops?
In a typical kitchen that sees daily cooking and cleaning, re-oiling every 1-3 months is realistic. If the countertop is more decorative than functional, every 6 months may be enough. The easiest indicator: when water stops beading and soaks into the wood quickly, or when the surface looks dry and whitish, it's time for another coat.
What type of wood is best for making butcher block countertops?
Hard maple is the industry standard. It scores 1,450 lbf on the Janka hardness scale, is tight-grained so it resists knife scoring, and takes finish well. Walnut is popular for its appearance but is softer. Cherry and white oak are good middle-ground options. Avoid softwoods like pine for any surface that will see cutting or heavy use.
Can you put hot pans on a butcher block countertop with any finish?
No finish makes butcher block heat-proof. Even polyurethane scorches and white-rings under hot pans. Oils offer no protection at all. Always use trivets or hot pads. This is one consistent disadvantage of wood countertops compared to stone or quartz surfaces, which can tolerate brief contact with hot pots without damage.
Sources
- University of Minnesota Extension, Food Safety in the Home Kitchen: Food-grade mineral oil is the recommended penetrating finish for wood cutting surfaces and butcher block; vegetable and plant-based oils turn rancid in wood.
- EPA, Safer Choice: Criteria for Coatings and Finishes: Water-based polyurethane has lower VOC emissions than oil-based; cure temperatures below 55°F can prevent proper film formation in water-based finishes.
- USDA Forest Products Laboratory, Wood Handbook (FPL-GTR-282, 2021): Hard maple (Acer saccharum) has a Janka hardness of approximately 1,450 lbf, making it a standard species for heavy-duty cutting surfaces.
- FDA, 21 CFR Part 175 Indirect Food Additives: Adhesives and Components of Coatings: Titebond III Ultimate Wood Glue, once cured, meets FDA 21 CFR 175.105 requirements for incidental food contact; food-contact surface finishes are regulated under this section.
- Rubio Monocoat, Product Technical Data Sheet: Oil Plus 2C: Rubio Monocoat recommends 120-grit sanding on bare wood; initial cure is 24-36 hours, full hardness and food-safe status reached at 5-7 days after application.
- California Air Resources Board (CARB), Architectural Coatings Regulation: CARB limits VOC content in varnishes to 275 g/L; many oil-based polyurethane products exceed this limit and may not be legally sold in California.
- HomeAdvisor (Angi), Butcher Block Countertop Cost Guide: Butcher block countertops typically cost $35-75 per square foot installed, depending on species, thickness, and edge profile.
- Franklin International, Titebond III Ultimate Wood Glue Technical Data: Titebond III requires clamping pressure of 150-250 psi and cure time of at least 24 hours at temperatures above 47°F for full bond strength.
- USDA Forest Products Laboratory, Drying and Control of Moisture Content and Dimensional Changes (FPL-GTR-282): Wood for countertop applications should be dried to 6-8% moisture content to minimize movement after fabrication and finishing.
Last updated 2026-07-09