TL;DR
- A laminated quartz edge bonds a strip of matching quartz to the underside of a thin slab (usually 1.2 cm or 2 cm) to mimic the thickness of a full 3 cm slab.
- The process takes precise miter or butt joints, color-matched epoxy, firm clamping, and multi-step grinding and polishing to hide the seam.
- Done right, the joint is nearly invisible and fully structural.
What is a laminated edge on a quartz countertop?
A laminated edge, sometimes called a build-up edge, is a strip of quartz glued to the bottom front face of a countertop slab so the visible edge looks thicker than the slab actually is. The slab itself might be 1.2 cm or 2 cm thick, but with a 2 cm or 3 cm laminate strip added, the finished profile reads as a full 3 cm (about 1.25 inches) or even 4-5 cm from the front.
This matters because kitchen countertops are almost always quoted and installed at a "standard" thickness. In North America, 3 cm has become the default for quartz and granite. A 2 cm slab is lighter, less expensive per square foot of raw material, and easier to handle, but it looks thin and unfinished on an exposed apron. Laminating solves that without paying for a full 3 cm slab everywhere.
The laminate strip is not purely decorative. It also stiffens the front edge and gives the installer a thicker substrate for any profiled edge detail, whether that is a simple eased edge, an ogee, or a waterfall mitered corner. If the strip is cut from the same slab lot, the color and veining can be matched closely enough that a casual observer never finds the seam.
Fabricators use laminated edges on 1.2 cm quartz most often for IKEA-cabinet integrations, IKEA-style kitchens, and projects where the designer wants a thick dramatic edge (4 cm or 5 cm) without the weight and cost of a full thick slab. It also shows up on marble countertops and granite countertops for the same reason, though quartz demands its own epoxy chemistry.
What thickness of quartz actually needs a laminated edge?
Three quartz thicknesses run through North American shops: 1.2 cm (roughly 1/2 inch), 2 cm (roughly 3/4 inch), and 3 cm (roughly 1.25 inches) [1]. The 3 cm slab never needs lamination for thickness, though some designers add a decorative buildup for dramatic 5 cm or 6 cm mitered waterfall edges.
The 2 cm slab sits in the middle. Many fabricators laminate 2 cm slabs to reach a 3.8-4 cm finished edge, which satisfies most residential specs and looks proportional on standard 36-inch cabinets. Some shops skip lamination on 2 cm when the installation will have a full apron or furniture base hiding the edge.
The 1.2 cm slab almost always needs a laminated edge for any exposed application. At roughly half an inch, the raw edge looks flimsy. Building it to 3 cm or 4 cm total brings it into acceptable visual territory. The 1.2 cm slab is also the one most likely to crack during transport if the front overhang runs more than about 8-10 inches without continuous substrate support, so the laminate strip adds meaningful structural help at the nose.
A quick decision guide:
| Slab thickness | Standard lamination target | Common use case |
|---|---|---|
| 1.2 cm | +1.8 cm strip = 3 cm total | IKEA kitchens, lightweight remodels |
| 2 cm | +1 cm or +2 cm strip = 3-4 cm total | Budget projects, light slabs |
| 3 cm | +2-3 cm strip | Thick waterfall or dramatic edge profiles only |
What tools and materials do you need before you start?
You can laminate a quartz edge with a short tool list, but every item on that list matters. Cutting corners on the glue or the clamps is where shops produce work that cracks at the seam six months later.
Tools you need:
- A bridge saw or CNC with a diamond blade for ripping the laminate strip to uniform width.
- An angle grinder or hand polisher with Velcro backer and a full set of diamond polishing pads (50 grit through 3000 grit, or 50 through buff depending on finish).
- A router or edge polisher if you want a profiled edge rather than a flat eased edge.
- Parallel clamps or spring clamps with non-marring pads, enough to space them every 6-8 inches along the strip. For a 10-foot countertop run you want at least 18-20 clamps ready.
- Denatured alcohol or acetone for surface prep. Both work; acetone flashes faster.
- Mixing sticks, mixing cups, and disposable gloves.
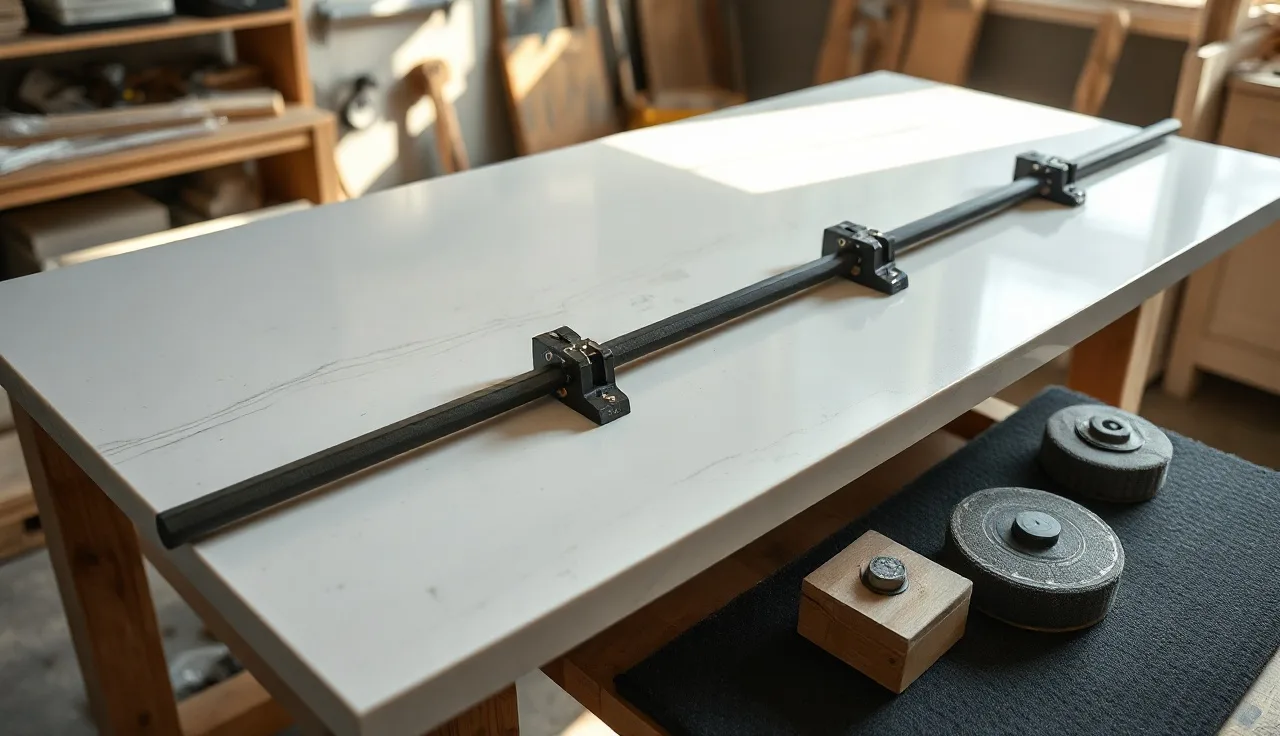
- A straight aluminum or steel reference bar at least as long as your countertop run to check alignment before the glue kicks.
Materials you need:
- A laminate strip cut from the same slab batch, or as close a color match as you can source. Same batch is the only reliable way to get veining to line up.
- Two-part polyester or two-part epoxy adhesive matched to quartz. Most quartz manufacturers specify an epoxy-based adhesive rather than polyester because polyester can telegraph color differently on light-colored quartz [2]. Akemi, Tenax, and Mapei all make color-tinted adhesives used in the stone trade. Tint the adhesive with pigment to match the background color of the slab.
- Color-matched pigment paste if the adhesive comes clear or white.
- Masking tape to protect the top face and the bottom of the strip during squeeze-out.
One safety note before any of this. Dry cutting and grinding quartz throws crystalline silica dust, which OSHA regulates hard. "Employers must use engineering controls, such as water or ventilation, to limit worker exposures," per OSHA's crystalline silica standard for construction [8]. Wet-cut, wet-grind, and wear respiratory protection. This is not optional.
How do you cut the laminate strip accurately?
The laminate strip has to be uniform in width, flat on both glue faces, and cut from a piece of slab that matches your countertop as closely as possible. Most fabricators rip the strip from the same slab lot, pulling it from the offcut or from a planned overage.
Width of the strip equals the finished edge profile you want minus the slab thickness, minus any overhang for profiling. If your slab is 2 cm and you want a 4 cm finished edge, the strip needs to be at least 2 cm wide, plus 2-3 mm extra for profiling and grinding flush. Cut the strip 2.5 cm wide and grind back to 4 cm total once bonded.
Length should be a single continuous piece for runs up to about 100 inches. For longer runs or L-corners, you will have seams in the strip itself. Plan those seams to land where they are least visible, typically in a corner or under the cabinet door. Never place a strip seam directly in front of a seam in the top slab.
The glue faces must be flat. After ripping, run both mating faces across a wet grinder or a diamond flat lap with a 120-grit segment to remove saw marks and create a consistent flat surface. Any bow or hollowness in the strip leaves a glue gap, and gaps in quartz epoxy joints fail under thermal cycling. Stone expands and contracts roughly 6-7 parts per million per degree Celsius [3]. Over a 10-foot run and a 50-degree temperature swing, that is real movement.
Dry-fit the strip before applying any adhesive. Hold it against the slab edge, check alignment along the full run, and mark the top of the strip with a pencil so you can quickly reposition after applying glue.
What adhesive works best for bonding quartz laminate strips?
This is the question shops get wrong more often than any other part of the process. The wrong adhesive either telegraphs a visible color line, fails the bond over time, or both.
Quartz is a man-made product with a polymer resin binder, which makes it chemically closer to acrylic or polyester than to natural stone. That matters because some polyester adhesives react slightly with the resin in certain quartz brands, causing a yellow or gray line at the joint even when you matched the pigment carefully. Epoxy adhesives are generally more stable and more color-neutral over time, which is why most quartz manufacturers (including Silestone, Cambria, and Caesarstone) specify epoxy-based adhesives in their fabrication guidelines [2].
For most quartz lamination work, a two-part epoxy with 15-25 minute open time gives you enough working time to clamp a full run. Fast-set epoxies (5-minute) are too short for any run over about 3 feet. Slow-set (60-minute) is fine but means a longer wait before you can remove clamps and grind.
Tinting is essential. Mix pigment paste into your adhesive base before adding the hardener. Match the lightest background color in the slab, not the veining. The joint line reads thinner and less visible when you match the background, because the veining pulls the eye away from any thin line that does survive polishing.
Apply adhesive to both mating faces, not one. A thin, even layer on both surfaces gives you the best wetting and the fewest voids. The bond line in a well-executed lamination should be 0.5-1 mm thick after clamping. Thicker than that and the joint is weak. Thinner than that and you may have starved the bond of adhesive.
How do you clamp and align the strip without it shifting?
Clamping is where most first-time lamination attempts fail. Quartz turns slippery when wet with epoxy, and even a millimeter of misalignment at the top surface forces aggressive grinding that risks burning through the polished surface.
Set up on a flat workbench with the countertop face-down or edge-up, depending on your shop setup. Face-down is more common because it lets gravity help hold the strip in place and gives you easy access to the top-face alignment. Place the countertop on padded horses with the front edge hanging slightly off the edge of the horse so you can reach it with clamps.
Apply adhesive, seat the strip, and immediately check alignment along the top face. The top of the strip should be either flush with or very slightly below (0.5 mm) the top face of the slab. Slightly below is fine because you will grind and polish the edge anyway. Slightly above is a problem because you risk grinding through the top face polish while chasing the high spot.
Use clamps every 6-8 inches. The clamps apply side pressure, pushing the strip against the slab edge face. You also need to stop the strip from sliding down, especially on a vertical setup. Wedges of scrap material or folded masking-tape stops work as temporary holds.
Wipe squeeze-out immediately with a rag dampened with acetone. Do not wait until the epoxy skins over. Skinned epoxy is much harder to remove without scratching the finished face.
Leave clamps in place for the full cure time listed on the adhesive spec sheet. For most 15-minute epoxies, that is 60-90 minutes before light handling and 24 hours before grinding. Grinding before full cure is the second most common mistake in shop lamination work.
How do you grind and polish the laminated edge to hide the seam?
Once the adhesive has fully cured, the grinding and polishing sequence is what separates a professional result from a visible, embarrassing joint line.
Start with a 50-grit or 60-grit diamond pad on an angle grinder or edge polisher to flatten any misalignment between the slab face and the strip. Work the edge in even, overlapping passes. Keep the tool moving. Quartz is hard (7 on the Mohs scale [4]), so it cuts slowly, but it also heats up fast. Dry grinding generates enough heat to cause micro-cracking, especially in the epoxy line. Keep a spray bottle of water nearby and wet the edge often, or use a wet edge polisher if your shop has one.
Progress through grits: 50 or 60, then 120, then 220, then 400, then 800, then 1500 or 1800, then 3000 or buff. Each grit removes the scratch pattern from the previous grit. Skip a grit and the scratches from the coarser step show through the final polish. You cannot rush this progression.
The joint line goes nearly invisible when the polished surface reflects evenly across the seam. Hold a flashlight at a low angle to the edge and look for any visible line. At 3000 grit with a buff, a well-executed joint on a solid-color or small-pattern quartz should disappear. On a large-vein quartz (think Cambria countertops with dramatic veining), the joint stays somewhat visible because the vein pattern cannot run continuously across a glued joint. Set that expectation with the customer before the job.
If you want a profiled edge (eased, beveled, bullnose, ogee), run the profile after the bonding cure and before the final polishing sequence. Profiling removes material evenly, and it is much easier to profile a bonded unit than to profile the strip separately and then match the profiles after gluing.
How do you handle inside corners and L-shaped countertops?
Straight runs are easy. L-shapes and U-shapes add complexity at every inside and outside corner.
For outside corners on a laminated edge, you have two options. A butt joint at the corner, where one strip runs to the corner and the other butts into it, is the simpler cut. A 45-degree miter at the corner looks cleaner and is the professional standard for visible corners. The miter takes precise cutting and a second adhesive seam, but the visual result is worth the extra work.
For inside corners, the laminate strip simply terminates. There is no laminate strip needed on an inside corner because that corner is typically against a wall or cabinet. Make sure the strip end is cut square and smooth so it does not catch on the cabinet frame during installation.
On an L-shaped run, plan your strip seams carefully. The top slab will have its own seam, usually at the inside corner. The laminate strip seams should not line up with the top seam. Offset them by at least 12 inches. Two seams stacked on top of each other create a visual focal point and a structural weak point.
For countertop installation with waterfall edges (where the countertop surface wraps vertically down the side of an island), the laminate strip approach changes entirely. A true waterfall uses a separate mitered slab panel for the vertical face, and the top slab edge receives a 45-degree miter rather than a built-up laminate strip. These are different processes and different skill sets.
What mistakes do fabricators most often make on laminated edges?
The mistakes follow a predictable pattern, and most of them trace back to rushing one of three steps: surface prep, clamping, or grinding.
Mismatched adhesive color is the most visible failure. The joint line shows as a white, gray, or yellow stripe across an otherwise clean edge. This happens when the fabricator uses untinted adhesive, or tints it to match the veining rather than the background. The fix is always to tint carefully and test on a scrap piece before the actual joint.
Inadequate surface prep is the most common structural failure. Saw-cut faces have micro-ridges and residual slurry. Skip the face-flattening step and apply adhesive straight to the saw-cut surface, and you get a bond with voids. Voids become cracks under thermal stress. Clean and flatten both mating faces before every lamination job.
Grinding before full cure causes micro-fractures in the epoxy line. The joint looks fine on day one and fails at six months. Follow the adhesive manufacturer's cure schedule. 24 hours is not excessive. It is correct.
Over-grinding burns through the polished surface on either side of the seam, leaving a dull strip along the edge. Keep the grinder moving, use water, and do not press hard into the surface. Let the diamond do the cutting.
Poor clamp spacing leaves sections of the joint with a gap. The squeeze-out pattern tells you where the pressure was: if there is no squeeze-out at a section, the clamp was not close enough. Add more clamps next time, or use a threaded rod and washer system along the length of the strip.
For shops tracking job costs and lamination material usage across multiple slab layouts, nesting software can flag whether you have enough offcut material from a slab to yield the laminate strips you need before you commit the cut. SlabWise handles that calculation inside the quoting and nesting workflow, which saves the back-and-forth of manually measuring remnants.
How much does a laminated edge add to the cost of a quartz countertop?
Fabricators price laminated edges two ways: as a per-linear-foot upcharge on top of the base countertop price, or as a built-in line item in their edge profile pricing.
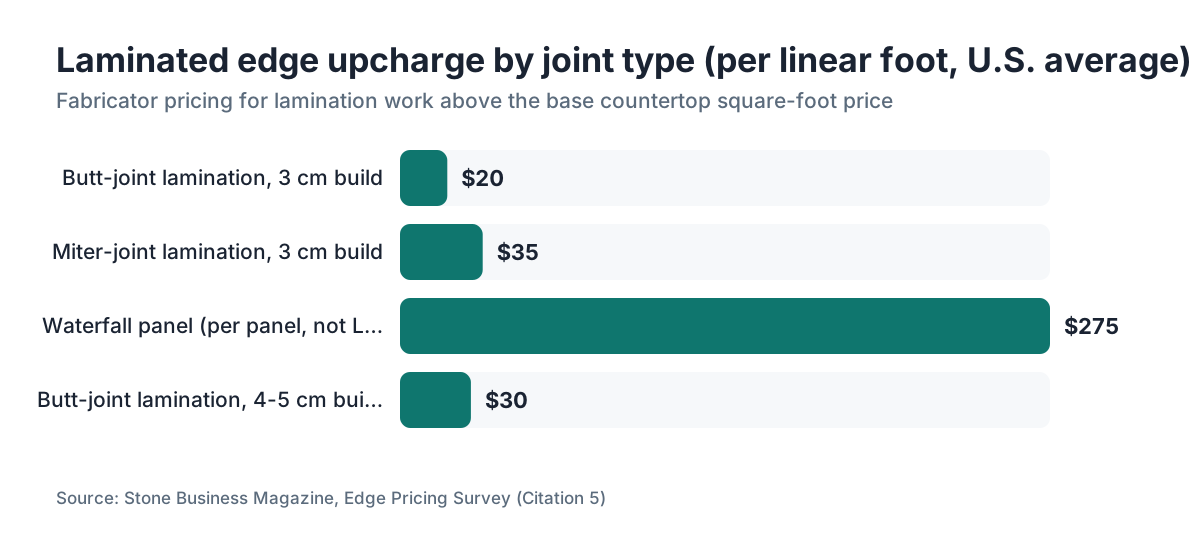
The typical range for a laminated edge upcharge in the United States is $10 to $30 per linear foot for a standard butt-joint lamination on a 3 cm build, based on shop pricing data from stone industry publications [5]. Miter-joint lamination, which is more labor-intensive and waste-intensive, runs $20 to $50 per linear foot. Waterfall mitered panels are priced separately and often range $150 to $400 per panel depending on slab cost and complexity.
Material cost is the strip itself, which comes from either the slab remnant (essentially free if you already own the offcut) or a new slab purchase (roughly $8 to $20 per square foot of raw 2 cm quartz at wholesale, though this varies significantly by brand and region [1]). A 3 cm build-up strip for a 10-foot run needs roughly 10 linear feet of strip at 2.5 cm wide, which is less than half a square foot of material. The material cost is low. The labor is what drives the price.
For homeowners, expect to pay roughly $15 to $35 per linear foot added to your countertop quote for a standard laminated edge, depending on your market and the fabricator's efficiency. That is on top of the base countertop square-foot price. On a 25-linear-foot kitchen with all exposed edges laminated, that is $375 to $875 in edge upcharges.
Is it worth it? Yes, if you are using 2 cm slab. The visual improvement is significant, and the structural benefit at the nose is real. On 1.2 cm slab, lamination is essentially mandatory for any respectable installation.
How does laminated edge fabrication differ for quartz versus natural stone?
The process is similar, but quartz has a few specific demands that natural stone does not.
Quartz is harder and more uniform than marble or granite. That uniformity is an advantage during grinding (it polishes more predictably) but a disadvantage for visual matching across a joint (the pattern is set at the factory, and no two strips ever line up perfectly). Natural stone has organic variation that the eye reads as intentional. Quartz patterns are engineered, and any misalignment reads as a mistake.
The resin binder in quartz also changes adhesive selection. As noted earlier, epoxy beats polyester for most quartz brands. On natural granite, polyester adhesive is common and perfectly acceptable. On marble countertops, epoxy is preferred too because marble is porous and polyester can stain the stone at the joint. On granite countertops, most fabricators use polyester without issue.
Quartz is also more sensitive to heat during grinding. The polymer matrix in quartz can soften or discolor at sustained high temperatures. Dry grinding a quartz edge with an aggressive diamond pad at high RPM leaves heat marks that no amount of polishing removes. Keep the edge wet.
The polishing endpoint also differs. Natural stone often reads as polished at 1800-3000 grit. Quartz typically needs to reach 3000 grit plus a buffing compound to match the reflective finish of the factory-polished surface. Some fabricators use a felt buff with a polishing compound as the final step to bring the edge shine up to match the top face.
How do you match the veining across a laminated quartz edge?
The honest answer: you often cannot, and managing customer expectations is part of the job.
For solid-color or very small-pattern quartz (think a white quartz with a fine salt-and-pepper texture), the joint goes nearly invisible after polishing because there is no veining pattern to break across the seam. These are the easiest laminations and the most forgiving.
For large-format veined quartz (calacatta-style slabs with long continuous veins), the laminate strip always shows a pattern break at the joint. The vein in the strip runs at whatever angle it held in the original slab, and there is no practical way to orient a thin strip so its veining flows continuously from the top surface. Some fabricators use a waterfall miter rather than a built-up laminate on these slabs, because the miter continues the top-face pattern down the front edge when executed carefully. But that is a different process.
For medium-pattern quartz, you can shrink the break. Select your strip from the same area of the same slab, orient it so the background color and any subtle pattern direction matches the top face, and use a tinted adhesive that blends with the background. The result will not be invisible, but it will look intentional rather than accidental.
Always show the customer a mock-up or a sample of the joint before the installation day. Set expectations in writing. A homeowner who sees the joint for the first time on installation day reacts very differently than one who understood the limitation at quoting time.
Frequently asked questions
Can I laminate a quartz edge myself, or does it require a professional fabricator?
It requires a professional. Cutting a uniform strip, flattening the glue faces, mixing and tinting two-part epoxy, clamping without shift, and then grinding through a full diamond pad progression all require shop tools and experience. A homeowner attempting this without a bridge saw, edge polisher, and diamond pad set will produce a visible seam at best and a cracked edge at worst. Budget the lamination into your fabricator quote and have it done in the shop.
What is the difference between a laminated edge and a mitered edge on quartz?
A laminated edge bonds a strip of quartz to the underside front face of the slab, building up thickness with a horizontal glue joint. A mitered edge uses a 45-degree bevel on both the top slab and the edge piece so they meet at a sharp angle with no visible flat joint. Mitered edges are standard for waterfall islands and produce a cleaner look on large-vein slabs, but they waste more material and require a precise 45-degree cut on both mating faces.
How long does a laminated quartz edge last, and can it delaminate?
A properly bonded laminated quartz edge with epoxy adhesive should last as long as the countertop itself, typically 20-plus years under normal residential use. Delamination happens when the bond line had voids from poor surface prep, when the wrong adhesive was used, or when the joint took impact or thermal shock before full cure. A well-executed epoxy joint on clean, flat surfaces is stronger than the quartz itself in tension.
What grit should I polish to on a quartz laminated edge to match the factory finish?
Most quartz factory surfaces are polished to an equivalent of 3000 grit or higher. To match them, run through the full sequence: 50, 120, 220, 400, 800, 1500, 3000, and then a felt buff with polishing compound. Stopping at 1800 grit leaves a slightly hazy edge that does not match the top face. The buff step is what brings the edge reflectivity up to the factory standard.
Does the quartz manufacturer's warranty cover fabricated laminated edges?
Generally no. Most quartz manufacturers, including Silestone, Caesarstone, and Cambria, warrant the slab material itself against manufacturing defects but exclude damage or failures resulting from fabrication and installation. Lamination is a fabrication process, so any failure at the joint line is the fabricator's responsibility, not the manufacturer's. Ask your fabricator for their workmanship warranty, which reputable shops offer for one to five years on labor and fabrication quality.
How thick should the laminate strip be for a 3 cm finished edge on a 2 cm slab?
If your slab is 2 cm and you want a 3 cm finished edge, your strip needs to be at least 1 cm wide, plus 2-3 mm extra for grinding and profiling. Cut the strip at 1.3-1.5 cm wide and grind to the final 3 cm total after bonding. Never cut the strip to exact final width before bonding. You need material to remove during the flush-grinding step to get a clean, flat edge.
How do you prevent the laminate strip from shifting when clamping?
Use masking tape tabs or small dabs of superglue (cyanoacrylate) at two or three points along the strip to tack it in position before applying clamps. The superglue tacks hold the strip from sliding vertically while the epoxy cures under clamp pressure. Alternatively, use a router fence or aluminum angle clamped to the slab top face as a stop to keep the strip from rising above flush. Vertical alignment matters more than side alignment, which the clamps handle.
Can you laminate a quartz edge on already-installed countertops?
Technically yes, but it is very difficult and rarely worth attempting. Sanding both glue faces flat requires tools that are hard to use in a cramped, installed position. Clamping against a cabinet edge lacks the stability of a shop setup. The resulting joint is more likely to have voids and misalignment. If a countertop needs a laminated edge, it should be done in the shop before installation. Retrofitting is a last resort.
How do you handle color matching when the laminate strip comes from a different slab lot?
You often cannot perfectly match different lots, even from the same color name. The best approach is to order enough slab material upfront so all your strips come from the same slab. If you must use a different lot, choose a background-color tint for the adhesive that blends with the lighter tones in both slabs, and orient the strip so its texture direction matches the top surface. Accept that a slight variation will show, and disclose it to the customer before fabrication.
Is a laminated quartz edge strong enough for an unsupported overhang?
The lamination adds stiffness to the edge profile but does not change overhang limits. Most fabricators and industry guidelines cap unsupported overhangs on 3 cm quartz at about 10-12 inches, and on 2 cm quartz (even with a laminated front edge) at 6-8 inches. Beyond those spans, you need corbels or a continuous substrate. The Marble Institute of America's fabrication guidelines address overhang support requirements in detail.
What causes a white line to appear at the laminate joint after polishing?
A white line almost always means the adhesive was not tinted to match the slab background, or air bubbles left a void that shows as a light-colored gap. If the adhesive was clear or white and the quartz is a light gray, the joint line reads white against the quartz color. The fix is to use pigmented adhesive from the start. If the white line appears on an already-polished job, some fabricators fill it with tinted color epoxy and re-polish, with mixed results.
How do laminated edges on quartz compare to thick slab options like 4 cm or 5 cm solid quartz?
Solid thick slabs (4-5 cm) are heavier, more expensive, and have no seam line at the edge. They also offer unlimited profiling depth since there is solid material all the way through. Laminated edges are lighter, less costly, and can be executed on standard 2 cm or 3 cm material. The tradeoff is the potential for a visible joint and a slightly different structural profile. For most residential kitchens, a laminated edge is indistinguishable to the homeowner and costs significantly less.
Do I need to seal the joint line on a laminated quartz edge?
No. Quartz is non-porous (water absorption is effectively zero [4]), so sealing is unnecessary on the quartz surfaces. The epoxy joint line is also non-porous once cured. There is nothing to seal. Some fabricators apply a thin bead of color-matched caulk at the very bottom of the laminate strip where it meets the cabinet to prevent debris accumulation, but that is a finish detail, not a sealing requirement.
Sources
- Natural Stone Institute (formerly Marble Institute of America), Dimension Stone Design Manual: Standard quartz slab thicknesses in North American fabrication are 1.2 cm, 2 cm, and 3 cm; wholesale quartz pricing ranges roughly $8-$20 per square foot depending on brand and region
- Caesarstone Fabrication and Installation Guide: Quartz manufacturers including Caesarstone specify epoxy-based adhesives for lamination and joint work, preferring them over polyester for color stability
- National Institute of Standards and Technology (NIST): Quartz and stone materials expand approximately 6-7 parts per million per degree Celsius due to thermal cycling
- U.S. Geological Survey, National Minerals Information Center: Quartz: Quartz hardness is 7 on the Mohs scale; engineered quartz is non-porous with water absorption effectively at zero
- Silestone by Cosentino, Fabrication Technical Guidelines: Silestone specifies epoxy adhesive for seaming and lamination, with color-matched pigmentation recommended for invisible joints
- Cambria Natural Quartz, Fabrication and Care Guide: Cambria recommends epoxy adhesives for all lamination and seaming work on its quartz surfaces
- Occupational Safety and Health Administration (OSHA), Crystalline Silica Standard: OSHA requires engineering controls such as water or ventilation to limit worker exposure during cutting and grinding of stone and engineered quartz
- Natural Stone Institute, Technical Bulletin on Overhang Support: Natural Stone Institute fabrication guidelines address maximum unsupported overhang spans for stone countertops including quartz at various thicknesses
- National Kitchen and Bath Association (NKBA), Kitchen Design Guidelines: NKBA design guidelines reference standard countertop thickness expectations for residential kitchens, with 3 cm the residential standard in North America
Last updated 2026-07-10