TL;DR
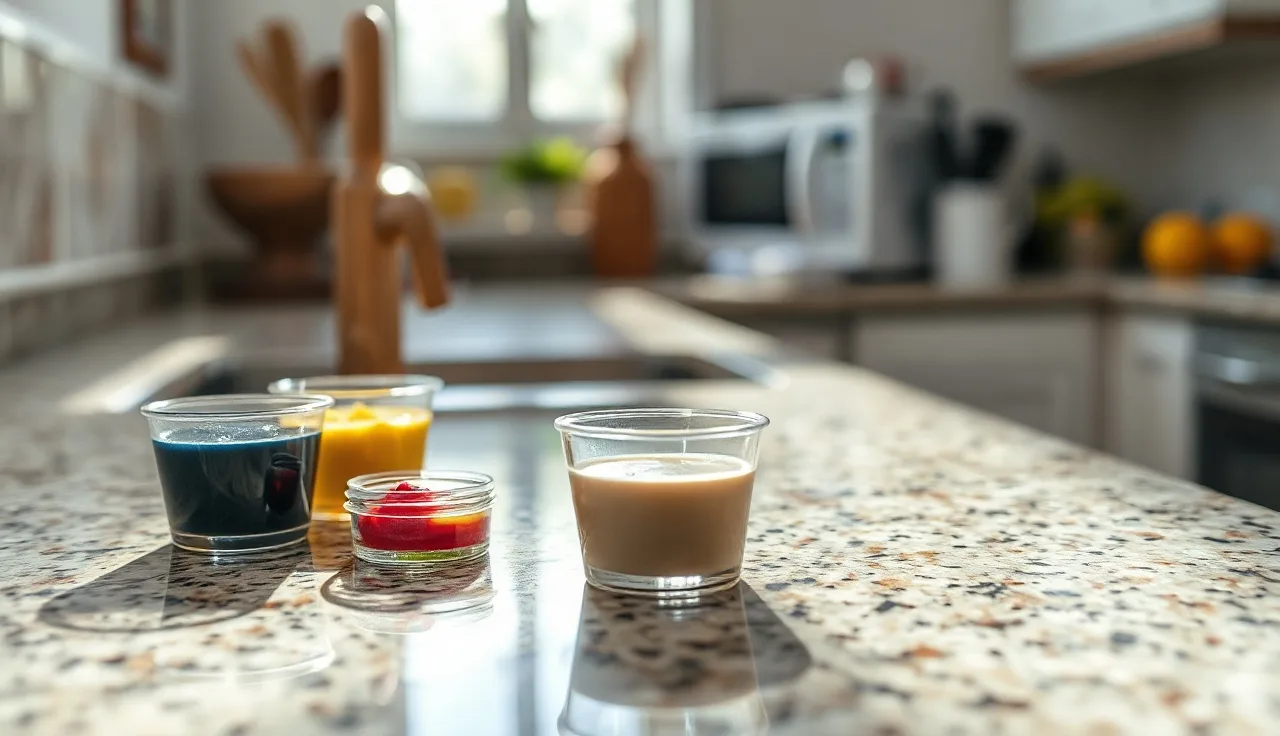
- Match epoxy to stone by starting with a clear or lightly amber base, adding dry mineral pigment or universal tint in toothpick-tip amounts, and curing a test batch before you touch the chip.
- Most repairs need two to four colors: a background plus its secondary tones.
- Solid colors can hide the repair.
- Complex patterns will always show something.
Why is epoxy color matching so hard on stone countertops?
Stone is never one color, and that is the whole problem. A slab that reads as solid beige from across the room has warm cream zones, grey flecks, maybe a rust vein, and a polished surface that throws light back at you. Epoxy dries flat and uniform unless you fight it. That gap between a busy natural surface and a homogeneous filler is behind every bad repair you have ever squinted at.
Granite punishes you the hardest because its pattern comes from interlocking mineral crystals: quartz, feldspar, mica, and hornblende, each with its own color and reflectivity [1]. Nail the background and the repair still looks wrong if it misses the specks. Engineered quartz (Cambria, Silestone, MSI and the rest) suspends aggregate in a binder matrix, so the challenge is similar but the colors run more consistent batch to batch, which tips the odds slightly in your favor.
Gloss is the third trap. A high-polish slab reflects like a mirror. Cured epoxy lands anywhere from matte to semi-gloss depending on the product. Cure at the wrong gloss and even a perfect color reads as a patch. Plan on a polishing step from the start.
What type of epoxy should you use for countertop chip and crack repairs?
Use a low-viscosity two-part stone epoxy (Part A resin plus Part B hardener) with a clear or lightly amber cure. Products labeled for stone or countertop repair cure hard enough to polish. Generic hardware-store epoxy usually does not.
Not all epoxies behave the same, and the formula matters more than people expect. The standbys in the stone trade include Tenax Tefill, Akemi Marble and Granite adhesive, and other Italian-origin stone adhesives that shops have run for decades [9]. These are built to cure to a polishable hardness.
Clear-cure epoxy gives you the most control because every bit of color comes from you. Amber-cure products carry a warm yellow-brown bias that flatters many granites but sabotages white or grey quartz. Confirm the cure color on a strip of tape or cardboard before you add a single drop of pigment.
Crack and seam repairs are a different job. There, mechanical strength beats color, so a filled knife-grade epoxy or a polyester adhesive with a short working time often wins. Color still counts, but the bond comes first.
Work time (pot life) is a hard limit. Most stone repair epoxies give you 5 to 15 minutes at room temperature [2]. A warm shop or a sun-baked countertop cuts that further. Mix small. Never mix more than you can place in five minutes.
What pigments and colorants actually work in epoxy?
Three colorant families work in two-part epoxy, and each has a catch. Dry mineral pigments are the professional pick because they are UV-stable and do not fight the cure. Universal tint pastes are convenient but must stay under 5% by weight. Alcohol inks hit deep tones but can slow the cure.
Universal tint pastes (the ones sold for tinting paint, caulk, and grout) disperse well and cover a wide color range. Mixol is the common shop brand. Go light: more than 5% colorant by weight can interfere with the cure and leave you a soft, sticky surface [3].
Dry mineral pigments (iron oxides, titanium dioxide, carbon black, chromium oxide) are the standard for good reason. They are inorganic, UV-stable, and they leave the cure chemistry alone [4]. Buy them from art supply houses or stone-repair suppliers. Iron oxides cover the warm brown, red, tan, and yellow range that carries most granite backgrounds. Titanium dioxide handles white, carbon black handles grey and black, chromium oxide handles green. Those five pigments match roughly 80% of granite backgrounds.
Alcohol-based inks (Ranger Adirondack, Pinata) disperse beautifully and let you reach the jewel tones exotic stones need. They work. They can also slow the cure, so test first.
One thing never works: latex paint. Its water content can stop the epoxy from curing at all. Skip it.
For quartz, several makers sell colorant kits with pre-measured pigments matched to common colors. If your top is a major brand, search the brand name plus "repair kit" for an OEM or third-party match. Our piece on Cambria countertops has brand-specific repair notes.
How do you read the stone's color before you mix anything?
Read the stone before you mix, because our eyes are terrible at isolating one color inside a busy pattern. Photograph the area in daylight, zoom in on the undamaged stone next to the chip, and name two to four distinct colors. This takes about three minutes and saves you three wrong batches.
This is where most DIY repairs die. People glance at the stone, grab a color that seems close, and mix. The result is usually off by 20 percent in hue or value because a glance averages everything together.
Do it the slow way. Shoot the area in natural daylight, no flash. Zoom in tight on the intact stone beside the chip. Most granites give you a dominant background, one or two secondary tones in the larger crystals, and a fleck or vein color. Write them in plain words: warm cream background, medium grey flecks, occasional black specks, faint rust vein.
Use the eyedropper tool in any photo app to sample the exact RGB values of each zone. Reason from those toward a pigment direction. It sounds like overkill. It is faster than guessing.
You will almost never use a single color in the repair itself. Mix a base to match the background, then swirl in tiny amounts of secondary color with a toothpick before the epoxy sets. That mimics the stone's variation instead of dropping a flat plug into it.
What is the step-by-step process for mixing and applying color-matched epoxy?
The sequence below is what stone fabricators and restoration techs actually run. None of it is complicated. The order is what matters.
1. Clean the repair area. Acetone or denatured alcohol on a clean cloth. Strip every trace of grease, sealer, and loose debris. Let it dry, usually five minutes. Contamination under the epoxy means the repair lifts later.
2. Test your cure color. Mix a pea-sized batch of uncolored epoxy at the maker's ratio (often 1:1 or 2:1 by volume). Spread it on tape. Let it cure (often 20 to 30 minutes to initial set, 24 hours to full hardness). Check that cured color in the light you actually live under.
3. Build your base color. Mix a fresh batch. Add primary pigment a toothpick tip at a time, stirring hard after each addition. Hold the mix against the stone in matching light. Aim slightly darker than the stone, because epoxy reads lighter once it is spread thin and cured.
4. Add secondary colors. For flecked granite, keep the fleck color out of the main batch. Fill the chip with your base, then drop and swirl tiny amounts of secondary color into the wet surface with a toothpick. You are faking the look of mineral pattern, not matching crystals one for one.
5. Overfill slightly. Epoxy shrinks a little as it cures [2]. Fill 10 to 15 percent above flush to cover it.
6. Protect and cure. Press a scrap of plastic wrap flat over the fill to block contamination and cut yellowing from air exposure. Cure the full time on the spec sheet, typically 24 hours to full hardness at 70 degrees F.
7. Level and polish. Shave the cured epoxy flush with a razor blade held nearly flat, then work through wet-dry sandpaper: 220, 400, 800, 1500, then a polishing compound matched to the original finish. A countertop installation pro would run a variable-speed polisher through a diamond-pad progression. Hand polishing works too, it just takes longer.
For granite countertops with a honed finish, stop at 400 grit and skip the polishing compound.
How do you match epoxy color for white or light quartz specifically?
White and light quartz are the hardest repairs there are. No dark background hides your mistakes, so every tonal error shows. Start with water-clear epoxy, build the base white from titanium dioxide, and add the undertone in the smallest touch you can manage.
For warm whites, a hair of yellow ochre or raw sienna. For cool whites and grey-whites, a trace of phthalo blue or ultramarine. For grey quartz, build the grey from carbon black plus titanium dioxide rather than a pre-mixed grey, because pre-mixed greys tend to read purple or green under kitchen light.
Engineered quartz with visible aggregate (those white chips floating in the matrix) wants texture, more than color. Add crushed glass microspheres or very fine quartz sand to the epoxy. Several stone-repair suppliers sell these fillers for exactly this. Mix them in before pigment so you can judge the texture. Keep filler under 20% by volume or the mix turns too thick to flow into a chip.
Expect imperfection on busy quartz patterns. A restoration company using spray-on liquid stone can beat epoxy alone on large damaged areas.
What common mistakes ruin an otherwise good color match?
The number one killer is matching to wet epoxy. Wet epoxy is darker, shinier, and more saturated than the cured result. Hold wet epoxy next to the stone, think you nailed it, and you did not. Cure a test batch every time.
Second killer: ignoring UV stability. Windows dump UV onto countertops all day. Organic pigments, some alcohol inks, and certain tint pastes fade over months. The June match reads pink by November. Inorganic mineral pigments (iron oxides, titanium dioxide) are UV-stable by nature [4]. If you insist on organic colorants, add a UV stabilizer to the epoxy.
Third: the wrong mix ratio. Under-catalyze (too little hardener) and the repair stays soft and tacky, scratching the moment you touch it. Over-catalyze and pot life collapses while the mix exotherms, getting hot enough to trap bubbles and stress the surrounding stone. Follow the volumetric ratio on the spec sheet exactly. Do not eyeball it. Two-part resins also want ventilation and skin and eye protection during mixing, per OSHA hazard communication rules [8].
Last: filling over stone that soaked up cooking oil. It looks fine for two weeks, then lifts from the edges. Clean the zone with acetone and let it off-gas fully before you mix.
When should you call a professional stone restoration company instead of DIY?
DIY is reasonable for small chips, under a quarter inch across, on stone with a fairly uniform background. Worst case is a visible fill you redo. Call a pro for a crack through the full slab thickness, a chip larger than a half dollar, damage near a sink cutout or edge, or high-pattern stones like Blue Bahia, Van Gogh, or Calacatta where veining has to line up across the repair.
Professionals have spray stone coating systems, airbrush technique, and the reps to feather a repair so your eye never catches the edge.
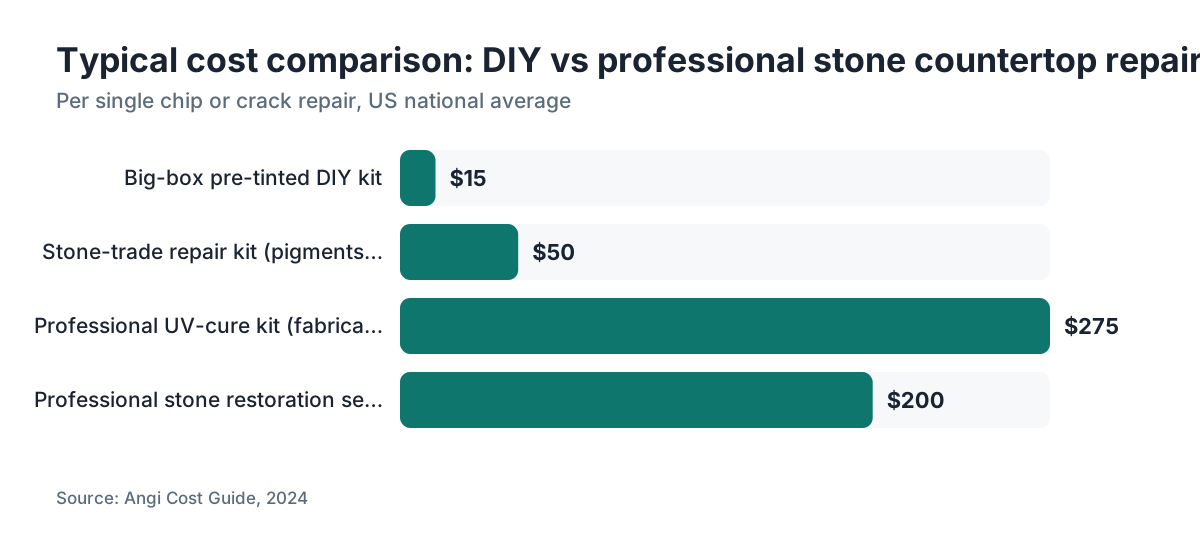
Professional stone repair usually runs $100 to $300 for a single chip or crack, depending on region and complexity [5]. A DIY kit from a stone supplier runs $25 to $80. The math favors DIY on simple chips and favors a pro on anything that will nag you every time you walk into the kitchen.
If the chip also cracked the material below the surface, no color match will make it disappear. That subsurface crack scatters light differently than intact stone. Section replacement, or full countertop replacement, is the honest answer there.
For how a new install compares to repair, our piece on kitchen countertops breaks down current material pricing by stone type.
Does the type of stone finish (polished, honed, leathered) change the color matching process?
Yes. Finish changes how you see the color and how you finish the repair, and this gets skipped too often. On a polished surface the reflective layer deepens the stone's color. Raw and honed stone look lighter and more muted than the same material polished. So judge your cured test epoxy after you polish it, not before, because polishing brings up a gloss that shifts the apparent color a lot.
On a honed surface you match a low-sheen matte. Polishing compound will make the repair jump out. Stop sanding at 400 grit, clean the area, and apply a honing powder (tin oxide or cerium oxide in a slurry) to blend the sheen. Honed stone is actually more forgiving on color, because less specular reflection means fewer places for a tonal miss to hide.
Leathered stone is textured, the product of brushed diamond pads that open the surface. A flat epoxy fill in leathered stone looks wrong even with perfect color, because the texture stops at the repair edge. Approximate it by stippling the wet epoxy with a stiff brush before it sets, then finishing by hand with fine abrasive. Harder to match than polished.
For finish-specific care, our articles on how to clean stone countertops and how to clean quartzite countertops go deeper.
Are there digital tools or color-matching apps that help with epoxy tinting?
A few tools earn their keep, none are magic. Smartphone color samplers (Palette Cam, ColorSnap from Sherwin-Williams, or the built-in eyedropper in your photo editor) pull RGB values off a photo of your stone. Look those values up and reason toward a pigment combination. This gets you in the ballpark fast, not to a final match.
Some stone restoration suppliers keep color formula databases, like paint-store tint recipes, for common granite and quartz varieties. Tenax and Akemi run dealer support programs, and a distributor may hand you a starting formula for a named stone.
If you run a shop, job management and quoting software like SlabWise (slabwise.com) tracks material details per job, including stone type and finish. When a repair call lands months later, you have a record of the slab you used and where it came from. That traceability makes it easier to source matching material or the right repair formula.
Spectrophotometers, the boxes paint stores use, can in theory read a stone surface. Their algorithms are tuned for paint, not mineral aggregate, and the stone's texture scatters the reading. Treat the result as a starting point, never a formula. Do not expect paint-store precision.
How long does a properly done epoxy repair last on granite or quartz?
A well-done repair with a stone-grade two-part epoxy, mixed at the right ratio and bonded to clean stone, holds for years under normal kitchen use. Tenax and Akemi adhesives, polyester or epoxy-based, are rated for indoor permanent use and get used for structural seam bonding, more than chips [9].
Still, a color-matched fill is not intact stone. It can scratch, chip again on impact, or stain if left unsealed. Cured epoxy keeps some porosity, so apply a penetrating stone sealer over the repair once it fully hardens (wait at least 48 hours) and reseal annually along with the rest of the top [6].
UV exposure degrades organic pigments over time and can slightly yellow even clear epoxies. A repair right under a window may shift color in two to five years. UV-stable inorganic pigments plus a UV-inhibiting epoxy stretch that out a lot.
Temperature swings stress the epoxy-to-stone bond, from a hot pan set on the repair to a frozen item out of the freezer. Most fabricators say keep hot cookware off any stone surface [6], and that goes double over a repair. Keep a trivet handy near patched chips.
What does a professional color-matching epoxy kit typically cost, and what comes in one?
Repair kits sold through stone fabrication suppliers usually run $25 to $80 and cover several small repairs [5]. Contents vary, but a full kit generally holds two-part epoxy tubes or cartridges, a set of universal pastes or dry pigments (typically 5 to 10 colors), mixing sticks and cups, a razor or scraper for leveling, and sometimes a small bottle of acetone or alcohol cleaner.
Premium kits aimed at fabricators add a UV lamp for accelerated curing (UV-cure adhesives harden in seconds under the lamp, handy in production) plus diamond polishing pads. Those run $150 to $400 and are worth it if you repair regularly.
Big-box kits in the $10 to $20 range are usually one pre-tinted color (beige or grey) with limited matching range. They handle simple chips in common stone and are not worthless, but they will not match a busy granite.
Already own iron oxide pigments and a clear stone epoxy? Then a single small chip costs under $5 in materials.
| Kit type | Typical price | Best for |
|---|---|---|
| Big-box pre-tinted kit | $10-20 | Simple chips, solid-color stone |
| Stone-trade repair kit (pigments included) | $25-80 | Most home repairs, multiple uses |
| Professional UV-cure kit | $150-400 | Shops doing frequent repairs |
| Custom mix from bulk materials | $5 per repair (at scale) | Fabricators with existing stock |
Frequently asked questions
Can I use regular food coloring or paint to tint epoxy for a countertop repair?
Skip latex paint entirely. Its water content can stop the epoxy from curing fully, leaving a soft sticky mess. Food coloring has the same water problem and fades fast. Oil-based pigments and dry mineral powders are safe. Universal tint pastes like Mixol work if kept under 5% by weight. Alcohol inks work but can slow the cure. Stick with products designed to be compatible with two-part epoxy.
How do I match the shiny gloss of polished granite in my epoxy repair?
Cured epoxy does not naturally match polished granite gloss. After the epoxy is fully hard (24 hours minimum), shave it flush with a razor blade, then wet-sand through 220, 400, 800, and 1500 grit using wet-dry sandpaper. Finish with a stone polishing compound on a felt pad or cloth. The progressive abrasive sequence builds the gloss, not the epoxy formula itself.
Why does my epoxy repair look fine when wet but wrong when dry?
Wet epoxy is darker and more saturated than cured epoxy, the same way wet stone looks darker than dry. Match to the wet mix and the cured result reads lighter and washed out. Mix a small test batch, let it cure fully, then compare it to the stone under the light you use daily. Match to the cured color, never the wet mix.
How do I repair a chip in black granite without the repair turning grey?
Black granite repairs fail when the base epoxy's amber or grey tint shows through. Use a clear-cure epoxy and add carbon black pigment (lamp black or bone black) as your primary colorant. Add a tiny amount of a cool undertone (ultramarine or phthalo blue) to deepen the black and kill any warm cast. Test the cured result. True black granite often has a slight blue-black quality a pure carbon black misses.
Can epoxy repairs on quartz countertops be polished to match the surface?
Yes. The same progressive wet-sanding and polishing sequence used on granite works on engineered quartz. Start at 220 grit after shaving flush, finish with a quartz-compatible polishing compound. Some engineered quartz has a factory finish that is harder to replicate exactly than natural stone polish, so the repair may show slight sheen variation under raking light even with correct color.
How many pigment colors do I actually need to match most granites?
Most fabricators clear 80 to 90 percent of granite repairs with five dry mineral pigments: titanium dioxide (white), carbon black (black and grey), yellow iron oxide (warm yellow), red iron oxide (rust and red), and raw umber (brown). Those cover the background tones of the most common granites. Exotic stones with green, blue, or purple minerals need chromium oxide, cobalt blue, or violet iron oxide on top of that base set.
Should I seal a repaired chip on granite after the epoxy cures?
Yes. Wait at least 48 hours for full epoxy hardness, then apply a penetrating impregnating sealer over the repair and the surrounding stone. Cured epoxy keeps some porosity and can absorb cooking oils and staining liquids if left bare. Reseal the whole countertop annually or on the sealer maker's schedule, whichever comes first.
What is the shelf life of two-part epoxy repair kits, and can I store mixed pigment batches?
Unmixed two-part epoxy stored cool and dry (below 77 degrees F) typically lasts 12 to 24 months from manufacture [2]. Once mixed, you have only the pot-life window (5 to 15 minutes typically) before it gels. You cannot store mixed epoxy. You can store premixed dry pigment blends indefinitely in a sealed container and reuse them in your next batch.
Can I repair a crack in a quartz countertop with the same epoxy I use for chips?
A hairline crack needs a very low-viscosity epoxy so it wicks in by capillary action. Thicker knife-grade epoxies sit on top instead of penetrating. For a structural crack, use a thin two-part epoxy, tape the underside to stop runthrough, and allow full cure before removing tape. Color match the surface the same way you would a chip. Large or moving cracks signal structural failure and need professional assessment.
How does humidity and temperature affect epoxy curing in a countertop repair?
Epoxy cures through an exothermic reaction that speeds up in heat and slows in cold. Below 60 degrees F, many epoxies cure incompletely or stay soft indefinitely. Above 90 degrees F, pot life shrinks fast and the repair may bubble. Do repairs at 65 to 75 degrees F with humidity below 80 percent. In a cold shop, warm the stone gently with a heat gun on low before applying.
Is it possible to get an invisible repair on granite, or will it always be visible?
Truly invisible repairs are possible only on solid or near-solid colored stone under normal viewing. On complex patterned granites, a skilled pro can get repairs that pass casual inspection, but close examination in raking light usually reveals the boundary. Set the expectation right: the goal is a repair that does not draw the eye from standing distance, not one that fools a geologist.
Do the same color-matching techniques work on marble countertop repairs?
The epoxy mixing, pigment selection, and curing steps are the same for marble. The difference is that marble veining is translucent and directional, much harder to fake than granite's opaque mineral pattern. Marble repairs on veined areas almost always need an airbrushed or hand-painted vein over the filled chip, using alcohol ink or diluted paint over the cured epoxy, then a clear topcoat. Our piece on marble countertops has more material context.
How do I find a professional stone restoration company for a repair I can't do myself?
The Natural Stone Institute (naturalstoneinstitute.org) keeps a member directory of certified fabricators and restoration professionals [7]. Search for restoration or refinishing specialists rather than shops that mainly install. Get quotes from at least two contractors and ask to see photos of finished repairs on similar stone before you commit. Prices vary a lot by region and complexity.
Sources
- USGS, Minerals Information and Geology topic pages: Granite's color complexity comes from interlocking mineral crystals including quartz, feldspar, mica, and hornblende, each with distinct optical properties.
- US EPA, Safer Choice program on adhesive chemistry: Two-part epoxy pot life (working time) and storage shelf life are functions of temperature and catalyst ratio; most stone repair epoxies provide 5 to 15 minutes working time at standard conditions and 12 to 24 months unmixed shelf life.
- Smooth-On Inc., Epoxy and Urethane Colorant Usage Guidelines: Colorant loading above approximately 5 percent by weight in two-part epoxy systems can interfere with the cure reaction, resulting in soft or tacky surfaces.
- ASTM International, ASTM D2244 Standard Practice for Calculation of Color Tolerances and Color Differences: Inorganic mineral pigments including iron oxides and titanium dioxide are classified as UV-stable colorants, while many organic pigments are susceptible to UV-induced color shift.
- Angi Cost Guide, Countertop Repair: Professional stone chip and crack repair typically costs $100 to $300 per repair depending on location and complexity; DIY repair kits from stone suppliers run $25 to $80.
- Natural Stone Institute, Care and Maintenance of Stone Countertops: Stone countertop maintenance guidelines recommend against placing hot cookware directly on stone surfaces and advise annual resealing with penetrating impregnating sealers.
- Natural Stone Institute, member directory and fabricator resources: The Natural Stone Institute maintains a member directory of certified fabricators and restoration professionals for consumer referral.
- OSHA, Chemical Hazards and Toxic Substances topic page: Two-part epoxy resins and hardeners require proper ventilation and skin and eye protection during mixing and application per OSHA hazard communication standards.
- Tenax USA, Stone Repair and Maintenance Products: Tenax Tefill and similar Italian-origin stone adhesives are rated for indoor permanent use including structural seam bonding and chip repair on granite, marble, and engineered quartz.
- ISFA, International Surface Fabricators Association: Surface fabrication industry standards distinguish between cosmetic chip filling and structural crack repair, recommending professional assessment for cracks exceeding surface depth.
Last updated 2026-07-10