TL;DR
- DIY kitchen countertops are realistic for laminate, butcher block, tile, and concrete.
- Slabs are the hard part.
- Quartz and granite run 18 to 20 pounds per square foot, crack if you flex them, and void most warranties the moment you self-install.
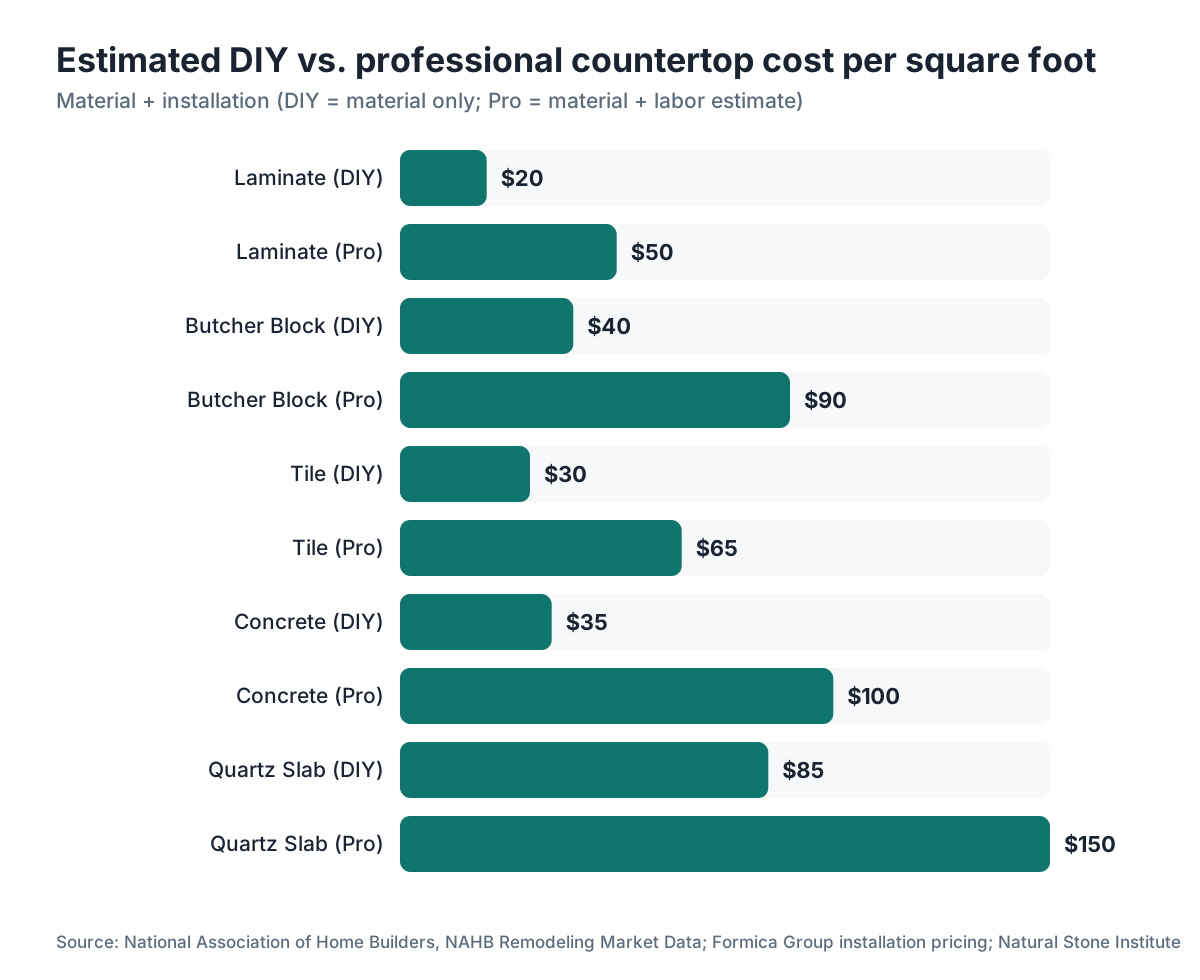
- Budget $10 to $80 per square foot for DIY-friendly materials versus $50 to $200+ for pro-installed stone.
- Your skill and your tool set decide what's actually on the table.
Which countertop materials can you actually install yourself?
Laminate, butcher block, ceramic or porcelain tile, and concrete are genuinely DIY-accessible for most homeowners with basic carpentry skills. Each tolerates modest fit errors. Each cuts with tools you own or can rent for a day. Slabs are the ones that punish mistakes.
Quartz and natural stone (granite, marble, quartzite) are a different animal. A standard 3 cm quartz slab weighs roughly 18 to 20 pounds per square foot [1]. An average kitchen has 40 to 60 square feet of counter, so you're moving 700 to 1,200 pounds of material that cracks if it flexes, in an awkward shape, around cabinets. Fabricators use vacuum lifts, slab dollies, and two or three experienced people. Dropping a $1,200 slab on your garage floor is an expensive lesson, and it happens more than anyone admits.
Solid surface products like Corian sit in the middle. They're lighter than stone (around 3 pounds per square foot for 12 mm sheets), cut with woodworking tools, and the seams bond and sand nearly invisible. The catch: the manufacturer's warranty on Corian countertops usually requires professional installation for the full coverage period. Weigh that before you buy.
Here's a quick orientation by material:
| Material | Typical DIY difficulty | Approx. installed cost DIY (per sq ft) | Special tools needed |
|---|---|---|---|
| Laminate sheet/post-form | Easy | $10, $30 | Router, laminate trimmer, contact cement |
| Butcher block | Easy, Medium | $20, $60 | Circular saw, sander, food-safe oil |
| Ceramic/porcelain tile | Medium | $15, $45 | Wet tile saw, notched trowel |
| Concrete (DIY pour) | Hard | $15, $50 (materials only) | Forms, concrete mixer, grinder, sealer |
| Solid surface (Corian) | Medium, Hard | $35, $80 | Router, belt sander, color-matched adhesive |
| Quartz or granite slab | Very Hard / Not recommended | $50, $120 (material alone, before breakage risk) | Wet bridge saw, vacuum lifts, polish tools |
What does DIY countertop installation actually cost?
The savings are real, and the range is wide. Laminate post-form sections run roughly $7 to $12 per linear foot at big-box stores, and you can install a typical kitchen in a weekend [2]. That same kitchen in custom laminate fabricated at a shop runs $30 to $60 per square foot installed. The gap is several hundred dollars, easy.
Butcher block is the other strong value. IKEA's oak butcher block runs around $130 for a 74-inch by 25-inch section as of 2024, which pencils out to roughly $20 to $25 per square foot. Professional installation adds $30 to $50 per square foot depending on region. You cut it with a circular saw, drop it in place, and finish it yourself with food-safe mineral oil.
For laminate countertops specifically, the material cost difference between doing it yourself and hiring out often lands at $500 to $1,500 on an average kitchen. That's one of the highest-return moves in a whole remodel.
Concrete is deceptive. The raw materials (Portland cement, sand, glass fiber, pigment) are cheap. The process eats time, and first-pour failures like cracking, pinholes, and bad sealing are common. Budget 20 to 30 hours for a first-timer and $50 to $150 on sealer alone for a kitchen pour.
One cost people skip: renting a wet tile saw runs $60 to $100 a day at most rental counters. A decent router for laminate trimming is $80 to $150 if you don't own one. Add the tools before you call a material "cheap."
How do you install laminate countertops yourself?
Laminate is the most beginner-friendly full-surface option there is. Post-form countertops (the pre-curved, pre-finished strips home centers stock) need almost no fabrication. You cut them to length with a circular saw and a fine-tooth blade, miter the corners against a straightedge guide, and pull the miter sections together with the draw bolts that come in the box, working from underneath.
Custom laminate sheet is the harder route. You bond laminate to a plywood substrate with contact cement, then trim the edges flush with a laminate trimmer or router. The Formica Group's installation guide says to run a J-roller across the entire bonded surface immediately after contact, because contact cement grabs on first touch and you cannot reposition [3]. Getting that roller pass right matters more than any cut you'll make.
For Formica countertops or any laminate brand, the common failures are predictable. Bubbles from incomplete roller pressure. Chipped edges from the wrong blade (always cut laminate face-down with a fine-tooth blade so you don't chip the decorative face). Gaps at backsplash seams that let water creep into the substrate over years. Silicone caulk at that joint is not optional.
Cutting a sink opening in post-form is straightforward. Mark the opening from your sink's template, drill a starter hole inside the cut line, and run a jigsaw with a fine blade. Support the cutout from below with tape or a clamp so it doesn't tear the laminate as it drops free.
Time for an average kitchen: one long day for post-form, a full weekend for custom sheet.
How do you install butcher block countertops yourself?
Butcher block is genuinely friendly to a first-timer. It cuts like hardwood, screws to the cabinet base from below, and finishes with oil. Three things decide whether it lasts: expansion, sealing, and clean sink cutouts.
Wood moves. A 96-inch run can expand or contract 1/8 to 1/4 inch seasonally depending on species and indoor humidity [4]. Mount it with figure-eight fasteners or slotted clips so the wood can breathe without splitting. Screwing it down rigid is the single most common installation mistake, and it shows up as a cracked top a year later.
For finishing, food-safe mineral oil is the low-maintenance entry point. Flood it on, let it soak, wipe the excess, and repeat three or four times over two or three days before use. Near a sink, a food-safe oil-and-wax blend holds up better against water over the long haul. The butcher block countertops guide covers ongoing care in detail.
Sink cutouts follow the same jigsaw technique as laminate. Seal every cut edge with your oil or wax before install, because raw end grain wicks water fast. Some installers run a bead of silicone under the sink rim as a backup barrier.
No wet saw. That alone makes butcher block more accessible than tile or stone.
Can you DIY tile countertops, and are they still a good choice?
Tile is a legitimate DIY option with a lower material cost than most alternatives, and it comes with an honest downside: grout joints. Grout stains, holds bacteria, and wants sealing every year in a kitchen. The National Kitchen and Bath Association has tracked tile's decline in countertop popularity, and maintenance is part of the reason [5]. If you're choosing tile because it's cheap, fair. If you love the look and you'll actually seal it, also fair. Just go in clear-eyed.
The substrate matters as much as the tile itself. Use cement backer board (HardieBacker or Schluter DITRA) over your plywood base, never drywall. The Tile Council of North America's handbook specifies a minimum 1-1/8-inch substrate assembly for countertops to stop the deflection that cracks grout and tile [6].
Large-format porcelain (12x24 or bigger) cuts your grout lines and eases maintenance. Use epoxy grout instead of cement grout: it resists stains, skips the annual sealing, and takes kitchen abuse far better. Epoxy is harder to work (short open time, sticky), but it's worth the learning curve on a first job.
A wet tile saw is essentially required for clean cuts around outlets, sinks, and corners. Rental is fine for one job. Plan half a day to set tile, then a second session 24 hours later to grout once the thinset cures.
What about DIY concrete countertops?
Concrete pulls in DIYers who want something nobody else has. The process runs long: build forms from melamine-coated particleboard, mix a concrete blend (usually with fiber, sometimes glass fiber, to fight cracking), pour, cure 24 to 48 hours, demold, grind, polish, then seal with a penetrating sealer plus a topcoat. The Portland Cement Association notes that concrete reaches its design strength at 28 days, though most DIY recipes work off 5 to 7 day cure times for practical handling [7].
Pinholes are the real problem. Concrete traps air by nature. Pros run vibrators during the pour to drive it out. Skip that step and you get surface pinholes that surface after sealing and read as amateur. Slurry filling (pressing thin cement paste into the surface before final sealing) is the standard fix, and it takes practice.
Weight is the other concern. A 1.5-inch concrete top weighs roughly 18 pounds per square foot, right up there with stone. Your cabinets and floor need to carry it. Cabinets built to the ANSI/KCMA A161.1 standard carry the structural load requirements for base boxes, so most modern kitchens handle it fine [8]. Check anyway if your cabinets are old or non-standard.
Pour a single test slab in the garage before you commit to the kitchen. It will save you an enormous amount of grief.
Should you attempt DIY quartz or granite slab installation?
Technically yes. Practically almost never, unless you've fabricated stone before. Here's the reasoning.
Quartz slabs (brands like Cambria countertops) and natural granite countertops get cut on a wet bridge saw or CNC waterjet. A circular saw with a diamond blade makes a rough cut, but it leaves an edge you then hand-polish with angle grinder pads through multiple grits, starting around 50 and finishing at 1500 or 3000 for polish. Buying the right gear runs $500 to $2,000. Rental of specialized stone tools is rare.
Cambria's warranty explicitly requires installation by a trained professional fabricator for the lifetime coverage to apply [9]. Most engineered quartz makers take the same line. A DIY install might save $400 to $800 in labor and void a warranty covering cracking or defects on a $2,000 slab. Bad trade.
For marble countertops, add sealing and the fact that marble chips and scratches easier during handling, which raises the breakage risk further.
If you want to save money on stone, here's the smart play: buy the slab yourself (some stone yards sell direct to homeowners) and hire a fabricator just for cutting and installation. The warranty stays intact and the slab stays in one piece.
What tools do you need for a DIY countertop project?
The tool list depends entirely on the material. Here's the honest breakdown by project.
Laminate post-form: a circular saw with a 60-tooth or finer blade, a jigsaw for sink cutouts, a file or belt sander for end joints, a caulk gun, and a level. You probably own most of it already.
Laminate sheet goods: add a router with a flush-trim bit and a laminate trimmer bit, a J-roller (about $15 at hardware stores), and a notched trowel for spreading contact cement.
Butcher block: a circular saw, a jigsaw, a belt sander for surface prep, figure-eight fasteners, and your finish oil or wax. An orbital sander speeds up the finishing.
Tile: a wet tile saw (rent for $60 to $100 a day), a notched trowel, a grout float, a rubber mallet, spacers, and a level. For epoxy grout, get dedicated mixing tools and read the instructions before you open the buckets.
Concrete: building the form takes a circular saw and drill. The pour needs a mixing drill with a paddle attachment, a concrete vibrator (rent), and at minimum an angle grinder with diamond polishing pads for surface prep after demolding.
One tool pays for itself on any countertop job: a digital angle finder or a sliding bevel gauge. Kitchen walls are almost never square, and a 2-degree out-of-square wall opens visible gaps at backsplashes and joints. Measure your actual angles before any cut.
What are the most common DIY countertop mistakes and how do you avoid them?
The biggest one: ignoring out-of-square walls and cabinets. Most kitchen corners are 90 degrees on the plan and something else in reality. Scribe every edge that meets a wall. A scribe molding on a laminate edge covers a 1/4-inch gap. A butcher block edge against a 91-degree wall needs planing or sanding to fit. Measuring once and cutting is how expensive material becomes scrap.
Second: skipping the dry fit. Before any adhesive, concrete, or caulk touches anything, assemble every piece in place and check every seam and edge. This matters most on laminate miter joints, where a 1/16-inch gap shows from across the room.
Third: a weak substrate. Thin underlayment cracks tile and concrete and lets laminate flex at the seams. Plywood (minimum 3/4-inch, two layers for tile) beats particleboard for any wet application.
Fourth: bad sealing near the sink. Water under a countertop rots the cabinet box, breeds mold, and eventually kills the top. HUD's Healthy Homes program lists water infiltration as a documented cause of cabinet rot and mold in residential kitchens [10]. Every cut edge, every seam, every penetration gets silicone. This is where most DIY countertops fail, not on day one but in year two or three.
Fifth: underestimating time. A first laminate install takes two to three times longer than any tutorial suggests. Build the extra time in so you're not rushing the last steps, which are the ones that leak.
How do you plan a DIY countertop project from start to finish?
Start with a detailed template. Measure every run twice. Record the depth (standard kitchen countertops run 25 to 25.5 inches deep including the overhang), all lengths, every inside and outside corner, sink and cooktop locations, and wall angles. A story stick (a long scrap with tick marks) beats a tape measure alone for transferring angles and irregularities to your material.
Pick your material and buy at least 10 percent extra, more for tile (15 to 20 percent is standard to cover cuts and breakage). On butcher block or laminate, that buffer absorbs a mismeasured cut. On tile, it covers breakage during cutting and leaves you spares for future repairs.
Plan the sink cutout before anything. Undermount sinks need the countertop drilled for clips from below, with the rim sitting at the finished plane. Drop-in sinks forgive more because the rim hides the cut edge. Confirm which type you have before you cut a thing.
Want a number for what a pro would charge on the same job? Fabrication quoting tools like SlabWise let fabricators generate instant quotes by material and square footage, which gives you a real benchmark even when you're doing the work yourself.
The finish sealing and caulking phase decides longevity. Don't rush it. Let adhesives hit their full rated cure before you load anything heavy on top. Silicone at the wall takes 24 hours to full cure, and some products want 48 in cool conditions.
For any hard surface you install yourself, the same care rules apply as for pro-installed material. The countertop installation guide walks the full professional process if you want to understand the steps you're copying.
How do you maintain DIY countertops once they're installed?
Maintenance depends on material, not on who held the tools. The surface doesn't know who installed it.
Laminate asks for almost nothing: mild dish soap and water, no abrasive pads, and keep standing water off the seams. You can't refinish a scratch, but a damaged section is cheap to replace.
Butcher block wants re-oiling, roughly once every one to three months in the first year, then once or twice a year after that, depending on how dry your kitchen air gets. Scratches and knife marks sand out and re-oil. That repairability is why butcher block keeps its loyal following.
Tile lives and dies by grout. Seal cement grout at install and reseal yearly. Clean with pH-neutral products, not bleach, which erodes the grout binders over time. Epoxy grout skips the sealing step entirely.
Concrete needs a penetrating sealer at install plus a sacrificial topcoat you renew every one to three years as it wears. Acidic foods (lemon juice, vinegar, wine) etch an unprotected surface fast. A well-sealed concrete top holds up well. A poorly sealed one shows stains within weeks.
For any stone you've installed, the how to clean stone countertops guide applies the same way. Stone doesn't care who set it either.
Frequently asked questions
Is it legal to install your own kitchen countertops?
Yes, in nearly all jurisdictions. Countertop installation is not a licensed trade and usually needs no permit. The plumbing connections to a sink underneath may require a permit in some localities, but the countertop itself does not. Check your local building department if you're unsure, but this is rarely an issue for countertop work alone.
How much money can you save by installing countertops yourself?
Labor for countertop installation typically runs $30 to $80 per square foot depending on material and region. On a 50-square-foot kitchen, that's $1,500 to $4,000 in potential savings. Laminate and butcher block offer the best DIY payoff since the material is cheap and the install is manageable. Stone slab DIY risks (breakage, voided warranties) often eat the labor savings whole.
What is the easiest DIY countertop material for beginners?
Laminate post-form, full stop. You buy pre-finished strips sized for standard depths, cut them to length with a circular saw, bolt corner miters together from underneath, and caulk the backsplash. No special adhesives, no polishing, no sealing. A careful first-timer finishes an average kitchen in one day. Butcher block is the second easiest.
Can you put new countertops over old ones?
Sometimes. Laminate over laminate works if the existing surface is flat, firmly bonded, and the added height (usually 1/16 inch) doesn't foul the sink or appliances. Tile over existing laminate works if the substrate is solid. Skip anything with soft spots, water damage, or loose sections. Added height also changes dishwasher and sink drain clearance, so measure before you commit.
Do DIY countertops add value to your home?
A well-finished DIY countertop in a material buyers recognize (butcher block, tile, good laminate) adds value equal to a pro-installed version of the same material. The difference is execution quality. A poorly fitted laminate top with visible gaps or buckling seams actually lowers perceived value. To a buyer, the finish quality matters more than who did the work.
How long does DIY countertop installation take?
Post-form laminate: one full day. Sheet laminate: a full weekend. Butcher block: one day plus a few days of oiling before use. Tile: two days minimum (set, then grout 24 hours later). Concrete: at least a week from pour to sealed and ready. These assume one person working steadily with materials and tools already on site.
Can you cut a sink hole in a countertop yourself?
Yes. For drop-in sinks, tape the paper template that comes with the sink to the countertop, drill a starter hole inside the cut line, and cut with a jigsaw using a fine blade. For laminate, support the cutout from below to prevent tear-out as it drops. For butcher block, seal every cut edge with oil or wax. Undermount sinks need a cleaner cut and a flush or eased edge at the opening.
What thickness should DIY countertops be?
Laminate post-form is typically 1 to 1.5 inches at the front edge, thinner at the deck. Custom laminate is usually built on 3/4-inch plywood. Butcher block commonly comes in 1.5-inch edge-grain or 3-inch end-grain. Tile countertops need a minimum 1-1/8-inch substrate assembly per the Tile Council of North America. Concrete is typically 1.5 inches minimum.
Can you do a DIY waterfall countertop edge?
A waterfall edge, where the countertop runs vertically down the side of a cabinet, is doable in butcher block, tile, and concrete. It needs precise 45-degree miters at the top and clean joining at the corner. In butcher block, the grain change at the miter is visible and reads as deliberate if you cut it clean. In stone, a waterfall requires a wet saw and polishing and is not a beginner project.
How do you handle seams in a DIY countertop installation?
For laminate post-form, the miter draw bolts pull the two sections tight and the seam nearly vanishes if the cuts are square. For sheet laminate, color-match seam filler is available from the manufacturer. Butcher block seams glue with waterproof wood glue and clamp. For concrete or tile, plan seam locations away from high-use areas. Visible seams on stone are unavoidable on runs longer than about 10 feet.
Is DIY countertop installation covered by homeowner's insurance if something goes wrong?
Homeowner's insurance covers sudden and accidental damage to the home structure, not DIY project failures. A slab you dropped is not covered. Slow water damage from an improperly sealed joint is typically excluded as a maintenance issue. Structural damage from a countertop collapsing due to a bad install could potentially be covered depending on your policy, but you'd need to document the cause.
What's the best DIY countertop for a rental property?
Laminate. It's the cheapest material, installs fast, cleans easily, and holds up to tenant use better than people expect. When it does get damaged, individual sections replace affordably. Butcher block in a rental tends to suffer from tenants who ignore the oiling schedule, which leaves dry, cracked surfaces. Tile grout in rentals gets neglected and stains badly over time.
Can you DIY countertops in a kitchen with many angles or irregular walls?
Harder, but doable with laminate sheet goods and tile, which both take scribing and irregular cuts. Post-form is tougher in angled kitchens because the pre-molded end caps and miters assume standard 90-degree corners. Butcher block scribes well with a belt sander or hand plane. Concrete forms build to any shape. Irregular kitchens just demand more templating time and patience.
Do you need to remove cabinets to install new countertops?
No. In almost every case, countertops sit on top of the cabinet boxes and attach from underneath. You remove the old top (usually by unscrewing it from corner blocks inside the cabinet), disconnect the plumbing, and lift it out. New tops go back the same way. You only pull cabinets if they're being replaced at the same time or if water damage to the boxes needs repair first.
Sources
- Natural Stone Institute (formerly Marble Institute of America), stone weight reference: Natural and engineered stone slabs at 3 cm thickness weigh approximately 18 to 20 pounds per square foot
- U.S. Bureau of Labor Statistics, Consumer Expenditure Survey: Home improvement material costs including countertop materials used as benchmark for national price ranges
- Formica Group, laminate installation instructions: Contact cement grabs on first contact; a J-roller must be used immediately after joining surfaces to ensure complete bond
- USDA Forest Service, Wood Handbook: Wood as an Engineering Material (FPL-GTR-282): Hardwood boards can expand or contract 1/8 to 1/4 inch or more seasonally depending on species and humidity changes
- National Kitchen and Bath Association, NKBA Kitchen and Bath Market Index: Tile countertops have declined in popularity due in part to grout maintenance requirements
- Tile Council of North America, Handbook for Ceramic, Glass, and Stone Tile Installation: TCNA specifies a minimum 1-1/8-inch thick substrate assembly for countertop tile applications to prevent deflection
- Portland Cement Association, concrete curing guidance: Portland cement concrete reaches design strength at 28 days; early curing conditions affect final strength
- Kitchen Cabinet Manufacturers Association, ANSI/KCMA A161.1 Performance and Construction Standard for Kitchen and Vanity Cabinets: ANSI/KCMA A161.1 standard includes structural load requirements for base kitchen cabinets
- Cambria, Cambria Limited Lifetime Warranty: Cambria's warranty requires installation by a trained professional fabricator for full warranty coverage to apply
- U.S. Department of Housing and Urban Development, Healthy Homes program: Water infiltration under countertops is a documented cause of cabinet rot and mold in residential kitchens
- National Association of Home Builders, Remodeling Market Index and cost data: Professional countertop installation labor costs range from approximately $30 to $80 per square foot depending on material and region
Last updated 2026-07-09