TL;DR
- The ultra edge profile (sometimes called ultra-top or stacked edge) mimics a thick slab by gluing a strip of stone under the front edge, creating a 1.5- to 3-inch-tall face on a standard 3/4-inch or 3cm slab.
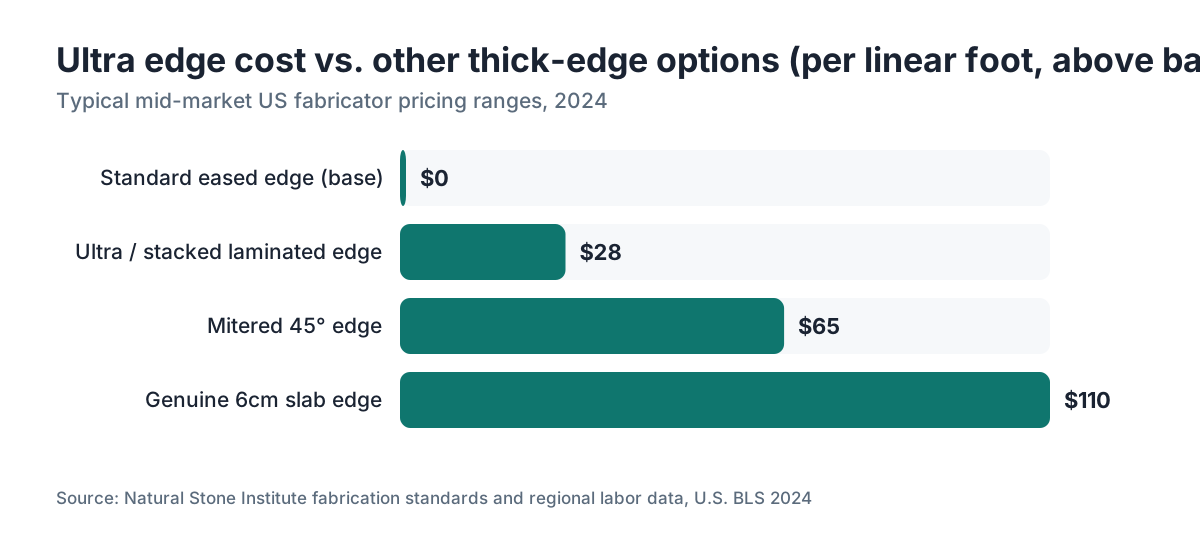
- It costs $15, $40 per linear foot above the base edge price, depending on material and shop.
- It's a visual upgrade, not a structural one.
What exactly is a countertop ultra edge profile?
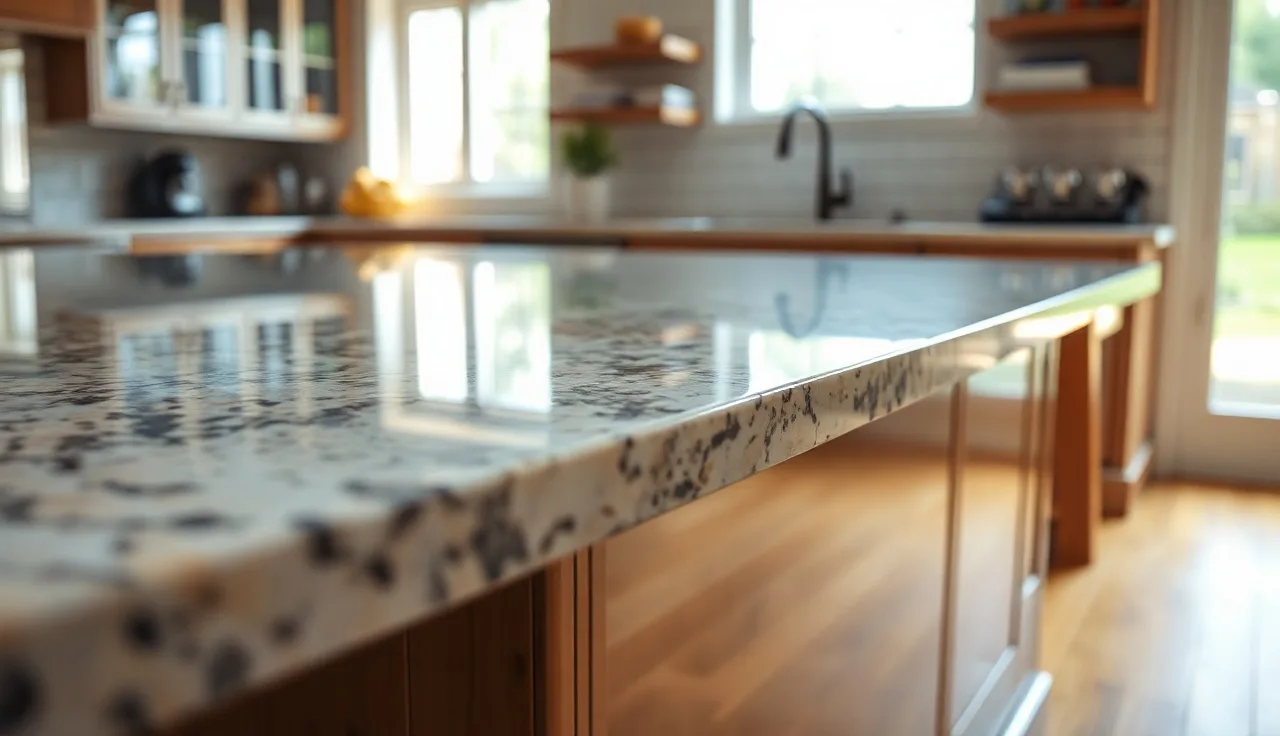
The ultra edge profile is a fabrication technique, not a single edge shape. A fabricator takes your standard-thickness slab (usually 3cm, which is just under 1.25 inches) and glues a strip of matching or complementary stone to the underside of the front edge. The result looks like a slab that's 2 to 4 inches thick from the front, even though the field of the countertop is still the original 3cm. Some shops call this a stacked edge, a laminated edge, or a double-laminated edge. The term "ultra-top edge profile" or "countertop ultra-top edge profile" tends to show up in quoting software and price sheets rather than in conversation.
The strip itself is usually cut from the same slab so grain and color match. On some stones with dramatic movement (think bookmatch-style quartzite or bold veined marble), a fabricator will mirror-cut the strip so the vein flows into itself at the seam. On solid colors like pure white engineered stone, the seam is nearly invisible once polished. On busy natural stone, a thin dark line may show at the glue joint no matter how skilled the fabricator, and that's just the reality of the technique.
The ultra profile is typically combined with a finished edge shape on the top face. You can have a mitered ultra edge, a bullnose ultra edge, or an eased ultra edge. The "ultra" part just describes the added lamination underneath. The edge shape you choose for the top corner is a separate decision.
One thing worth knowing: a true mitered edge achieves a similar thick look but bonds the stone at a 45-degree angle so there's no visible seam at the bottom. The ultra (stacked) approach leaves a horizontal seam visible on the face of the lamination. Both look good from across a kitchen. Up close, the mitered version looks more expensive because the seam is hidden. The ultra version is faster to fabricate and usually cheaper.
How does the ultra edge compare to other thick-edge options?
There are three main ways fabricators create a thick-edge look on a countertop: true mitered edges, laminated (ultra) edges, and genuine thick slabs. Each has real trade-offs.
| Edge Type | Visible Seam? | Relative Cost | Fabrication Complexity | Best For |
|---|---|---|---|---|
| Ultra / stacked laminated | Yes, horizontal line | Low-mid ($15, $40/LF extra) | Low | Solid colors, tight budgets |
| Mitered 45° | No | Mid-high ($40, $90/LF extra) | High | Dramatic stone, premium kitchens |
| Genuine 6cm slab | No | Very high (slab cost doubles+) | Medium | Waterfall islands, ultra-luxury |
| Single 3cm eased or beveled | No | Base price | Low | Budget jobs, hidden edges |
The ultra edge beats a genuine 6cm slab on price by a wide margin. A 6cm slab (two slabs bonded at the yard) can cost two to three times what the same stone costs at 3cm, and you pay for all that extra material on every square foot, more than the exposed edges [1]. If you only want the thick look on the island perimeter, the ultra profile makes much more financial sense.
The mitered edge wins on looks for natural stone with heavy veining. If you're working with marble countertops or a high-movement quartzite, a visible seam line on the face of the lamination can look slightly industrial rather than luxurious. For granite countertops with a busy pattern, the seam is less noticeable because the eye has so many other things to process.
For laminate countertops, edge profiles work differently since laminate is a thin sheet over a substrate. What laminate suppliers call a "post-formed edge" or a built-up edge uses a thicker particleboard core and a shaped laminate strip, not stone lamination. Same visual goal, completely different construction.
What does a countertop ultra edge profile cost?
The honest answer is $15 to $40 per linear foot above whatever the shop charges for the base edge, and the range is wide because material and shop location drive it hard. A shop in a rural Midwest market may charge $12 to $18 per linear foot for an ultra lamination. A shop in the San Francisco Bay Area or New York Metro may charge $35 to $50. Labor rates, real estate, and competitive pressure all vary [2].
Material matters too. An ultra edge on white engineered stone (quartz) is straightforward: cut, glue, polish, done. The same operation on a slab with tight movement or quartzite that blows out CNC tooling faster takes more time and material. Expect to pay toward the high end on exotic stone.
Here's how the numbers stack up on a real kitchen. An average kitchen has about 30 linear feet of countertop perimeter, but only the exposed edges get a finished profile. A standard island might have 14 linear feet of exposed edge. At $25 per linear foot for an ultra edge (a reasonable mid-market figure), that island edge adds $350 to the invoice. If you also do the perimeter counters (maybe 20 feet of exposed edge at the peninsula and sink wall), add another $500. Total upgrade cost for ultra edge on an average kitchen: $400 to $900, depending on how much edge is exposed.
That's a reasonable number for a visual upgrade that does make a kitchen feel more finished. I'd spend it on an island where the full edge is visible. I'd skip it on counters that back up to walls on three sides.
Which stone materials work best with the ultra edge?
Engineered quartz is the easiest material for ultra edge lamination. The color is consistent through the slab, so the glue joint on the face of the lamination nearly disappears after polishing. Brands like Cambria countertops have relatively uniform pigment distribution, which helps. The seam line is there if you look for it, but it doesn't call attention to itself.
Granite with moderate movement also works well. Most granite has enough random patterning that a horizontal seam line at the lamination joint reads as just another line in the stone. Highly directional granite (think linear flow patterns) shows the seam more clearly, but even then it's subtle once the joint is filled and polished.
Marble is harder. The veining in marble tends to run in one direction, and a horizontal glue line cutting across that vein pattern is visible. It's not ugly, but it reads differently than the stone itself. If you want an ultra edge on marble, ask your fabricator to select a strip from an area of the slab where the pattern at the joint will be as consistent as possible. It helps. It doesn't fully solve it.
Soapstone and other softer metamorphic stones can work, but the lamination bond depends on surface preparation. If you're curious about how the material wears over time, the cleaning and maintenance guides for how to clean soapstone countertops and how to clean quartzite countertops are worth reading before you commit, since an ultra edge adds one more surface (the lamination face) that needs the same care as the top.
Solid surface materials like Corian countertops don't use the stone lamination approach at all. Solid surface edges can be built up using the same material, and the seams are heat-welded and sanded invisible. That's a cleaner result than stone lamination, with no joint line to hunt for, though solid surface has its own durability trade-offs.
What are the actual visual differences between ultra edge heights?
The height of the lamination strip determines how dramatic the effect looks. Fabricators typically offer a few standard heights.
A 1.5-inch total face height is the minimum that reads as a "thick" edge from a distance. This is the most common option on perimeter counters where cabinets and drawers are nearby and a taller edge would conflict.
A 2-inch total face height (so about 3/4 inch of added strip below the slab) is the most popular island choice. It looks substantial without being chunky.
A 3-inch total face height is the statement option. On a large island with 36-inch-tall stools, a 3-inch face edge reads as a genuine design feature. Below that island height, it can look heavy.
Some shops offer anything from 1 inch to 4 inches in quarter-inch increments. Others have two or three set options. Ask before you assume.
The edge shape you choose above the lamination changes the perceived thickness too. A flat eased edge on top of a 2-inch ultra lamination looks cleaner and thinner than a bullnose top edge on the same lamination height, because the bullnose curves down and adds to the apparent face height.
Is the ultra edge structurally sound or will it fail?
Done right, the bond is strong. Fabricators use two-part epoxy adhesives that cure to a strength that often exceeds the tensile strength of the stone itself [3]. A properly bonded lamination strip won't separate under normal kitchen use. The weak point is impact: if someone whacks the edge hard with a cast iron pan or drops something heavy on it, the lamination joint is a slightly higher-risk spot than solid stone. This is a real (if rare) concern, not a theoretical one.
Where ultra edges actually fail is poor surface prep. If the bonding surfaces aren't clean and dry, if the epoxy isn't matched to the stone type, or if the joint isn't properly clamped during cure, the strip can separate. This is a fabricator quality issue, not an inherent flaw in the technique. Ask any fabricator you're considering: what adhesive do they use, do they clamp during cure, and what's their warranty on lamination bonds? A shop that can answer those questions directly is a good sign.
Temperature cycling (hot pans set near the edge repeatedly) can stress the glue joint over years. The advice to use trivets applies doubly to laminated edges.
For kitchen countertops in high-traffic homes with kids, I'd lean toward the mitered edge for exposed island edges just because there's no seam to separate. But thousands of ultra-laminated edges have been in kitchens for 10 to 15 years without incident. It's not a fragile choice.
How does fabrication software handle ultra edge pricing?
This is a real operational headache for shops that quote manually. Ultra edge pricing depends on linear feet of exposed edge, the height of the lamination (which determines material consumption from the slab), and whether the stone has to be matched carefully. A shop using a spreadsheet tends to underprice it by forgetting that a taller lamination strip consumes more slab material per linear foot, which affects nesting and yield.
Tools like SlabWise's quoting system let fabricators set up edge profiles as line items with configurable linear-foot pricing, so the ultra edge gets priced correctly every time and the customer sees it as a transparent upgrade on the quote. If you're a shop owner or fabricator, running a demo to see how edge upsells get handled automatically is worth the 20 minutes.
For homeowners, the practical implication is that quotes from different shops for the same ultra edge job can vary significantly based on whether the shop has done the math correctly on material consumption. A quote that seems low might be missing the lamination strip material cost. Always ask for an itemized breakdown.
What is the installation process for an ultra edge profile?
The lamination happens in the shop, not on-site. Here's the actual sequence.
First, the main countertop pieces are cut and rough-shaped from the slab. Then the fabricator cuts the lamination strips from remaining slab material. Ideally this comes from the same bundle (sometimes called a book) so the material is visually consistent.
The bonding surfaces (the underside of the slab at the front edge and the top face of the strip) get cleaned with acetone or a similar solvent to remove dust and oils. Two-part epoxy is mixed and applied. The strip is positioned, and the assembly is clamped. Cure time varies by adhesive, typically 20 to 60 minutes for handling strength and 24 hours for full cure [4].
After the bond cures, the fabricator grinds and polishes the full edge profile, which blends the joint line and creates the finished surface. A skilled polisher can minimize the joint visibility significantly at this stage.
On-site, countertop installation of an ultra-edge piece is the same as any other countertop. The extra weight of the lamination strip is minor. The main handling caution is that the lamination does create a slightly more fragile geometry during transport and setting, particularly on long pieces, because the strip extends below the cabinet line and can catch on cabinet doors or drawers during positioning.
Should you choose an ultra edge upgrade or spend the money elsewhere?
This is the question that matters. The ultra edge is a visual upgrade with no functional benefit. It doesn't change how the countertop performs, cleans, or wears.
I'd say the upgrade is worth it when: the island edge is a design focal point, the kitchen is open-plan so the island gets seen from multiple angles, or the overall countertop budget is already at a level where $500 in edge work is a rounding error.
I'd skip it when: the budget is tight and that $500 could go toward a better material at a standard edge (a nice eased or beveled edge on a good stone beats an ultra edge on a mediocre one), or when the counters are mostly against walls and the full edge face is rarely visible.
For butcher block countertops, the whole framing is different since butcher block is glued-up wood and has its own edge profile options (end grain, face grain reveals, waterfall) that don't map to stone lamination at all.
One more honest point: the countertop upgrade edge profiles that get the most attention in design media are often the ones that photograph well, not necessarily the ones that hold up best in real kitchens. The ultra edge photographs beautifully. Whether it's the right call for your specific kitchen is a different question.
How do you communicate ultra edge specs to your fabricator?
Vague requests cause expensive remakes. When you're ordering a countertop upgrade edge profile (whether you call it ultra, stacked, or laminated), tell your fabricator these five things explicitly.
One: the total finished face height you want (e.g., 2 inches total, or specify the added strip height below the slab). Two: which edges get the ultra lamination and which get a standard single-thickness edge. Three: the top edge shape (eased, beveled, bullnose, etc.) that goes on top of the lamination. Four: whether you want the lamination strip to be from the same slab for matching or whether contrast is acceptable. Five: your expectation about the joint line. Be realistic: a hair-thin dark line at the glue joint is normal on many natural stones. If a fabricator promises an invisible seam on a dramatic-vein stone, that's a red flag.
Get the edge specification in writing on the quote or work order. "Ultra edge, 2-inch face, eased top, island only, strip from same slab" is a complete specification. "Nice thick edge" is not.
Photos help. Find a picture of the look you want and put it in the job file. Fabricators work visually too.
Are there building code or safety requirements for edge profiles?
For residential kitchens in the US, there are no federal building codes that specify countertop edge profiles [5]. Some state and local health codes for commercial kitchens do regulate countertop edges, typically requiring a coved or sealed edge to prevent bacterial buildup, but these apply to food service establishments, not homes.
The Americans with Disabilities Act (ADA) sets accessible counter height requirements (28 to 34 inches for accessible work surfaces) but does not regulate edge profile geometry [6]. The edge height of the lamination (the 2 to 3 inches of face) does not affect ADA compliance as long as the counter surface height is correct.
For Formica countertops in rental properties or commercial spaces, check local health department requirements for the specific use case. But for a residential kitchen remodel, you're choosing edge profiles based on looks and budget, not code.
Frequently asked questions
What is the difference between an ultra edge and a waterfall edge?
They're completely different. An ultra (stacked/laminated) edge adds thickness to the front face of the countertop perimeter by bonding a strip under the slab edge. A waterfall edge runs the full slab material vertically down the side of an island to the floor, like a continuous sheet of stone. A waterfall edge requires more slab material (often a second full slab), costs significantly more, and is a design statement rather than just an edge upgrade.
Can you add an ultra edge to an existing installed countertop?
In theory, yes. In practice, it's rarely worth it. The fabricator would have to remove the countertop, bond the lamination strip in a shop environment, re-polish the edge, and reinstall. The labor cost often approaches or exceeds the cost of a new countertop in that material. Most homeowners who want this upgrade end up planning it before installation, not retrofitting it.
How thick is the lamination strip in an ultra edge?
The strip is typically cut from a full 3cm (about 1.25-inch) slab, then profiled so the visible face shows a specific height below the main slab. A 2-inch total face height with a standard 3cm slab means the strip adds about 3/4 of an inch of visible face below the slab edge. Shops can cut strips thinner or stack two strips for taller faces, depending on the look you're going for.
Will the seam line in an ultra edge always be visible?
On engineered quartz in a solid or subtle pattern, the seam after polishing is barely visible. On natural stone with heavy or directional veining, a thin line at the joint is normal and expected. A skilled fabricator minimizes it during polishing, but cannot eliminate it entirely on patterned stone. Seeing a thin line is not a defect. An obvious gap, step, or color mismatch is a defect.
Does the ultra edge profile affect countertop weight and cabinet support requirements?
The added weight of a lamination strip is small relative to the main slab. A 2-inch-tall by 14-linear-foot lamination strip on a standard granite adds roughly 10 to 20 pounds to the counter section. Standard base cabinet construction handles this comfortably. You don't need extra blocking or reinforcement specifically for an ultra edge. If the countertop spans an unusually long unsupported run, that's a separate concern independent of the edge profile.
What adhesive is used to bond ultra edge lamination strips?
The industry standard is two-part polyester or epoxy adhesive, color-matched to the stone. Polyester (often called 'poly') cures faster and is cheaper; epoxy is stronger and more flexible. High-end shops tend to use epoxy for lamination bonds because the joint is more durable over time. The adhesive is mixed immediately before application and cures within 20 to 60 minutes for handling strength, with full cure in 24 hours.
Is the ultra edge more expensive on quartzite than on granite?
Usually yes, for two reasons. Quartzite is harder and more abrasive than granite, which wears tooling faster and slows polishing. Some quartzites also have dramatic veining that requires more careful material selection and positioning for the lamination strip. Expect to pay toward the top of the $15 to $40 per linear foot range for ultra edges on exotic quartzite, and confirm the price explicitly with your shop before signing off.
Can you get an ultra edge on a 2cm slab?
Yes, and it's actually more common with 2cm slabs because the slab alone looks thin and insubstantial. Adding a lamination strip to a 2cm countertop to bring the edge face to 1.5 or 2 inches is a standard technique for porcelain slabs and some thinner stone applications. The bonding approach is the same; the strip is just proportionally larger relative to the main slab thickness.
How long does ultra edge fabrication add to the turnaround time?
The added shop time for lamination is usually 1 to 2 hours per job, not including adhesive cure time. Many shops cure overnight anyway, so it typically adds one day to the fabrication timeline, not multiple days. In peak season when shops are backed up, any additional step can extend the lead time marginally. Ask your shop what their current turnaround is, including cure time, before you schedule your installation date.
Do ultra edge profiles on countertops affect resale value?
There's no reliable data on this for edge profiles specifically. General research on kitchen remodels suggests mid-range kitchen renovations return roughly 49 to 80 cents on the dollar at resale according to Remodeling magazine's Cost vs. Value report, but that data covers full kitchen jobs, not individual upgrades. An ultra edge on a well-chosen stone material adds to the overall visual impression of a kitchen, which buyers notice, but isolating the dollar value of the edge alone isn't something you can measure reliably.
What questions should I ask my fabricator before ordering an ultra edge?
Ask: what adhesive they use and whether they epoxy or polyester bond, what the warranty covers on lamination joints, whether the strip comes from the same slab bundle, what the finished face height options are, how the top edge will be shaped above the lamination, and what to expect in terms of visible seam on your specific stone. Get the full specification in writing on the quote before work starts.
Is an ultra edge the same as a double-laminated edge?
Essentially yes, though terminology varies by shop and region. Some shops call a single added strip a 'laminated edge' and reserve 'double laminated' for two strips bonded to create an even taller face (3 to 4 inches). Others use 'ultra edge' as a brand-specific term for their premium edge category, which may include the lamination plus a specific top edge shape. Always confirm exactly how many strips and what finished height you're getting, more than the name.
How do I clean and maintain an ultra edge countertop?
Treat the edge the same as the top surface: the same stone, same finish, same maintenance needs. For natural stone edges, follow the same sealing and cleaning protocol as the field (pH-neutral cleaner, periodic sealing). The glue joint itself is sealed by the polishing process. Avoid harsh chemical cleaners near the joint. If you're unsure about your specific stone's maintenance, reading a guide like the one on how to clean stone countertops is a good starting point for general principles.
Sources
- Natural Stone Institute, Dimension Stone Design Manual: 6cm slabs are produced by bonding two 3cm slabs, effectively doubling raw slab material cost before fabrication
- U.S. Bureau of Labor Statistics, Occupational Employment and Wage Statistics: Stone and Tile Setters: Stone cutting and finishing labor rates vary significantly by region, with highest wages in Pacific and Northeast states
- Natural Stone Institute, Fabrication Standards for Dimensional Stone: Properly mixed and applied two-part epoxy adhesives bond stone joints to a strength that frequently exceeds the tensile strength of the parent stone
- Tenax USA, Technical Data: Stone Epoxy and Adhesive Products: Two-part stone epoxy adhesives reach handling strength in 20 to 60 minutes and full cure at 24 hours under normal shop conditions
- International Residential Code (IRC), International Code Council: The IRC does not specify countertop edge profile geometry for residential kitchens
- U.S. Department of Justice, 2010 ADA Standards for Accessible Design: ADA accessible counter height is 28 to 34 inches; standards do not regulate edge profile geometry or lamination construction
- Remodeling Magazine, Cost vs. Value Report 2024: Mid-range major kitchen remodels return approximately 49 to 80 cents on the dollar depending on market, per the 2024 Cost vs. Value national data
- Marble Institute of America (now Natural Stone Institute), Countertop Installation Standards: Lamination strip bonds must have bonding surfaces cleaned with solvent prior to adhesive application to achieve rated bond strength
- U.S. Food and Drug Administration, Food Code 2022: Section 4-101 (Materials for Food Contact Surfaces): FDA Food Code requires commercial kitchen surfaces to be smooth, non-absorbent, and easily cleanable; edge profiles in commercial food service must not create harborage points
- National Kitchen and Bath Association (NKBA), Kitchen Planning Guidelines: NKBA design guidelines address counter heights and clearances but do not mandate specific edge profile types for residential kitchens
Last updated 2026-07-09