TL;DR
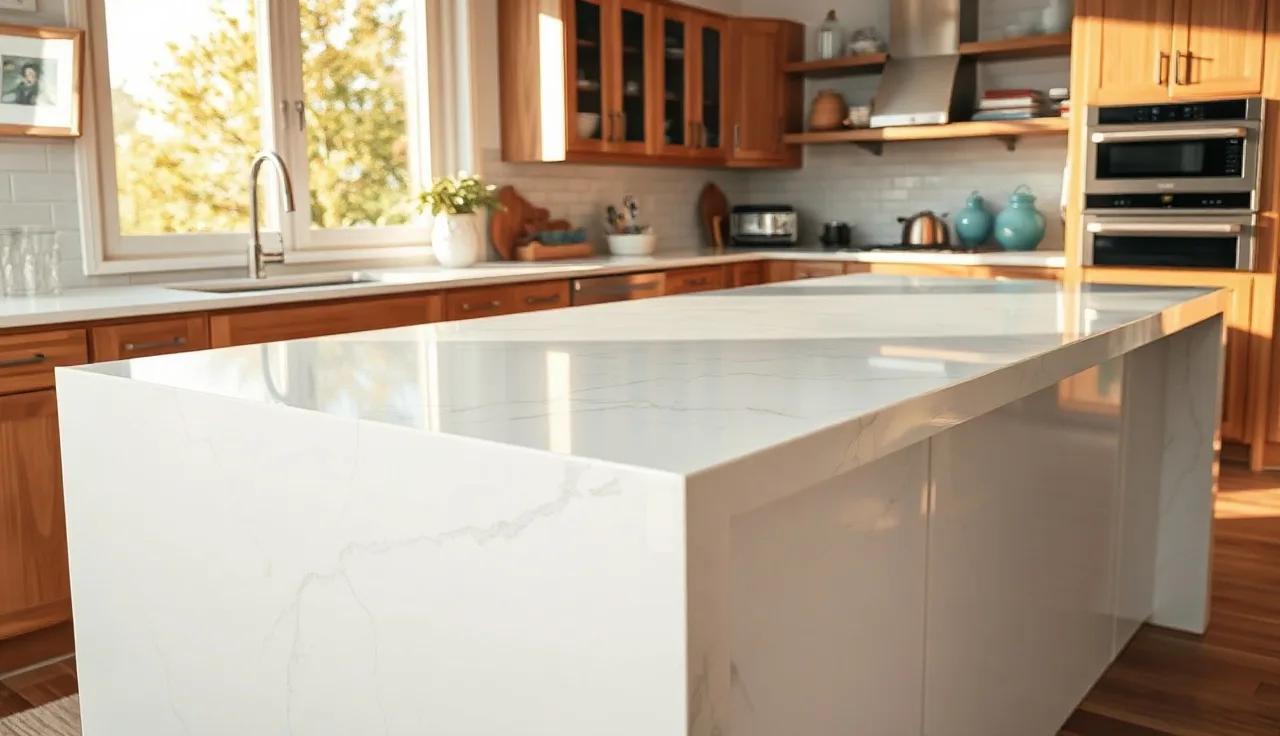
- A mitered edge joins two pieces of stone at a 45-degree angle to fake a much thicker slab, usually 3 to 6 inches of apparent thickness from a 3/4-inch or 1.5-inch slab.
- Prices run $30, $80 per linear foot above a standard eased edge, depending on material and profile.
- Not every material pulls it off cleanly.
What is a mitered edge on a countertop?
A mitered countertop edge is formed by cutting the front face of the slab at a 45-degree angle and gluing a strip of the same material to the underside at the matching 45-degree angle, so the two cuts meet at a nearly invisible seam. The result looks like a slab four or five inches thick when the actual stone is only 3/4 inch (2 cm) or 1.25 inches (3 cm). That visual weight is the whole point.
The technique comes from woodworking, where miter joints are standard for picture frames and cabinet doors. Fabricators adapted it for stone once bridge saws and CNC machines got precise enough to hold the tolerances required. A gap of even 1/32 inch at the joint is visible in polished stone, so this cut demands a well-calibrated saw and an experienced operator.
Mitered edges are most often specified on kitchen islands and waterfall edges, where the countertop wraps down to the floor on one or two sides. They also show up on bar tops and any application where the designer wants the slab to read as a solid block rather than a thin surface. If you have seen a countertop that looks like a 4-inch slab of marble but the homeowner only bought standard 3/4-inch material, you have almost certainly seen a miter.
This is different from a laminated edge, which stacks an extra strip of stone flat against the underside to build up apparent thickness. A laminate buildup shows a visible seam at the front face. A miter hides the seam on the corner, which is why designers prefer it for premium work.
What edge profiles can be mitered, and which ones can't?
The miter joint is the structural and visual foundation, but the exposed corner can carry almost any profile a fabricator can grind. Some profiles pair far better with miters than others.
Profiles that work well with miters:
- Straight/eased: The most common choice. A clean 90-degree corner (slightly softened) on top of a mitered edge reads as pure architectural slab. This is the waterfall look.
- Beveled: A small 45-degree cut on the top arris softens the corner without adding visual noise to the thick edge below.
- Ogee (single or double): A compound S-curve profile ground into the top edge adds ornate detail. It is technically doable but costs more because the fabricator profiles the top edge after mitering.
- Bullnose (half or full): Rounded top edge on a mitered slab. Common in transitional kitchens. Works well.
- Chiseled or leather: A raw, broken edge finish on the top face above a mitered corner is very popular in contemporary design with quartzite and marble.
Profiles that are difficult or inadvisable:
- Dupont and ogee with laminate buildup: Combining a thick laminated buildup with a mitered corner creates a bulky seam area that is hard to finish cleanly. Most fabricators will push back on this combination.
- Waterfall with a full bullnose: The rounded edge on a waterfall panel has to transition smoothly where the horizontal and vertical pieces meet, and a full bullnose makes that corner transition brutally hard. Some shops can do it. Most won't.
- Multi-step profiles on thin material: Any profile that removes a lot of material from the edge of a 3/4-inch piece is risky. The miter strip is already thin at the joint, and aggressive profiling can weaken it.
The profile on the actual top edge (the part you touch) is largely independent of the miter joint below it. Think of the miter as the construction method that creates apparent thickness, and the profile as the finish on top. When a fabricator quotes your countertop specs for an edge profile, they price the miter and the top profile separately in most shops.
How much does a mitered edge cost compared to standard edges?
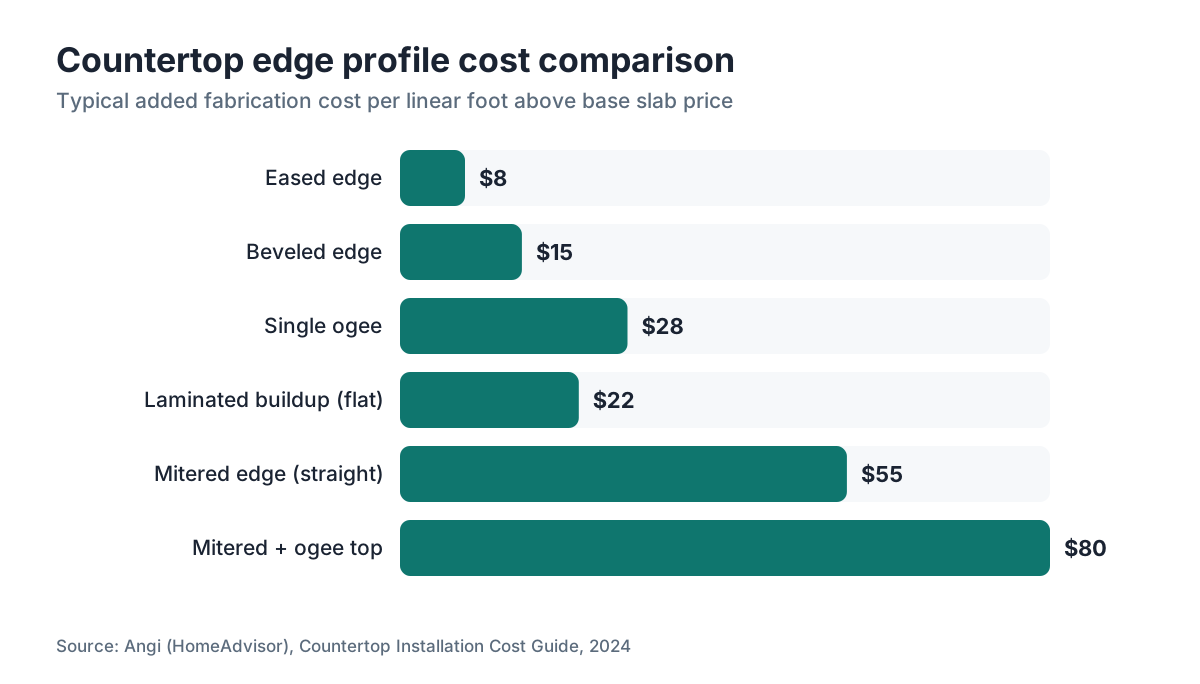
Mitered edges carry a real price premium because they use more material, more machine time, and more skilled labor than any standard edge. Here is what the range looks like right now.
A standard eased or beveled edge typically costs $10, $20 per linear foot above the base slab price, or it may be baked into the fabrication fee. A mitered edge generally runs $30, $80 per linear foot more than that baseline, putting the all-in edge cost at $40, $100 per linear foot depending on the shop, region, and material [1].
Material matters a lot. Porcelain at 6mm or 12mm needs specialized cutting equipment and chips easily at the miter joint, so some shops charge a 20 to 30 percent premium over their stone miter price. Quartzite and harder granites take longer to cut and polish cleanly, which pushes costs up too. Softer stones like limestone and some marbles are easier to miter but more fragile at the joint.
| Edge type | Typical added cost (per lin. ft.) | Notes |
|---|---|---|
| Eased | $0, $15 | Often included in fab fee |
| Beveled | $10, $20 | Simple profile, fast to grind |
| Ogee (single) | $20, $35 | Compound curve, more passes |
| Laminated buildup (flat) | $15, $30 | Extra material + glue time |
| Mitered (straight/eased) | $40, $80 | Two 45° cuts + glue, labor intensive |
| Mitered + ogee top | $60, $100+ | Miter plus profile grind on top edge |
| Waterfall miter (floor-to-ceiling) | $150, $300+ per corner | Includes vertical panel material |
Those waterfall numbers reflect the cost of the extra slab material for the vertical panel plus the miter seam work. A full waterfall island can add $1,000, $3,000 to the total project cost depending on panel dimensions [2].
Fabricators pricing jobs in quoting software should break out miter edges as a separate line item so customers see exactly what they are paying for. Shops that bundle everything into one square-foot price get more pushback from customers who don't understand why two seemingly similar jobs cost wildly different amounts.
Which countertop materials work best with mitered edges?
Not every material handles a miter joint equally well. The joint relies on a precise 45-degree cut, a strong adhesive bond, and a finished surface that hides the seam. Some materials cooperate on all three. Others fight you.
Natural stone (granite, marble, quartzite): These are the traditional home for mitered edges. Granite is forgiving because it is hard, chips less during cutting, and sands flat easily. Marble and quartzite miter beautifully when cut carefully, though softer marble (think Calacatta) can chip at the thin arris if the blade is even slightly dull. Quartzite, harder than granite, needs sharp tooling and patience but produces a nearly invisible seam when done right. See the granite countertops guide for more on granite fabrication.
Engineered quartz: Quartz slabs miter well, with one caveat. The particulate pattern in engineered quartz does not flow through the joint the way a natural stone vein might, so the seam is always visible on close inspection, even when it is tight. For solid colors or very fine patterns, this is a non-issue. For slabs with large veining that mimics marble, the seam can be obvious and disappointing. Cambria and similar premium brands sometimes offer book-matched vein patterns specifically to help with this. Check cambria countertops for brand-specific details.
Corian and solid surface: Corian can be mitered, and the joint can be made nearly invisible because the material is homogeneous all the way through and bonds to itself with a color-matched adhesive. Corian's technical literature lists mitered options because the material suits it [3]. The catch: solid surface is softer than stone and can scratch or dent at the thin miter corner over time. For more on solid surface, the corian countertops article covers material properties in depth.
Porcelain and sintered stone: This is the most technically demanding application for miter cuts. Porcelain slabs at 12mm (about 1/2 inch) are brittle at the cut edge, and the 45-degree angle creates a very thin, fragile arris. Fabricators who work with porcelain regularly have the tooling and technique to pull it off. Those who don't will crack slabs. Expect a premium and verify the shop's experience.
Laminate and Formica: Laminate countertops can get a post-formed edge profile, but a true stone-style miter isn't really achievable because the substrate (particleboard or MDF) is visible at any cut. Specialty laminate shops sometimes fake a thick edge with built-up substrate plus a matching laminate wrap, but it is not the same as a stone miter. The laminate countertops and formica countertops articles cover what edge options actually exist for those materials.
Butcher block: Wood can be mitered, and it is done for waterfall applications. The challenge is wood movement. Solid wood expands and contracts with humidity, and a miter joint can open slightly over time if the adhesive or wood species does not handle that movement. End grain exposed at the miter also behaves differently from face grain. Some woodworkers use floating miter joints with internal hardware to absorb the movement. See butcher block countertops for wood-specific edge details.
What is a waterfall edge and how does it relate to mitered profiles?
A waterfall countertop is the application that made mitered edges mainstream in residential kitchens. The countertop surface continues down the side of the island or cabinet to the floor (or close to it), creating a continuous vertical panel. The connection between the horizontal countertop and the vertical panel is a mitered joint: both pieces cut at 45 degrees and joined so the face of the material appears continuous.
The name comes from the effect. The stone seems to pour over the edge like water. When the slab has strong veining, designers sometimes book-match the two pieces so the vein pattern mirrors across the miter, which takes careful slab selection and costs more.
A waterfall is not structurally part of the cabinet. The vertical panel is typically secured to the cabinet side with adhesive and sometimes hidden mechanical fasteners. It carries no load, but it has to be stable enough not to move and crack the miter joint. Installers usually secure the bottom of the vertical panel to the floor or to a ledger inside the cabinet.
Waterfall edges get very expensive with rare or heavily veined stone. A single waterfall panel on a 36-inch-tall island might need a piece 36 inches wide by 42 inches tall, which can be most of a slab. Two waterfall sides can mean two full slabs for the panels alone, on top of the horizontal surface. This is where installation planning and quoting software earns its keep: a shop needs to lay out the cuts accurately to know whether the job is even possible from available slab inventory before quoting. SlabWise's nesting tools help fabricators see exactly this kind of multi-piece layout so there are no surprises at install time.
For homeowners, the practical check is simple. Confirm your fabricator has done waterfall miters before, ask to see photos of finished work, and get the seam location specified in writing so you know where it lands visually.
How is a mitered edge actually fabricated? What should you watch for?
Understanding the process helps you read a quote and catch problems before the stone is cut.
It starts with the bridge saw. The fabricator tilts the blade to 45 degrees and cuts along the front edge of the slab. Then they cut a strip of the same material, also at 45 degrees on one long edge. The strip is usually 3 to 6 inches wide, depending on the desired apparent thickness. Both cut faces have to be perfectly flat and at exactly 45 degrees for the joint to close tightly.
After cutting, both faces get ground flat with a hand grinder or CNC polishing head to remove blade marks and ensure contact across the full joint face. This step is where most miter failures start. If either face has even a slight bow, the joint will show a gap somewhere along its length.
The pieces are then joined with two-part epoxy, usually color-matched to the stone. Light stones get a white or clear epoxy. Dark stones get a tinted product. The strip is clamped firmly while the epoxy cures, typically 30 to 60 minutes for handling strength and 24 hours for full cure. Some shops use dedicated miter clamps that pull the two pieces together evenly.
After cure, the corner is ground and polished to match the face finish of the slab. On a well-executed miter in polished granite, the seam should be very hard to find. On a veined marble, the seam will be visible but should still be tight.
What to watch for in a quote or contract:
- Is the miter joint location specified? On an island, a seam on the face that greets the kitchen is less forgiving than one on a hidden side.
- What epoxy color will they use? Ask to see a sample on a scrap piece.
- How is the vertical panel attached? Adhesive only, or with mechanical backup?
- Does the quote include the material for the vertical strip, or just the labor? Material cost is real and significant.
For a full look at what happens on the job, the countertop installation guide covers site prep and the install sequence.
What countertop specs for edge profiles do fabricators and designers actually use?
Countertop specs for edge profiles show up in two places: project drawings from designers and architects, and fabrication shop tickets. The terminology and level of detail differ a lot between them.
In architectural drawings, edge profiles get called out by name (eased, mitered, ogee, bullnose) with a reference to material thickness and any special dimension like apparent miter height. A typical spec line reads: "3 cm quartzite, mitered edge at island, 5-inch drop, eased top arris, polished finish."
In fabrication shop tickets, that same information gets translated into machine instructions: blade angle for the miter cut, strip width, profile code for the CNC head, and finish spec. Shops with CNC equipment keep a library of profile codes. Shops doing hand work rely on templates and operator experience.
For Corian and solid surface, countertop specs for edge profiles include options straight from the manufacturer. Corian's technical guides list fabrication methods for miter joints specifically, including adhesive type and recommended joint preparation [3]. That is useful when you compare solid surface quotes: if a fabricator is not following the manufacturer's process, the joint may fail.
The countertop specs edge profile information you should always have in writing before a job starts:
- Profile name and any dimension (e.g., "3-inch miter drop")
- Material thickness at the face after miter
- Finish (polished, honed, leathered)
- Seam location on the plan view
- Any book-match requirement
Miss any of these and you create ambiguity that costs money to resolve after the slab is cut.
How do mitered edges affect countertop durability and maintenance?
A mitered joint is a glue joint, and every glue joint has some vulnerability. The practical durability of a mitered edge depends on the epoxy quality, how well the joint faces were prepped, and how the countertop gets used and maintained.
On a horizontal countertop, the miter joint runs along the front bottom edge where it is largely out of the way. It is not a high-impact zone, and properly cured epoxy there can last decades without trouble. The risk is the corner itself. A direct impact (a heavy pot dropped on the corner) can chip stone and crack the joint. Harder stones like granite and quartzite handle that better than softer marbles or limestones.
On a waterfall panel, the horizontal-to-vertical miter sees slightly more stress from the weight of the vertical panel pulling on the joint. That is why proper mechanical attachment of the vertical panel matters. The panel's weight should ride on adhesive to the cabinet side and the floor or ledger, not on the miter joint itself.
For cleaning, the miter joint needs no special treatment beyond normal stone care. Avoid letting acidic liquids pool at the joint line, because the epoxy is technically more vulnerable to acid than the stone over a long period. Sealing a stone countertop with a penetrating sealer does not seal the epoxy, but it does not harm it either. See how to clean stone countertops for care routines that apply to mitered stone surfaces.
For quartzite specifically, the joint is extremely durable because quartzite's hardness means the stone itself will not scratch or etch around the seam. The how to clean quartzite countertops guide covers the maintenance side in detail.
Can you add a mitered edge to an existing countertop?
Usually no, at least not to stone that is already installed. Adding a true miter to an existing countertop would mean removing the slab, cutting a 45-degree angle off the front edge (which shortens the countertop depth), cutting a matching strip from the same or similar stone, and gluing the assembly. You would lose 1/4 inch or more of counter depth in the process, and matching existing stone precisely is often impossible.
There are workarounds. A fabricator can sometimes cut a mitered buildup strip from remnant stone in a close match and apply it to the underside of an existing countertop edge. If the stone is not a perfect match, the seam will show. For some designs a contrasting strip is an intentional detail, but it is not the same look as a matched miter.
For new construction or a full remodel where the countertops are getting replaced anyway, the miter is easiest to specify from the start. If you are renovating an existing kitchen and want waterfall edges, plan to replace the countertops entirely rather than modify what is there.
Solid surface like Corian is a partial exception. Because Corian bonds to itself and the joint sands invisible, a skilled solid surface fabricator can sometimes add a mitered piece to an existing Corian countertop if the original material is available. It is specialty work and not every shop offers it.
What questions should homeowners ask their fabricator before specifying a mitered edge?
A few targeted questions tell you fast whether a shop can execute a miter to the standard you expect.
1. Have you done waterfall miters on this specific material before? Porcelain, quartzite, and veined marble each require different blade speed and tooling. Granite experience does not automatically transfer.
2. Can I see photos of finished miter joints in this material? A confident fabricator has a portfolio. If they cannot produce photos, that tells you something.
3. Where exactly will the seam be, and can you mark it on the drawing? Seam location determines visibility. You want it away from the most prominent sight line if at all possible.
4. What epoxy will you use, and can I see a color test on a scrap piece? Epoxy color matters enormously on light stones. A gray epoxy in a white marble joint is visible from across the room.
5. How is the vertical panel attached? Adhesive only to the cabinet box is fine for most applications, but tall or heavy panels benefit from extra mechanical fastening.
6. Is the strip material included in the price? Some shops quote labor only and add material separately. Clarify this before signing.
7. What is the warranty on the joint? Reputable shops warrant their work for at least one year against joint separation under normal use.
Those seven questions surface most of the issues that lead to disappointing results. Get the answers in writing. A fabricator who is confident in the work will have no problem confirming details.
If you are comparing multiple quotes and struggling to normalize the numbers, an instant quote tool that itemizes edge profile costs separately makes the comparison much cleaner.
How do kitchen design trends affect mitered edge demand?
Mitered edges moved from a specialty fabrication detail to a mainstream kitchen request roughly between 2015 and 2020, driven largely by the waterfall island trend on design platforms and in showrooms. Before that stretch, most residential kitchens used laminated buildup edges or simple profiles, and mitered joints lived mainly in the commercial and high-end custom market.
The National Kitchen and Bath Association (NKBA) publishes an annual design trends report that tracks the popularity of specific countertop and edge details among its member designers [4]. The specific share data for mitered edges versus other profiles is not broken out in their public summary, but the trend toward thick-edge looks and waterfall designs shows up consistently in their annual reports as a top design direction.
The practical effect for fabricators is that miter capability has become a differentiator. Shops that produce clean waterfall miters in porcelain and quartzite have a real advantage in the premium kitchen market. Shops without CNC equipment or experienced stone fabricators struggle to compete on these jobs.
For homeowners, the trend means more fabricators have miter experience than they did ten years ago, which has pulled prices down slightly from the early premium. It has also raised expectations: a sloppy miter joint that might have passed inspection in 2012 gets rejected by a homeowner who has seen twenty perfect examples on social media.
The direction looks stable. The thick-slab aesthetic is not going away soon, and mitered edges are the most technically correct way to get it in thin material. Sintered stone slabs at 4mm and 6mm, too thin for any kind of buildup, will likely push miter demand up as those materials get more common.
Frequently asked questions
How thick does a mitered countertop edge look?
A mitered edge on a standard 3/4-inch (2 cm) slab typically creates an apparent thickness of 3 to 6 inches, depending on the width of the mitered strip. On 1.25-inch (3 cm) material, the visual thickness can reach 4 to 8 inches. The homeowner specifies the desired drop and the fabricator cuts the strip to match.
Is a mitered edge stronger or weaker than a laminated buildup edge?
Both are glue joints, so neither is load-bearing on its own. A laminated buildup has more glue surface area because the flat contact face is wide, which gives it slightly more shear strength. A miter has less contact area but puts the joint on the corner where it sees less stress in normal use. In practice, either joint fails from impact, not from normal countertop loads.
Can porcelain countertops get a mitered edge?
Yes, but it requires a fabricator with specific porcelain experience and diamond tooling rated for the material. Porcelain at 6mm or 12mm is brittle at a 45-degree cut and chips easily if the blade is wrong or the feed rate is too fast. Expect a 20 to 30 percent premium over what the same shop charges for a granite miter, and ask to see prior porcelain miter work before committing.
What is a book-matched waterfall miter?
Book-matching means the vein or pattern in the vertical panel mirrors the vein in the horizontal countertop across the miter joint, like the pages of an open book. It requires buying two sequential slabs from the same block of stone and carefully planning the cut layout so the pattern aligns. It is visually striking but adds material cost and layout complexity.
How do I know if the miter seam on my countertop is good quality?
Run your fingertip along the seam. A quality miter should feel flush with no ledge or step. Look at the joint with raking light from the side; a visible gap or color difference means the faces were not ground flat before gluing or the epoxy color was mismatched. Any opening wider than a credit card thickness is a fabrication defect worth discussing with your shop.
Does a mitered edge require extra countertop material?
Yes. The mitered strip uses stone from the same slab or a compatible slab. A 3-inch drop around a 10-foot island requires roughly 2.5 square feet of strip material plus waste. Fabricators should account for this in the slab quantity estimate. If they don't, the quote may come in under budget initially and then need a slab upgrade when the layout is actually done.
Can a marble countertop get a mitered edge without chipping?
Yes, with the right tooling. Softer marbles like Carrara chip more easily than quartzite or granite, so the fabricator needs a sharp blade, slow feed rate, and a gentle grind on the arris after cutting. The result on a polished marble can be beautiful. The seam on a heavily veined marble like Calacatta will be visible, though. Ask your shop to show you examples in marble specifically.
What is the difference between a mitered edge and a waterfall countertop?
A mitered edge is the fabrication technique: two pieces of stone joined at 45 degrees. A waterfall countertop is an application where that technique continues the countertop surface down the side of a cabinet to the floor. All waterfall countertops use mitered joints, but not all mitered edges are waterfall designs. A simple front-edge miter on a standard countertop is a mitered edge without being a waterfall.
How long does it take to fabricate a countertop with a mitered edge versus a standard edge?
A standard eased edge can be ground in 10 to 20 minutes per linear foot on a CNC machine. A mitered edge typically adds 30 to 60 minutes of machine and hand time per linear foot once you include the 45-degree saw cut, face grinding, glue-up, clamp time, and finish polish. For a 10-foot island with a full miter, plan on 4 to 6 additional shop hours versus a simple edge.
Does the countertop edge profile affect resale value of a home?
There is no reliable published study on countertop edge profiles and home resale value specifically. The broader National Association of Realtors research on kitchen remodels suggests kitchen upgrades return roughly 50 to 60 percent of cost on average [5], but that figure is for the full kitchen, not edges. A mitered waterfall island reads as premium construction and may sway buyer perception in a competitive market, but it is not a guaranteed return.
Can I specify a mitered edge on a laminate countertop?
Not the way you would with stone. Laminate countertops use a particleboard or MDF substrate, and cutting it at 45 degrees exposes raw substrate at the joint face. Some fabricators build up the substrate and wrap it with matching laminate to fake a thick edge, but the result reads as a post-formed edge, not a true miter. If a thick-edge look matters to you, solid surface or stone are the better material choices.
What adhesive is used for mitered stone countertop edges?
Two-part polyester or epoxy adhesives are standard for stone miter joints. Most fabricators use a color-matched polyester rod (heat-cured) or a two-part epoxy mixed on site. The adhesive must be rated for the specific stone type, particularly for porous stones like marble. Manufacturer adhesive selection guides from brands like Tenax or Integra Adhesives are widely used in the trade as reference.
How do I clean and maintain a countertop with a mitered waterfall edge?
Clean the surface and joint area with a pH-neutral stone cleaner or mild dish soap and water. Avoid leaving acidic liquids (lemon juice, vinegar) sitting at the joint seam, since epoxy can yellow or degrade over long exposure. Seal the stone on the manufacturer schedule, typically every one to three years depending on porosity. The vertical panel collects less mess than the horizontal surface but benefits from the same care.
Sources
- HomeAdvisor (Angi), Countertop Installation Cost Guide: Mitered edge pricing premium of $30, $80 per linear foot above standard edge costs in residential countertop fabrication
- HomeAdvisor (Angi), Waterfall Countertop Cost Guide: Waterfall countertop panels adding $1,000, $3,000 to total project cost depending on dimensions
- DuPont Corian, Fabrication and Installation Guide (Corian Solid Surfaces): Corian product line includes mitered edge fabrication as a specified method in manufacturer technical guidance
- National Kitchen and Bath Association (NKBA), Design Trends Report: NKBA annual design trends report tracks waterfall and thick-edge countertop aesthetics as a consistent top design direction among member designers
- National Association of Realtors, Remodeling Impact Report: Kitchen remodel projects recover roughly 50 to 60 percent of cost on average at resale
- Marble Institute of America (MIA+BSI), Stone Reference Manual: Industry reference for stone fabrication tolerances including edge profile and joint quality standards
- U.S. Geological Survey, Minerals Information: Stone, Dimension: Dimension stone production and material category data used as baseline for stone slab market context
- Occupational Safety and Health Administration (OSHA), Silica Rule for Construction (29 CFR 1926.1153): Fabricators cutting stone including edge profiles must comply with OSHA silica dust regulations; permissible exposure limit is 50 micrograms per cubic meter as an 8-hour TWA
- Tile Council of North America, Porcelain Tile Fabrication Guidance: Porcelain slab fabrication including miter cutting requires diamond tooling and specific feed rates to prevent chipping at cut edges
Last updated 2026-07-09