
TL;DR
- A seam allowance is the small planned gap left between two pieces of stone where they meet on a countertop.
- In stone fabrication it runs 1/16 inch to 1/8 inch wide.
- That space lets the fabricator align pieces precisely, fill with color-matched epoxy, and keep edges from chipping against each other.
- How visible the seam looks depends on the material, the color pattern, and the fabricator's technique.
What exactly is a seam allowance in stone countertops?
A seam allowance is the intentional gap engineered between two pieces of stone that meet on a countertop run. Wood and tile can butt together and call it done. Stone can't. The edges have to be cut and polished to a specific profile, and that finishing removes material, so the fabricator plans for it from the start with a gap of roughly 1/16 inch to 1/8 inch (about 1.5 mm to 3 mm).
The term comes from the broader construction and manufacturing world, where a seam allowance is any planned margin built into a cut so that finishing, joining, or fastening the material doesn't eat into the functional dimension. Stone follows the same logic. The saw blade has a kerf width, the polishing wheel takes a sliver more, and the epoxy or polyester adhesive that bonds the seam needs space to grip. Skip the allowance and edges chip under the pressure of being pressed together, or the epoxy bond runs too thin to hold.
The allowance gets set during templating, before anyone touches a saw. A digital template (or a physical one made from luan strips or plastic) records the exact field dimensions, and the shop subtracts the seam allowance from each piece's length so the gap in the finished kitchen is exactly what was planned. Get it wrong here and the pieces either collide or leave a gap too wide for epoxy to fill cleanly.
Why do stone countertops need seams at all?
Stone slabs come off the quarry block in standard sizes. Most quarried granite and marble slabs run roughly 55 to 65 inches wide and 110 to 130 inches long, though some suppliers offer jumbo slabs wider than 65 inches [1]. The average kitchen run, including an L-shape or U-shape, often exceeds what a single slab can cover. Seams are where two pieces meet.
There is also a hard handling limit. A typical 3 cm (1.25-inch) granite slab weighs about 18 to 20 pounds per square foot [2]. A 60-by-120-inch slab weighs close to 900 pounds. Getting a single piece that long around a corner, through a doorway, and onto a cabinet run without cracking it is genuinely risky. Fabricators often seam a long run even when a single slab could technically cover it, because two shorter pieces are safer to carry and less likely to crack under their own weight in transit or on install day.
Engineered stone like Cambria and quartz composites follow similar slab dimensions, so the same seam logic applies. Granite and marble countertops add the challenge of natural veining and color variation, which makes matching pieces across a seam a separate skill entirely.
How wide should a countertop seam allowance be?
The industry standard for finished seam width in polished stone starts at 1/16 inch (about 1.5 mm), with most shops targeting 1/8 inch (3 mm) as a safe working number [3]. Some fabricators push tighter than 1/16 inch on book-matched marble or heavy-vein material where pattern continuity beats gap size. Others open up to 3/16 inch when they're filling with thick epoxy and want extra room for color-matched filler.
What drives the choice:
- Material hardness. Softer stones like soapstone chip less at zero gap, but most shops still leave a small allowance. Harder granites need more room because edge stress concentrates at contact points.
- Edge profile. A mitered waterfall edge has almost no tolerance; the edges must meet nearly perfect or the miter gap reads as a V-groove. A standard eased or bullnose profile forgives more.
- Epoxy type. Two-part polyester seam setters are thicker and need a slightly wider gap. Thin-set epoxies fill 1/16 inch cleanly.
- CNC vs. hand-cut. A CNC waterjet or bridge saw running off a digital template produces a more consistent allowance than a hand-guided saw. The difference shows up in the finished seam.
The 1/8-inch number became a de facto standard partly because most color-matched epoxy kits are formulated to fill that gap without slumping or cracking. Go past 3/16 inch and you may need multiple applications or a structural adhesive underneath the cosmetic fill.
How does a fabricator calculate and mark the seam allowance?
The math is simple. A 144-inch run with one seam in the middle gets cut into two pieces at 71-15/16 inches each, leaving a 1/8-inch gap when they sit together. That 1/8 inch is the seam allowance, and it lives in the cut file, not in the field.
In a digital workflow, the template technician draws the full kitchen layout in software, places seam lines where the material logic and veining dictate, then assigns an allowance value to each seam. The software splits each piece at the seam line and subtracts half the allowance from each side's cut dimension. Some shops assign the full allowance to one piece and leave the other full-length, which simplifies the math but demands careful job-site coordination so the right piece goes against the wall first.
In an analog workflow, the template crew cuts physical luan strips to the field dimensions, marks seam locations in pencil, then overlaps the strips by the allowance amount before taping them into the final template. Same result: each piece's physical template comes out shorter than the raw field by half the allowance per seam.
Shops running fabrication quoting and nesting software (tools like SlabWise fall into this category) can set a default seam allowance in the job template and have it apply automatically to every seam in a layout. That cuts the chance of a technician forgetting to subtract it on one of four seam lines in a complicated kitchen.
Where are seams placed, and who decides?
Seam placement is a negotiation between physics, looks, and material yield. The fabricator's first job is to put seams where they hold: over a cabinet face or a support block, never spanning an unsupported open run like a dishwasher bay or a range cutout [4]. A seam sitting over empty air cracks under load. That's a structural rule, not a preference.
Inside the structural constraints, aesthetics drive the rest. A seam through the middle of a bold book-matched vein looks terrible no matter how tight the gap. Good fabricators study the slab layout during templating and suggest seam locations that hide in a busier part of the pattern, run along a natural vein line, or land in a corner where a return wall cuts the sightline.
Homeowners often want seams gone entirely. Most of the time that's not possible on a full kitchen without either a custom jumbo slab (more money, more logistics headaches) or a material like solid-surface Corian that can be glued and sanded to near-invisibility. Natural stone seams are always visible on close inspection. The goal is to make them unobtrusive, not to make them disappear.
On laminate countertops and Formica countertops, seam allowance works differently because the substrate gets cut and then the laminate is bonded over it. Stone fabricators don't apply those techniques directly, but homeowners comparing materials ask about it constantly.
What materials are used to fill the seam gap?
The standard fill is a two-part epoxy mixed to match the stone color. Most stone supply distributors sell color-pigment packs made for this, with tints for white, black, gray, beige, and a range of browns. The fabricator mixes the base epoxy with hardener and pigments until the color matches the dominant background tone, applies it while the pieces are held in clamp blocks, and lets it cure for 30 to 60 minutes before scraping flush and buffing [5].
Polyester adhesive (sometimes sold under the brand names Akemi or Tenax) is another common option, especially in shops working with Italian marbles. It's generally less flexible than two-part epoxy and can yellow slightly with UV exposure over years, which matters on a counter near a window.
For ultra-tight seams on dark material, some fabricators use a transparent or lightly pigmented epoxy and let the stone surfaces themselves provide the color. The epoxy essentially vanishes optically when the gap drops below 1/16 inch and the material is dark.
No filler makes a seam invisible. Natural variation in color, texture, and reflectivity always reads differently across a seam line under raking light. Judge seam quality from two to three feet away at normal standing height, not from six inches with a flashlight.
Does seam allowance affect how a countertop is priced?
Yes, in two ways. Seams add fabrication time. Cutting to a seam allowance, mixing and applying epoxy, clamping, curing, scraping, and re-polishing the seam area typically adds 30 to 60 minutes of shop labor per seam on straightforward jobs [6]. On a complex or book-matched install with several seams, that time climbs fast. Some shops charge a flat seam fee of $50 to $150 per seam; others bake it into the square-foot price.
Every seam also eats a bit of material. Two 1/16-inch allowances on a single seam is only 1/8 inch of stone lost, which sounds trivial. But on a layout with four or five seams, plus slab breakage risk at the cut lines, those fractions add up. The bigger cost is that matching pattern across a seam may force cutting from adjacent sections of the slab rather than optimizing purely for area, which can mean buying more slab than the raw square footage suggests.
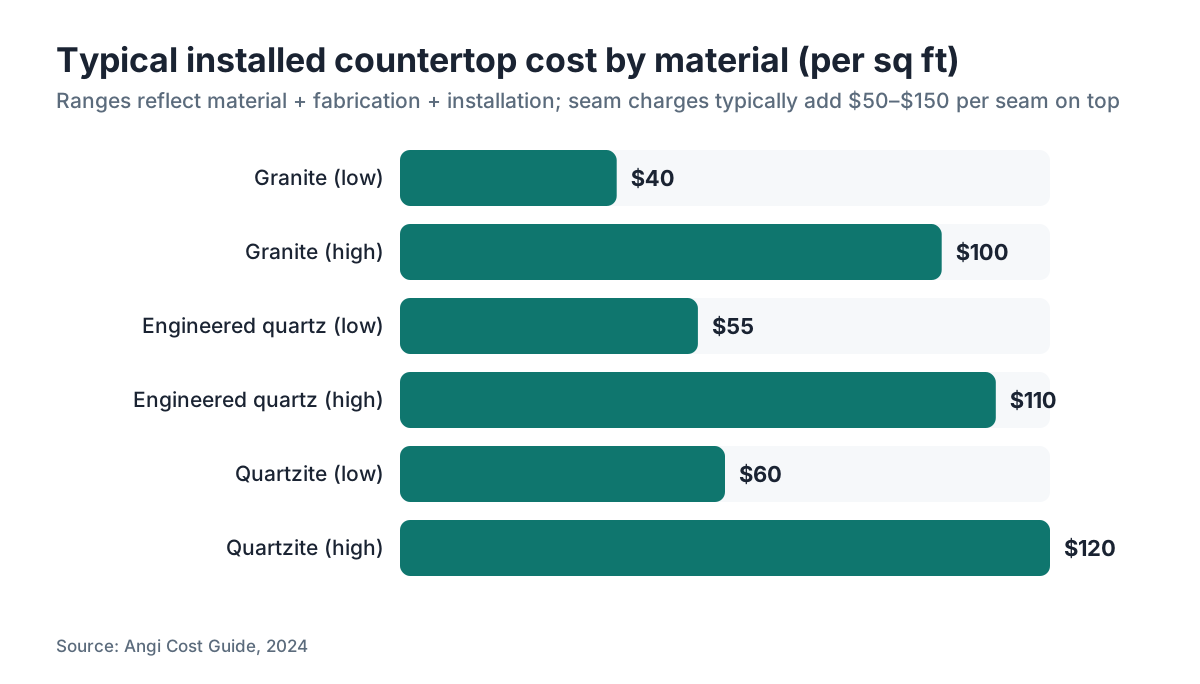
The per-square-foot price of kitchen countertops swings widely by material. Granite typically runs $40 to $100 installed per square foot; quartzite runs $60 to $120; engineered quartz falls around $55 to $110 [7]. Seam charges usually show up as line items on quotes, so ask the fabricator to break them out if you want the real number.
Fabricators using structured quoting software can pull these line items straight from job parameters instead of estimating them in their heads, which cuts down on under-quoting multi-seam jobs.
How does seam allowance differ between stone materials?
The gap dimension itself is similar across materials. The handling is where they part ways.
| Material | Typical seam allowance | Special considerations |
|---|---|---|
| Granite | 1/16" to 1/8" | Hard, chips less at tight gaps; color matching easier on uniform patterns |
| Marble | 1/16" to 1/8" | Veining makes pattern-matching critical; book-matching may require 1/16" or tighter |
| Quartzite | 1/16" to 1/8" | Similar to granite; some quartzites have unpredictable cleavage planes near seam cuts |
| Engineered quartz | 1/8" | Consistent color means matching is easy; manufacturer warranty may specify minimum gap |
| Soapstone | 1/8" | Softer material; gap fills with wax or epoxy; less risk of edge chipping |
| Porcelain slab | 1/8" to 3/16" | Brittle at edges; wider allowance reduces chipping risk during handling |
Soapstone is notably forgiving because it's soft enough that installers can make minor field adjustments without power tools. You can read more about keeping that material clean in our soapstone cleaning guide. Quartzite is the opposite kind of surprise. It can hide micro-fractures along bedding planes that only reveal themselves once the cut is done, which turns the seam allowance into a genuine engineering variable rather than a formality.
Can you reduce or hide seams by choosing a different material?
Solid-surface materials like Corian can be joined with seams that are genuinely hard to find. The adhesive is chemically matched to the material and sanded flush, producing a bond that reads as continuous surface. That's a property of the material more than better technique, and it's one reason solid-surface stays popular in commercial jobs where hygiene wants an unbroken surface.
Laminate and Formica countertops can also run with fewer seams because the substrate (usually particleboard or MDF) is easier to cut in long lengths, and the laminate skin hides small variations. But those materials can't be edge-polished the way stone can, and a seam through the substrate becomes a water-entry point once the laminate chips.
For natural stone, the only real way to minimize seams is buying a larger slab. Some suppliers offer extra-large (or "jumbo") slabs, typically defined as anything wider than 65 inches or longer than 130 inches [1]. Those slabs cost more per square foot, need specialized equipment to move, and may limit you to quarries that produce large blocks. Whether the premium pays off depends entirely on your kitchen layout and how much a visible seam bothers you.
What should you ask your fabricator about seam allowance before the job starts?
A few questions separate a fabricator who has thought the job through from one winging it:
1. Where exactly are you placing each seam? Ask for a drawing or a digital layout. If they can't show you seam locations before cutting, that's a problem.
2. What allowance are you using, and what filler? Standard is 1/8 inch with color-matched two-part epoxy. Any deviation should come with a reason.
3. Will the seam fall over a supported cabinet face? If it won't, ask why. Unsupported seams crack.
4. Can I see a sample seam on this material? Many shops keep off-cuts with practice seams. Looking at one tells you more than any verbal description.
5. How do you handle seam warranty? Epoxy seams can open slightly over years of thermal cycling, especially near a range or in climates with wild seasonal humidity. Some fabricators warrant seam repairs for one to two years; others don't. Know before you sign.
For countertop installation in general, seam quality is one of the top post-install complaint categories. Getting these answers upfront saves a contentious phone call later.
How does seam allowance interact with templating and digital fabrication?
Templating is where the seam allowance goes right or wrong. In a digital workflow, the technician captures exact kitchen dimensions with a laser or structured-light scanner, then draws the layout in CAD or fabrication software. Every seam line carries an allowance value stored in the file, and the cut files sent to the CNC saw already account for it. The machine doesn't guess. It cuts exactly what the file says.
Analog workflows leave more room for human error. A crew that forgets to subtract the allowance from one piece ships cut files where one edge is 1/8 inch too long. On the job site that piece either gets ground down or, if the fabricator is unlucky, it's already glued and the grinder leaves a stress riser that cracks the slab months later.
Nesting software matters here too. When a shop lays out multiple pieces from a single slab to minimize waste, the nesting algorithm has to treat the saw kerf (the width of material the blade removes, typically 3/16 inch for a 3 mm blade) and the seam allowance as separate parameters. Conflate them and you get pieces that come out the wrong size. Good nesting tools keep them distinct.
The practical takeaway for homeowners: ask whether your fabricator templates digitally or by hand, and whether they cut on a CNC. Digital-to-CNC workflows produce tighter, more consistent seam allowances and fewer surprises on install day [8].
What are the most common seam problems homeowners see after installation?
A few failure modes come up again and again:
Lippage. One side of the seam sits slightly higher than the other. This happens when the slabs aren't leveled precisely during the epoxy-clamping stage, or when the cabinets themselves aren't level. Even 1/32-inch lippage catches a fingertip dragged across the seam, and it's a knife-edge hazard.
Epoxy discoloration. The color match looked right in the shop but reads differently in the kitchen. Epoxy cures slightly darker or lighter than the mixed color, and shop light is almost never the same as the finished kitchen's light. This is why some fabricators run a color-match test on the actual slab before mixing the full batch.
Seam opening. Stone expands and contracts slightly with temperature. A seam near a range, a sunny window, or a radiant-heat floor can open a hair over years. The epoxy is rigid, so a thermal gap tends to crack the epoxy rather than push the stone. This is the most common warranty call fabricators get on older jobs.
Telegraphing through to the surface polish. If the epoxy fill sits slightly proud and isn't scraped flush before the final buff, the seam shows as a faint ridge in raking light. Skilled installers avoid this. Rushed ones cause it.
Most of these trace back to one of two root causes: too little seam allowance (pieces too tight, stress concentrations) or too little support (seam over an open bay, flexes under load). Get those two right and the rest turn rare.
Frequently asked questions
What is the standard seam allowance for granite countertops?
Most granite fabricators work with a 1/8-inch (3 mm) seam allowance as a standard. Some go tighter, to 1/16 inch, on jobs where pattern matching is the priority. The allowance is filled with color-matched two-part epoxy. Any gap wider than 3/16 inch is generally considered outside the quality standard for polished granite.
Is a 1/8-inch seam normal for stone countertops?
Yes. A 1/8-inch finished seam is the de facto industry standard for natural stone and engineered quartz. It's wide enough for epoxy to bond properly and narrow enough to stay inconspicuous under normal viewing. Seams tighter than 1/16 inch risk edge chipping; seams wider than 3/16 inch are hard to fill cleanly with standard epoxy.
Can a stone seam be completely invisible?
No, not on natural stone. The cut edges have different reflectivity than the polished field surface, and even a perfect color-matched epoxy fill reads slightly differently under raking light. The practical goal is a seam that's unnoticeable from standing height in normal kitchen lighting, not one that disappears under close inspection. Solid-surface materials like Corian come closer to true invisibility.
Does seam placement affect countertop strength?
Significantly. A seam must fall over a supported cabinet face or a dedicated support strip, never over an unsupported span like a dishwasher opening or a range bay. An unsupported seam is a stress concentration point. Under normal kitchen use, including someone leaning on the counter, it will crack. This is a structural requirement, not a stylistic preference, and any fabricator should tell you the seam location before cutting.
Who decides where the seams go on my countertops?
The fabricator drives seam placement based on slab size, structural support points, and material yield. But you have input. Before cutting begins, ask for a layout drawing showing seam locations. You can request that a seam avoid a prominent area, like the center of an island, though the fabricator may need to buy additional material to accommodate that preference, which raises the cost.
How much does a stone countertop seam cost?
Most fabricators charge $50 to $150 per seam as a flat line item, or they fold seam labor into a per-square-foot price. On a simple kitchen with one or two seams, the total seam charge usually lands between $100 and $300. Complex book-matched or multi-seam jobs cost more. Always ask for seam charges to be broken out on the quote so you can see what you're paying for.
What is the difference between a seam allowance and a saw kerf?
A saw kerf is the width of material removed by the blade itself during cutting, typically 3/16 inch for a standard bridge-saw blade. A seam allowance is the planned gap between two finished pieces after polishing. Both remove material from the net dimensions, but they are separate values. Nesting and quoting software must account for both independently to produce accurate cut sizes and material estimates.
Can a seam be repaired if it opens or discolors?
Yes. A fabricator can clean out a failed seam with a grinder, re-mix a color-matched epoxy, refill, and buff the area. The repair is usually straightforward and takes a couple of hours. The tricky part is matching the original epoxy color if it has aged or if the stone has been sealed and the surface sheen has changed. Get the repair done before water infiltration starts to undercut the epoxy bond.
Does the type of edge profile affect seam allowance?
Yes. A flat eased edge is forgiving; small mismatches in the seam gap stay less visible. A mitered waterfall edge is the opposite: the two pieces must meet at nearly zero gap along the miter line or the joint reads as a pronounced V. Mitered seams often require an even tighter allowance and more precise CNC work than standard flat edges, and they take longer to install correctly.
How does digital templating improve seam accuracy compared to hand templating?
A digital laser or structured-light template captures field dimensions to within 1/32 inch or better and encodes the seam allowance directly into the cut file. A hand template relies on the technician measuring and subtracting the allowance manually. Digital templates reduce the chance of human arithmetic error, which is the most common cause of pieces arriving on site too long or too short. CNC cutting from digital files also produces more consistent edge quality.
Is a seam allowance the same thing as a grout joint?
No. A grout joint is the gap between tiles filled with grout, and it's typically wider (1/16 inch to 1/4 inch) and intentional as a visible design element. A stone countertop seam allowance is a narrower engineering parameter filled with color-matched epoxy and meant to be as inconspicuous as possible. The goal of a grout joint is defined spacing; the goal of a seam allowance is a nearly invisible join.
What happens if the seam allowance is cut too tight?
If the pieces are cut with no allowance or one smaller than the epoxy needs to grip, several things can happen. The edges may chip against each other during handling. The epoxy film may be too thin to cure properly, producing a weak bond. Under thermal expansion, the pieces push against each other with no room to move, generating stress that eventually cracks one or both edges near the seam. Tight is not always better.
Do engineered quartz countertops need the same seam allowance as natural stone?
Roughly, yes. Most engineered quartz manufacturers recommend a finished seam of 1/8 inch, and some include a minimum seam width in their warranty documents. The color-matching is actually easier than natural stone because engineered quartz has a uniform pattern. But the structural rules are identical: seam over a support, fill with compatible epoxy, never span an open bay.
Can I ask for my countertop to have fewer seams, and will it cost more?
Yes on both counts. Fewer seams usually means buying larger pieces of stone, which may require a jumbo slab (wider than 65 inches or longer than 130 inches) that costs more per square foot and may carry a special-handling surcharge. It may also mean lower material yield from the slab, since a single large piece leaves less usable stone around it. The premium for going seam-minimal on a standard kitchen can range from a few hundred dollars to over a thousand, depending on material and layout.
Sources
- Natural Stone Institute, Slab Dimension Standards: Standard stone slabs run approximately 55 to 65 inches wide and 110 to 130 inches long; jumbo slabs exceed 65 inches wide or 130 inches long.
- Natural Stone Institute, Stone Reference Manual: A typical 3 cm granite slab weighs approximately 18 to 20 pounds per square foot.
- Marble Institute of America (now Natural Stone Institute), Fabrication Standards: Industry standard finished seam width for polished stone countertops is 1/16 inch to 1/8 inch.
- Natural Stone Institute, Countertop Installation Guidelines: Seams must be located over a supported cabinet face or support strip and must not span unsupported openings such as dishwasher bays or range cutouts.
- Tenax USA, Stone Adhesive and Epoxy Technical Data: Two-part epoxy for stone seams is mixed with color pigments and typically cures in 30 to 60 minutes before scraping and buffing.
- HomeAdvisor (Angi), Countertop Cost Guide 2024: Granite countertops typically run $40 to $100 installed per square foot; quartzite $60 to $120; engineered quartz $55 to $110.
- ISFA (International Surface Fabricators Association), Digital Templating Best Practices: Digital-to-CNC fabrication workflows produce tighter, more consistent seam allowances and reduce on-site fit problems compared to hand-template methods.
- ISFA, Surface Fabrication Quality Standards: Seam gaps wider than 3/16 inch are outside accepted quality standards for polished stone countertop fabrication.
Last updated 2026-07-09